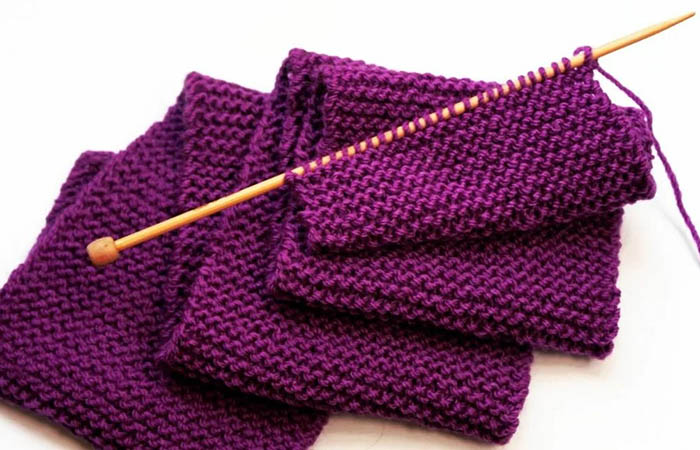
Despite the simplicity of execution, garter stitch products always look stylish. These can be hats, socks, children's suits or voluminous cardigans. It is worth noting that garter stitch is a mandatory technique for beginner needlewomen, the mastery of which allows you to work out and master the speed of knitting.
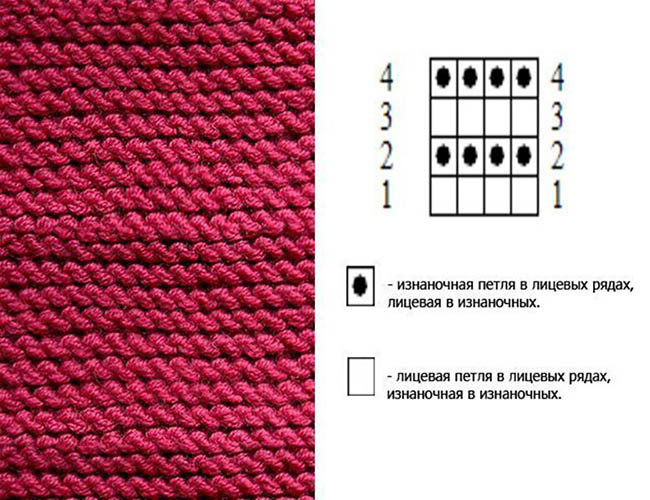
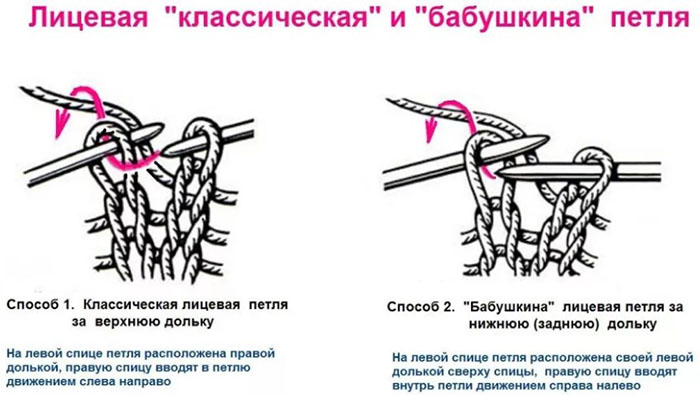
There are different patterns for knitting a garter stitch: purl stitch (PS), knit stitch (K), or crossed stitch (CS).
How to choose yarn and knitting needles
The choice of knitting needles and yarn depends on the density of the knitting required. This indicator determines the number of rows and loops of a knitted fabric measuring 10x10 cm.
The size of the knitting needles is selected taking into account the thickness of the yarn:
| Thread thickness | Needle size |
| Ultra-thin | Less than 2 mm |
| Thin | From 3.25 to 3.75 mm |
| Average | From 3.75 to 4.5 mm |
| Fat | From 4.5 to 5.5 mm |
| The fattest | From 6 mm and more |
How to cast on stitches
Garter stitch, like any other pattern, begins with casting on stitches with knitting needles. The simplest and most popular is the classic one.
Step by step diagram:
- Take the working thread in your left hand, with its end in the center of your palm. It should be 2 times longer than the width of the fabric. Wrap the thread around your thumb clockwise and lower it onto your palm. Place the other end on your index finger. Press the 2 ends with the other fingers.
- Place 2 knitting needles together, insert under the thread between the thumb and index finger. Then insert them into the loop located on the thumb.
- Pick up the thread located on the index finger.
- Pull it through the loop on your thumb.
- Remove and place it on the needles, spreading your fingers apart. 1 loop will be formed.
- The remaining amount needed for a specific product is cast on in the same way. Then remove one knitting needle and start working.

To prevent the loops from twisting, hold each new one with your index finger while casting on. There are other casting methods. When knitting items, you can use any that is most convenient.
How to knit loops
Garter stitch stitches can be knitted using 4 different methods.
With face loops
Garter stitch knitting (the pattern for knit stitches (LS) is the most accessible and simple) is done in the following way:
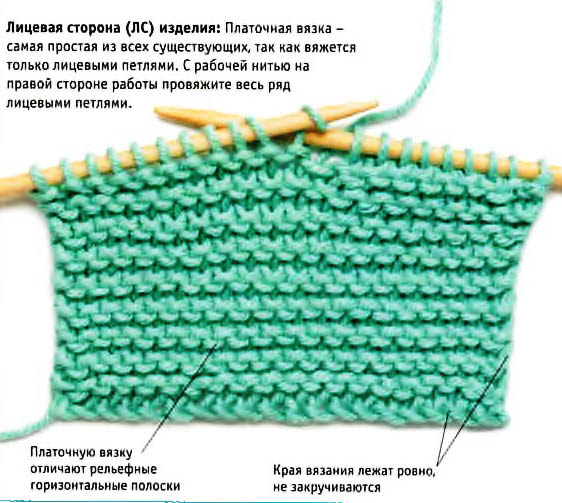
- Cast on stitches. Remove 1 needle.
- Place the working thread over your index finger and lightly press it against your palm with the other 3 fingers. It should be located behind the work.
- The first loop is the edge loop, which you simply need to remove. In doing so, insert the knitting needle into it from left to right.
- Knit the LP in the following sequence: insert the knitting needle into the loop, pick up the thread from the bottom right and pull it out. Also knit the final loop as a LP.
- Turn the work over. Complete steps 2 through 5 in sequence.
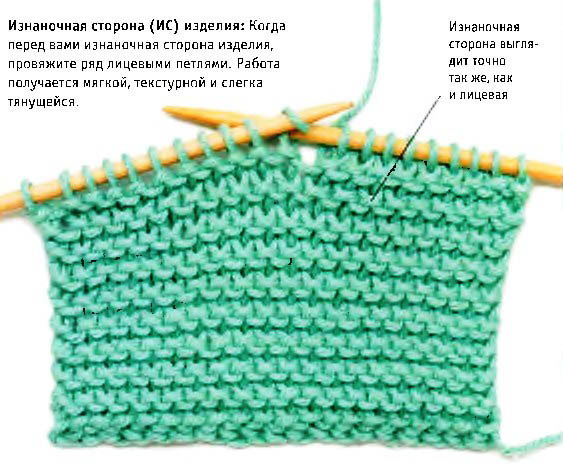
Purl stitches
Garter stitch knitting (the pattern with purl stitches (PS) is more complex, therefore This method is used extremely rarely) has the following step-by-step instructions:
- Cast on stitches.
- Remove 1 needle.
- From right to left, insert the knitting needle into 1 loop and simply remove it.
- Make sure that the working thread is always located in front of the knitting. Knit IP to the end of the row. Knit the outer loop also IP.
- Repeat steps 3 through 5 in turn.
Double-sided knitting
The pattern is created in this way by knitting the front loop of all rows. Due to this, it turns out to be absolutely identical on both sides. This knitting is used to start or finish the work, as well as to fill the space between other ornaments.
The double-sided ornament is also used for knitting an independent fabric when making blankets, hats, scarves and other items. The width of the knitting is determined by the number of loops cast on.
Garter stitch with granny stitches
Garter stitch knitting (a diagram of a more complex method of making an ornament, which is used by experienced needlewomen) using the grandmother's method has such a distinctive feature as knitting behind the back wall of the front side.
Step by step instructions:
- Cast on stitches.
- Simply remove the last loop at the beginning of the row, knit the next and all subsequent loops.
- Turn the work over. Simply remove the outer loop. Knit all subsequent ones IP. The thread from the ball is located behind the knitting.
- Knit all IP stitches as front stitches.
How to knit in the round
This pattern is knitted in this way on knitting needles connected by a fishing line. The work is not difficult, especially if you managed to master the first two methods of creating an ornament. The process consists of alternating rows. This way, a variety of products are knitted, from hats to cardigans and coats.
Step by step instructions:
- Close the cast-on stitches into a circle by knitting 1 row of LP.
- Mark the connection point in any convenient way.
- Start knitting the 2nd row from the place where the IP joins.
- Repeat, alternating rows knitted IP and LP to the required size of the fabric. It is worth noting that it cannot be turned over during work.
When working garter stitch with circular needles, the stitches appear twisted, which gives the garment an unusual appearance. This can be easily prevented by using a simple but effective method: to make a traditional pattern, insert the needle into the stitch from the back, as if untwisting it.
To make knitting convenient, the length of the line should correspond to the width of the fabric. Garter stitch makes the fabric significantly shorter in height, this should be taken into account when making different models.
Using circular knitting needles
Circular knitting needles are used to knit items both with and without seams.
Using knitting needles with a fishing line has its own nuances:
- It is not possible to turn the product over, so the desired effect is achieved by alternating rows of purl and knit stitches.
- When knitting in a closed circle, you can miss the beginning of a new row, which will affect the final result. To prevent this, use markers or needles of a contrasting color. They mark the last or first loop of the row.
- When working a row of purl stitches, insert the thread from the back side, creating an unwinding effect to prevent distortion of the pattern.
- To make the work easier, select knitting needles that match the width of the product.
Before you begin working garter stitch on circular needles, you need to master the technique on straight needles.
How to knit a snood
A snood is a scarf closed in a ring. It turns out to be a kind of "pipe". The product can be of different lengths and widths. It can be used as a headdress or a scarf. Thick threads are used for winter, and thinner yarn is suitable for wearing in the autumn-winter period.
Materials required:
- circular knitting needles No. 5 with a 40 cm cord;
- yarn – 150 g;
- marker;
- hook or needle.
Step by step instructions:
- Cast on 80 stitches using any convenient method on knitting needles with a fishing line, then close them into a circle. Mark 1 stitch of the row with a marker.
- Knit all loops of the next row as front loops (FS).
- The next row is knitted with purl stitches (WS). Simply slip the outer loop. Remove the marker. Pick up the yarn over with the left knitting needle. Knit it together with the WS through the front wall. Put on the marker.
- Knit all loops of the row LP.
- Alternately knit from 2 to 4 points to the desired height of the product. Close the loops. Hide the ends of the threads.
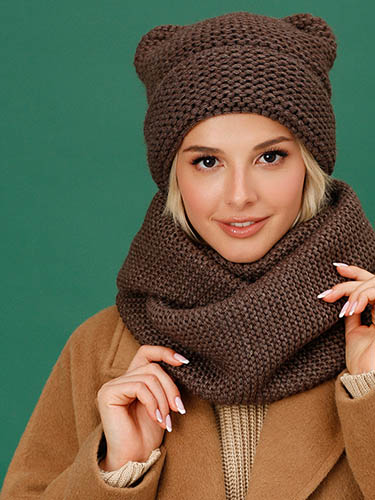
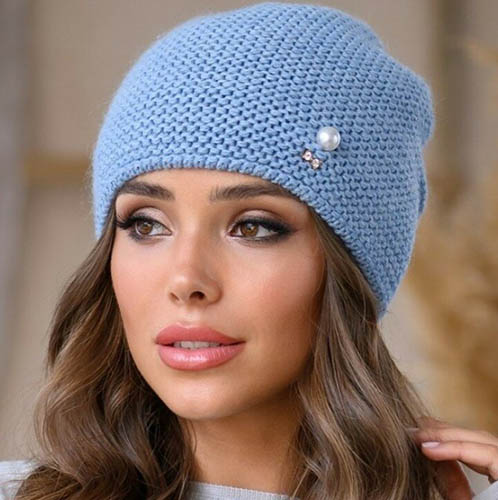
Garter stitch hat
A hat made with this pattern, despite its simplicity, looks stylish. The product can be with or without a lapel. If desired, it can be decorated with rhinestones, stones, fur pompoms or decorative knitted elements. The hat can be knitted seamlessly on knitting needles with a fishing line or fabric, which can then be sewn together.
Materials required:
- yarn - 100 g;
- markers;
- double pointed needles No. 4;
- circular knitting needles No. 5.
Step by step instructions:
- Close the 71 loops you have cast on into a circle (this will leave 70 loops).
- Knit to desired length (approximately 24 cm), alternating 1 WS and 1 LP.
- Mark 7 stitches in the front center and the same number in the back, starting with the front row. The number of stitches between these stripes will vary.
- Decreases are performed before and after markers. In other words, knit 7 loops, and decrease the loops before and after them in each row. On the outer part of the product you will get stripes of LP. To make it neat, after the knitted strip of 7 loops you need to swap 2 loops. It is important to control this.
- As a result, 2 stripes knitted from 9 LP will be formed on the outer side. During the decrease process, it will be inconvenient to continue knitting on knitting needles with a fishing line, so it is recommended to switch to stocking needles. Close the remaining 18 loops. A strip of 9 loops will be formed. Cut the thread and tighten. Wash the hat by hand or in an automatic machine in the gentle wash mode and dry, laying it out on a horizontal surface.
The product according to this description is one-size-fits-all. When making a hat for winter, you need to cast on more loops. If you plan to knit a model with a lapel, you need to increase the height of the product.
Bactus
A baktus is a knitted item in the form of a triangular scarf that is tied around the neck in different ways. A warm baktus will keep you warm in the cold, and knitted from thin yarn will be a great addition to everyday demi-season clothing.
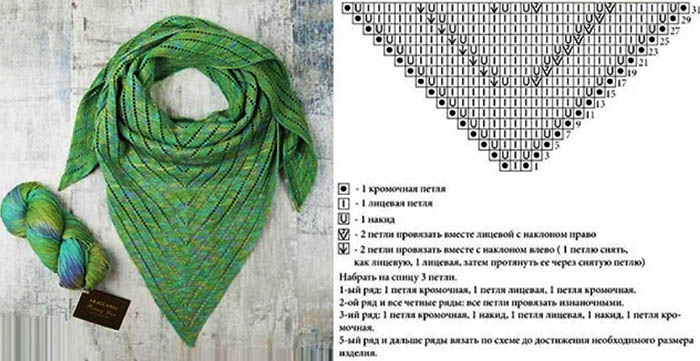
To knit a 1.5 m baktus you will need the following materials:
- knitting needles No. 2;
- yarn – 200 g.
Step by step instructions:
- Cast on 4 stitches using any convenient method.
- Knit all rows with LP.
- After knitting 3 rows, you need to make an increase: make a yarn over after the last loop.
- In the next row, knit it behind the back wall of the LP. This will prevent the formation of a hole.
- Make the next increase in row 8.
- All increases should be made along the originally selected edge of the product.
- Knit, increasing 1 loop every 3 rows until the baktus reaches a width of 30 cm.
- From this point on, begin decreasing the loops. For this purpose, every 3 rows, knit the 2 outer loops together LP.
- Continue until you have 4 loops. These need to be closed.
This model of baktus goes well with clothes of any style: office, sports or casual.
Beret
Garter stitch knitting (the knitting pattern is suitable for beginner needlewomen) is used to make a beret. Any yarn will do for a universal model. According to this description, you can knit a headdress for different times of the year. If desired, the product can be decorated to your taste with decorative elements.
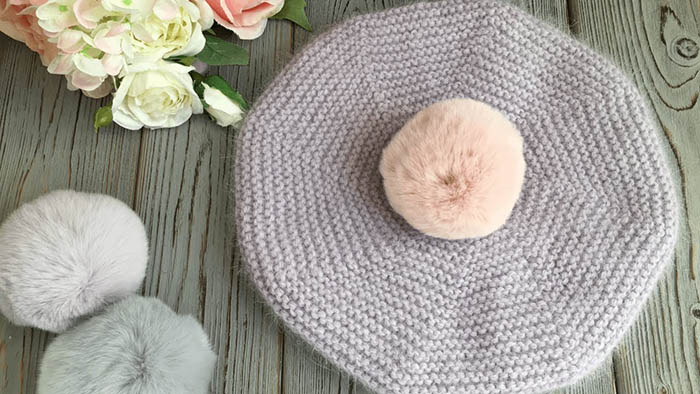
The model will turn out original if you combine several types of yarn.
Materials required:
- circular knitting needles No. 3;
- needle;
- threads – approximately 100 g (480 m).
Step by step instructions:
- Cast on 112 stitches on the needles. Knit 6 rows in the following way: in odd rows alternate LP and LP, in even rows - knit only LP, and remove LP, leaving the thread from the ball before knitting.
- Increase 10-20 stitches. Knit the next 14-16 cm with the main pattern.
- Close the bottom. Knit 2 loops together in an odd row, then 4 cm without reductions, again a row with reductions, the next 1.5 cm, without making decreases, reduce the last time. Knit 2 rows, gather the remaining loops on a thread and carefully pull together.
When finished, sew the 2 edges.
Cardigan
The garter stitch cardigan looks the same on the front and back, looks stylish and is easy to knit. The model can have sleeves or be without them. The product is knitted longitudinally or transversely. The description below shows the first option. For production, it is permissible to use yarn of any thickness, taking into account the season for which the product is knitted.
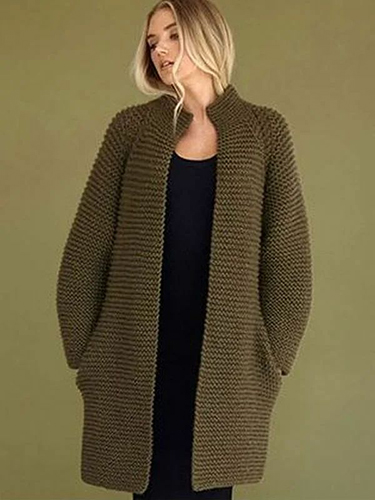
General nuances of knitting a simple cardigan:
- Make a control sample measuring 10x10 cm.
- Wash it in the same way as the future product.
- Dry and determine the density parameters by counting the number of rows and loops.
- Take basic measurements.
- Draw a pattern for the model. Write down all the measurements taken in centimeters.
- Based on the sample parameters, calculate the vertical and horizontal values for the entire product. To do this, the height or length of a certain section should be multiplied by the number of loops in the sample and divided by 10. However, it is worth remembering that when determining the number of loops, you should use the loop indicator, and when calculating the number of rows - this indicator in the sample.
Special attention should be paid to the density, it should correspond to the sample, not weaken or tighten the loops. Otherwise, the parameters of the fabric will change.
Step-by-step instructions for knitting a cardigan:
- Cast on stitches and knit all rows of LP to the beginning of the armholes.
- There are two ways to make them: give the armholes a regular oval shape or leave them as slits. The second way is much easier to form: divide the fabric into 3 parts and knit them separately to the required height.
- At the end, connect the 3 pieces in one row and continue knitting the cardigan to the height of the neck. Close all loops.
- Knit the sleeves from the bottom up. To calculate, subtract the wrist circumference from the widest part of the arm circumference (+ 5 cm for ease of fit). Divide the resulting number by 2. This model does not require the formation of a full armhole; it will be enough to make a 5 cm high rounding on the sleeve.
- Cast on stitches. Their number should repeat the width of the wrist. Continue knitting the fabric in height, adding 1 stitch after the 1st and before the outermost stitch of the row until the beginning of the armhole. Form an armhole 3 cm high: decrease 1 stitch in each row after the 1st and before the outermost stitch of the row. Close the stitches. Knit the second sleeve according to the above pattern.
- Assemble the model: sew the sleeves and sew them into the armholes.
Wash and dry, laying the finished product on a horizontal surface. If desired, the cardigan can be steamed with an iron.
Sweater
A sweater knitted with garter stitch will never go out of fashion. This stylish product is still very popular today.
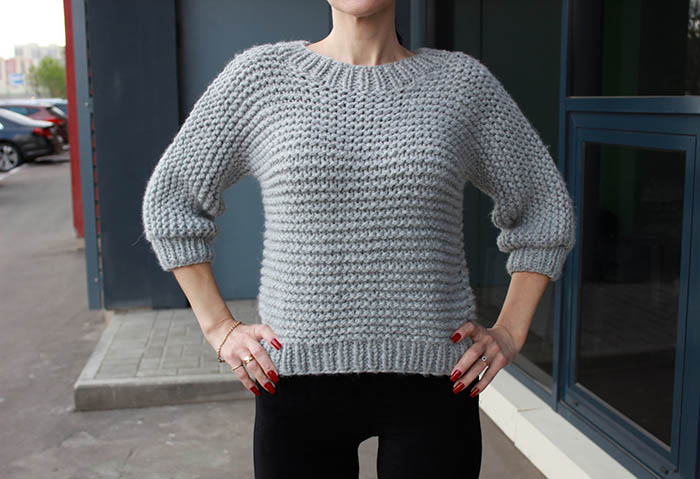
Materials required:
- bulky yarn – 600 g;
- knitting needles No. 6-7
Step-by-step instructions for making the back:
- Cast on 52 stitches.
- Knit a row, alternating LP and IP.
- Turn the work to the opposite side and knit 7 rows according to the pattern.
- The main fabric is knitted exclusively in LS, not reaching the height of the shoulder lines by 3 cm. The sleeves in this model are dropped, so there is no need to form armholes.
- Having knitted to the shoulder lines, begin knitting the neck. Do it as follows: knit 15 LP, close the next 20, knit the remaining 15 LP. Now knit the shoulders one by one.
- Turn the work over and knit 12 stitches in total.
- Again turn the knitting to the other side and knit another 12 LP. When you reach 3 cm, close the loops.
- Attach the thread to the edge of the second shoulder and make similar decreases, close the loops, cut the thread.
Step-by-step instructions for knitting the front
- Knit as the back, but do not knit to the edge of the shoulders by 5 cm - knit the neck, making changes to the calculations: knit 19 loops, close the next 12, knit 19 LP.
- Turn the work and knit 15 stitches.
- Turn the work again, close 3 loops, knit 12 LP - this way knit 5 cm of the neck.
- Knit the second part of the shoulder in the same way.
Step-by-step instructions for knitting a sleeve:
- Cast on 24 stitches and knit 7 rows, alternating 1 ip and 1 knit.
- Switch to garter stitch, making increases every 3 rows - make increases in the front rows so that they are invisible.
- Add stitches by knitting an extra stitch from the previous row.
- Knit in garter stitch for about 30 rows. With increases there should be 38 stitches that need to be closed.
- Knit the second sleeve using the same pattern.
Soak the finished sweater parts in water and lay them out on a towel to dry and shape correctly. Connect the dried parts with a hook or sew with a needle. First, connect the seams along the shoulders. Then sew on the sleeves, and finish by connecting the side seams. It is recommended to steam the resulting seams with an iron.
You need to try on the finished sweater. If the sewn product fits well, you can start forming the neck. Pull the loops for it with knitting needles with a fishing line, starting from the center of the back. Check that their number is even. Now start knitting the neck - knit 7 rows, alternating LP and IP.
For beginners, garter stitch is the basis of knitting. Every craftswoman begins to master this type of needlework with this pattern.
There are several different patterns for knitting a garter stitch, but the most popular remains the classic method. It is considered universal and is suitable for knitting with yarn of any thickness.
All you need is to learn how to knit face loops behind the front wall. Gradually, you can master the other methods to combine them when knitting various products.
Video about garter stitch
Nuances of garter stitch: