A touching event is mom's birthday. And even more touching is to congratulate a loved one not just with a purchased gift, but to make some craft yourself. To give a pleasant surprise to mom, you can make her a handmade birthday card.
Materials for creating a postcard
To bring your flight of fancy to life and make a truly original postcard, you will need a standard set of tools:
- scissors, including curly ones;
- office glue or glue stick;
- double-sided and simple narrow adhesive tape;
- ruler, including a figured one, compasses;
- markers, felt-tip pens, pencils.

And also a variety of materials:
- sheets of thin cardboard or thick colored paper;
- multi-colored paper, can be used for gift wrapping;
- various ribbons, scraps of material, laces;
- rhinestones, beads, beads, buttons.
Postcard in quilling technique for mom "Bouquet of flowers"
A wonderful addition to a gift or as a small surprise is the postcard "Bouquet of Flowers", made using the quilling technique (paper rolling). To make it, you will need a sheet of cardboard, colored paper that matches it in contrast and color, a ribbon, a quilling stick and a standard set of tools.
Now we can get to work:
- Blanks are being made. First, you need to cut out small circles of different diameters from colored paper, then cut each piece in a spiral from the outer edge to the middle. It is better to do this with curly scissors, then the future flowers will look more elegant.
- Flowers are forming by twisting the blanks with a special stick in a spiral from the carved edge to the middle. We fix each resulting flower with glue at the center.
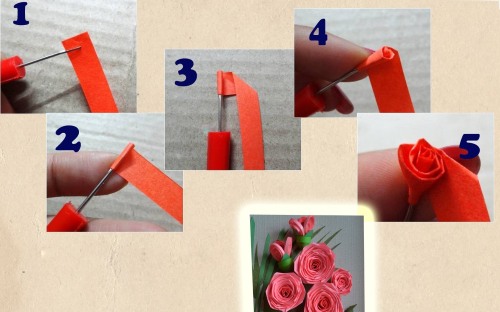
- The base of the postcard is being prepared, by folding a sheet of cardboard in the middle. The resulting flower heads are placed on its front part and their number and location are determined.
- A flower vase is being formed. To do this, cut out its configuration from thick colored paper or dark-colored cardboard, perhaps in the form of an inverted equilateral trapezoid. The blank is attached to the future postcard with double-sided tape.
- Creating a background. If necessary, cut out a rectangle from colored paper of a suitable tone, slightly smaller than the field of the card itself, and glue it to this base. Then, using the available flowers, create a bouquet. It is better to glue the flowers in a bunch to create a lush effect.
- Vase decoration. A bandage with a bow is made from a satin ribbon and attached, a strip of paper with an inscription is glued in a suitable place. The card is ready.
Volumetric postcard "Hearts"
A handmade birthday card for mom will look especially heartfelt if the central figure on it is a heart. To make it, you will need sheets of thick white A4 paper and scarlet paper, glue and scissors.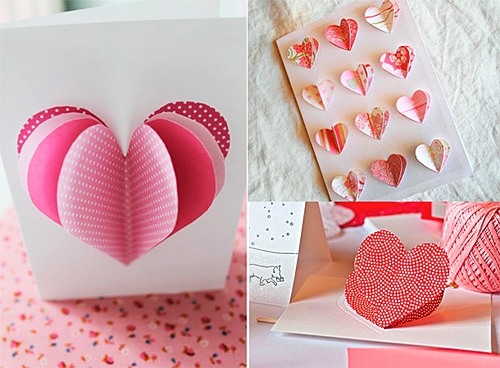
The whole work consists of 4-5 stages:
- Preparing 2 heart templates. White paper is folded in half, on it, with one side to the fold, a large heart is drawn. A strip of 4-5 cm wide is cut out of colored paper, which is folded into a square accordion, consisting of 6 sections. On the outer section, half of the figure is drawn so that its middle falls on the fold.
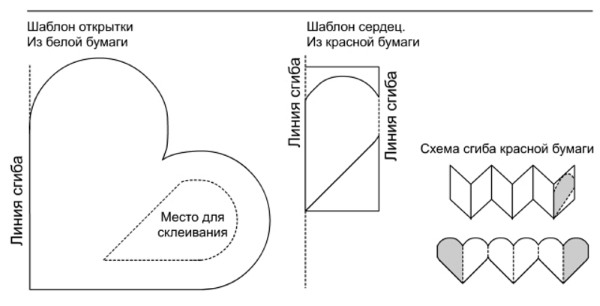
- Getting figures. It is necessary to cut out the paper along the contour. From white paper you will get 2 paired hearts - this is the basis of the craft. From colored paper - an accordion of 3 small hearts.
- Connecting the workpieces. The small 3 hearts are attached inside the larger ones using PVC so that when opened they open like an accordion.
- Inscription. Warm words and wishes can be written with felt-tip pens in any place you like.
- If the outer sides of the postcard remain blank, then you can write on them glue on glitter and beads.
Postcard-pendant "Butterflies"
For your mother's birthday, you can make a handmade butterfly-shaped pendant card.
A delicate and romantic craft, made in the birthday girl's favorite colors, will require a set of tools:
- thick white paper for the base;
- lace ribbon of 2 types;
- scrapbooking paper;
- details in the form of flowers and butterflies;
- lace;
- beads or beads that match the overall tone of the card;
- a ready-made chipboard with pleasant, capacious content (for example, “From the heart”, “With love”).
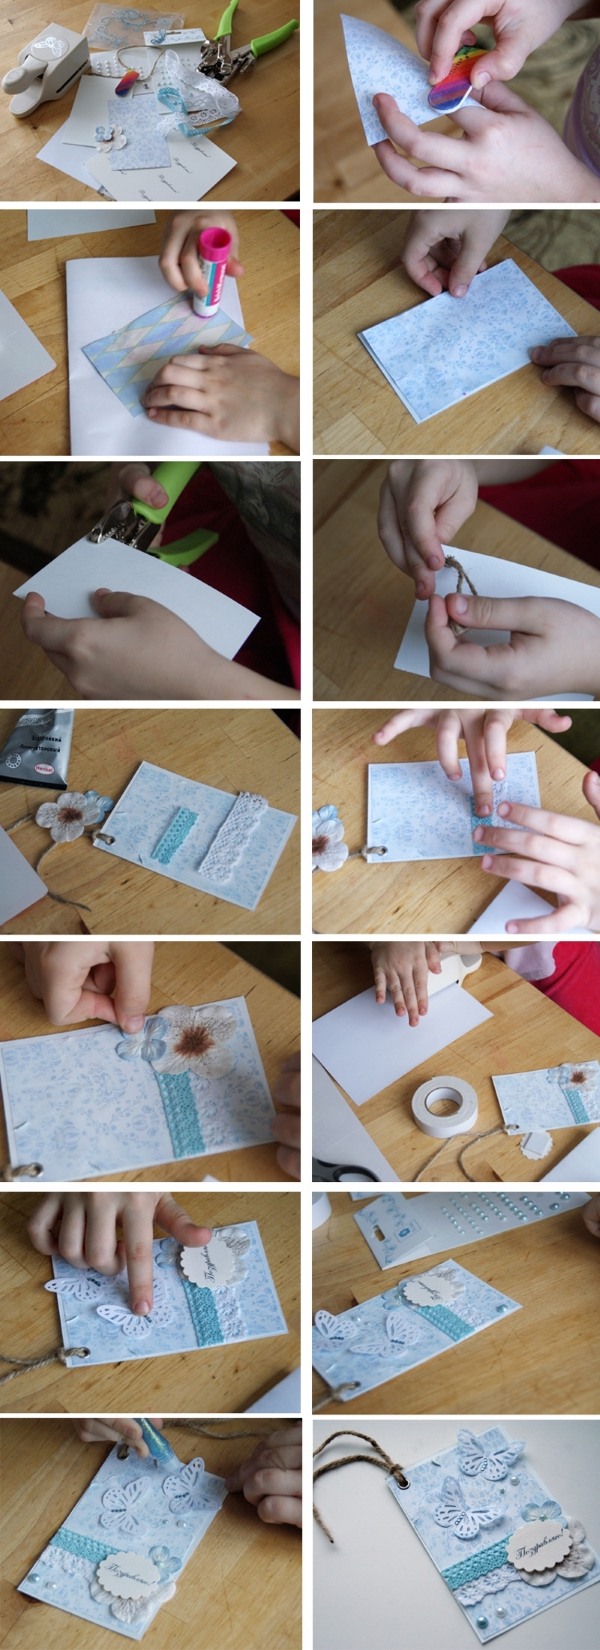
The work takes a little over an hour and is divided into 4 stages:
- A blank of the card base is cut out of a sheet of white paper and folded in the middle. On the outside, this detail is decorated with a sheet of scrapbooking paper of the same size with an unobtrusive pattern.
- After joining the two sheets, a small hole is made in the upper left corner with a hole punch, which can be fixed and reinforced with a grommet. Now you can thread a beautiful cord through the future postcard and hang the craft in a prominent place.
- The base is ready, it remains to decorate the front part of the craft. Just below the middle of the cover, pieces of lace are glued, imitating the fence of a flower bed. On one of the edges, 3 flower heads are closely attached with the core of the detail using double-sided tape. A pair of butterflies are glued above them so that their wings remain free. Flowers and butterflies can be made by yourself, found ready-made, cut out from postcards.
- The decoration process is completed by randomly gluing beads or seed beads, as well as attaching a small chipboard to the background of the flowers.
The birthday card for mom is ready. Now you can decorate the inside of the product with your own hands, writing a couple of warm lines in calligraphy.
Surprise Card: Step-by-Step Making
A surprise in a postcard is something unexpected and extraordinary.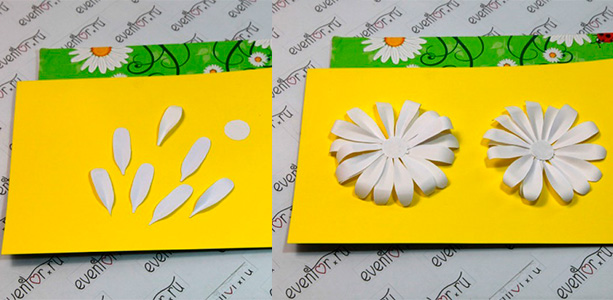
One of the options for such a gift is very simple:
- On a sheet of paper, you need to draw 2 circles using a compass, one inside the other, where the inner circle is 2 times smaller than the outer one.
- Between the circles, petals are drawn. As a result, the drawing looks like an open daisy.
- A congratulation is written in the middle of the flower.
- The petals are cut, separated from each other, colored with a colored pencil and bent inward. On one of the petals you can write "I bloom in water." This will be a hint.
- The card is ready. Now all that's left is to give the birthday girl a surprise and watch as a flower with warm words opens in the water before her eyes.
A postcard with a secret inside
A pleasant surprise remains in the memory for a long time, so you can congratulate the birthday girl with a card with a secret. For this you will need colored paper, glue, scissors and lace.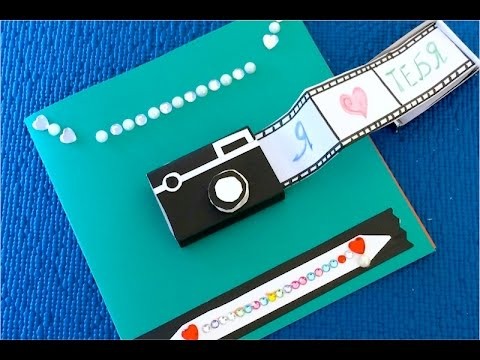
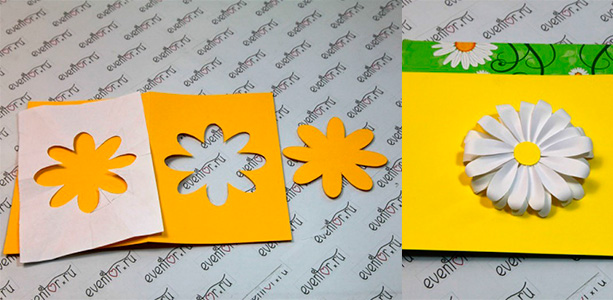
Preparing a gift consists of several stages:
- The basis will be a sheet of paper equal in size to a double postcard. The blank is folded in the middle, where paired cuts of different lengths are made. The number of cuts (future holders) is determined by the overall composition, consisting of 2-3 secret parts.
- The cuts are folded inwards to form the future postcard. Folding/unfolding movements are made several times to give the paper the required shape.
- Preparation of secret pictures. They can be a bouquet of flowers cut out of colored paper, balloons, an anniversary date, or a chipboard with congratulations. A card with a wish together with a photographic figure of the person making the card will look original.
- The outer side of the craft is covered with paper of the same color and size as the base. Pictures are glued to the holders.
- If it suddenly seems that the outer side of the card does not look festive enough, then it can be decorated by gluing lace with beads over the entire surface. The main thing is that all the details are in harmony with each other.
Postcard with two doors
To make a card with 2 panels, you will need 2 sheets of photo paper, ribbon, tape and decorative elements at the discretion of the person congratulating you.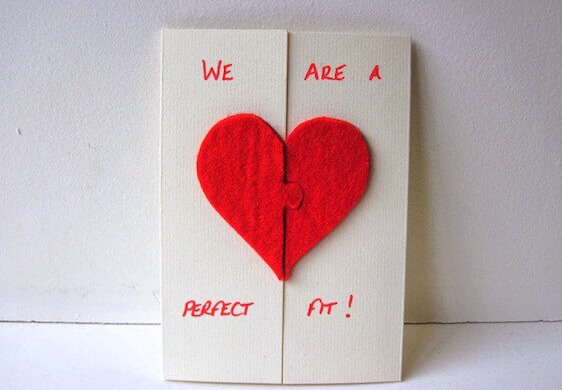
Just 4 steps and your exclusive gift is ready:
- One of the sheets is cut into 2 parts - they will become the flaps. The blanks are glued to the main sheet using tape.
- A piece of ribbon is attached to each panel so that a bow can be tied from them. The fabric can be secured with glue or a stapler.
- It is recommended to decorate the doors from the outside with several small details, so as not to get an overloaded surface. For example, you can use a beaded border.
- The inside of the gift should contain the text of the greeting. To make everything look decent, you can use computer typesetting, decorating the greeting itself not only with an interesting font, but also with vignettes.
Scrapbooking style postcard
For those who are not very familiar with the technique of making cards in the scrapbooking style, It may be advisable to purchase a ready-made set of materials, which includes:
- several options for cardboard bases;
- colored paper with different patterns;
- lace scraps and ribbons;
- beads with a flat base for ease of gluing;
- elements of decorative figures: artificial flowers, various types of figures, frames, templates.
If you already have experience making cards in a similar style, then your imagination may suggest replacing cardboard with photo paper, artificial flowers with dried flowers covered with a protective layer, and factory lace with handmade lace.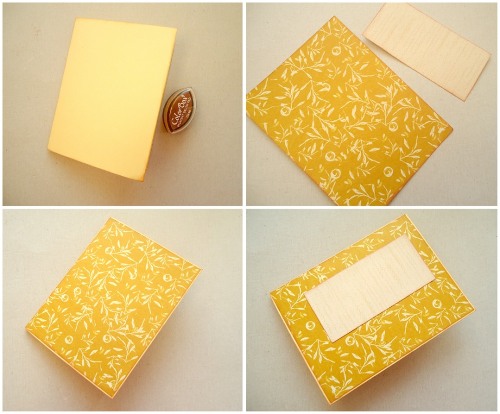
In addition to having the materials, you need a clear understanding of what exactly you want to capture on the postcard:
- traditional birthday greetings,
- a reminder of some pleasant event,
- a hint of a hobby,
- humorous collage.
Only after this does the selection of decor begin.
The simplest idea for congratulating mom is a frame glued to photo paper or special cardboard.
You can put a photo of the birthday girl in it and write a few heartfelt words. The corners of the improvised portrait are decorated with small bows or flowers, in the center of which you can attach beads. The most important thing is not to overload the surface of the gift and stick all the details so that together they look like a single, integral composition.
Original postcard with flowers embroidered with lace
A handmade birthday card for mom will look original if you embroider flowers on it with lace.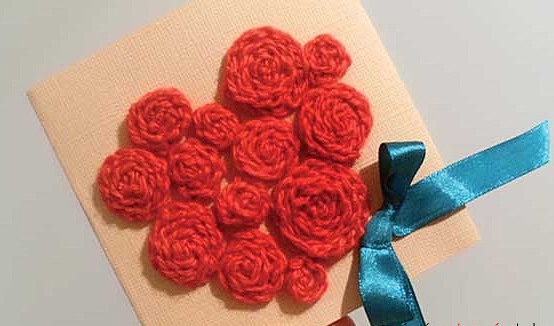
To complete the work you will need:
- silver-tone and colored cord (1 mm thick, can be purchased at a specialty store);
- dark colored cardboard;
- 2 needles - with a large eye and a small one;
- ordinary white threads;
- simple pencil, colored markers;
- scissors;
- carbon paper.
First, you need to fold the cardboard in half with the colored side out. On a regular white sheet, draw the outline of an elegant flower or a beautiful bouquet. The drawing should not be complicated, since the trick is not in its sophistication, but in the resulting volume. The finished outline is transferred to the colored base of the postcard using carbon paper.
The surface is prepared for embroidery with a silver cord, which is threaded through a needle with a large eye (Gypsy needle). A white thread is threaded through an ordinary needle, which is intended for fixing the cord in certain positions and places. The flower head can be embroidered with a cord of a different color. It is necessary to pierce the cardboard very carefully, so as not to wrinkle it.
It is not recommended to tighten the lace too much; the outline should look voluminous.
Words of congratulations can be written with a marker or printed on a printer and pasted onto the gift in a convenient place.
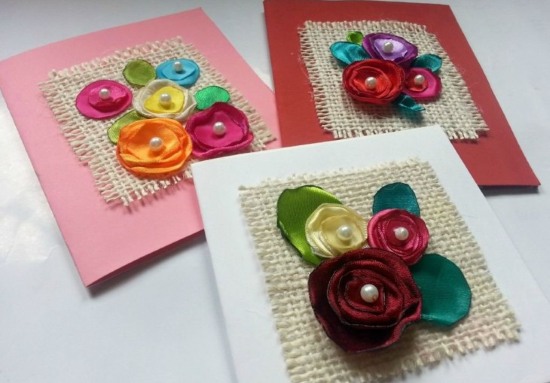
Unusual card with fabric flowers
Flowers made of fabric, like light country, echo of the folk and cozy. Such a card captivates with its seeming simplicity and does not require much time to make.
For this you will need:
- fabric ribbon;
- buttons;
- needle, silk and regular threads;
- set of paper and cardboard;
- glue.
A piece of fabric tape is stitched with zigzag stitches, then pulled together and the edges are sewn. The blank looks like a flower. Its core will be a bright, eye-catching button, which is sewn in the center with silk threads. If a bouquet is planned, then there should be 3 or 5 blanks.
The base of the card is formed using cardboard folded in half., onto which slightly smaller colored paper is glued. Now, using glue, you can begin to form a bouquet. It can consist only of flower heads or have stems made from a suitable cord.
Below the flowers, a small leaf with a congratulation is pasted. Its shape can be played out as a leaf, the bark of a tree, or just a handwritten note.
3D postcard from scrap materials
Fantasy and diligence will help you make a very interesting 3D postcard for your loved one.
This will require:
- sheet of photo paper;
- sheet of cardboard;
- double-sided tape and glue;
- ribbons (lace and satin);
- scrap sheet;
- small scissors.
First, a picture with different colors is selected from the Internet. It is printed several times on photo paper using a color printer.
Now you can make blanks of 5 flowers, cutting out the details for each flower as follows:
- 1st – life-size;
- 2 – slightly less than the first;
- 3 – even less;
- 4 – slightly larger than the center of the flower;
- 5th - almost the center.
Double-sided tape is glued to the back of each piece, after which the flowers are carefully assembled.
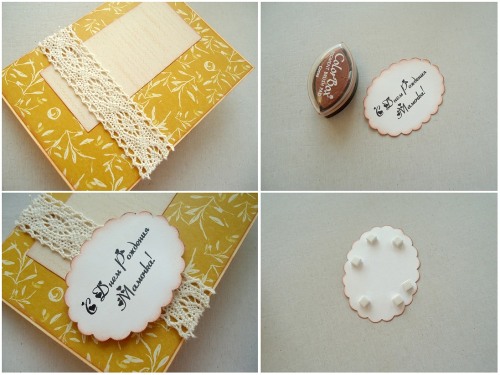
The basis of the postcard will be a cardboard folded in half, onto which a slightly smaller scrap sheet is glued. A lace ribbon is attached a few cm from the edge of the latter in width, and a satin ribbon is attached on top of it. These manipulations are best done with double-sided or foam tape.
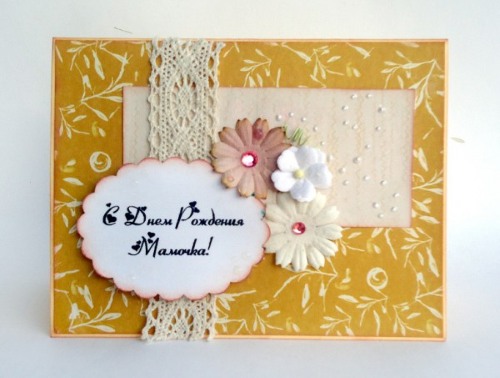
From the remaining cardboard and scrap sheet trimmings, cut out 2 ovals - the colored one is slightly smaller than the white one, they need to be glued together and attached to the base of the card. A composition of the flowers made is formed on the oval part. All that remains is to write wishes for a loved one either on the card itself or on a figured sheet (card), which is then attached to the inside of the craft gift.
Original ideas for making birthday cards for mom from daughter
How many pleasant memories will flood a mother after many years when she comes across a postcard once made by her daughter. Such crafts look especially touching, where the main detail is children's hands outlined on paper with a pencil.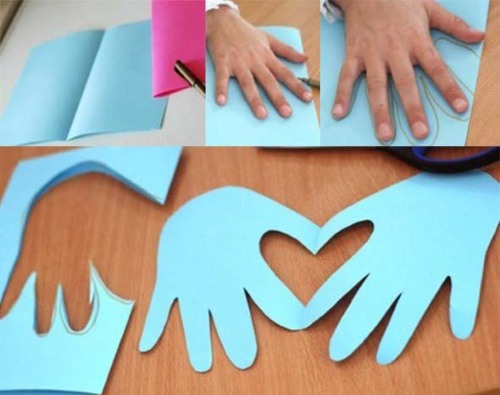
To implement one of these ideas, you need to trace a hand on cream-colored paper with a pencil, cut out the outline and stick it on a card base prepared at your discretion so that your fingers remain free. Next, using the quilling technique, make 3-5 flower heads and cut stems and leaves from green paper for them.
The flower arrangement is attached with glue so that it looks like a hand holding flowers. A couple of good wishes will complement the card. Another idea for a card would require a photo of the birthday girl (preferably with the gift giver), which is glued to the prepared base of the craft. The photo can be put in a lace frame.
The second step is to cut out the outline of the right and left hands with the continuation of the wrist. The blanks are glued in such a way that it seems that the children's hands are criss-crossed hugging or holding the photograph.
You don't have to waste time making a handmade birthday card for your mom; you can choose something suitable from the abundance of ready-made printed cards. But will a store-bought card absorb the warmth of loving hands, and will a template of greeting words reflect the full range of a daughter's feelings for her mother?
Video: DIY Birthday Card for Mom
How to make a card for mom with your own hands, watch the video:
Let's make a card for mom with our own hands:
Thank you very much. Lots of great ideas.
(\_/)
(^-^)