Handmade cards, are necessary for any event as a pleasant sign of attention and providing joy to the hero of the occasion. If you want to surprise and impress, it is recommended to create an original three-dimensional craft.
The advantage of 3D postcards
A three-dimensional handmade postcard is characterized by a more original appearance. At the same time, such a message can be supplemented with good wishes, phrases that are difficult to convey in words, for example, a declaration of love or poems addressed personally to the hero of the occasion.
To create such a craft, it is enough to prepare fabric, cardboard or paper sheets.
For decoration, it is acceptable to use simple things that you have at home, for example:
- beads;
- beads;
- ribbons;
- buttons;
- shells;
- with tape.
A three-dimensional craft is considered an original and pleasant gift. Moreover, such a card can easily be made by a child if he is given an idea.
Volumetric postcard with flowers
A voluminous card with flowers can be made by hand or together with a child, if you follow a certain pattern.
Children aged 5 to 6 years can independently create a three-dimensional applique from colored paper sheets; small children need the help of adults.
Necessary materials and tools:
- watercolor paper sheets;
- beads for decorating stamens;
- glue with scissors;
- colored sheets of paper.
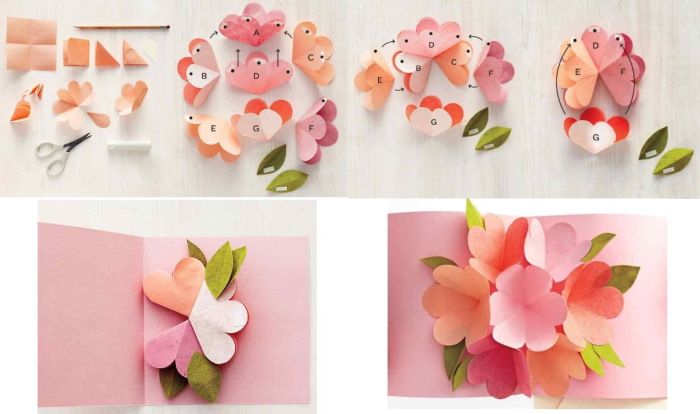
Step-by-step description of the work:
- Draw 10 cm squares on colored paper sheets. You should end up with 7 geometric figures.
- Fold the shapes three times to obtain triangle-shaped blanks.
- On all the details depict a petal, cutting it out according to the pattern. If you unfold the blanks, inflorescences with petals should form.
- Cut off one element from each inflorescence. Join adjacent petals together to obtain a voluminous bud.
- Fold the flowers in half, and use glue or double-sided tape to secure the remaining inflorescences to the blanks, leaving the petals in the center intact.
- To design a greeting card, fold a watercolor paper sheet in half. Since the main part will be located inside, create a background for the backing from the colored sheet, gluing it to the spread.
- To place the buds inside the product, fix the flowers on the craft on each side by the middle petal. In the center of each inflorescence, design several stamens from beads, applying them to the base of the blanks.
- When the glue is completely dry, the craft can be folded in half.

To decorate the cover of the greeting applique, you can use bows made of satin ribbon, pieces of lace, pearls or rhinestones.
Heart
A 3D DIY postcard with a heart inside will be a good gift for a birthday, March 8 or Valentine's Day. At the same time, the design of the congratulatory product will take a little time and a minimum set of materials will be required.
List of required materials:
- for the base of the postcard you need a rectangular cardboard sheet of any color;
- glue;
- colored paper sheet for decorating the heart;
- sample.
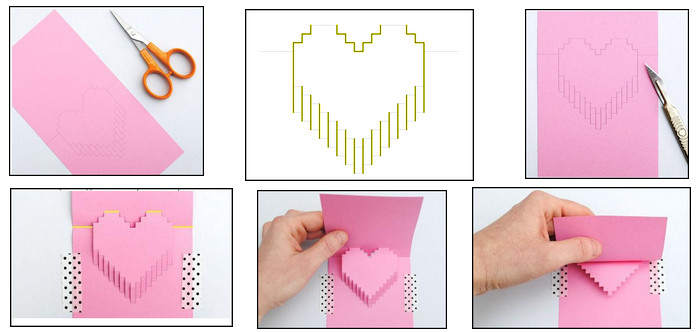
Method of creating the craft:
- Using the template, cut out a heart with 2 small hearts on each side. Draw a fold line in the middle of the main piece.
- Fold the large heart in half and bend the pieces that are placed on the sides.
- Fold a sheet of cardboard in half to create the base.
- Place the cut out heart on the base and mark the area where the details will be glued.
- Using glue, glue the small pieces to the marked places.
- As a result, the large heart should be located in the center of the craft.
If desired, you can write a wish inside the card, and the front side of the craft can be decorated with another large heart or other decor.
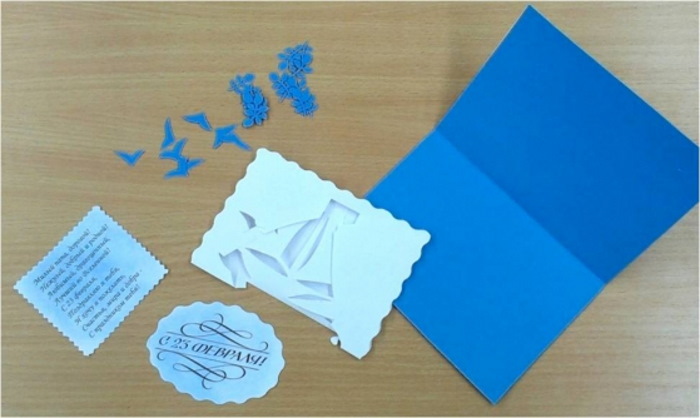
Ship
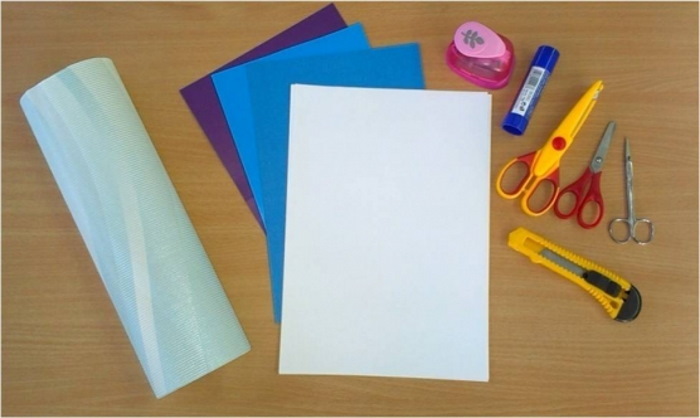
To create a volumetric applique with a ship inside, you need to prepare:
- double-sided blue cardboard sheet, as well as wallpaper with the corresponding pattern and color, if the cardboard is not double-sided;
- stationery knife;
- glue stick;
- manicure scissors, regular scissors, scissors with teeth or wavy blades;
- office white paper;
- figured hole punch.
Step by step instructions:
- Print out an image of a ship made using the kirigami technique on half of a white sheet of paper.
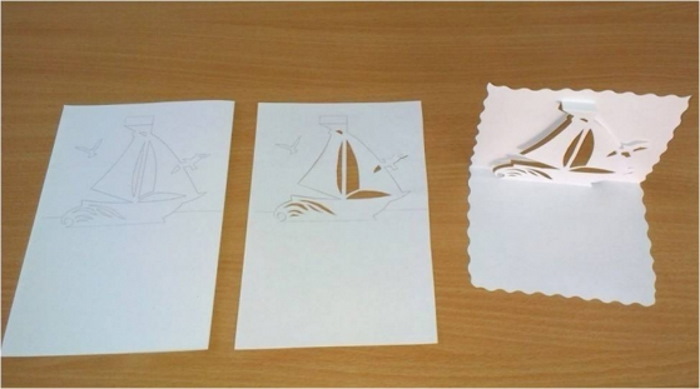
- Using a stationery knife and manicure scissors, cut out the design along the outline, without touching the horizontal lines.
- Bend the horizontal lines by folding the product in half. If desired, the edges of the craft can be cut with scissors with wavy blades.
- Attach the ship detail to the cardboard sheet. Stepping back 1 cm from the edge, mark the parameters for the base of the craft. If the cardboard sheet is not double-sided, glue a piece of wallpaper of the same size to the back side. Fold the base of the product in half.
- Make a printout of a greeting poem that will match the theme of the card. Use a piece of cotton wool and slate shavings from a colored pencil to tint the paper. Use scissors with wavy blades to cut out the poem with inscriptions.
- To decorate the craft, make seagulls from a cardboard sheet in the same color as the base and decorate the leaves with a decorative hole punch.
- Open the blank and glue the part with the ship. First the lower part, then the upper one.
- Place a poem in the lower part of the product, decorating its border with leaves. Additionally, glue seagulls.
- The front part of the congratulatory craft should be supplemented with the appropriate inscription and decoration.
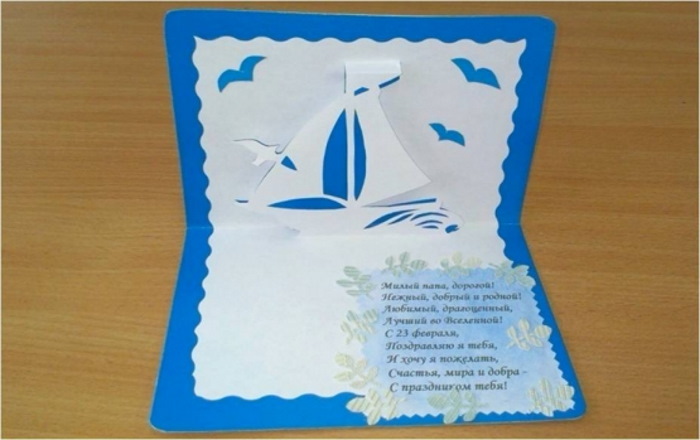
Volumetric postcard Ship
Christmas tree
A three-dimensional postcard with a Christmas tree inside can be made from decor and material that can be found at home, so there is no need to go to a special store to buy accessories and material. To decorate the blank with your own hands, you can use colored paper sheets and cardboard.
For decoration, you can use stones, beads, buttons, lace or satin ribbons so that the craft matches the New Year theme. To make the work easier, it is recommended to prepare a template on this topic in advance.
A voluminous postcard with an accordion-shaped Christmas tree inside will have an original appearance and will be a good holiday gift.
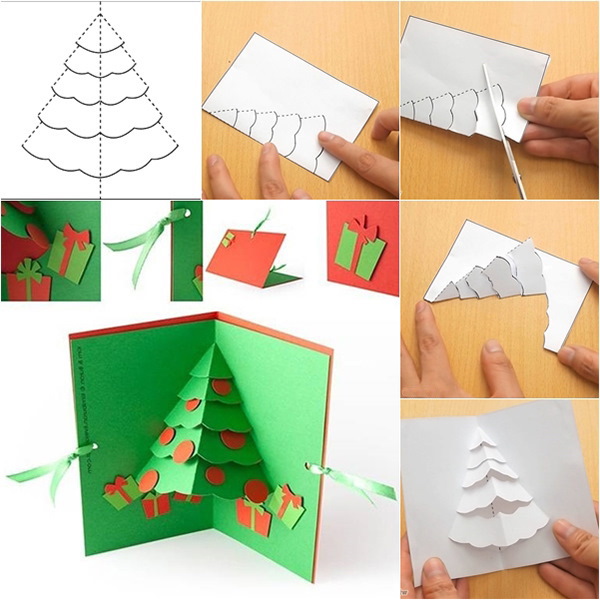
Option for making a craft:
- To decorate the base, you can use double-sided colored sheets or scrap paper. A colored sheet will work as a stencil.
- Make a base from scrap paper and fold the piece in half.
- Fold a sheet of colored paper like an accordion. Using a ruler, mark the resulting accordion at 7, 13, 18, 22, 25, 27, and 29 cm.
- Use scissors to make cuts in the marked areas to obtain elements for the future Christmas tree. The length of the blanks should reach 1.5, 2, 3, 4, 5, 6 and 7 cm.
- Open the base of the craft and start assembling the parts, fixing the elements on the workpiece.
- Perform similar manipulations with all the accordion parts, lubricating the blanks with glue and fixing each one on the base 0.5 cm higher than the previous one.
- Cut out a star from a sheet of shiny paper and use other details to decorate the tree.
To prevent the elements of the card from becoming deformed after final drying, it is recommended to use glue in the form of a stick to glue the parts together.
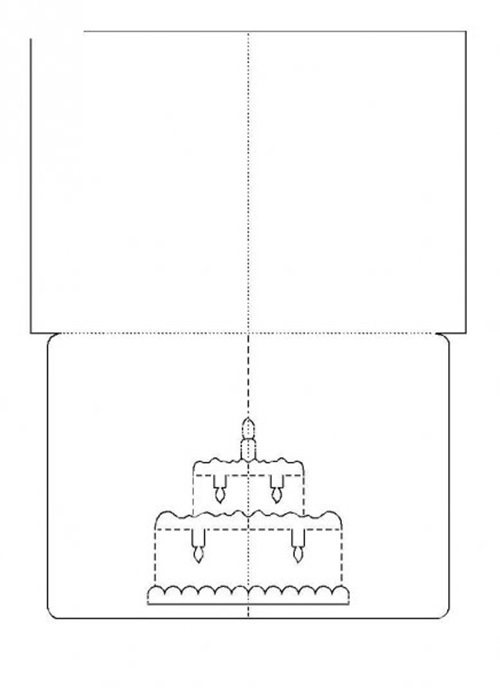
Cake
A 3D DIY cake-shaped card is perfect for birthday greetings.
To design the blank you will need to use:
| Material and inventory | Features of selection |
| Thick sheets | For the basic structure, it is recommended to use white or blue cardboard sheets. It is also acceptable to use thick light paper intended for drawing with watercolors. |
| Multicolored paper | The cake will consist of 3 layers, so you need to prepare 3 colored paper sheets of different shades. Additionally, you need to take a yellow sheet for decorating candles with red cardboard. |
| Tools | For ease of drawing, you need to prepare a simple pencil with a ruler. You can cut out the parts with scissors, and it is advisable to use glue in the form of a pencil for gluing. |
Often, candles are placed on the cake, the number of which will correspond to the age of the hero of the occasion. When decorating a craft, an adult may not have enough space to place candles. In this regard, it is acceptable to draw them or cut out numbers in the form of candles with fire on top. You can mark the age in tens, where 1 candle will be equal to 10 years, or not use candles.
How to design a postcard:
- Mark 1.5 cm on each side of a cardboard sheet or white paper and cut off. The workpiece should be smaller than the blue cover. No need to glue the parts together.
- Fold a white sheet of paper in half. On the part where the fold is formed, draw stripes that protrude as layers of the cake. The 2 outer stripes should be the same, the rest should be 1 cm smaller.
- Cut the marked lines and fold them upwards to determine the fold area on the sides.
- When you open the paper, you will see layers of cake that are folded inward.
- Bend the layers in the opposite direction, outward, and try to cover the craft. Iron the workpiece well so that the bends take the right place.
- To decorate the workpiece, measure the outer layer and cut a strip of the corresponding size from a colored sheet. Glue the detail.
- Do the same with the remaining layers. Pastel shades of paper and sheets with images that match the theme look unusual.
- To create candles, cut the red cardboard sheet into small strips. Cut out lights from the yellow sheet. Join the blanks together and apply to the cake.
- Fix the white paper sheet on the blue cardboard, having folded it in half beforehand. First try on the sheet with the applique without glue, fixing one part, then the other. Try to shift the fold of the white paper sheet to the fold of the blue cardboard.
- Decorate the front of the craft with pictures or flowers. The wish can be written inside or outside the card.
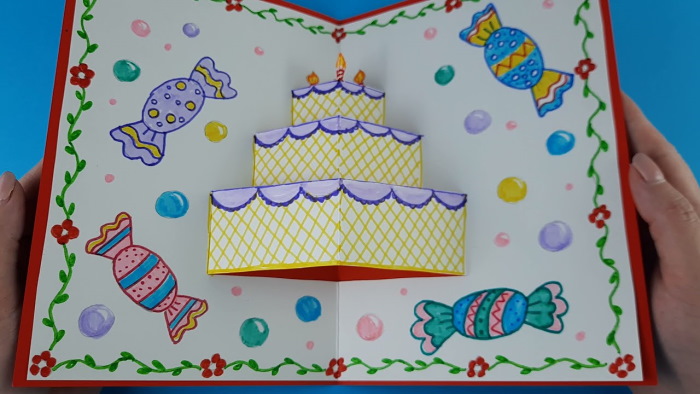
The cake can also be decorated. For this purpose, longitudinal ribbons with bows, stars or inflorescences are suitable.
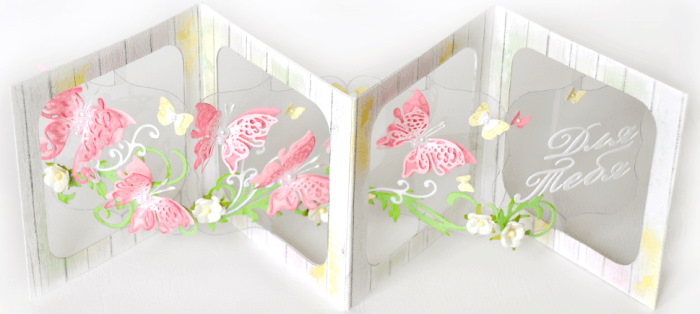
Butterfly postcard
A 3D DIY postcard can be designed in the shape of a butterfly. In this case, it will take about 20 minutes to create a greeting craft.
List of required materials with inventory:
- beads;
- double sided tape;
- PVA glue;
- a piece of thin rope or wire;
- thin cardboard sheet.
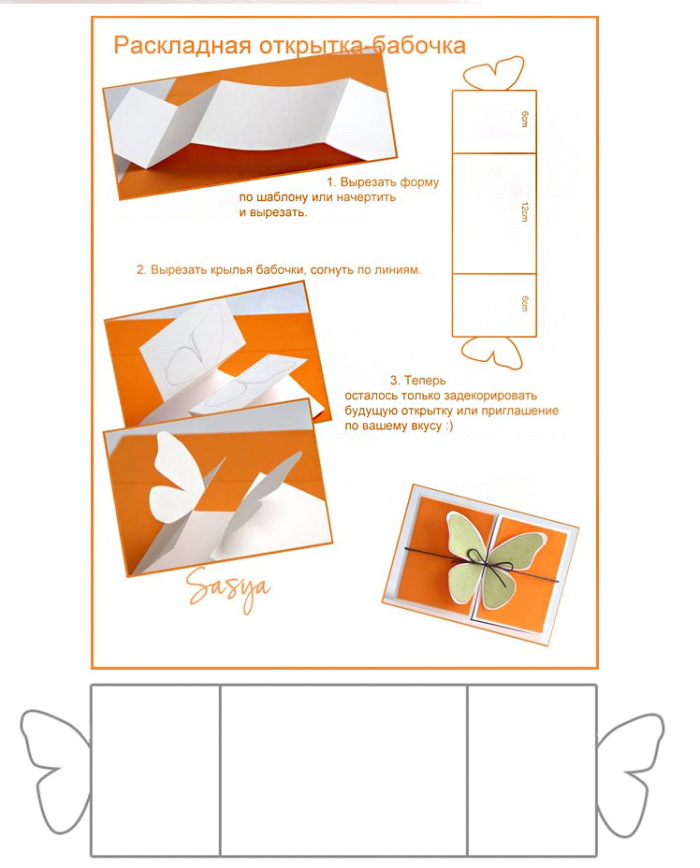
Step by step instructions:
- First, make stencils for the large and small butterflies. Fold a colored cardboard sheet in half. Direct the stencil with the large blank toward the fold so that its upper area protrudes slightly beyond the edge.
- Once you have finished cutting, you should have 2 butterflies that are joined at the top wing sections.
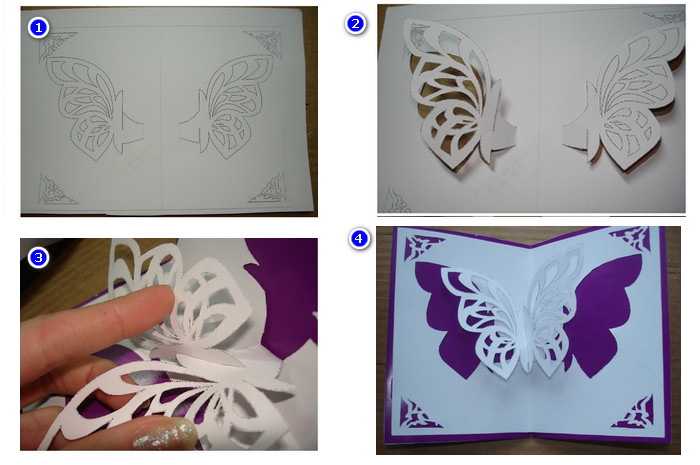
Volumetric butterfly card how to make step by step - Additionally, cut out 1 small and 1 large butterfly. Make the latter from a cardboard sheet with a pattern that will match the main detail in color.
- For a double blank, bend one lower wing upwards, on which part of the decor will be held in place later.
- Along the small butterfly, along the central line, fix a narrow strip with tape, gluing it to the back of a single colored piece.
- Do the same with the large butterfly, placing the tape across the workpiece. Fix the element to the bend that was previously created on the lower wing of the double butterfly.
- To create the whiskers, use beads, rope or wire. Attach the finished part to the butterfly.
- Additionally, you can decorate the small butterfly by laying out beads in a row along the central line on the back of the piece.
- After finishing the work, adjust the wings.
The finished greeting card is suitable for March 8 and birthdays.
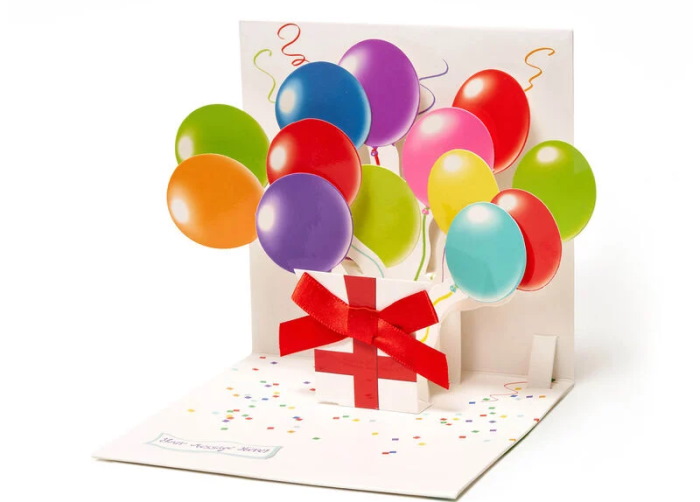
Balloons
To design a 3D postcard with balloons inside, it is recommended to prepare:
- PVA glue or stick, as well as a glue gun;
- a ruler with a regular pencil, scissors, a compass and double-sided tape;
- thick gray and white paper with double-sided sheets of different shades;
- thick threads or twine;
- felt-tip pen with colored tape.
Method of creation:
- Fold the grey thick sheet in half crosswise. Cut out a rectangle measuring 20x14 cm from the pink paper. Cut out a rectangle measuring 16x10 cm from the grey thick sheet.
- Use double-sided tape to secure the grey figure to the pink one, attaching the latter to the cover of the future craft.
- Cut the colored sheets into strips of equal length but different thickness, which will act as blanks for the balls. Visually divide one strip into 3 zones and fold along the lines twice.
- Use a compass to draw a circle on the finished piece, cutting it out along the outline. As a result, you should get 3 balls. Prepare circles from the remaining colored stripes in a similar way.
- The remains of the folded paper are cut into small triangles, fixing the blanks on the bottom area of each ball.
- Fold a small paper strip in half, unfold and fold each side like an accordion. Make as many blanks as you have balls. Glue the parts to the balls so that the accordions are on top.
- Use a glue gun to attach a thick thread or piece of twine to each circle.
- Fold the long edges of the white paper sheet by 2 cm and cut along the edge to obtain 2 strips that are folded lengthwise. Fold each piece in half crosswise 3 times. Cut out identical triangles so that the bases of the parts are on the fold.
- Each triangle serves as 1 letter from the greeting phrase. Coat the inside of the flags with glue, put them on 2 pieces of rope and secure. Tie the ends of the two threads.
- Soak the accordions with glue from the back of the balls and place them on the inside of the craft. Leave a few pieces for the cover.
- Tie the ends of the strings, twist them and cut off the excess. Use a glue gun to fix the flags with letters to the workpiece.
Designing 3D postcards is considered an interesting and exciting creative process. If you have free time, you can do this kind of work together with your child, making simple items.
A hand-made message can be creatively signed and decorated. In this case, to complete the congratulations, you can add a memorable quote or your own poems.
Video on how to make a 3D card with flowers
Postcard with 3D flowers inside.