It is not difficult to make a beautiful Mother's Day card with your own hands, choosing the most favorite method of handicraft - applique, drawing, decorative and applied art. Due to the ease of execution and the small investment of time, both an adult and a child can handle the open one.
Necessary tools
To make postcards you will need stationery and decorative materials, the list of which varies depending on the selected postcard option.
But for all cases you will need: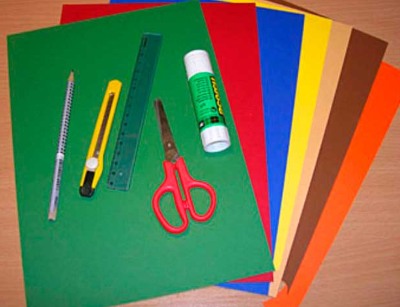
- Colored and white cardboard;
- Plain colored paper;
- Mother-of-pearl (or coated) colored paper;
- Colored paper with hologram;
- Double-sided colored paper (for a 3D postcard);
- Glue stick, PVA or hot glue gun.
For the selected version of the postcard, depending on the desired result, you may need the following materials:
- Scrapbooking elements;
- Corrugated paper;
- Pom-poms;
- Lace;
- Beads or rhinestones;
- Decorative wire;
- Varnish (artistic or construction)
It is also permissible to use natural materials, as well as any available means, including certain products – cereals, salt, coffee beans and others.
How to make a postcard
The basis for any type of postcard is a sheet of cardboard folded in half. Its format can be any - from A4 to A1.
The emphasis in a postcard is usually on the design of the title page.
Paper
The simplest version of a postcard is a paper one with flowers.
Materials required:
- A sheet of colored cardboard (very thick A4 paper will also work);
- Plain colored paper;
- Mother of pearl (coated);
- Colored paper with hologram;
- Glue stick.
 Making a postcard:
- The sheet of cardboard is carefully folded in half.
- Leaves for flowers are cut out of ordinary colored paper in any quantity, leaves of different sizes are preferable. The shape of the leaves can also be any: in the form of a poplar leaf, elongated, with "teeth".
- Veins for the leaves are cut out of paper with a hologram, or they can be drawn with a felt-tip pen or a glitter pen. The leaves will look more expressive if they are outlined with glitter paste.
- Flowers of different colors and sizes are cut out of mother-of-pearl or coated colored paper. For veins, which give the flower expressiveness, as in the case of leaves, colored paper with a hologram or a felt-tip pen (pen) is used.
- First, the leaves are glued to the card, then the flowers, which are placed organically throughout the space. An interesting idea is to arrange the flowers in a garland in the shape of a "horseshoe" at the bottom or in the corners of the card, opposite each other. Large flowers look more appropriate in the corners, and smaller ones closer to the center.
- For one inscription "Happy Mother's Day!" or "Dear Mom" you can use all types of paper, alternating the letters by color and texture of the paper.
Volumetric (3D)
A 3D Mother's Day card is made with your own hands using the same tools and materials as a simple paper card, but using a more complex technique.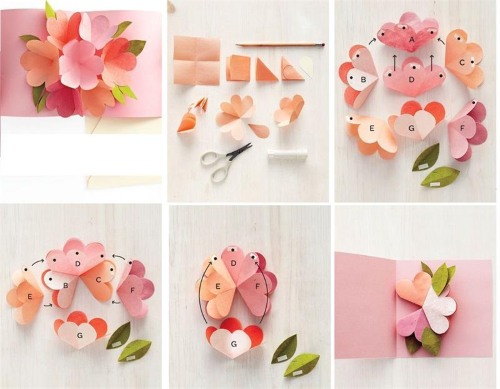
Manufacturing instructions:
- Flowers and leaves for the card are cut out of paper, with the edges of the flower petals slightly curled around a pencil.
- Glue the leaves, previously folded in half, onto the card. Only the edges of the leaves are coated with glue.
- One flower can be glued in 2 or 3 tiers. Thus, only the middles are glued on top of the leaves, thus creating a 3D volume effect.
- Flower pistils are made from rhinestones, “planted” on PVA glue using tweezers. Pistils cut from holographic paper are no less impressive.
The 3D image can be used to design both the title page and the opening of the postcard. The option with a turn is the most original and festive, accessible to both adults and children.
Master class
A DIY Mother's Day card with a 3D image requires the same tools and materials as the two previous options.
Step-by-step instructions for making it are provided:
- From colored paper, you need to cut out squares in a quantity equal to the desired number of flowers on the card. The length of the sides of the squares is about 3-5 cm.
- Fold the cut out squares in four, i.e. twice in half. Then bend them diagonally.
- On the multi-layered sides of the triangles formed from the bent squares, semicircles should be marked and cut out. When the figures are opened, flowers are obtained.
- 3-4 squares of the same shape as for making flowers are folded, half of the leaves of the desired shape for the postcard are drawn with a pencil. The leaves need to be cut out.
- Pieces of double-sided tape are attached to the outer sides of the flower petals to secure them together.
- The cardstock for the postcard is folded in half, and flowers are attached to the middle of the cover. For gluing, only the "ribs" of the leaves are coated with glue.
- The pistils are cut out of colored holographic paper and glued with PVA glue using tweezers. You can also replace them with rhinestones, which look more festive.
Postcard options
There is no fundamental difference in the technique of making postcards, they differ only in the selected material. You should pay attention to the choice of glue. Some materials glue stick or PVA do not stick firmly, which should be foreseen in advance.
With applique
A Mother's Day card with an applique is an option that is recommended to be made by hand by those who find it difficult to cope with the technique of making 3D cards. The applique is usually made on the title side of the card, as an independent decoration, or as an addition to other elements.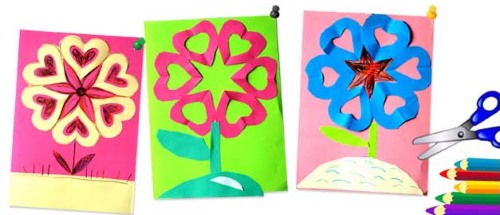
For applique, the materials used are already familiar - paper, glue, cardboard, and they can also be supplemented with various improvised means.
For a beautiful and original, but more complex applique you will need:
- Matches or dry, straight stems of grass "Bonfire";
- Blanks of leaves from satin. Such blanks are sold in craft stores;
- PVA glue;
- "Superglue".
The paper applique for the Mother's Day card is glued on using a glue stick. The details are completely coated with glue and carefully smoothed out on the cardboard base of the card. A more complex version of the card: satin or paper leaves are made as an applique, and flowers are made as a 3D image.
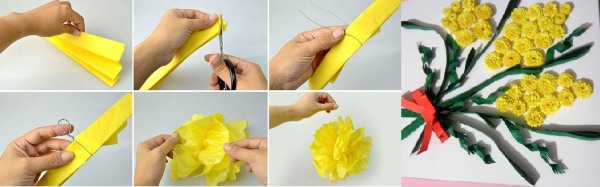
For such a “bouquet” it is suggested to make a basket from dry grass or matches.
It is done as follows:
- Cut blades of grass or matches are glued to cardboard in the form of a basket weave using PVA glue.
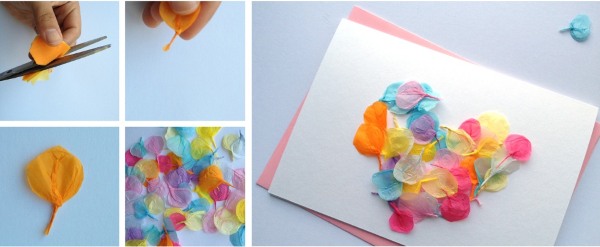
- The laid out basket is covered with artistic varnish, which can be replaced with construction varnish, taking into account that it must be applied extremely carefully and in a thin layer.
- For each flower in the basket, 3 circles of different sizes are cut out in a circle with a fringe, which needs to be “twisted” with a pencil. Such fringed circles are superimposed and glued one on top of the other - the largest at the bottom, and, accordingly, the smallest - at the top. This should be done so that the fringed petals do not overlap each other, so that in the final version of the flowers, a petal from one tier alternates with a petal from another.
- After the flower elements are made, first the leaves are glued “into the basket”, then the flowers themselves.
If the option with satin leaves for the postcard is not possible, you should make leaves from colored paper. The applique will look more expressive if the flowers are made of mother-of-pearl paper, and the leaves are made of regular paper, or vice versa. This will add a visual illusion of a three-dimensional postcard.
It is recommended to complement the card with red beads, “put on” the decorative wire using “superglue”. This way, the card will be complemented with decorative berries.
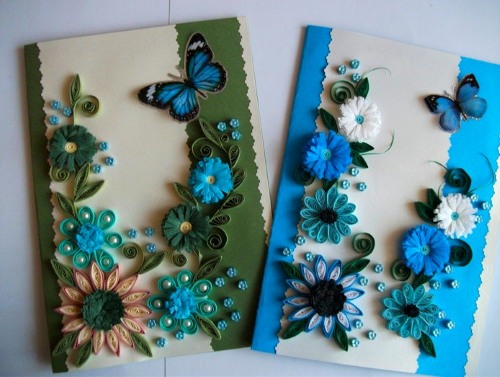
Scrapbooking technique
A scrapbooking card for Mother's Day is one of the most successful options, as it conveys the holiday mood to a greater extent. You can make it yourself in the form of a composition of flowers and leaves.
For this composition you will need:
- White cardboard A4 format;
- Corrugated paper;
- Satin flowers and leaves;
- Lace;
- Hot glue gun, glue stick, scissors. Silicone glue can be used instead of a hot glue gun.
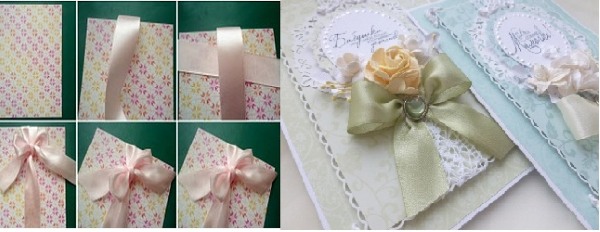
The instructions include the following steps:
- The white cardboard for the base of the card is folded in half, with the white side facing inward.
- Glue stick is carefully and evenly applied to the cardboard, after which corrugated paper is glued, the excess of which is cut off.
- Lace is glued along the length and width of one side of the card.
- Using a hot glue gun or silicone glue, glue leaves and flowers made of satin to the lace corner.
It is recommended to glue "dewdrops" made of rhinestones or beads onto flowers and/or leaves. Elements in the form of "grass" made of decorative wire are also appropriate.
Another interesting option for a postcard is this one: dry grass inflorescences ('bonfire' or wormwood), soaked in varnish and rolled in salt or semolina, reinforced with PVA along the lace line or closer to the center of the postcard. They will add originality and completeness to the composition.
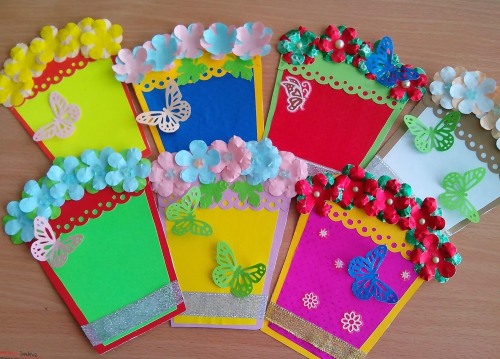
With corrugated paper
The main role in the production of the postcard is played by flowers made from corrugated paper.
Materials and tools required to make the card:
- Corrugated paper of two colors - white and any other bright color - blue, red, purple, pink and others;
- Pencils and/or markers;
- Stapler;
- PVA glue;
- White sheet of A3 format.
Making a postcard:
- Squares of approximately 5x5 cm in size are cut from corrugated paper.
- The squares for the flowers are folded in any order. One flower requires 10-15 squares.
- The squares are stapled twice so that the staples are positioned crosswise.
- A circle is cut out from the resulting blank made from squares.
- To create a three-dimensional flower, each layer of paper should be “crumpled” towards the center.
- An A3 sheet of paper is folded in half. On it you need to draw or make an applique depicting stems and leaves or a basket/vase. The edges of the image need to be decorated with drawn frames.
- Flowers are glued to the designated places on the sheet with the design for them.
From the same corrugated paper you can make a bow and decorate the corner of a postcard or “tie” it to a bouquet or flower basket.
With flowers
A Mother's Day card with flowers is made with your own hands not only in one technique, but also in combinations. A card using applique and scrapbooking elements looks beautiful and original.
For this postcard you will need:
- A3 coloured cardboard in pink or lilac;
- Mother-of-pearl colored paper of raspberry color;
- Flowers for scrapbooking – 2 white, 1 – to match the card;
- 3-4 sheets of satin;
- PVA glue;
- Small rhinestones;
- Tweezers.
Manufacturing technique:
- The cardboard sheet for the base is folded in half, and a heart is glued to the center. The distance from the edges of the heart to the edges of the paper should be 8-10 cm.
- Along the right half of the heart, but not all the way to the top, glue leaves first, then flowers. The flower in the same color as the card should be in the center.
- In the center of the heart, using tweezers and PVA glue, lay out the inscription “Mom” from rhinestones.
- The contours of the heart are framed with a scattering of rhinestones.
In the lower left and upper right corners, it is also acceptable to make a small scattering of rhinestones. Since in this version the main detail is flowers, in one corner with rhinestones you should add 2 small flowers for scrapbooking, in the other - 1 such flower. Making this card is not difficult, but it requires attention., perseverance and patience.
With a dress
A postcard with a dress is an original option. Dresses made using scrapbooking technique look the most elegant on postcards; they are glued to the postcard with PVA glue and practically do not need any additional decoration. But a dress “designed” and invented independently looks more interesting on a postcard for Mother’s Day.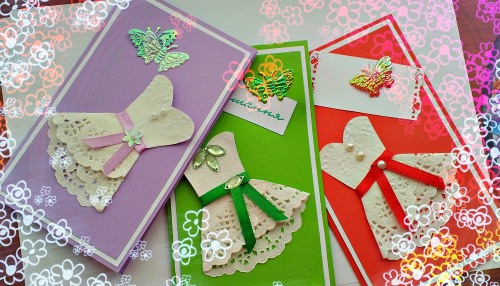
Materials required:
- Paper - absolutely any;
- Simple pencil;
- Ruler;
- Scissors;
- Glue stick;
- A sheet of white or colored cardboard (very thick paper). Its format should correspond to the size of the postcard;
- Lace;
- Any decorative details – rhinestones, beads, bows.
Basic technique for making a dress for a holiday card:
- The details of the bodice and the fluffy, flared skirt are drawn separately; the fold lines should be marked on the skirt.
- The details for making the dress are carefully cut out. The second set of dress details, only in one piece, is cut out of lace. On the skirt (the hem of the dress), using a ruler, folds are formed so that some of them go inside, as on a regular pleated skirt.
- The details of the product are glued to the title page of the card. A lace copy of the dress is glued on top of the paper dress.
The dress is decorated with decorative details. There are many options: a belt made of rhinestones, in the form of a bow made of satin, made of braid, a brooch on the bodice, a scattering of rhinestones or beads, and others. The hem of the dress can be folded from satin, and a lace frill can be glued along the edge. The skirt can have several tiers made of different materials.
2 or 3 different dresses will look very original on a postcard - a smart and rich dress is placed in the center of the postcard, and more modest styles and designs are placed on the edges. It is acceptable to add small flowers and/or hearts cut out of any colored paper to the postcard.
With pompoms
A card with pom-poms for Mother's Day is an original option, and in order to make such a card with your own hands, you should prepare all the materials in advance. Pom-poms for handicrafts, both fur and thread, are sold in specialized stores. Pom-poms from threads can also be made independently.
To do this, the following steps are taken:
- Take two “rings” cut out of cardboard, place them on top of each other and wrap them with yarn.
- The threads are cut along the edge, and the resulting bundle is tied in the middle.
- The thread bundle should be fluffed up and the pompom is ready.
The size of the pompom depends on the thickness of the cardboard rings, as well as the quantity and quality of the yarn. The thicker the rings and threads, the more voluminous the pompom. An interesting flower arrangement is made from many small pompoms. For such flowers, a basket from the postcard version with an applique is appropriate. A thematic version of a postcard, “Chicken with Chicks,” is perfect for Mother’s Day.
Materials and tools for making a postcard:
- Yellow pom-poms – 1 large and 1 smaller, several very small pom-poms for making chickens;
- PVA glue;
- "Superglue";
- Tweezers;
- Colored paper with a hologram. Felt-tip pens can also perform this function in a postcard;
- Small black rhinestones.
The production of a postcard is as follows:
- A sheet of colored cardboard is folded in half and large pom-poms are glued onto it so that they form the body of a chicken.
- Next to the chicken are chicks made from small pom-poms.
- “Paws” and “combs” made of paper are glued to the corresponding places with the image for them or drawn with a felt-tip pen directly on the postcard.
- The “eyes” are glued on with tweezers using “superglue”, using black rhinestones for them.
Pom-poms are also used in this version:
- Take 2 sheets of paper.
- At the top and bottom, 2 pairs of holes are punched in the sheets, through which the sheets are fastened with two laces, to the ends of which pom-poms on threads are sewn and tied into a bow.
There is a huge scope for postcard design; all of the above options are acceptable, but the presence of pom-poms on the title page is desirable for the “balance” of the composition.
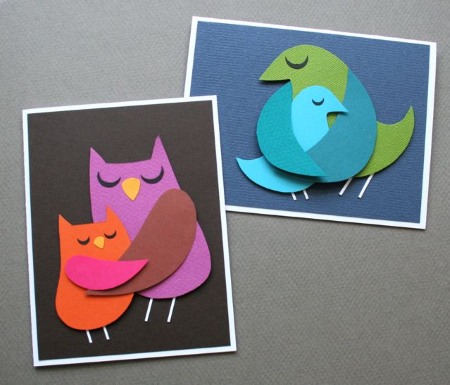
With birds
It is also appropriate to make a card with birds for Mother's Day with your own hands. Birds can be on the card both as an addition to the composition and its main element.
Materials and tools:
- A4 coloured cardboard;
- Colored paper of two types - regular and pearlescent (coated,
 mother-of-pearl, with a hologram) or different colors;
 - Scissors;
- Glue stick.
Making a postcard:
- Cut out 2 bird figures from two types of paper. The bird figures should be of different sizes and for the larger one, 2 wings should be made separately.
- The birds are glued onto the card so that the smaller one is pressed against the larger one.
- The wings are glued to the body of the larger bird in such a way that the larger bird “embraces” the smaller one.
- The eyes and beak for both birds are drawn on the card with felt-tip pens.
Mother's Day cards can be made using any available materials and simple office tools. The techniques for making each card vary in complexity and require creative imagination and attention.
Video on how to make a Mother's Day card with your own hands
How to make a 3D postcard with flowers, watch the video:
DIY Mother's Day Card: