Many children aged 5-7 years are able to independently study the origami craft scheme and fold the corresponding model. This is an excellent option for preparing for school, since it simultaneously develops discipline with logical and creative thinking. However, all schemes must be understandable and consist of a small number of steps.
Necessary materials and tools
Origami is an ancient paper folding technique that originated in Japan. Thanks to this technique, children will be able to learn how to create various paper crafts and read simple diagrams for creating various toys. At the same time, fine motor skills of the hands are additionally developed.
For work it is necessary to prepare sheets of paper. For a more in-depth study of the art of origami it is necessary to use auxiliary materials with tools:
| What is needed | Peculiarities |
| Sharpened pencil | Using a sharpened pencil, you can apply markings to the material. |
| Glue | It is better to use pencil or PVA glue for work. Despite the fact that this technique almost does not use adhesives, with the help of glue it is permissible to make the finished craft stronger and decorate it with decorative elements. In this case, professional craftsmen use a special aerosol glue that binds 2 items, creating unusual combinations of shades with texture. |
| Coloring materials | Paints and colored pencils are suitable as coloring materials for creating the craft. They are required if a white sheet of paper is used for work. When choosing watercolor paints, you need to be very careful, because a large amount of applied pigment can spoil the product. |
| Stationery knife | The stationery knife must be sharpened. The tool is required if it is necessary to replace the scissors. |
| Scissors | For work, it is recommended to use several scissors of different lengths, which will not be too tight and have sharp ends. When planning work with small details, it is advisable to prepare manicure scissors. However, for children's creativity in the origami technique, scissors are almost not required, because the patterns are quite easy. |
Origami paper patterns for children aged 5-6, step-by-step master classes
Origami for kids should start with simple step-by-step actions that need to be repeated in a certain sequence to create a basic shape. From there, you can build on this to add folds, turn out or bend parts to get a specific model.
Professional craftsmen use 11 standard parts. Children aged 5-6 years old only need to familiarize themselves with a few elements to decorate origami items:
- "Crap";
- "water bomb";
- "kite";
- "doors" or "cabinet";
- "book";
- "triangle".
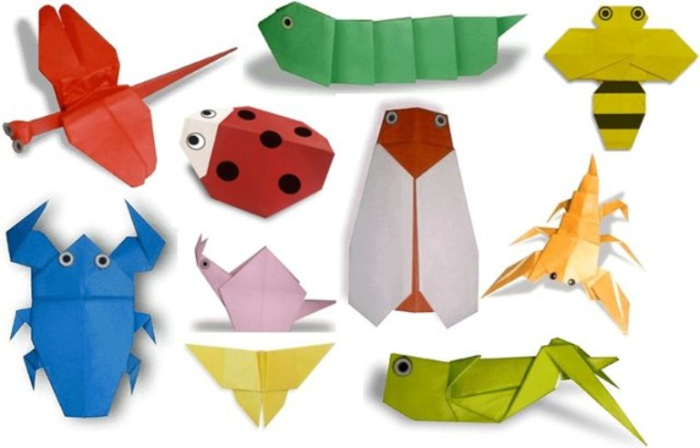
The task of parents is to ensure that the child broadens his own horizons, and also has the desire to learn and develop comprehensively. In this regard, flower models with various figures of insects and animals are the best solution. When folding any model, it is recommended to tell the child about the object of the image, so that the supported information along with the beautiful product is better remembered.
Children aged 5-6 can create various functional items in the form of greeting envelopes, storage boxes or accessories.
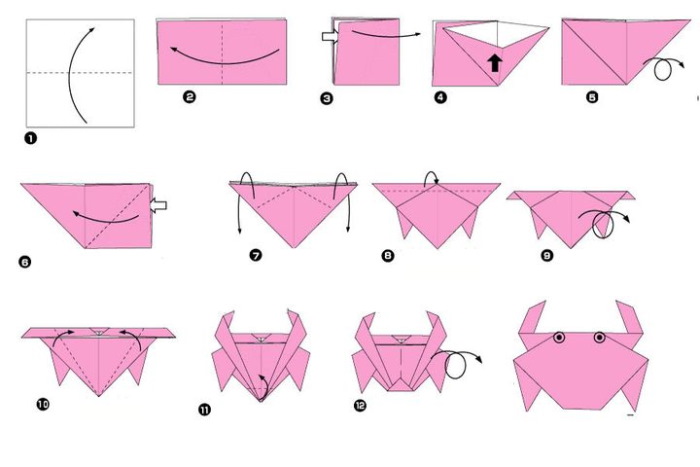
Crab
To make a paper crab, you need to prepare plastic doll eyes, a marker and a sheet of paper in the shape of a square measuring 15x15 cm. The basic shape of this model is a "water bomb".
Step by step description:
- Fold a piece of paper in 2 directions diagonally and 2 times in the shape of a book.
- Open the piece. Make diagonal reverse folds. Join the extreme points of the central line in the middle to create a “water bomb”.
- Place the model base down, bending the outer corners inward along the dotted line.
- Turn the figure over, bending the bottom part and ironing the fold well. Bend the sides down along the dotted line.
- Turn the workpiece over, fold the animal's claws along the dotted line and unfold.
- Give the front limbs the shape of scissors by moving the outer elements of the claws back along the marked fold.
- At the end of the work, glue plastic eyes onto the figure.
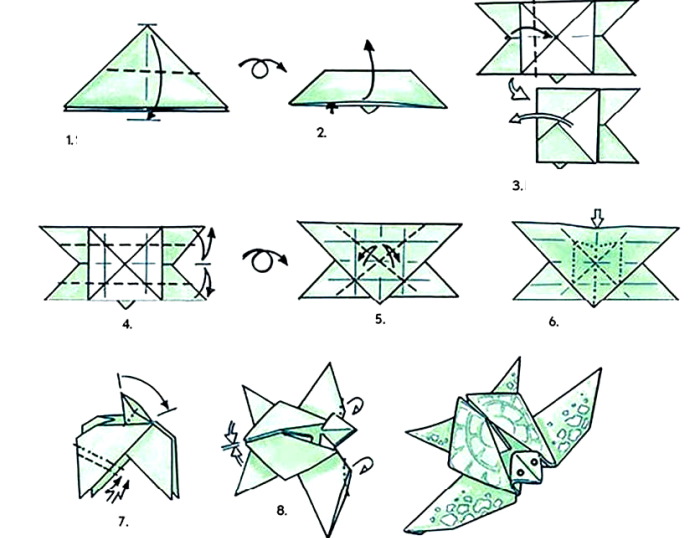
Turtle
Origami for children should be simple, so it is advisable to choose easy folding patterns. One of such models is a turtle. To make it, you need to prepare a sheet in the shape of a square, the sides of which will be equal to 21 cm.
At the same time, such a craft is characterized by one feature: after completing the folding of the figure, one cut must be made to obtain the desired product.
Step by step instructions:
- Place a sheet of paper on the table surface with one side facing you and fold it into a triangle.
- Fold the outer corners up to create a double square.
- Fold the top layer side on the right side from top to bottom into 2 parts. Do the same with the left part.
- Bend the right valve from below. Do the same with the left valve.
- Turn the workpiece 180°. Separate the first layer of the triangle that is at the bottom and cut from the top to the middle.
- Bend the resulting 2 halves as you wish.
- Fold the lower flaps like the upper ones.
- Fold the sides inward, without reaching the middle.
- Lower one of the tops of the model down.
- After performing a double fold, return to the original position.
- Turn the figure over, folding it lengthwise to add extra volume.
Greeting card
To create a greeting card paper cards You need to use one-sided colored paper, which is square in shape and measures 15x15 cm. One part of the sheet should be colorless, the other - pink or another shade.
Method of creation:
- Start with a clear piece of paper. Create a triangle with the top facing away from you. Bend the corner of the top layer so that it does not reach the base of the workpiece.
- Fold the model like an accordion. First lift it up by 2/3, then lower it down by 1/3. Turn the figure over. Fold the part on the left so that the top touches the opposite edge. Do the same with the right part, but bend the top corner down a few centimeters lower.
- Turn the workpiece over again. Fold the upper triangle forward twice so that its edge is visible from the outside.
- Proceed to creating a postcard. Fold a 21x28 cm cardboard sheet intended for scrapbooking in half crosswise. Cut a strip for the table and a narrow strip for the candle from the packaging sheet.
- First, glue the base, then the cupcake on top, decorating it with rhinestones or glitter.
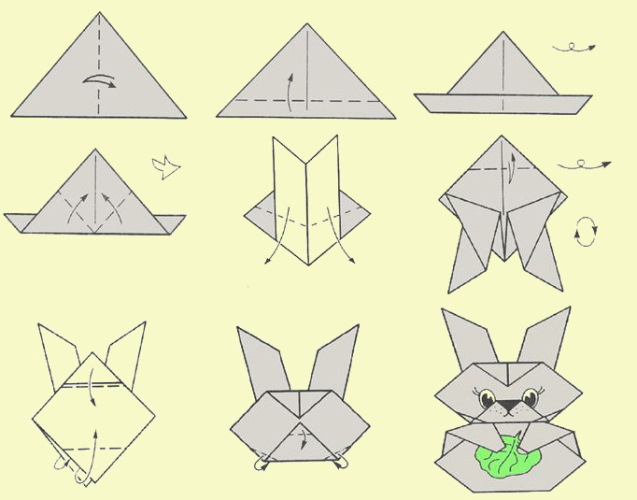
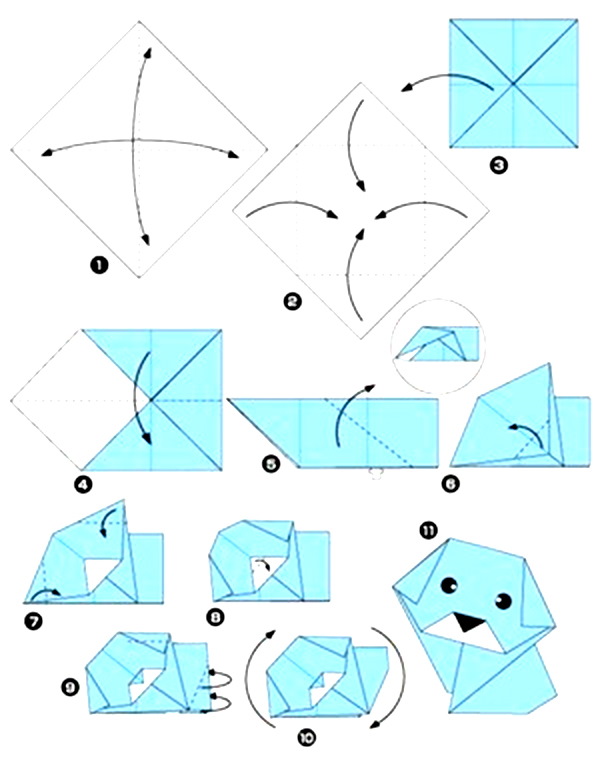
Dog
To create a dog figure using the origami technique, you will need felt-tip pens, scissors, and a square sheet of paper.
Master class:
- Fold the square sheet diagonally, smoothing the fold line with your finger.
- Fold the resulting triangle in half, pressing it in the middle and unfolding it. Bend the sharp corners down on the right and left, ironing the folds, to create ears.
- Fold the double triangle upwards, drawing its end with a dark marker to design the nose.
- Draw oval eyes. If desired, make a tongue from a red sheet of paper.
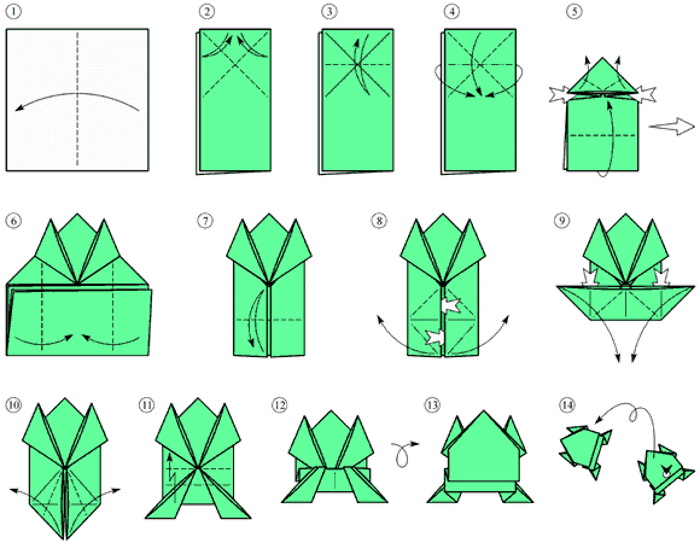
Frog
Origami for children aged 5-6 years should mainly consist of diagrams with which you can create various figures of animals or small insects. For example, it is acceptable to make a frog. For work you will need a green sheet of A4 format, as well as glue and scissors. If desired, you can cut out oval eyes from paper or draw this part of the figure with a marker.
Step by step description:
- Fold the sheet in half, folding the strips on the sides to the central fold area. Open the first strip and fold the upper corners to the center to resemble a check mark.
- Turn the workpiece over and perform the same manipulations.
- Fold the resulting hexagons in half horizontally, and the resulting trapezoid vertically. Open the piece and make small 0.5 cm cuts in the middle of the base and on the outer edges.
- Bend 4 sides up.
- Glue or draw the prepared eyes. Grasp the head of the figure with your index finger and thumb, pressing open the frog's large mouth.
Elephant
An origami elephant needs to be folded from 2 pieces of paper. The figure will consist of a body and a head, which are easy to make using a diagram.
Method of creation:
- Prepare 2 square pieces of paper. The size of the head should be 4 cm smaller than the body. For example, if the sides of the large square are 10 cm, the small ones should be 6 cm.
- Fold the figure's head, placing a smaller square sheet of paper in front of you. To find the center, fold the 2 opposite corners together.
- Open the sheet, aligning the left and right sides along the central fold.
- Direct the corners in the center outward. Fold a small section of the corner at the top down.
- When you turn the figure over, you should get a head with a trunk and ears.
- Glue the eyes on, making folds on the trunk.
- Start folding the body using a larger square piece of paper. Fold the sheet of paper in half, matching the opposite sides.
- Open the piece and join the two remaining sides to create cross folds.
- Unfold the product and fold it on the sides, taking up 1/3 of the fold area.
- Fold the finished figure in half, joining the bottom and top parts.
- Bend a small corner on one side. If desired, you can glue a tail to the finished body.
- Attach the head to the body to complete the forgery.
Simple Origami for 7 Year Olds
Origami for children aged 7 should be a desirable and creative work, so beginners should start with the easiest schemes. Later, as they master the technique of folding paper, it is permissible to complicate the task.
Christmas tree
The Christmas tree is a simple paper folding scheme, since you only need a colored sheet of paper to work with.
Step by step instructions:
- Fold a square sheet of paper in half to obtain 4 equal sides.
- Place the sheet so that a rhombus is formed. Fold the left and right corners to the middle.
- Make a fold at the bottom of the figure.
- Turn the figure over with its back part.
- Fold the ends of the top of the sweet.
- Fold the sides of the bottom part towards the middle, taking into account the previous step.
- Lift the ends of the corner on the fold and place them upward.
- Fold the corner of the base upward and turn the workpiece over.
- Bend the model slightly forward in the center.
The finished tree can be decorated or decorated, and then used for theater or games.

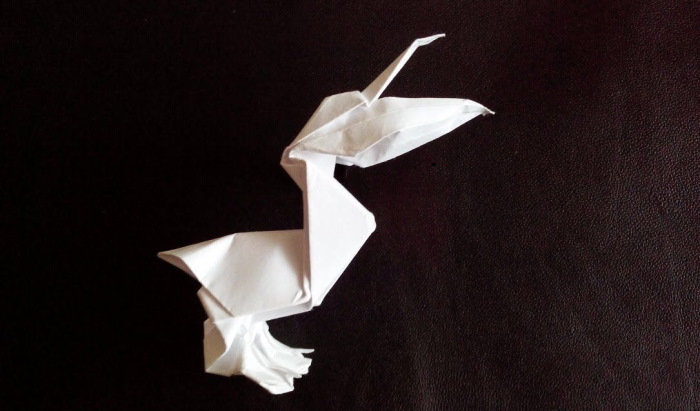
Pelican
You can create a pelican using origami. All you need is a sheet of paper. To make the figure look complete, you can draw wings on the bird at the end of the work using a felt-tip pen or paint.
Method of creation:
- Fold the square sheet in half, turn it over and fold it in half again to get 4 parts.
- Fold the paper sheet in half and leave it like that. Fold the top half in the same way.
- Bring the corner up on the right. Lift the folded part and align it.
- Fold the top and bottom left corners.
- Turn the figure over by folding the corner located at the bottom.
- At the end of the work, draw wings on the figure.
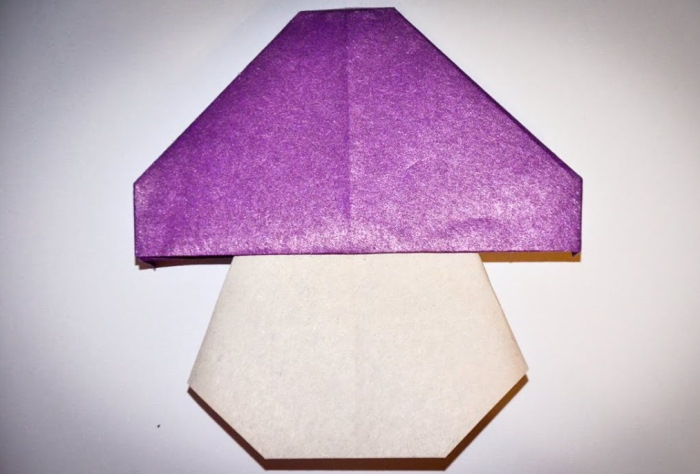
Mushrooms
Mushrooms can be used to decorate any decor, because they look great as a festive garland or an autumn bouquet. To create the craft, you will only need 2 sheets of paper in white and red shades measuring 15x15 cm.
Step by step instructions:
- Connect the white and red sheets of paper together, immediately making diagonal folds on them.
- Fold the top corner of the workpiece to the middle. Do the same with the right and left corners.
- Bend the top half of the figure into a valley shape.
- Move the left and right corners back.
- Turn the model over and carefully iron the previously created folds so that the figure does not fall apart.
- Bend the right corner to the central strip. Do the same with the left corner.
- Straighten out the folds that were made in the 2 previous steps.
- Open one part of the mushroom cap.
- Bend the adjacent leg toward the central strip. Do the same with the left half.
- Fold the bottom corner and fold the top triangle of the hat.
- Turn the mushroom over to the front side.
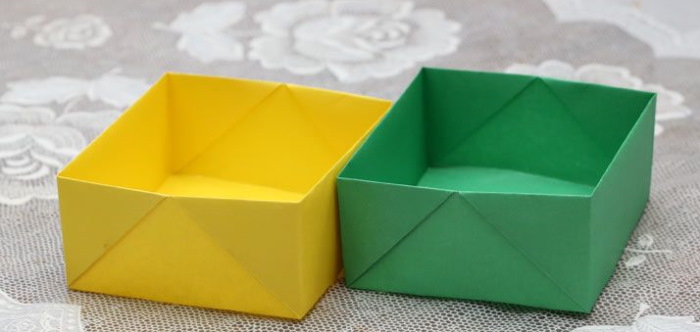
Box
An origami box can be made from a sheet of A3, A4 paper or a whole Whatman paper. Any sheet should be thick so that the figure does not lose its shape during use.
Method of creation:
- Place the sheet of paper horizontally, bending the rectangle from right to left, and open it.
- Fold the opposite edges towards the center and turn the model over.
- Bend the right end to the central strip, releasing the part that was located at the back. As a result, a zigzag fold should be formed.
- Do the same manipulations with the left edge.
- Move the valve on the right to the left.
- Bend the edge up to the vertical fold indicated by the arrow, ironing the formed strip well.
- Open the folds. Fold the lower and upper corners on the right side.
- Do the same manipulations with the left side, but bend the corners more tightly and only in the top layer.
- Fold the end along the dotted line. Fold the left flap to the right side.
- Repeat the previous 3 steps again and open the workpiece from the inside.
- Press sharp corners inward.
- Align the model along the bottom contour, giving it a clearer shape.
- To increase rigidity, squeeze the corners with your fingers.
The finished box can be used to store jewelry, stationery or art supplies.
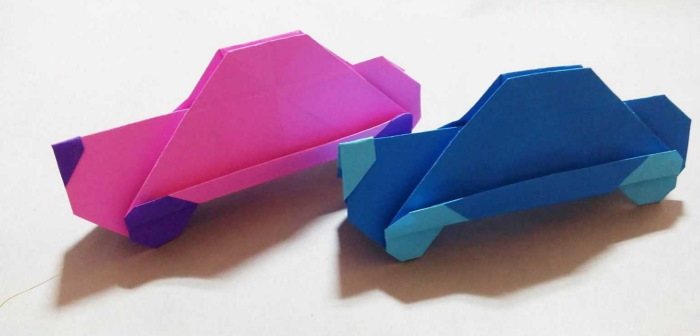
Car
With the help of origami it is possible to create almost any kind of vehicle. The car is the simplest and most common model, because such a figure is very quick to make.
Creation option:
- Fold the paper sheet in half. Bend each formed half again. Align the cuts parallel to the central fold.
- Bend back all corners of the folded sides. The corners should be the same size. For this purpose, it is acceptable to measure the interval from the fold to the corner.
- Fold the vertices in all 4 triangles. The fold strip should be parallel to the side of the base.
- Fold the figure in half. Press the corner on one side, make a diagonal cut on the other side and hide the corner inside the workpiece.
- When finished, draw wheels with headlights and windows on the figure. The finished model will stand firmly on a flat, even surface.
Tips and tricks for beginners
- When folding opposite sides with corners, they must be carefully joined together.
- If the fold lines are not going to open up later, they need to be carefully ironed with a finger, the edge of scissors or a ruler. Thanks to this, the figure will not lose its shape.
- The model must be bent exactly in the directions indicated in the diagram. At the same time, it is necessary to maintain symmetry relative to the central axis.
- In order not to damage the pockets that are opened by the internal elements of the craft, all manipulations must be unhurried and careful.
- To create crafts, it is permissible to use special paper intended for origami, foil or regular sheets. To decorate models with wet folding, it is necessary to use thick paper that is treated with an adhesive composition.
Thanks to paper crafts in origami technique, a child can train fine motor skills, improve concentration, develop accuracy and perseverance. However, to attract children, it is recommended to use simple schemes to arouse interest in the work.
Video about simple paper crafts
Simple origami paper crafts for children aged 5-6 and older step by step. Origami kitten, dog and fox. To make them, you will only need a square sheet of paper.
For classes with my granddaughter. Interesting.