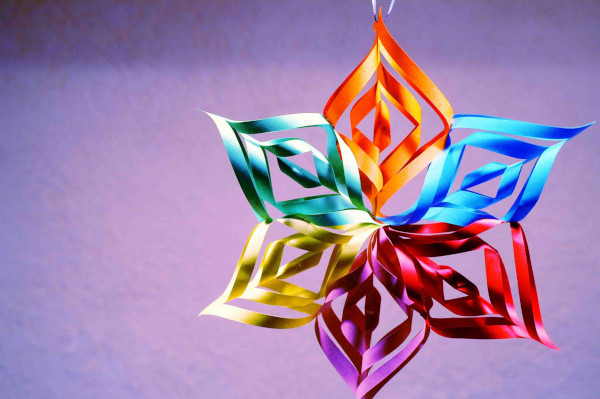
Snowflakes - traditional new year decoration, used to decorate windows, ceilings or create garlands. Made with your own hands using simple templates from paper or other available material, they have a significant volume or 3D shape, are made in various techniques and help create a festive Christmas atmosphere.
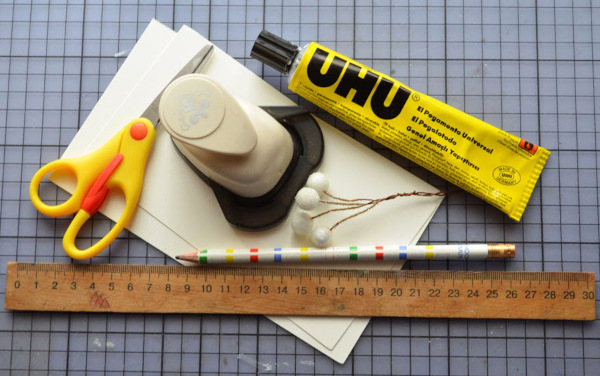
Necessary materials
You can make voluminous snowflakes with your own hands from paper of different colors, hang them with threads or attach them to the wall with pins.
Materials used:
| 6 sheets of paper | It is acceptable to use white, office or multi-colored double-sided paper to create snowflakes, and also to combine different colors. |
| Scissors | When doing creative work with children, it is recommended to use safe materials with rounded edges, which will help prevent possible injury. |
| Glue | You can glue the items together with a glue stick, superglue, or use PVA glue. In the latter case, you will also need a brush and a soft cloth to remove excess glue. |
| Puncher | Used to decorate snowflakes. |
| Ruler and pencil | Necessary to create a product drawing. |
| Thread and needle | Used when assembling garlands or creating fixing loops. |
Simple volumetric craft
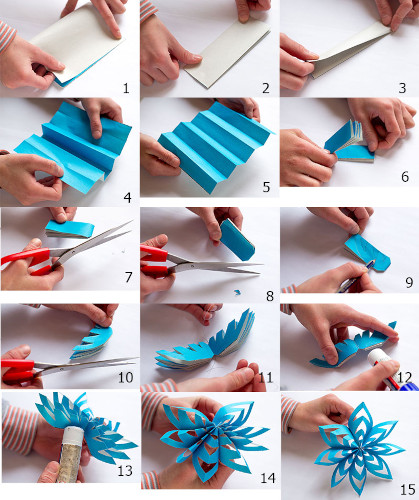
To make a simple, three-dimensional snowflake you need:
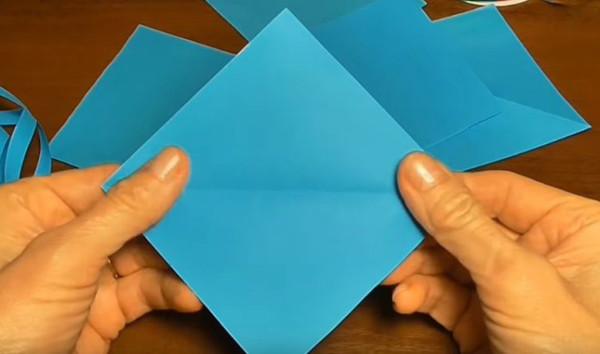
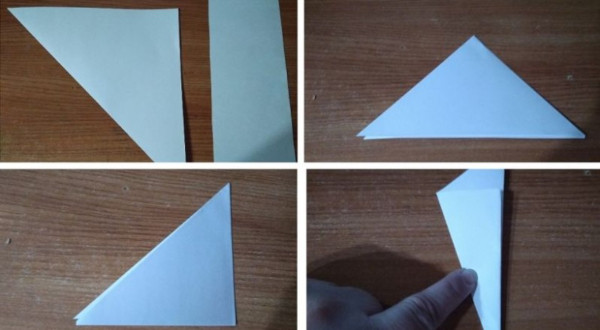
- Take a sheet of paper and fold it in half so that the workpiece has isosceles angles. From the resulting figure, cutting off the excess with scissors, you need to make a square. In total, you need to cut out 6 identical squares.
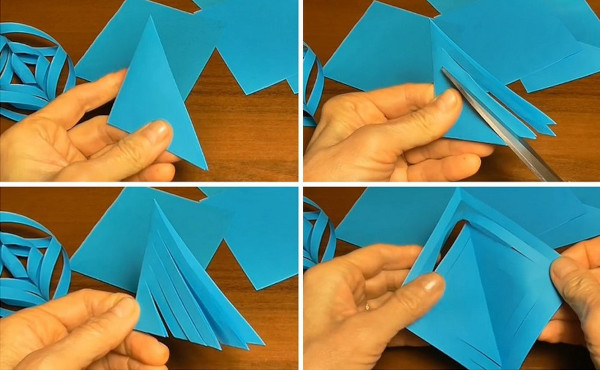
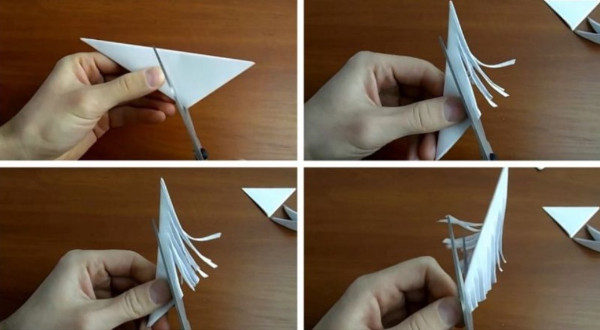
- Each square needs to be folded in half, turning it into a triangle. Using scissors, make 4-6 cuts on one of its sides, not reaching the edge of the workpiece, and then unfold the resulting figure.
- Take a pen or pencil, place it in the middle of the square along the fold line, then coat the 2 inner corners of the figure with glue and wrap it around the pencil, gluing the parts of the product together.
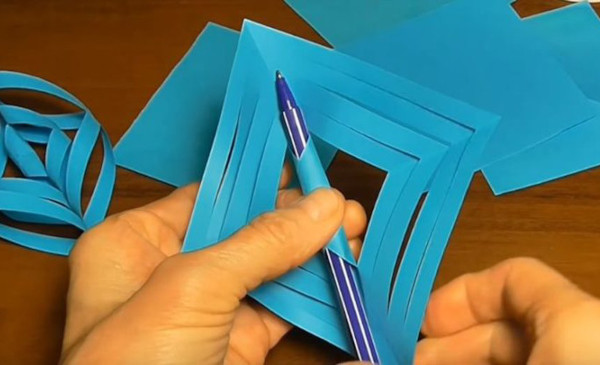
- Applying a pencil to the middle of the other side of the square, wrap the following parts of the blank coated with glue around it in the same way. Acting in a similar way, constantly changing the sides of the square, you need to glue together all the parts of the 6 cut blanks.
- To assemble the snowflake, coat the ends of the prepared blanks with glue and attach them to each other. Using a needle, you can make a small hole in one of the snowflake parts and pull a thread through it to hang the product.
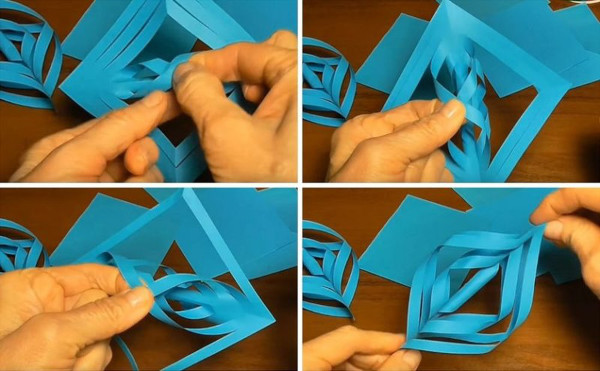
In a similar way, you can make a volumetric snowflake from several parts, for this:
- From an A4 sheet of paper you need to make a square, and then fold it 4 times at right angles to get an equilateral triangle.
- Using scissors, from one edge of the workpiece (without reaching the other end of the triangle), make 7-8 cuts diagonally towards the center.
- The finished workpiece needs to be unfolded.
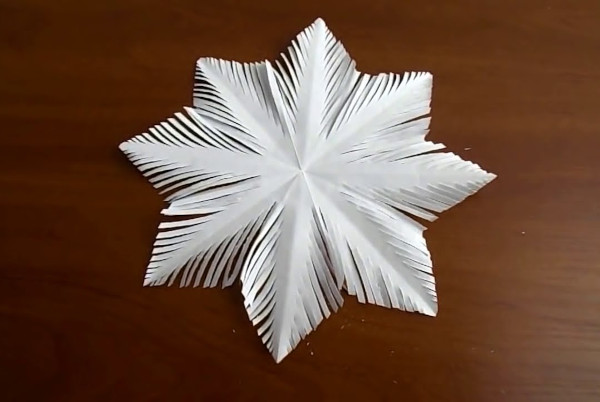
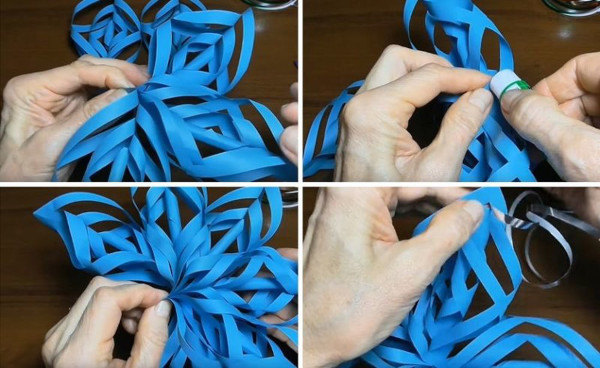
- In a similar way, you need to make 5-6 blanks of different sizes, and then, placing them on top of each other so that they have a common center, sew them with a thread and needle or fix them with PVA glue or a glue gun.
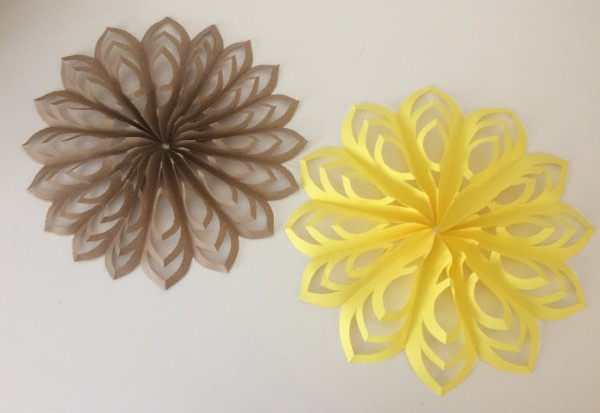
If desired, you can use not only white paper, but also any colored paper, and cover the finished snowflake with glitter or rhinestones. The latter can be glued to the middle of the product, and the scattering of glitter can be fixed to a transparent thin adhesive layer applied to the teeth.
For the third version of the snowflake you will need:
- Fold an A4 sheet of paper of any color lengthwise 3 times, and fold the resulting strip in half.
- From each edge of the workpiece, you need to cut off the corners with scissors and tie it in the center with a thread that matches the color of the paper.
- Moving with scissors along the fold lines, the paper needs to be cut on both sides from the center into separate strips.
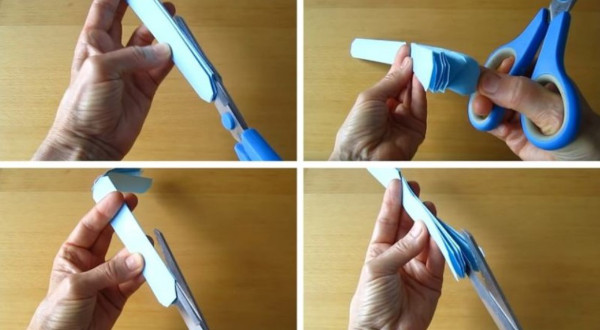
- After folding each strip in half, it needs to be glued at the center of the main product, make 2 additional cuts on each, bend the resulting strips in different directions, straightening them out like wings.
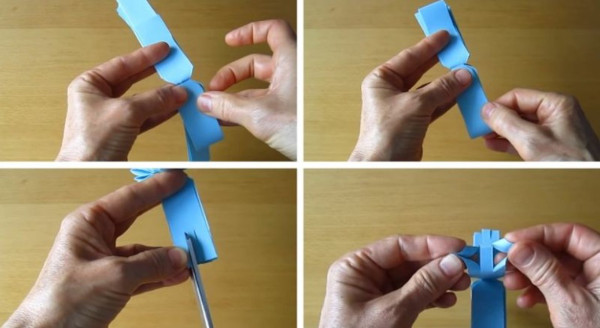
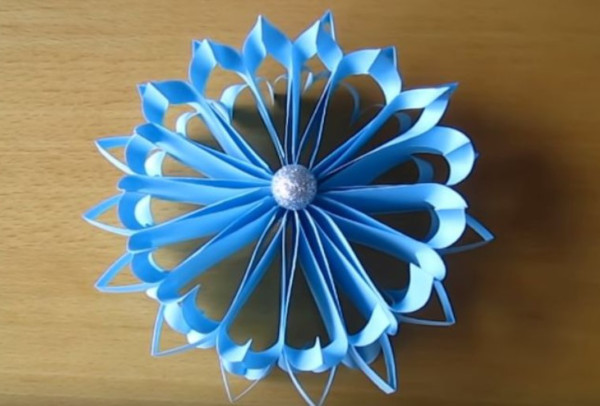
- Unfold the resulting product and straighten it into a snowflake shape. For decoration, you can glue rhinestones or a shiny ball to its center.
3D
Snowflakes can be cut out of a sheet of paper folded into several layers. This model is quite simple to make and requires the use of 2 sheets of office or any colored paper of A4 format, scissors and glue.
To make a snowflake you will need:
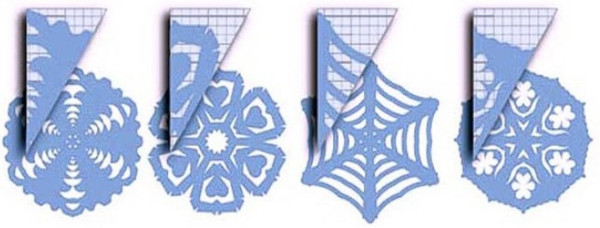
- Take the sheets of paper and fold them in several layers like an accordion so that the result is a fairly voluminous strip 3 cm wide.
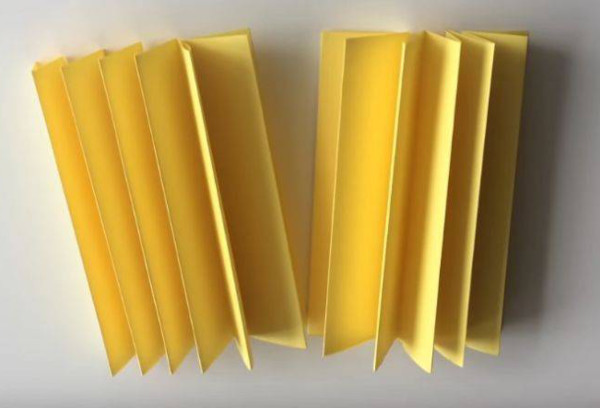
- Using a pencil, draw any pattern you like on paper, copy it onto another strip, cut along the outline using scissors, and then unfold the folded sheet.
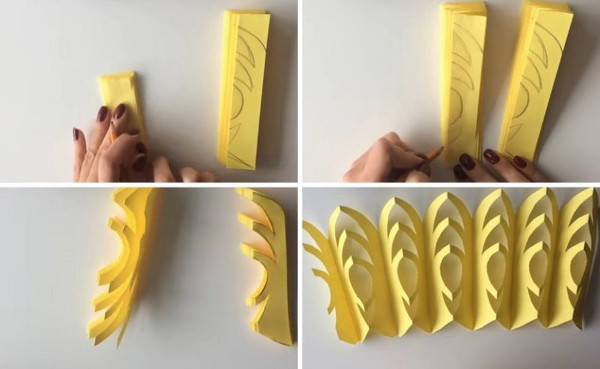
- After applying glue to the edges of both pieces, they need to be connected into a circle, and then, having secured the middle, give the snowflake the required shape.
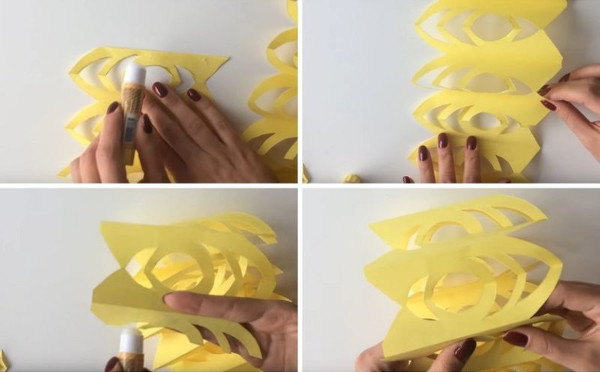
In a similar way, you can make a snowflake from one sheet of paper, but in this case:
- The sheet of paper must first be folded in several layers to form a strip 3 cm wide, and then folded in half.
- Using scissors, carefully cut off the corners from the middle of the strip, and then use a pencil to apply the same pattern on both sides, starting from the edge so as not to damage the middle of the workpiece.
- Carefully cut out the created design along the outline.
- Apply a strip of glue to the middle and edges of the blank, unfold and glue in a circle, and then give the snowflake the desired shape.
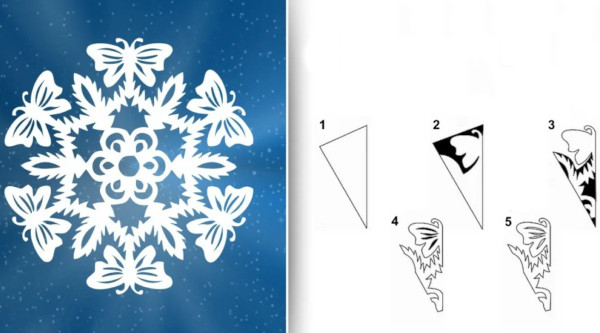
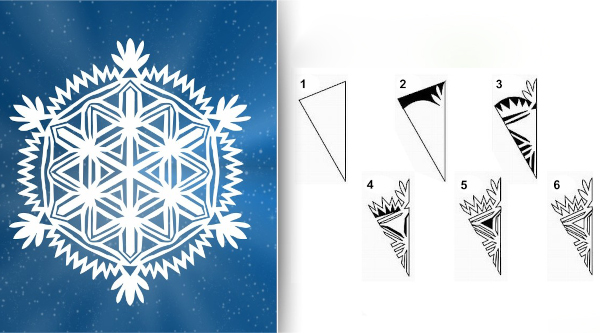
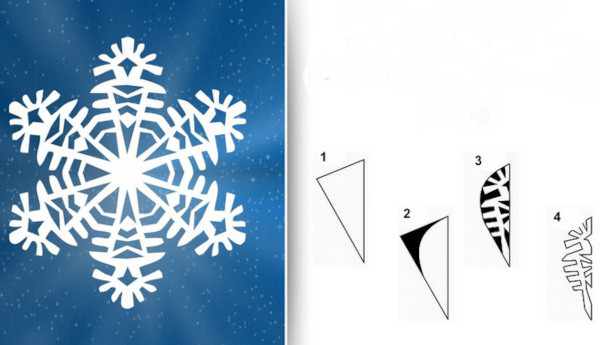
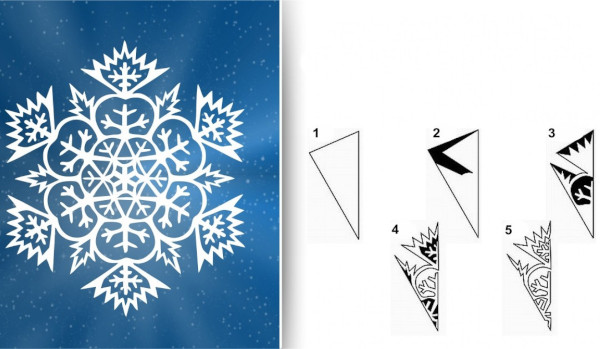
From paper templates
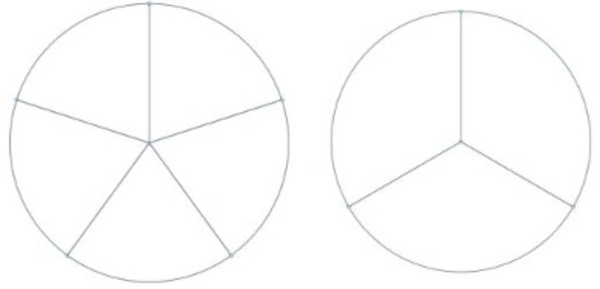
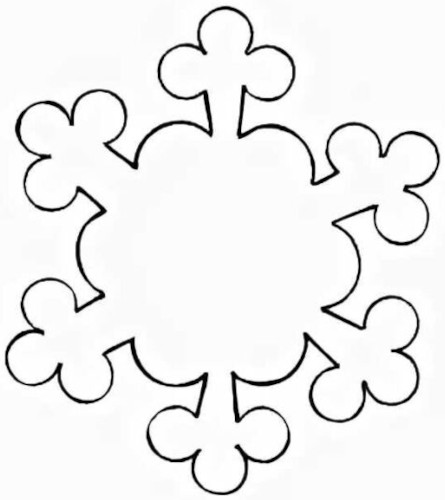
Volumetric paper snowflakes for decorating rooms can be made from 3 identical templates connected together.
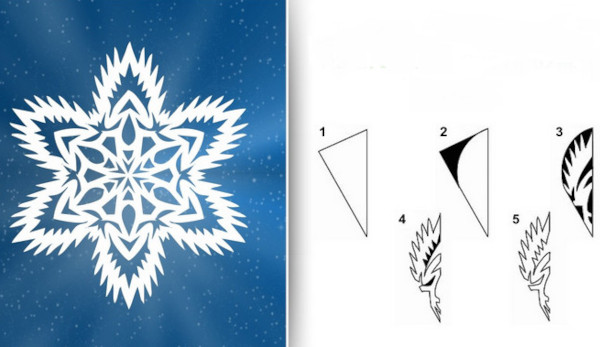
The design of the template depends on the author's imagination, but the following options are considered the most popular:
| Figure 1. |  |
| Figure 2. | 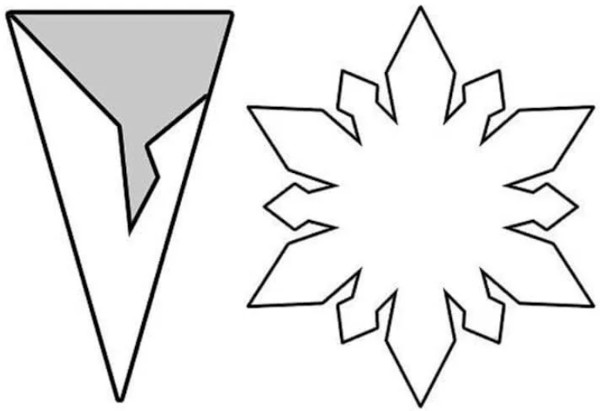 |
To create a snowflake, you need to make 3 identical templates using paper and scissors, and then, applying glue to the middle of each of them, connect the blanks to each other:
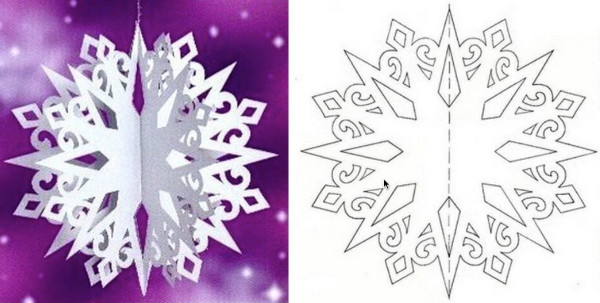

You can attach a thread or cord to the top of the resulting snowflakes and use them to decorate the ceiling in the room.
Using a shaped hole punch
You can decorate voluminous paper snowflakes with your own hands using a figured hole punch, which allows you to create unique 3D New Year's products.
Also, to make a snowflake you need to use:
- sheets of white office paper or colored paper;
- with scissors;
- PVA glue;
- with a ruler and a pencil.
During the work process you need to:
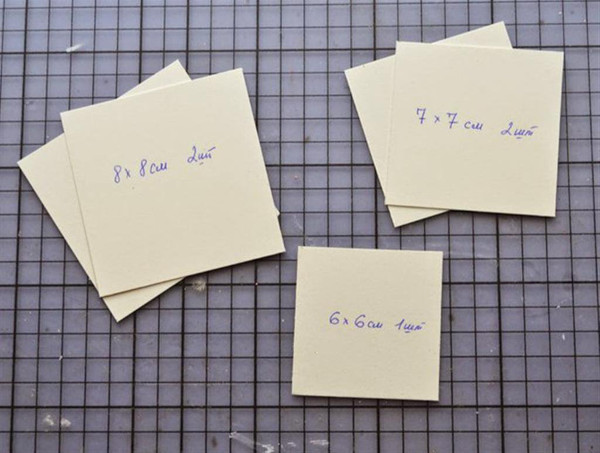
- Using scissors, a ruler and a pencil, cut out of paper: 2 square blanks measuring 7*7 cm and 8*8 cm and 1 with dimensions of 6*6 cm.
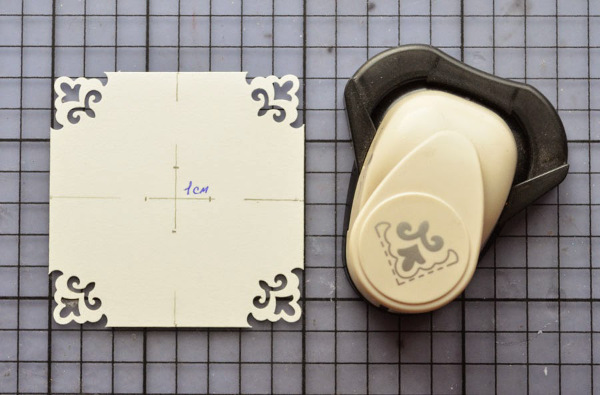
- Divide each of the squares into 4 parts with lines so that 1 cm is set aside on each side from the center of the product, and process the corners of the blanks with a curly hole punch.
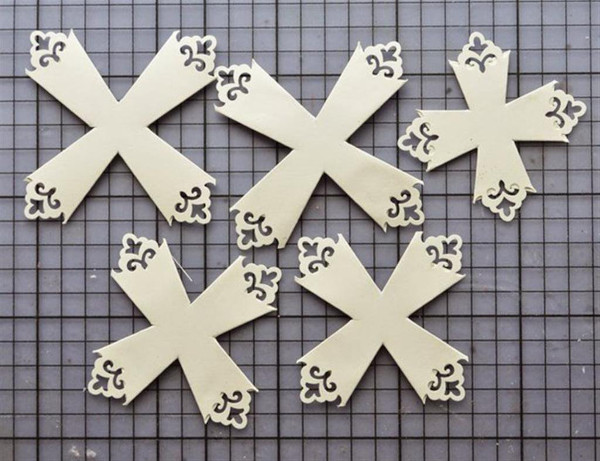
- On each side, use scissors to make cuts so that they do not reach the center of the square by 1 cm, and then, bending the square, cut out a cross-shaped blank diagonally.
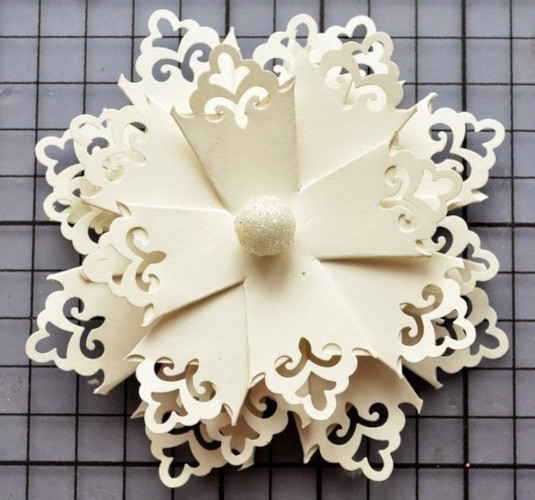
- Having placed all the parts on top of each other, you need to glue or sew the finished product with thread. The center of the snowflake can be decorated with rhinestones or a cotton ball dipped in glitter.
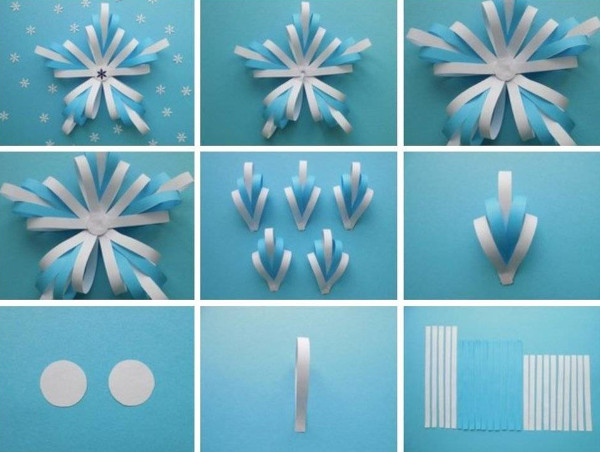
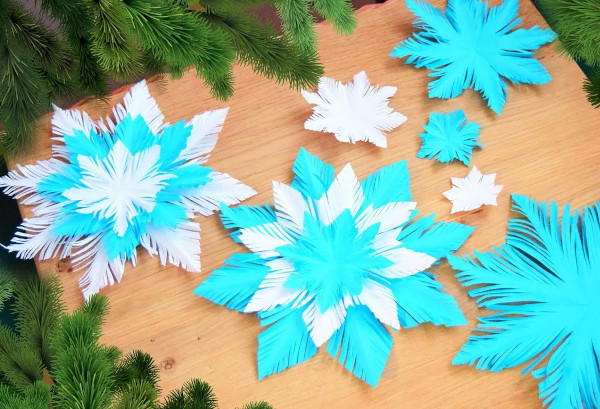
From paper strips
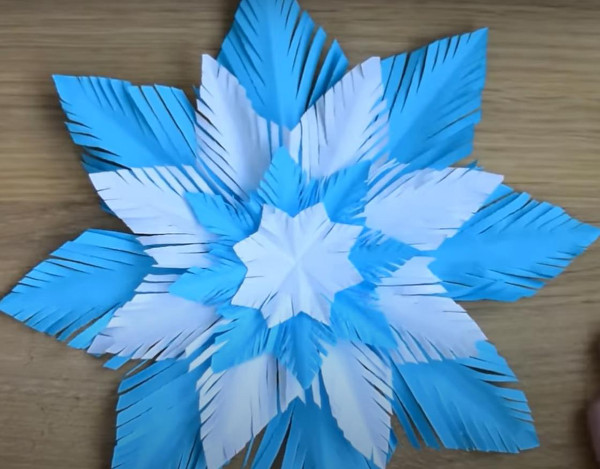
Volumetric paper snowflakes can be made with your own hands from paper strips of different colors. Such a product turns out to be quite voluminous and can be decorated with colored sequins if desired.
You need to prepare:
- A4 paper sheets of various colours;
- glue stick;
- scissors or a stationery knife.
The number of strips used varies depending on the desired volume of the finished product:
| For 5-ray snowflake | You will need to prepare:
|
| For 2-3 beam snowflake | Required:
|
The snowflake is glued together using a template - a circle with 3 or 5 identical sectors, allowing the snowflake rays to be evenly positioned and glued together.
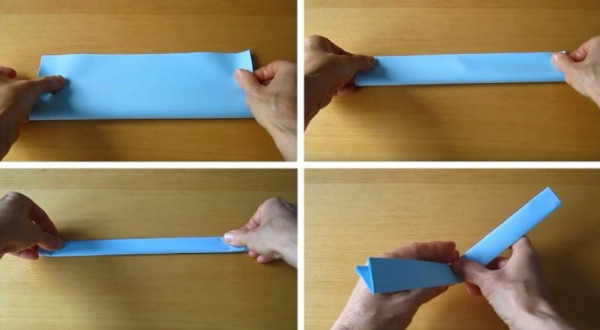
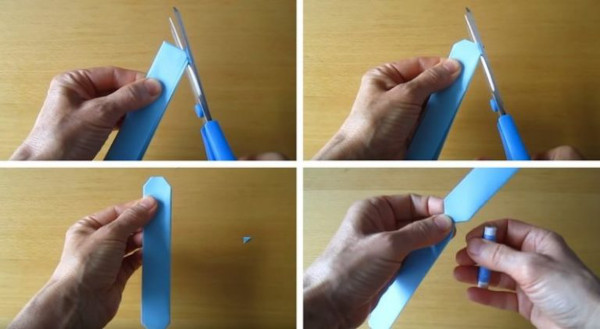
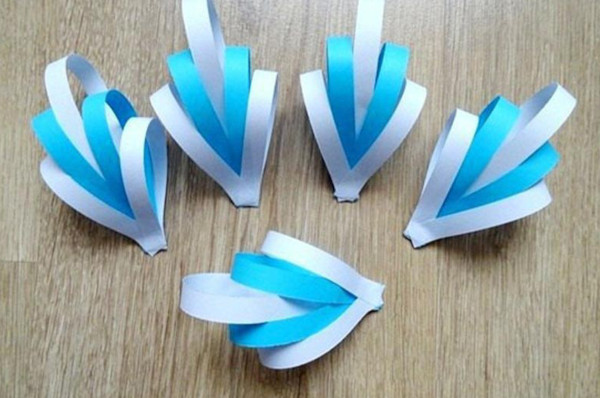
To create rays you need:
- Fold the longest strip in half without smoothing the fold, apply glue and glue its ends together.
- To the glued ends, taking the ends, glue on both sides, first the medium-width strips, and then the smallest ones;
- Alternate the sides of the gluing to create a “spikelet” effect.
To form a snowflake, the prepared rays must be placed on the template and carefully, applying glue to the ends of the longest strips, connect all parts of the product to each other.
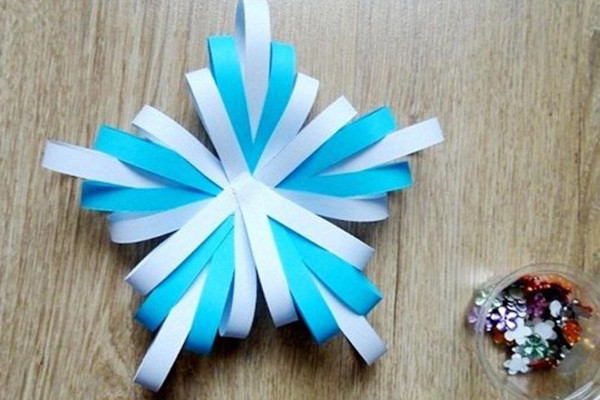
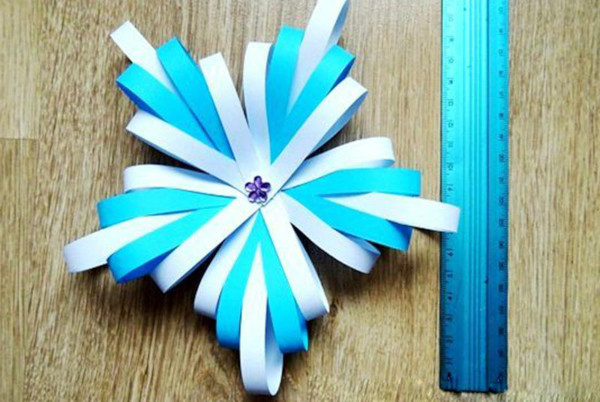
The asymmetrical central part of the finished snowflake can be masked with sequins or rhinestones.
From foamiran
Volumetric snowflakes made of paper with your own hands, made of foamiran, require additional creation of a preliminary cardboard template. You can vary the sketch depending on your desire and imagination, but experts do not recommend making the rays of the future product very thin due to possible difficulties in work.
You need to prepare:
- sheets of foamiran of any shade;
- threads and sewing needle;
- knife or scissors;
- any decorative items.
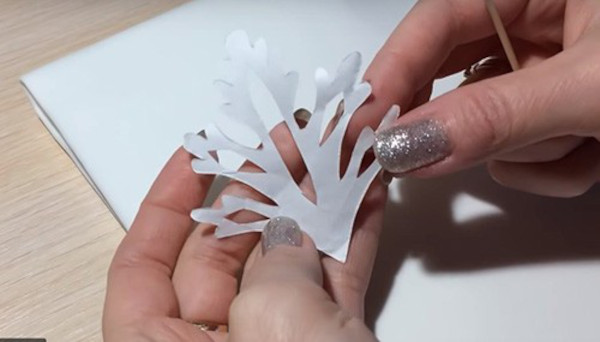
- On the cardboard you need to draw any template with a pencil, then cut it out and place it on the foamiran sheet.
- Using the resulting template, cut out 2 identical blanks, glue them together, leaving a small hole, and fill the resulting snowflake with synthetic padding or cotton wool, evenly distributing the filling inside the product with a toothpick or cotton swab.
- The remaining hole needs to be sealed, and the snowflake itself needs to be decorated with any decorative elements.
- To one side of the snowflake you need to make a loop with thread or sew on a cord, by which you can hang it on a Christmas tree or on a wall.
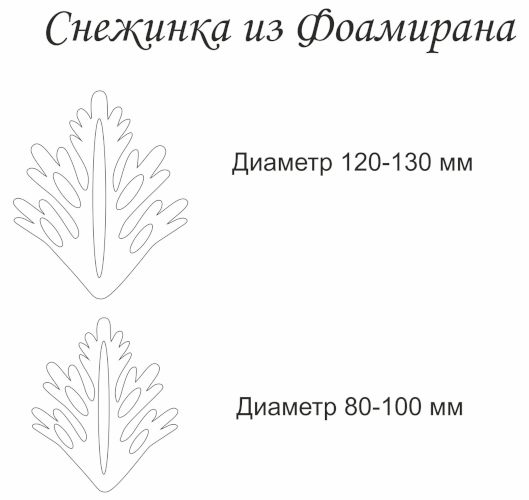
A voluminous snowflake made of foamiran can be made from 15 small blanks, with a diameter of 120-130 cm and 80-100 cm.
For this craft you will need:
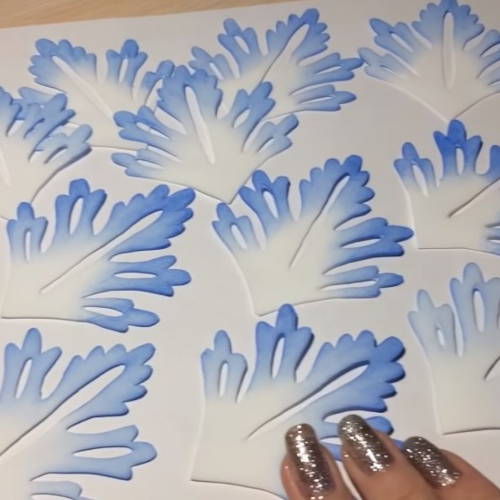
- Cut out a template from paper, apply it to the foamiran, press it with a toothpick or a needle and carefully cut along the contour. For the finished product, you need to prepare 15 blanks.
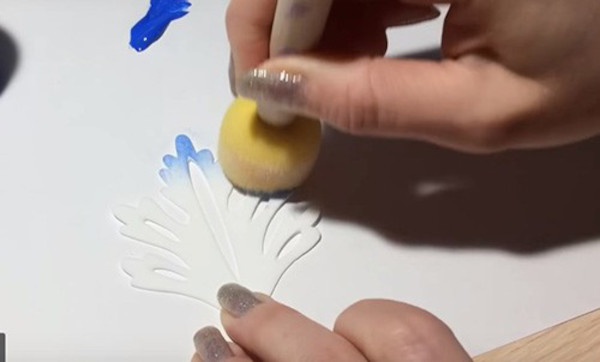
- Using acrylic paint applied to a sponge, tint the details.
- To give a convex shape, place each piece on a hot iron.
- To create stamens, first dip the fishing line into transparent glue, then into glitter and glue it, placing it inside the bent petal.

- From the remains of foamiran, cut out a circle with a diameter of 4-5 cm and glue all the parts of the workpiece to it, having previously arranged them in a circle in 2 rows. If desired, you can make an intermediate row of organza between the rows of petals.
From the newspaper
A voluminous snowflake made from newspaper is considered the easiest and most budget-friendly option for New Year's decor.
This model is made in a popular retro style, and for its creation requires the use of:
- 5-6 sheets of any newspaper;
- scissors;
- glue or glue gun;
- threads or ropes.
To make a retro snowflake you will need:
- Fold the newspaper sheets together and cut them with scissors to form one even strip with 5-6 sheets arranged in a column. The finished strip should be rolled into a cone, having first tied and glued its ends.
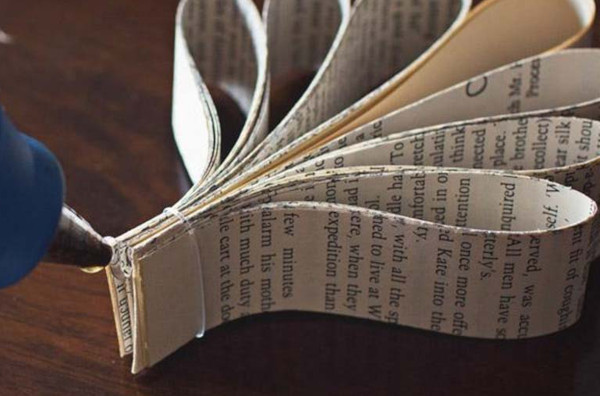
- Similarly, make 5 more strips of different lengths, the width of the blanks should not change. The finished strips should be folded together, secured with threads and glued at the base. When creating a snowflake beam, its parts should be arranged in descending and ascending order so that the largest of the strips is in the middle.
- From 5-6 sheets of newspaper folded together, you need to cut out a small circle (the base of the snowflake), gluing its ends with a glue gun.
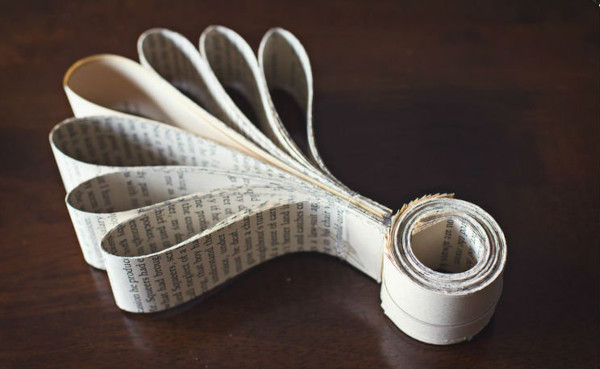
- Having made 5-7 parts (rays) of the retro snowflake, they need to be attached to the common base using a glue gun.
You can decorate the product with shiny varnish, applying it to the outer side of the rays.
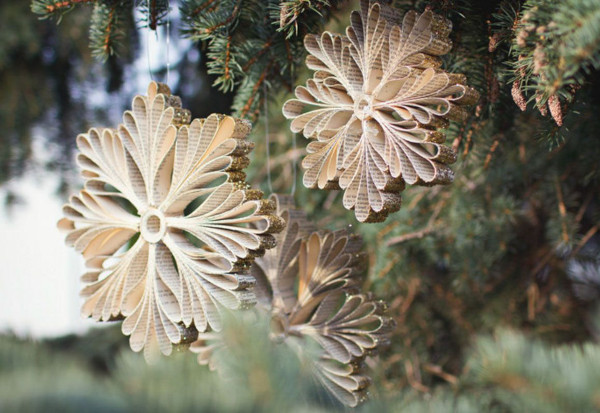
Snowflake Ballerina
The voluminous snowflake is made in the form of a dancing girl, dressed in a fluffy tutu made from a snowflake cut out of paper.
To create such a product you will need:
- white thick cardboard;
- office paper, white or blue, A4 format;
- glue;
- scissors;
- pencil and ruler.
During work you need to:
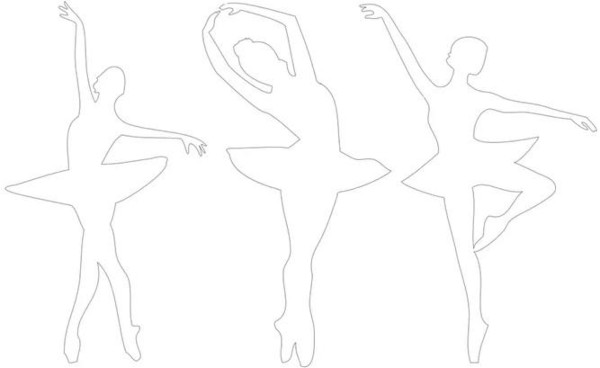
- Copy the silhouette of a ballerina onto white cardboard with a pencil, and then carefully cut it out along the outline.
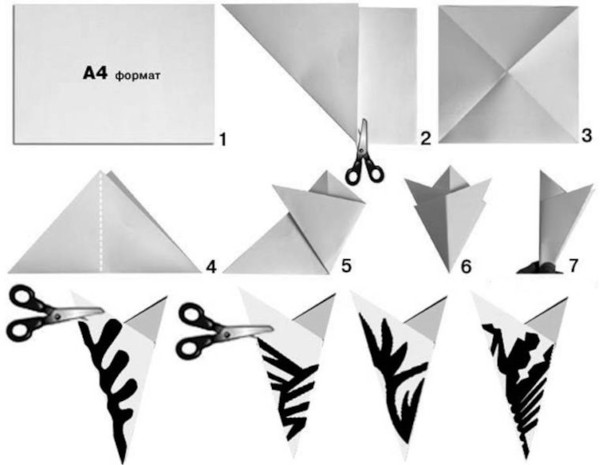
- To create a skirt, fold a sheet of paper into several layers to form a triangle. Using a pencil, draw a sketch, cut it out along the outline and unfold the workpiece.
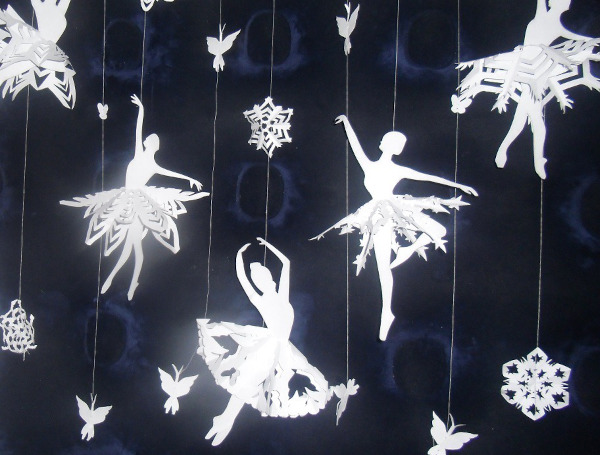
- Glue the finished skirt to the ballerina's silhouette.
- Attach a thread to the top of the product with a needle and make a loop. The finished snowflake-ballerina can be hung from a lamp or a suspended ceiling.
To create a paper skirt, you can use any design:
You can also make a ballerina's skirt from a piece of organza, carefully gathering it with a needle and thread and sewing (or gluing) it to the girl's silhouette.
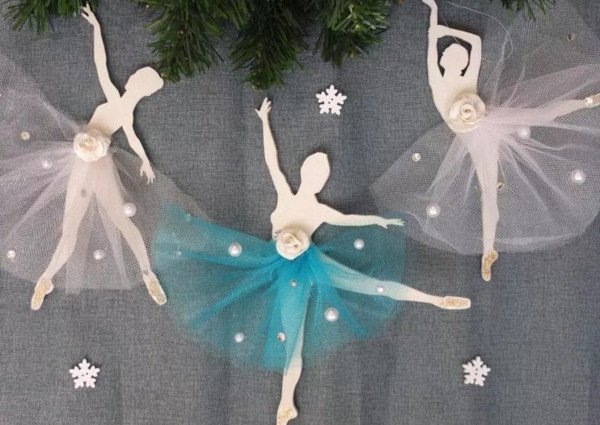
The finished skirt can be decorated with rhinestones or glitter applied to a layer of glue.
Snowflake witch
The voluminous snowflake Vorozhey is made from 12 paper squares of different colors and shades, decorated with rhinestones or glitter and fixed on a miniature circle cut out of cardboard.
To create the product you will need:
- Cut out 6 squares with a side of 10 cm and 6 squares with a width of 6 cm from paper. The diameter of the cardboard circle for fixing should be from 4 to 6 cm.
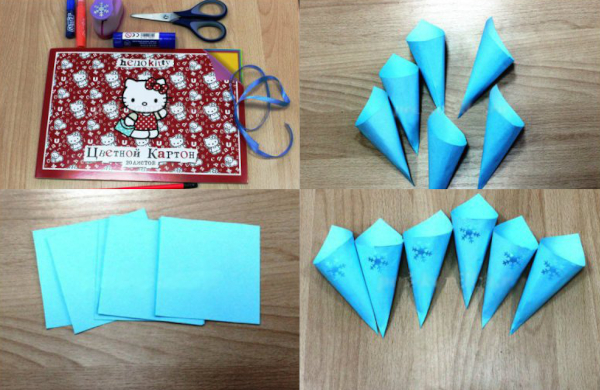
- Roll each square into a cone and secure with glue.
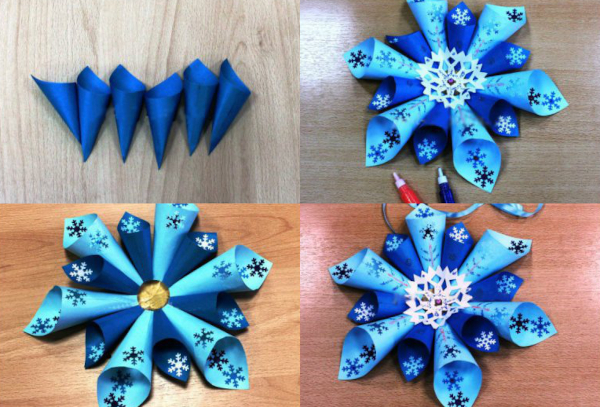
- Grease a cardboard circle with glue, and then, applying the finished blanks to it with sharp ends, alternating by size, assemble a snowflake. As a decoration, the cones can be decorated with glitter glue or markers.
You can glue a snow-white snowflake cut out of paper into the middle of the product, and sew a satin ribbon to the back of the model for hanging.
From isolon
Snowflakes made of insulating material - isolon - are made like paper volumetric snowflakes, and it is recommended to use transparent superglue to connect the parts.
Lightweight but fairly dense polyethylene foam grade PPE-F, Isolon 500 and 0.2-10 mm thick, the material is widely used to create various crafts; when heated, it easily changes shape and can be slightly stretched.
To create the product you will need:
- roll of isolon, white or blue;
- glue gun;
- hair dryer with 2 temperature settings;
- spray gun, acrylic or rubber paint.
- Cut the material into strips of any length, 5-10 pieces of each.
- Glue the ends of the strips together using a glue gun, then attach strips of a different color to each loop on both sides and glue them together.
- Assemble a snowflake from 5 petals. For easier assembly, you can assemble the product on a circle with a diameter of 4-5 cm, lined in 4 parts.
- You can decorate the center of the snowflake with rhinestones or sequins on a sticky base.
The insulation must be heated carefully, due to its ability to melt at high temperatures.
How to use snowflakes
Do-it-yourself volumetric snowflakes can be used to decorate a room in anticipation of the New Year holidays.
You can place items made of paper, cardboard or insulation:
- on the New Year tree;
- on a chandelier or suspended ceiling;
- on the New Year's table, placing them among the dishes;
- on the windows.
It is recommended to decorate the products with glitter, markers or rhinestones (sequins) applied to a layer of glue, and attach them using a loop made at the top from a thread or thin rope.
8-10 snowflakes, fastened together with a thread and a needle, can be used as a garland to decorate arches and doorways.
You can also decorate pre-wrapped New Year's gifts with snowflakes, using them instead of a bow and sticking them on with a glue gun or double-sided tape.
Volumetric snowflakes are original, do-it-yourself New Year's decorations. Easy to make and not requiring professional skills, such products are made of white or colored paper, newspapers or foamiran, decorated with glitter, ribbons or rhinestones and used to decorate rooms, assemble garlands or original holiday decor for New Year's gifts.
Video about volumetric paper snowflakes
How to easily make a 3D snowflake out of paper: