Plastic for modeling was invented not so long ago, but is already very popular among designers. With the help of simple master classes for beginners, you can learn how to model from polymer clay and what tools are needed for this.
What is polymer clay
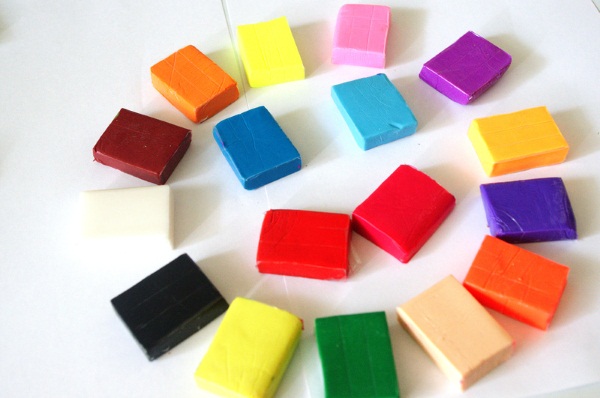
Polymer clay is a substance that can be easily deformed and takes various forms without breaking. The amazing properties of plastic clay are widely used in the design industry for making decorative items. Plastics vary in composition, hardening method and area of use.
| Types | Description | Subspecies | Description |
| Self-hardening | Hardens in air for a certain period of time, stored in vacuum packaging. | Heavy | Softens with water, can crack and crumble when dry. Similar in properties to ordinary clay. |
| Easy | Easy to stretch and roll out to a very thin layer. | ||
| Cold porcelain | Plastic, easy to paint. Can be made at home. | ||
| Baked | Hardens at temperatures above 100 degrees due to the evaporation of plasticizers. | Liquid | White or transparent gel. |
| Normal | Matte bars of different colors. | ||
| With fillers | Metallic, glitter, stone surface. | ||
| Translucent | Changes color after baking. |
 Beginner craftswomen can learn how to sculpt from polymer clay by studying the features of different types of plastic.
Advantages and disadvantages of polymer clay
Depending on the application of clay, its specific properties can be both advantages and disadvantages. Each designer studies the features of different types of polymer clay from their own experience, selecting suitable materials for specific tasks.
The advantages of baked clay include:
- smooth surface after baking;
- easy to paint or remove paint;
- strength;
- color fastness;
- the ability to create small details.
The shape of such a clay product cannot be corrected after baking. Modeling should be done in a clean space and with gloves, as the clay quickly absorbs small debris.
Self-hardening clay has its advantages:
- the product can be adjusted over a long period of time;
- the hardening process is regulated independently;
- the surface is easy to clean;
- If correction is necessary, the plastic can be softened with water.
This type of clay is not suitable for making small elements. Crafts made from self-hardening clay often require correction of imperfections and may slightly change their color.
What can be made from polymer clay
How to sculpt from polymer clay for beginners can be learned from special master classes on hand-made from experienced needlewomen. The brand of clay is selected depending on the area of its application.
Polymer clay is used to make:
- decorations;
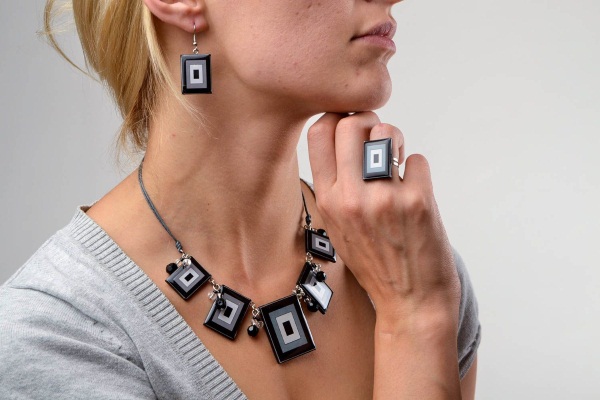
Very often girls make jewelry for themselves from polymer clay. - flower ikebana;
- toys;
- dolls;
- souvenirs;
- decorative items;
- accessories.
Modeling from plastic allows you to create something individual, putting in a little effort and imagination. Toys and decorations from polymer clay always look unusual and attract attention. You can also make any decorative item or figurine that will fit into the interior and create a special atmosphere.
How to Sculpt with Polymer Clay
If you want to thoroughly study this type of art, you should start with theory and read books on the topic of sculptural modeling.
Some tips for beginners:
- It is necessary to arrange a workplace at eye level.
- You shouldn't sculpt a figurine from an image without having a minimum knowledge of proportions and human anatomy.
- It is advisable to photograph your creation from different sides while sculpting in order to have a general idea of its appearance.
- You need to start with large elements and finish with small ones.
- You should have a general vision of the subject, a picture or a work plan.
- It is worth working on each side of the figure, since any flaws may be visible in the finished work.
Polymer clay modeling can be fun, a hobby, and even a way to earn money if you want.
It is better to learn polymer clay modeling on self-hardening materials, the shape of which can be adjusted several times. For the first lessons, you can take several matching colors and a set of basic tools for modeling.
All necessary items are usually sold in handicraft stores. It is recommended to take watercolor paints for painting the first items. Beginners should choose high-quality plastic, having checked the expiration date in advance.
https://www.youtube.com/watch?v=Abjpi0JGAlQ
Tools
How to sculpt from polymer clay for beginners, and what tools are needed for this, can be read further in the article. For the first lessons, it is advisable to stock up on a set of necessary tools.
These include:
- dense and smooth surface (tile, glass, plastic board, strong paper);
- sharp paper knife;
- glass rolling pin or bottle;
- wooden sticks;
- brushes of different thickness;
- stencils for cutting out figures;
- thin wire for the frame;
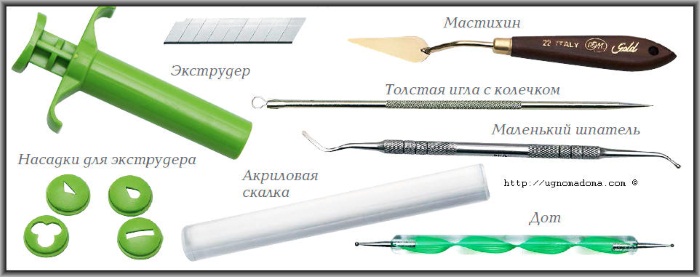
- gloves (to avoid staining the clay);
- auxiliary materials for baking (napkins, foil).
If you don’t have a certain tool, you shouldn’t buy everything at once; any of them can be replaced with improvised means.
Sculpting techniques
Each master has his own sculpting technology that he uses most often.
New creative approaches are gradually emerging, but there are several well-known polymer clay modeling techniques:
- Millefiori. In this technology, clay is rolled out into a thin layer, pieces of clay of different colors are placed on it and rolled up like a roll. A certain pattern is obtained on the cut of the roll, depending on the arrangement of the internal elements.
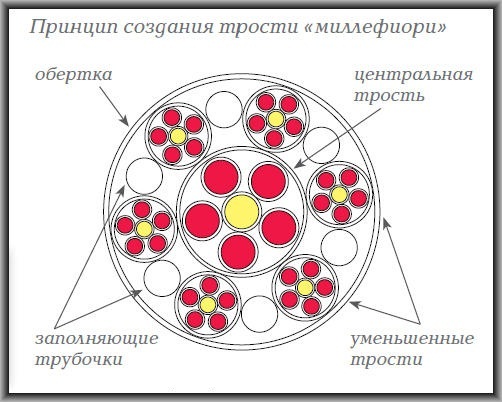
- Kaleidoscope. The technique is similar to the previous one, only the roll is given some geometric shape, which further complicates the design.
- Filigree technique. The basic idea is to create a pattern on the surface using small pieces of clay. The resulting patterns are subtle and elegant.
- Watercolor. Creating smooth color transitions by layering clay of different shades. The clay is rolled out and then torn into small pieces, which are then used to cover the product.
- Mokume-gane. The clay layers are rolled out, folded and rolled out again. Then a stencil with a design is applied to the surface or the design is created independently. The thin top layer of clay is cut off and a new unusual design is obtained.
- Volumetric drawing. In this technique, the master creates a drawing on the surface of clay using small details of different shades. The result is a landscape, portrait or any other image.
Using various sculpting technologies, you can make any object that will look like a miniature copy of the real thing.
Gluing parts together
Usually, the finished product consists of several small parts that are connected to each other. Latex or epoxy glue is used for this. Latex glue is suitable for all types of products due to its transparent consistency.
Epoxy glue may give a yellowish tint to white clay. For beginners, it is better to use glue that hardens within 10-15 seconds so that you can adjust the connection.
To glue the elements of the product it is necessary:
- Degrease the surfaces to be bonded.
- Apply the required amount of glue using a spatula or toothpick.
- Connect the parts and hold for the specified time.
- Leave the product until completely dry.
When working with glue, wear gloves and work in a ventilated area.
Baking
Baking polymer clay most often occurs in an oven with a temperature control function. Less often, microwave ovens, multicookers and grills can be used for this procedure, since with these devices the process is more difficult to control.
Before firing the items, it is necessary to:
- find out the baking temperature and time from the polymer clay instructions;
- prepare the oven by preheating it;
- Place the products on parchment.
It is worth remembering that small parts will be ready earlier than large ones. Firing can take from 3 to 40 minutes. The duration of baking affects the strength of the finished crafts.
When polymer clay is heated, various compounds evaporate, so the oven should be washed from the inside after firing. Otherwise, you can bake the clay in a cooking sleeve, then cleaning is not necessary.
Ideal baking surfaces:
- wooden board;
- stone tiles;
- steel baking tray;
- ceramic tiles.
You can always use regular paper as a backing.
Varnishing
To make the finished polymer clay product shiny, it is covered with a special varnish. Most often, this is a construction varnish for wood. Also, in handicraft stores, shiny and matte varnishes for polymer clay are sold. You should not cover the products with acrylic varnishes and nail polish.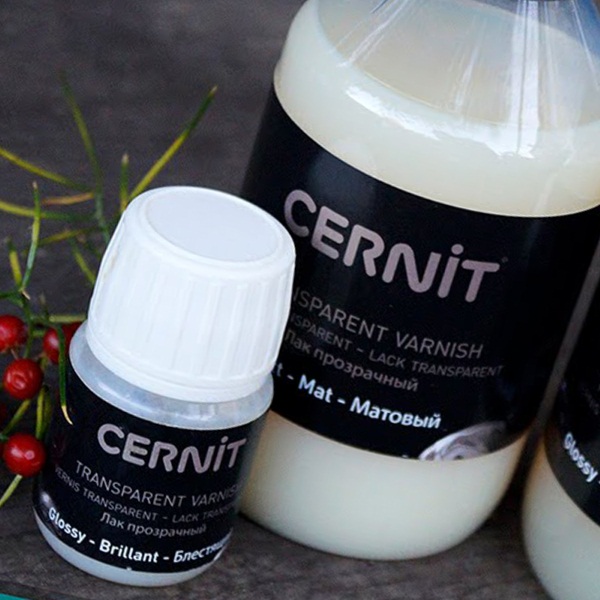
Before applying varnish, the surface must be completely dry and degreased. Sometimes it is necessary to apply several layers with periodic drying. Varnish can be applied with a brush or by dipping the product completely, which will be more difficult for beginners. In some cases, with careful grinding of clay objects, varnishing may not be necessary.
Safety precautions
When working with plastic, you should follow several rules:
- Follow the instructions on the package.
- Do not allow children under 6 years of age to participate in the sculpting process.
- Wear gloves to protect your skin.
- Do not use working tools for purposes other than modeling.
- Ventilate the room after firing.
- Do not exceed maximum baking temperature.
- Dry the finished craft in the fresh air or with the windows open.
If polymer clay is overheated, toxic substances will start to be released. In this case, you need to turn off the oven, open all the windows and leave the room until it is completely aired out. If symptoms of poisoning appear (dizziness, nausea, weakness), it is better to immediately consult a doctor.
DIY Polymer Clay Crafts. Step-by-Step Instructions
How to sculpt from polymer clay for beginners can be learned from simple master classes on making beads, buttons or flowers. Children will be interested in sculpting small specimens of vegetables and fruits.
A few things to pay attention to when sculpting:
- you need to wash your hands well before sculpting or wear gloves;
- gather your hair, preferably wear a headscarf and an apron;
- sculpt on a clean and dry surface;
- keep the packaging with the remaining clay closed;
- Do not use more clay than you may need.
Polymer clay modeling is a creative process, so inspiration and a positive mood are needed here.
Easy Polymer Clay Crafts for Beginners
Those who have never sculpted with polymer clay before should learn how to make multi-colored rolls. To do this, take several colors of plastic, roll them into thin ropes and connect them into one bundle. On top of it, you can wrap a thin layer of clay. Such a bundle is stretched and baked.
Then you can cut it thinly and see the resulting pattern on the cut. All craftsmen start with this technique, and it will be useful for making more complex products.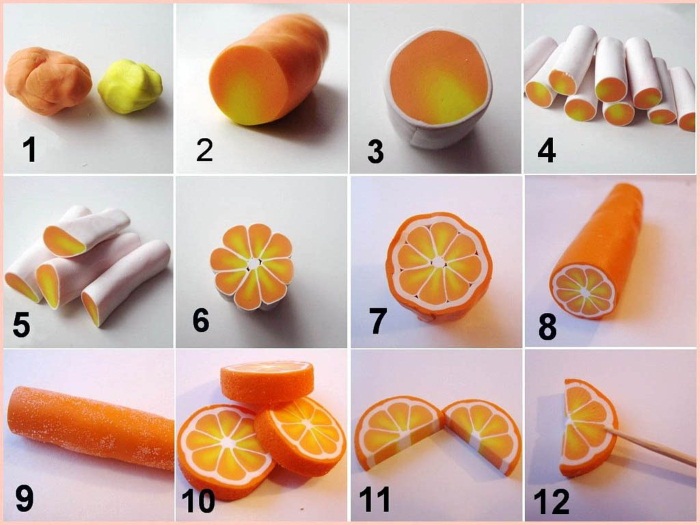
Beginners can practice making beads. To do this, take several colors of clay and roll them into a sausage. Roll the pieces of sausage into balls, in which you can make a hole with a toothpick. The finished beads are baked for several minutes.
Another simple plasticine element is buttons. To create them, you can use buttons with a relief surface or lace. The clay needs to be rolled out into a thin layer and imprinted with a button or lace pattern. Then you need to cut out a circle and make holes in it. The button is ready for baking.
New Year's crafts
New Year's crafts made from polymer clay can include Christmas tree decorations, souvenirs, and figurines.
Some simple examples for beginners:
- Christmas tree. To make it, you will need green clay, a wooden rod and manicure scissors. From a small piece of clay, you need to form a cone and stick the rod-trunk into it. Using the tips of the manicure scissors, you can make the branches of the Christmas tree.
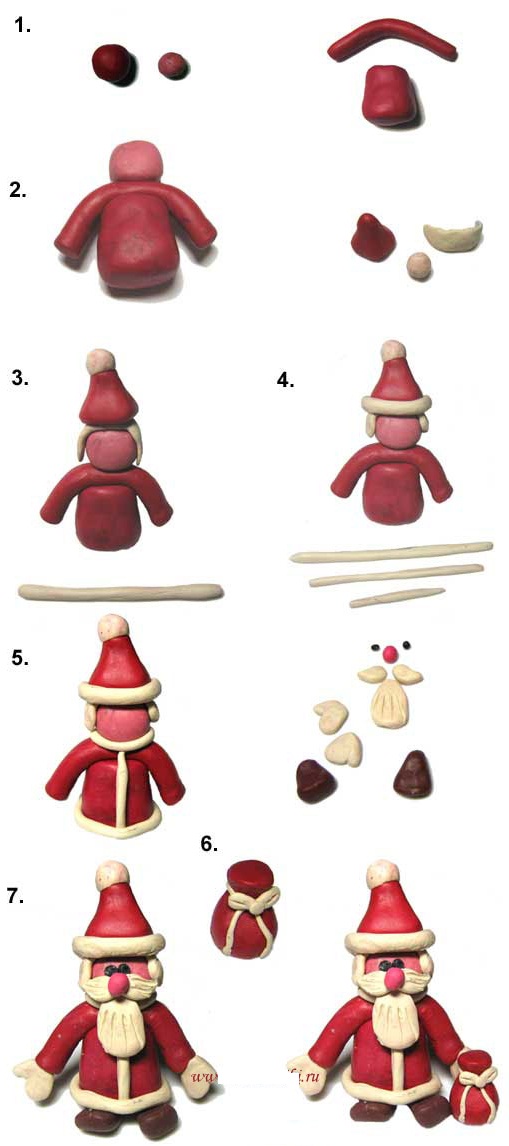
- Father Frost. The main colors of clay are red, beige, white and a little black. The main attributes of the grandfather figurine are a hat, beard, suit and staff. All these elements are easy to mold for a novice craftsman. To draw small facial features or suit, you can use a toothpick or knife. It is better to bake the head and body separately and then connect them with glue.
- A gift sock or boot. A thin layer of plasticine of the colour you like is rolled out and the shape of the sock is cut out. The heel and the elastic of the sock are made from slightly lighter clay. Using a stick, you can make an ornament or a braided pattern on the surface. Candies and caramel sticks can be seen peeking out of the sock; they should be baked separately and added to the finished composition.
- Snowflake. To make a snowflake, you will need white plastic, a knife or small cookie cutters. A snowflake shape is cut out of a thinly rolled layer of clay with a stationery knife. Then, using cookie cutters, it will be easier to create a snowflake pattern. Or, you can cut out an individual pattern with a knife.
Beginner needlewomen can also practice making spruce branches, tangerines and snowmen.
Decorative figurines
Sculpting figurines from polymer clay is a fascinating process that captivates both children and adults. Those who have little experience in sculpting can start with animal figures.
A small master class on sculpting a wolf cub:
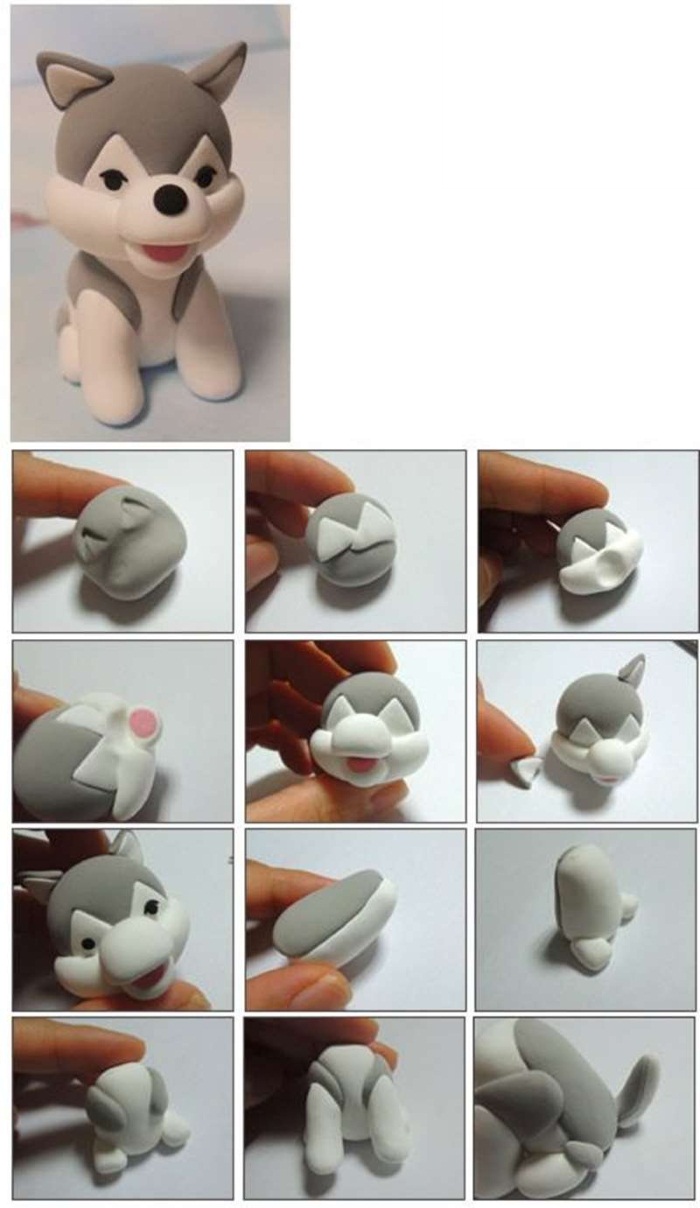
- You need to take clay of gray, white, pink and black colors.
- First, you need to mold the wolf cub's head from a ball of gray clay, flattening it a little at the front.
- Small white plastic plates will represent the white coloring around the eyes and on the cheeks of the animal.
- The upper and lower jaws are molded from separate pieces, and a small pink tongue should stick out between them.
- The wolf's ears are made from small triangles.
- Using black clay, you need to depict the eyes and nose.
- The wolf cub's body is molded in the form of an oblong oval, gray at the back and white at the front.
- Next, paws and a tail are added to it.
- The head can be attached to the body using a piece of wire.
It is better to start with simple animal figures, gradually complicating the task with more complex drawing of features.
Toys
You can make all sorts of toys for children from multi-colored plastic; here the scope for imagination is unlimited.
Step-by-step instructions for sculpting a little fairy:
- You will need clay of beige, white, green and yellow colors.
- For the head, you need to roll a small ball of beige clay, flattening it a little in the middle, where the fairy's eyes will be.
- Ears made from small oblong pieces are attached to both sides of the head.
- Using rolled out sheets of yellow clay, the fairy's hair is molded.
- The fairy's dress is molded in the form of a small green cone; you can draw folds on it with a toothpick.
- From white clay you need to mold relief wings.
- The fairy's wings, arms and legs are attached to the dress-body. For a strong connection, it is better to use wire.
- Then the head is attached to the body.
- After baking the figurine, you need to paint the fairy's face with watercolors.
When sculpting figurines, it is better not to rush, but to carefully think through all the details and their fastening.
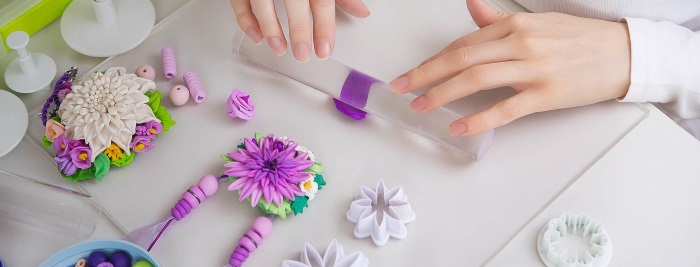
Flowers
You can learn how to sculpt from polymer clay from detailed master classes on sculpting flowers for beginners.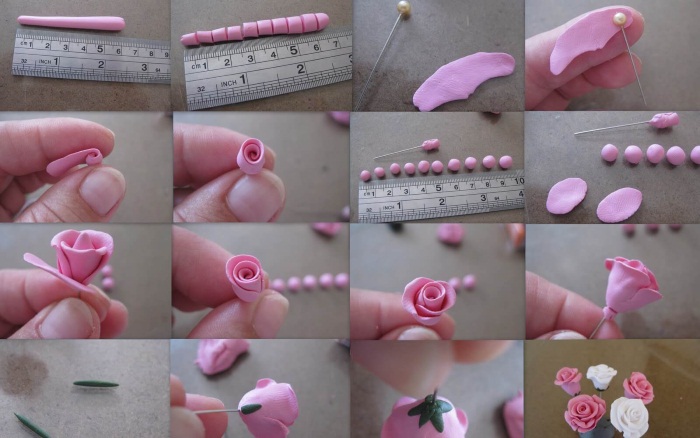
Instructions for making a rose from plasticine:
- Prepare clay of the color you like.
- Roll out the small pieces into very thin sheets of approximately the same size.
- Roll the first plate into a tube, bending the edges slightly outward.
- The second plate is applied in a circle, slightly protruding and widening towards the top.
- The remaining layers are applied in the same way, creating the shape of a rose.
- The finished flower can be attached to the wire.
There are a lot of master classes on making flowers from polymer clay, the main thing is to remain patient and persistent in this painstaking work.
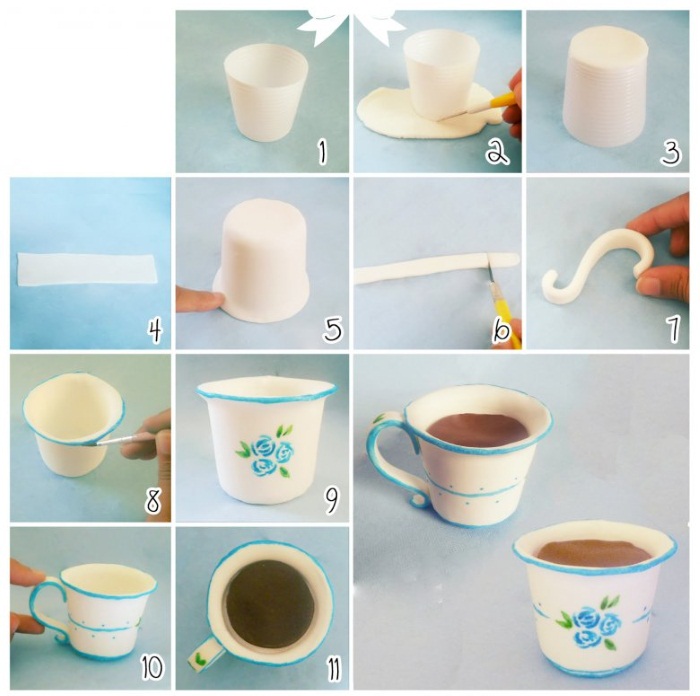
Dishes
Plastic can be used to make not only flowers and toys, but also dishes. In this way, unique cups, plates and other containers can be created.
Step-by-step plan for making a decorative plate in the shape of a monstera leaf:
- First, you need to prepare white clay and a real monstera leaf with a clear outline.
- The clay must be rolled out to a layer 1-1.5 cm thick.
- After placing a sheet on top, you should trace its outline with a wooden stick.
- Then you need to cut out the sheet along the outline and draw its veins.
- The sheet is transferred to parchment and placed in a convex ceramic plate to give it shape.
- The frozen sheet can be painted with watercolors.
This plate can be used as a candy bowl, stand or mini tray.
Top 5 Best Polymer Clay Manufacturers, Prices
Based on the experience and feedback from professional craftsmen, we can highlight several popular brands of polymer clay:
| Brand | Description | Average price |
| Sculpey — Premo (USA) | Easy to use, does not stain, often used for making jewelry and flower arrangements. | 150 rub. for 57 g |
| Fimo Soft (Germany) | Soft and flexible clay, ideal for fine work. | 140 RUB for 57 g. |
| To Do - You Clay (Italy) | A flexible clay based on beeswax, odorless. | 250 rub. for 56 g |
| Artifact (Russia) | Soft clay, does not crumble, suitable for small details. | 460 rub. for 140 g (7 colors) |
| Sonnet (Russia) | Flexible and easy to use, suitable for flowers, jewelry, figurines. | 110 rub. for 56 g |
For your first lessons, it is recommended to purchase inexpensive polymer clay in colors that match each other.
You can choose the ideal polymer clay for yourself only after working with its different types. Beginners should check on their own experience how the plastic behaves in order to learn how to sculpt from polymer clay.
Author: Ovcharenko Liliya
Article formatting: Vladimir the Great
Video on how to sculpt with polymer clay
Master class on decorating a polymer clay mug: