The pattern of mittens with knitting needles with a description of the knitting process can be found in fashionable thematic magazines. Fingerless gloves, as this clothing accessory is also called, came into fashion in the middle of the 17th century and are still popular among women and men of different ages.
The convenience of mittens is that they do not restrict movement and keep your hands warm. There are several types of these fingerless gloves, and the most popular among them are the tubes, which are simply knitted fabric sewn on one side.
In the models of this winter accessory you can also find fingerless gloves with straps or with a snap-on mitten. In this case, the convenience of the mittens and the quality of hand warming are increased.
Fashionable fingerless gloves are knitted both from warm wool and from decorative materials. Mittens can be both winter, warming hands, and summer, serving as a fashionable accessory and complement to the image.
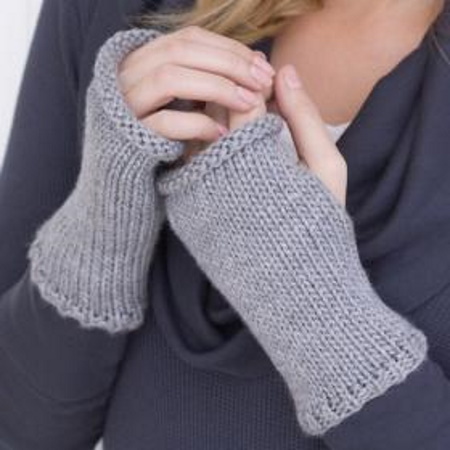
Simple knitted mittens for beginners
Mittens with knitting needles, the scheme with the description of which will help beginners to create a unique thing of their own production, are not difficult to knit. Experts note that in order for the product to turn out, you need to strictly follow the instructions in the description as you work.
Experienced craftswomen recommend that beginners knit fingerless gloves for themselves first, so that they can always try on the product and understand whether the process is going correctly. In such cases, the fabric is usually applied to the wrist or palm and pulled by the ends to understand whether it is suitable for this hand size.
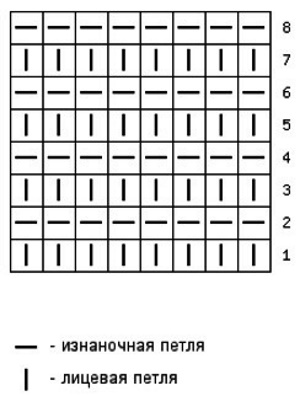
Before you start making mittens, you need to learn how to knit front and back stitches. Usually, the front ones are obtained by knitting a free thread through the front wall of the loop, and the back ones - through the back wall. In addition, you need to learn how to make yarn overs and remove loops to a spare knitting needle so as not to lose them and not unravel the fabric.
Yarn and pattern
To create a winter element of a woman’s wardrobe you will need:
- 100% acrylic yarn (1 skein);
- knitting needles 5 mm (2 pcs.);
- scissors;
- needle.
Knitting density 10 cm in stocking stitch = 18 loops.
Knitting instructions
To knit simple fingerless gloves yourself, you need:
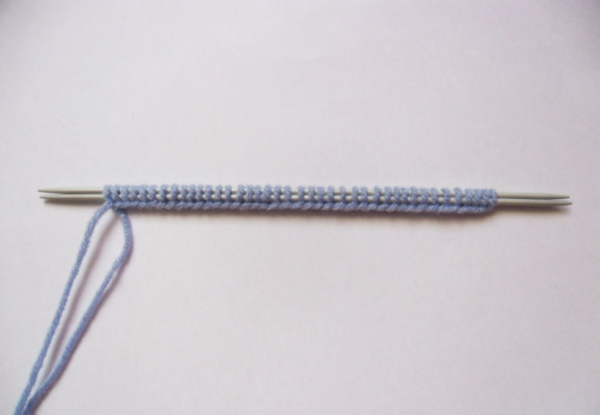
- Cast on 31 stitches (including 2 edge stitches), leaving a 20 cm long tail of yarn free.
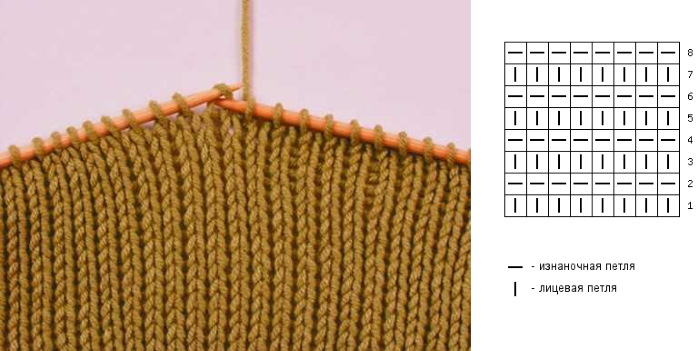
- Next, knit 3 rows alternating 1 knit, 1 purl to create a 1 by 1 elastic band. If desired, this pattern can be made wider by alternating 2 through 2 or 3 through 3.
- After this, 8 cm are knitted in stocking stitch, where even rows are only knit stitches, odd rows are only purl stitches.
- As soon as the length of the fabric is 8 cm, the last row is closed by knitting each loop with the front one and tightening the tail of the thread.
- The next step is to leave 25 cm of loose yarn to sew the top of the item.
- Next, sew the fabric along the edge from the top of the closed loops down 3 cm.
- After this, sew the edge to a height of 2 cm using the lower thread left after casting on.
The finished mitten comes with a hole for the thumb, which is formed from the remaining unsewn material.
Features and nuances
Experienced needlewomen note that in the first product, you need to correctly calculate the tightening force of the loops and knit with the same density. Beginners often have a situation where part of the work is done tightly, and part is loose and dangling. To avoid this, you need to practice by knitting a small piece with only front or only back loops. Such training will hone the skill of uniform knitting.
In the process of creating a knitted accessory, you need to periodically try the product on your hand to understand whether the item is the right size. In addition, after knitting the first few rows, it is recommended to apply the fabric to your wrist to understand whether the mitten will be of the desired diameter.
If the width is not enough, the product is unraveled and the loops are cast on again or additional loops are formed in any convenient way.
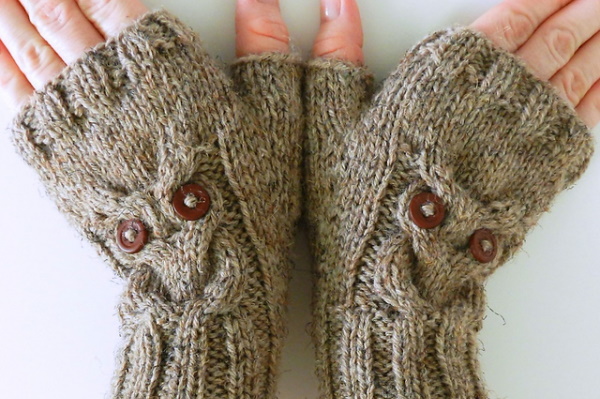
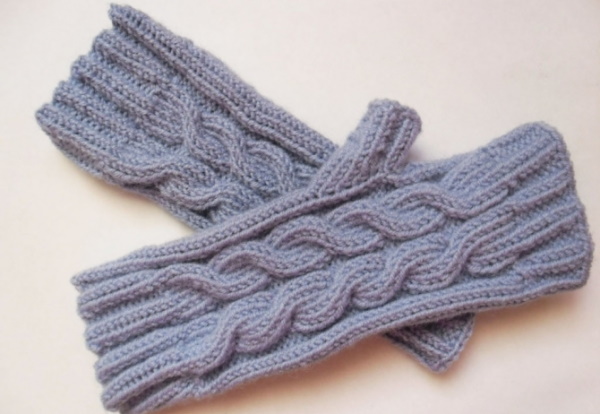
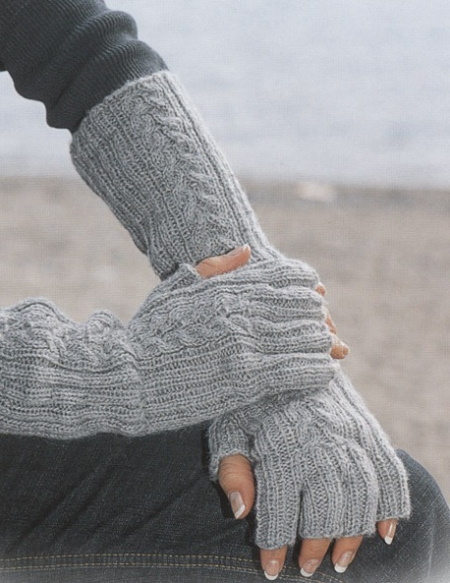
Mittens with braids knitted
The pattern with the description of mittens with knitting needles can include a decorative element in the form of one or more braids. Experts recommend that beginning needlewomen knit fingerless gloves with one weave at first to practice and hone their skills.
Mittens with braids can be either winter, made of warm wool, or summer, knitted from thin, light yarn. The craftswoman chooses the color of the accessory herself, and the knitting density depends on the thickness of the thread and the diameter of the knitting needles.
Yarn and pattern
To create fashionable mittens with braids, the needlewoman will need:
- yarn, 50% wool and 50% acrylic (1 skein);
- knitting needles No. 3.5 (5 pcs.);
- scissors;
- needle;
- big pin.
The knitting density will be 1 cm = 2 loops. The product is made from double thread, that is, the yarn is folded in 2 times for casting on and knitting.
Knitting instructions
To knit mittens with braids yourself at home, you need:
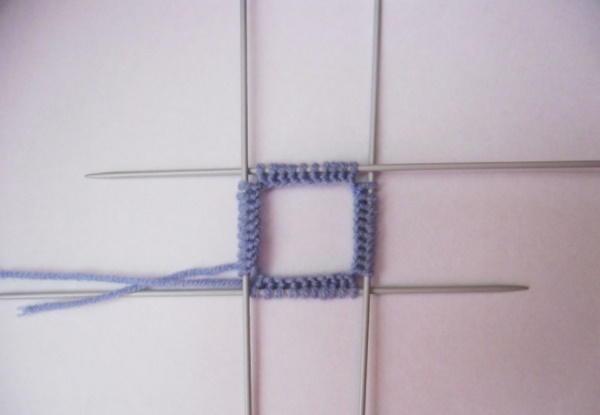
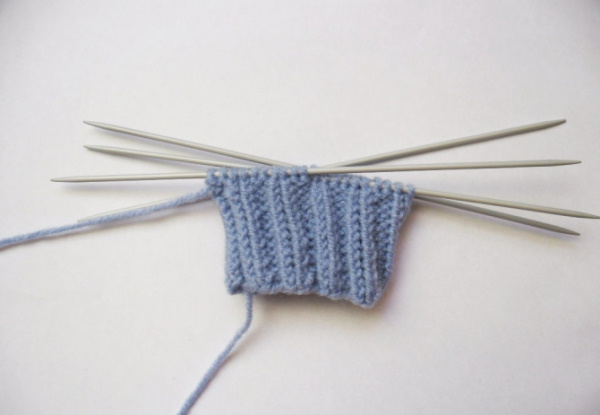
- Cast on 45 stitches in the usual way and distribute them onto 4 knitting needles.
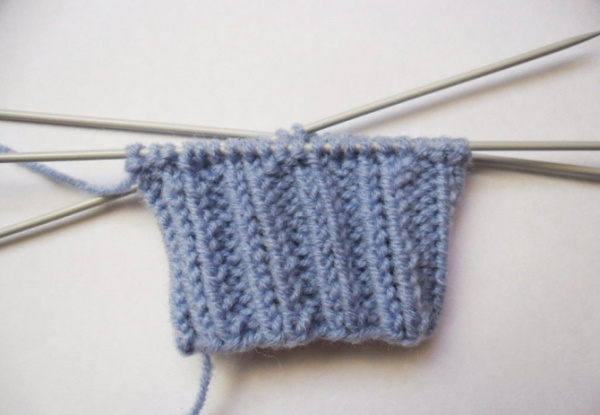
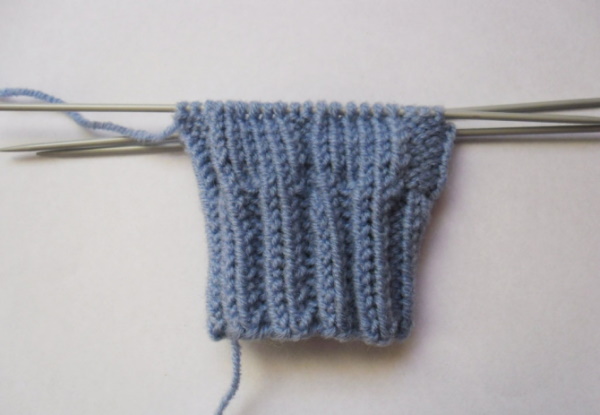
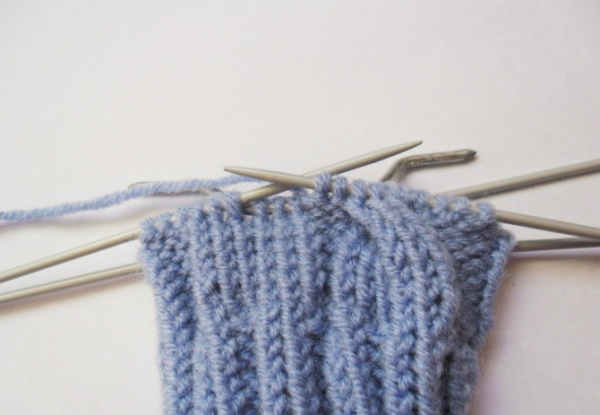
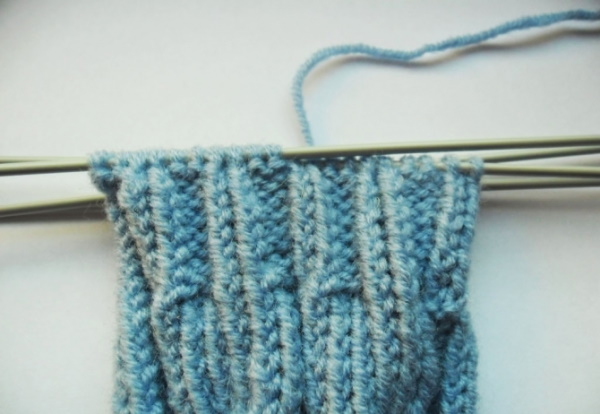
- Next, 24 loops from the set are knitted with a 2 by 2 elastic band, 10 loops are knitted, 2 are purl, 2 are knit and 2 are purl again. The pattern is repeated over 15 rows.
- After this, on needles No. 1 and No. 2, knit the classic front surface, where all even rows are front, and all odd rows are back.
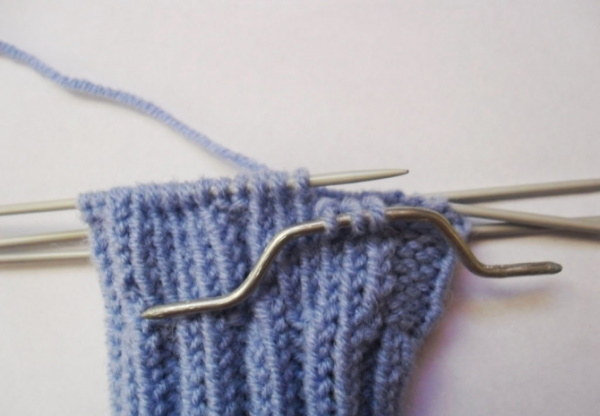
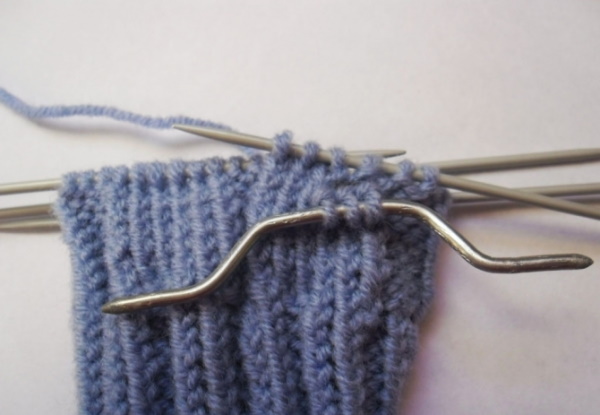
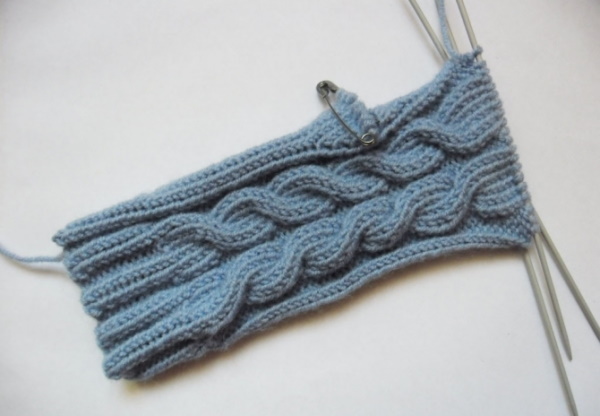
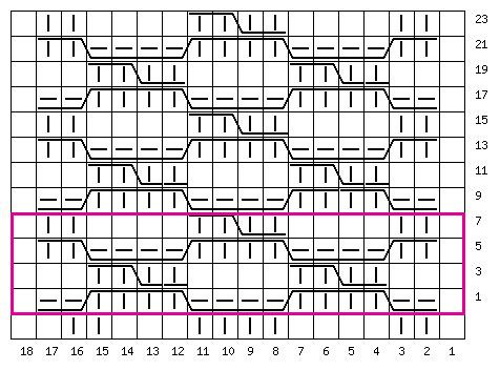
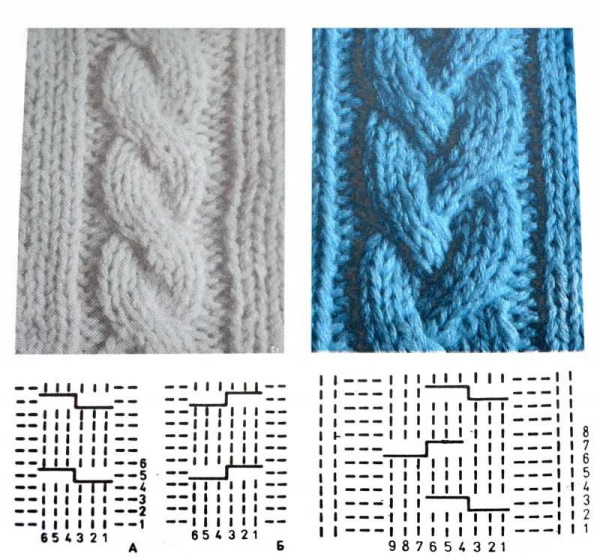
- At the next stage, the loops from knitting needles #3 and #4 are shifted to the first two and a braid of 10 loops is knitted. To do this, in the 1st row of the pattern, 22 knits, 2 purl, remove 5 knits to knitting needle #5 and place it behind the work, knit 5 loops as knits, then 5 from knitting needle #5 also as knits. Then follow 2 purl and 4 knits.
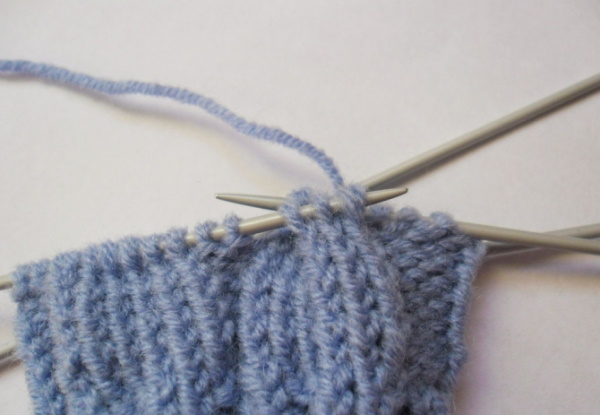

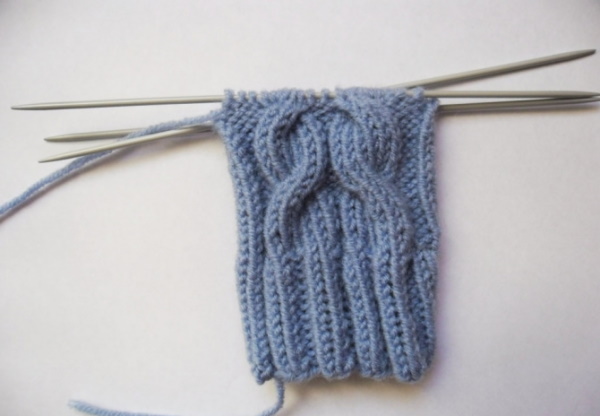
- After this, from the 2nd to the 11th row, repeat the pattern of 22 front, 2 back, 10 front, 2 back and 4 front.
- In row #12, repeat the manipulations from row #1.
- Next, from rows #13 to #22, knit as you did from 2 to 11.
- At the next stage, in row No. 23, the report from row No. 1 is repeated again.
- After this, rows 24 through 26 repeat the pattern knitted from rows 13 through 22.
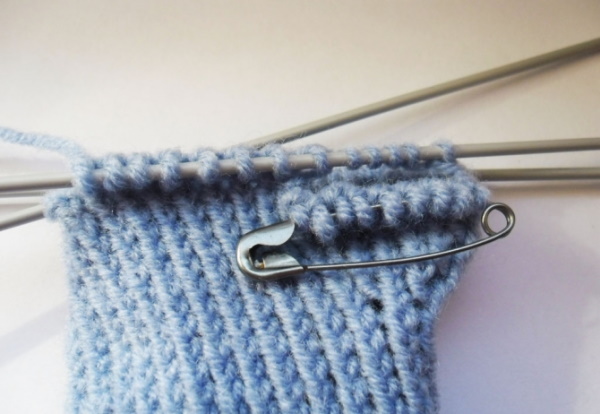
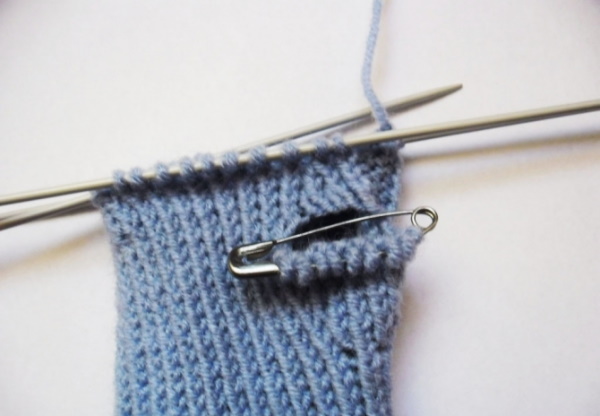
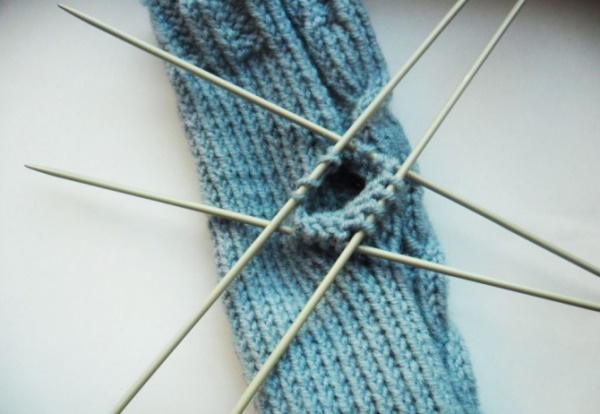
- Next, in row #27, form a hole for the thumb and for this, knit 2 front loops on 1 knitting needle, then remove 5 loops onto a pin and pick up another 5 loops from the free thread, and finish the row according to the pattern.
- Row 34 is knitted like rows 1 and 12, and from 35 to 44 the pattern from rows 13 to 22 is repeated.
- At the next stage, the knitting is closed and the thread is fixed.
- After the main product is ready, they begin to create a “pipe” for the thumb, and for this, the loops from the pin are transferred to the knitting needle and a loop is knitted from the yarn over.
- Next, knit 5 loops from the needle and 2 from the yarn over.
- After this, cast on and knit another 5 loops and 1 from the yarn over to get 13 loops.
- At the final stage, the thread is secured and cut.
This product is not sewn, as it is made in one piece.
Features and nuances
When knitting a braid, make sure that the needle always goes behind the work. Otherwise, the pattern will jump, and the weave will not be uniform, turned in one direction. By moving the needle behind the work or in front, the direction of the braid waves is formed.
It is recommended to work on the thumb only after finishing the general knitting. This is due to the fact that in the process the craftswoman may get confused and the product will have to be unraveled. In addition, the main knitting thread will be busy and it will be inconvenient to form the tube.
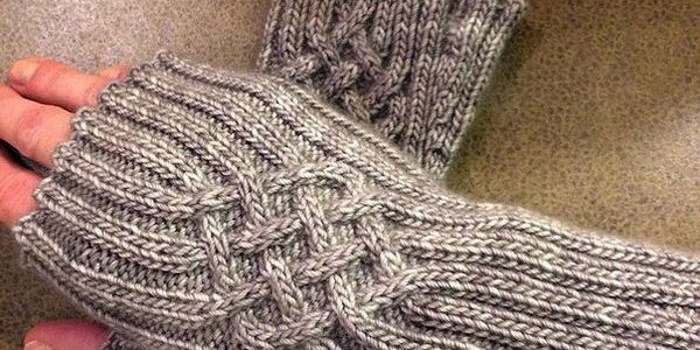
Mittens with aran knitting needles
Mittens with knitting needles, the scheme with the description of which sometimes contains Irish motifs, are called "Aran" or "Celtic braid". Some experts also call this style fisherman's, since it comes from the island of Aran, where the population has long been engaged in catching fish and seafood.
Arans are patterns of intertwined braids. They form a honeycomb that looks like a fishing net. Sometimes the arans are filled with other northern traditional elements such as moss or bud.
Yarn and pattern
To knit Celtic Braid Fingerless Gloves you will need:
- sock threads (2 skeins);
- knitting needles No. 3 (3 pcs.);
- scissors;
- needle;
- the pin is big.
The knitting density depends on the thickness of the thread and knitting needles.
Knitting instructions
To knit beautiful mittens with Aran elements, you need:
- Cast on 60 stitches (including edge stitches).
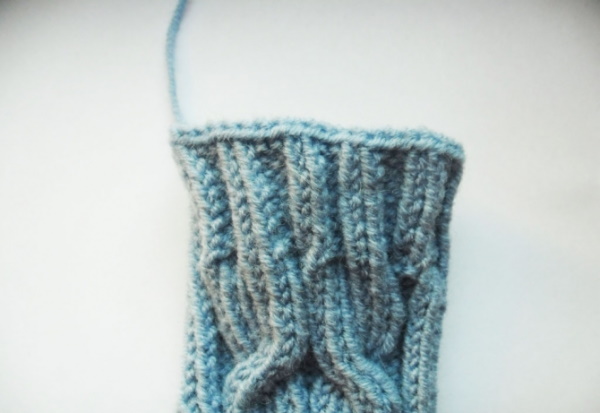
- Next, 30 rows are knitted with a 2 by 2 elastic pattern, where 2 front stitches alternate with 2 back stitches.
- After this, the first 30 loops in the 31st row are knitted, periodically alternating the removal of the spare knitting needle with 2 loops removed to it behind and before the work. The remaining loops are made purl.
- At the next stage, they begin to form a tube for the thumb. To do this, in every 3 rows, add 1 loop before the first and after 58. The procedure is repeated 8 times, and the finger itself is knitted in garter stitch after the main fabric is completed.
- After the last increase for the finger, knit 3 more rows in garter stitch and close the loops of the pipe.
- Next, continue knitting the elastic pattern for another 10 rows.
- At the final stage, the loops in the last row of the product are closed.
The fabric can be knitted both in a circle and in a standard way on 2 knitting needles. If you choose the latter option, the edges of the mittens are sewn together.
Features and nuances
When knitting mittens with an Aran pattern, you need to make sure that the fabric does not twist. Experts also recommend monitoring how and where the loops are removed on the additional knitting needle. This is necessary to ensure that the pattern is symmetrical and beautiful.
Celtic braids come in different diameters. In some patterns, small interlacings look harmonious, while others are impossible to imagine without large ones.
Long mittens knitted
The pattern of knitted mittens with a description may contain a guide on how to knit long fingerless gloves. The height of the cuff of the accessory in different versions reaches from half the arm to the elbow.
Yarn and pattern
To knit long fingerless gloves you will need:
- threads (1 skein);
- knitting needles No. 2.5 (2 pcs.);
- scissors;
- needle.

The product is made using garter stitch, and its density depends on the thickness of the yarn and the knitting style of the needlewoman.
Knitting instructions
To knit a beautiful accessory yourself, you need:
- Cast on 42 stitches.
- Knit with a 4 x 4 rib pattern, alternating 4 front and 4 back stitches, 5 cm.
- Next, knit a 30 cm piece of fabric using the front surface.
- After this, knit another 5 cm with a 4 by 4 elastic band.
- At the final stage, the last row is closed.
The fabric is sewn together, leaving a slit for the thumb. If the product was knitted in a circle, a tube for the thumb can be formed using the method described above.
Features and nuances
Needlewomen who are worried that they will not have enough thread for the entire product can knit a cell for the thumb that is not long or do without it. In addition, some craftsmen create long mittens without elastic at the top and bottom, which allows the product to be carelessly rolled up.
Openwork mittens knitted
Mittens with knitting needles, the scheme with the description of which can contain step-by-step instructions for creating a summer accessory, are irreplaceable in warm weather. In addition, winter fingerless gloves are also made openwork, which look more delicate and, at the same time, do not lose their warm qualities.
Yarn and pattern
To create an openwork accessory for a woman's wardrobe, you will need:
- wool/acrylic threads (1 skein);
- knitting needles (4 pcs.);
- needle;
- scissors.
Knitting density for 10 cm is 22 loops.
Knitting instructions
To knit openwork fingerless gloves, you need:
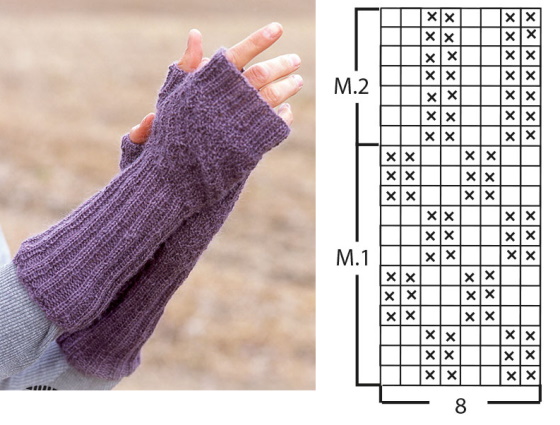
- Cast on 39 stitches (including the closing stitch).
- Distribute the stitches onto all needles in the order 10, 10, 9 and 9.
- Next, knit the “Elastic” pattern in 1 by 1 format, alternating front and back stitches, over 6 rows.
- After this, knit 2 rows.
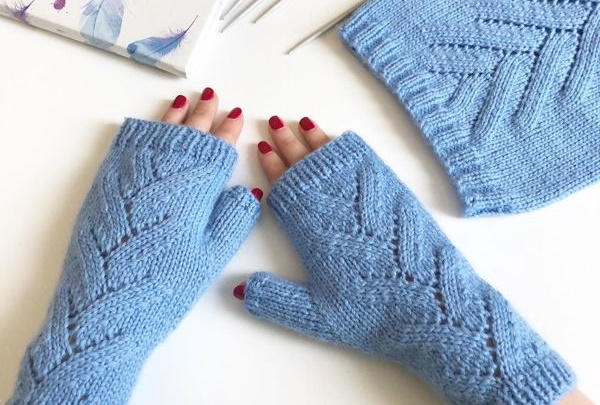
- At the next stage, we move on to knitting the main pattern, and for this, the first 20 loops are knitted like this: 2 front loops, 16 loops of the decorative element (2 together with a tilt to the right, yarn over, 2 together with a tilt to the left, and between them, on an even row, front loops, and on an odd row, purl loops).
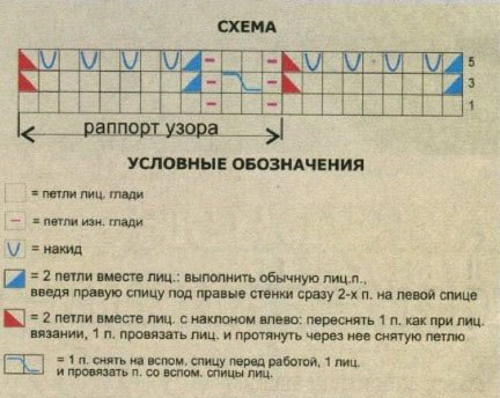
- Then from the 2nd rapport the pattern continues on the back side. In this case, on the right glove there will be 2 knits, an increase to the left, 16 knits, and on the left it will be the opposite, first 16 knits, and then an increase to the right and 2 knits.
- After this, the next row is created without increases.
- At the next stage, add 2 loops in each row through 2 from the beginning of the palm. Do this 11 more times through the row.
- Next, begin to remove loops on the thumb from the back of the hand. To do this, on the right mitten, knit 2 front loops, remove 10 and knit 18 front loops again. On the left signet, the pattern looks the other way around: 18 front loops, remove 10 and knit 2 front loops. In this way, knit another 11 rows.
- After this, knit 2 more rows with the front stitch.
- The pattern is completed with 5 rows of 1 x 1 elastic.
The loops in the last row are closed and we begin knitting the tube for the thumb. To do this, the removed loops are knitted in any convenient way.
Features and nuances
To make lacy mittens, experts recommend that beginners follow the instructions and do not add any unknown elements that can spoil the pattern and appearance of the product. If the needlewoman has strayed from the pattern, it is better to unravel the product to the desired point and start knitting again.
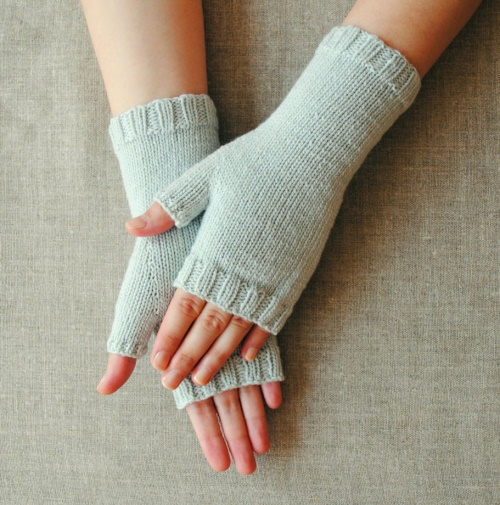
Fingerless mittens
Fingered mittens are more difficult to knit, but they are more practical to wear. In addition, the product is warmer than its fingerless "relatives" and is better suited for cold winters.
Yarn and pattern
To create fingerless mittens, the needlewoman should have on hand:
- yarn (1 skein);
- contrasting color thread;
- knitting needles (4 pcs.);
- pin;
- scissors;
- needle.
The craftswoman chooses the color and thickness of the threads herself.
Knitting instructions
To knit gloves with cut fingers, you need:
- Cast on 44 stitches on 2 knitting needles.
- Knit 30 rows with a 2 by 2 rib pattern, alternating 2 front with 2 back.
- On the top side of the product, start knitting braids in the standard way, and if you do not want to decorate the fabric with such a pattern, then continue knitting the elastic along the entire length of the mittens.
- After 11 rows, start creating tubes for the fingers, and for this, 8 loops are knitted on the back of the hand with a contrasting thread.
- After this, knit 4 rows with the selected pattern.
- Next, they begin to create the fingers and for each pipe they take 12 loops, knitting them to a height of 12 rows each.
- Once the 4 tubes are formed, work begins on the "clothing" for the thumb. To do this, pull out the contrasting thread and transfer the loops it held to the knitting needle.
- After this, the loops are distributed on 3 knitting needles and knitted in a height of 12 rows.
At the final stage, the sides of the cuff are sewn together.
Features and nuances
In order to avoid holes between the pipes, experienced needlewomen recommend picking up the loops from the side of the previous finger and letting them enter when forming a new one.
In addition, the volume of the pipes can be adjusted by reducing the required number of loops when knitting.
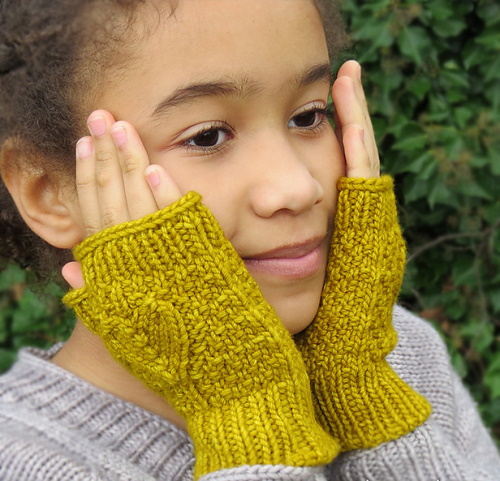
Children's mittens knitted for girls
Mittens with knitting needles, the scheme with the description of which is in fashionable thematic online publications on knitting, can also be children's. In this case, craftswomen use bright yarn and delicate patterns or floral ornament. In addition, children's fingerless gloves can be colored or made with a simple pattern.
Mittens with lace or accessories made of thin threads are also popular among little fashionistas. Girls from an early age love to decorate themselves with unusual wardrobe items, and fingerless gloves become one of their favorite things.
Yarn and pattern
To knit children's mittens, the needlewoman will need:
- yarn (1 skein);
- knitting needles (2 pcs.);
- scissors;
- needle.
The knitting density of gloves for girls is 21 loops = 10 cm.
Knitting instructions
To knit fingerless children's gloves, you need:
- Cast on 22 stitches.
- Next, knit 10 cm with the "Rubber" pattern, alternating 1 front with 1 back. Turning the side over, knit the loops according to the visible pattern.
- After this, 30 rows are formed with the "Rice" pattern, where in every 3rd row the knitting is changed depending on which loop was at the bottom. If there is a front loop, then it is made purl and vice versa.
- The next step is to remove the loops for the thumb. In this case, 8 loops are put on the pin.
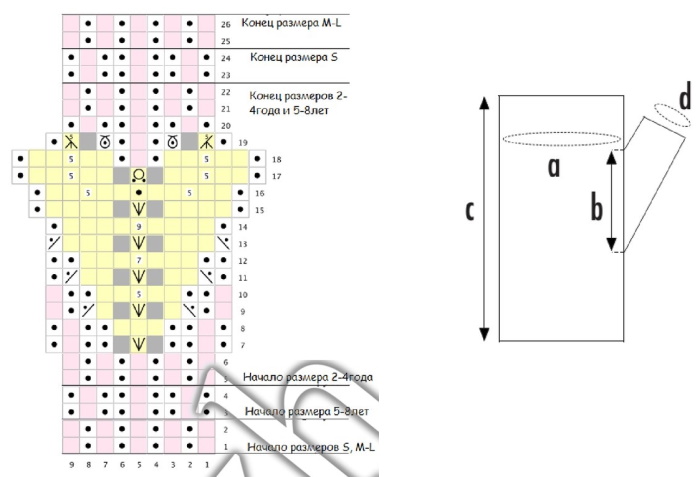
- Next, form another 5 cm with a 1 x 1 elastic band and close the knitting.
- After this, they begin to create a tube for the thumb and knit it in any convenient way. In this case, you can also design the "clothes" for it with an elastic band.
At the final stage, the halves of the product are sewn together with a blind stitch.
Features and nuances
Children's mittens can be decorated with patterns of hearts or owls, and to get a softer back part, you can knit it with face loops, without using the main pattern. Mittens made with multi-colored threads in a rainbow style look original on children's hands.
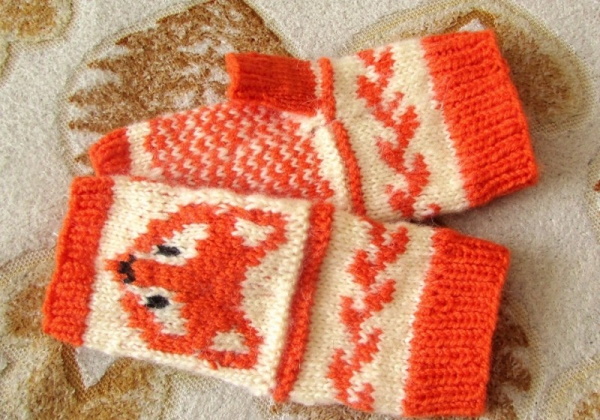

Craftswomen who know how to knit well decorate children's gloves with hearts, flowers, bows and other decorative elements. Ribbons, beads or shiny sequins look beautiful on children's fingerless gloves. In addition, accessories can be complemented with embroidery or applique.
The pattern of knitted mittens with a description will help beginners create their own masterpieces from yarn. Fingerless gloves have long been popular among representatives of many professions and this is due to the fact that they are convenient for performing various jobs, since they do not restrict movement and protect hands from cold and damage.
Having learned how to knit mittens, a woman can independently provide herself with beautiful and fashionable designer accessories without overpaying for them.
Video about knitting
Mittens knitting. Patterns with description:
I looked at the models - nothing similar to what I need. I need mittens made of thin cotton yarn, knitting with 1 - 1.5 mm needles. Since I do not have a set of 5 needles of this diameter, I am looking for sewn mittens.