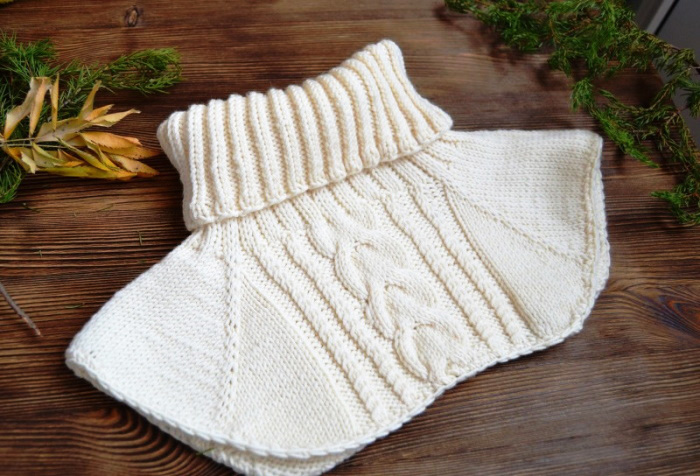
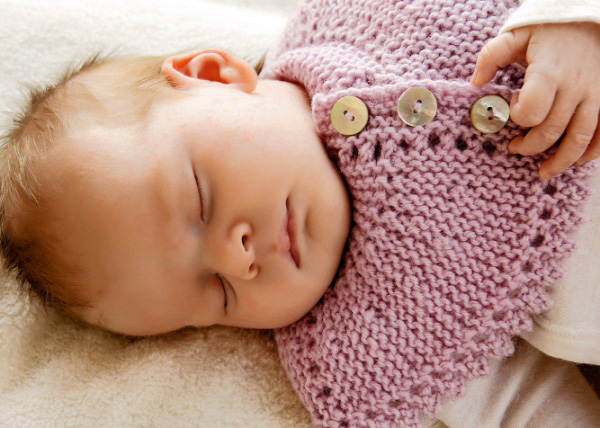
A bib is a convenient and versatile item of clothing for children and adults, which can be quickly and easily knitted with your own hands. Such a thing will not only be beautiful and comfortable to wear every day, but will also have a useful function - to warm the child's throat in the cold season.
Patterns and descriptions of knitting interesting collars for boys and girls – in the article below.
How to take measurements for knitting a collar
Before you start knitting a collar for a boy using the patterns below, you will need to take measurements using a measuring tape.
A bib is a garment that is put on over the head, so the main measurement is the head circumference.
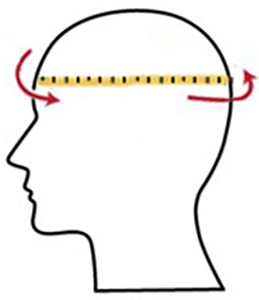
This measurement is taken along the protruding points of the forehead above the ears to the back of the head.
Neck height
This measurement is taken from the pit where the collarbones meet in front to the base of the skull. The measurement must be doubled, since the collar in the finished product is folded in half. The exception is the model with buttons, in which the measurement value is not doubled.
Shoulder length
This measurement is needed to determine the maximum possible width of the product. It is measured from the neck to the highest point of the shoulder.
Neck circumference
The measurement is taken at the base of the neck in the fossa area.
How to choose threads, what else you need
When choosing yarn for knitting a collar, you should take into account its composition.
For young children (0-3 years old), 100% acrylic children's yarn is suitable.
Acrylic is an artificial wool that does not cause allergies in children and does not itch.
Yarn options from different manufacturers:
| Name | Manufacturer | Weight of skein (g) | Thread length (m) |
| "Children's novelty" | Pekhorka, Russian Federation | 50 | 200 |
| "Favorite New" | OOO Polesie. RB | 50 | 190 |
For children aged 3-6 years, you can use yarn containing wool. It is best to choose merino wool, as it retains heat well and does not itch.
Here are some options:
| Name | Manufacturer | Weight of skein (g) | Thread length (m) |
| Alize "Baby wool" | Türkiye | 50 | 175 |
| Gazzal «Baby wool XL» | Türkiye | 50 | 100 |
| Alize «Merino Royal» | Türkiye | 50 | 100 |
| Vita «Harmony» | Germany | 100 | 110 |
| Alpina "Margo" | Austria | 50 | 75 |
| "Children's whim" | Pekhorka, Russian Federation | 50 | 125 |
In addition to yarn, to knit a collar you will need knitting needles (circular or straight, depending on the model), knitting markers (for knitting in a circle and according to a raglan pattern), a hook (for closing loops and threading the ends of the thread), scissors, a measuring tape, and a needle for sewing knitted items.
Simple collar for the little ones: master class
Young children have increased tactile excitability. A seamless bib would be a great option for them.
This product will not cause discomfort to the baby and will keep him warm in winter.
For knitting you will need:
- hypoallergenic children's yarn ("Children's novelty" - 100% acrylic);
- straight knitting needles No. 3 - 4 pieces;
- circular knitting needles No. 3 with a 40 cm cord;
- hook;
- scissors
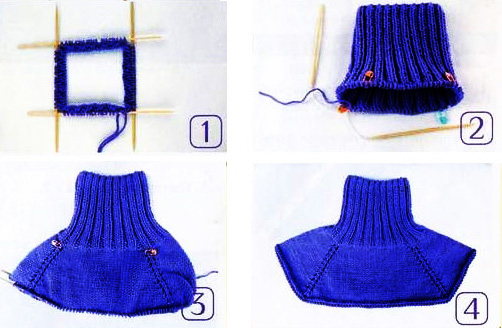
A seamless collar for a boy is knitted on two knitting needles according to the pattern described in the master class.
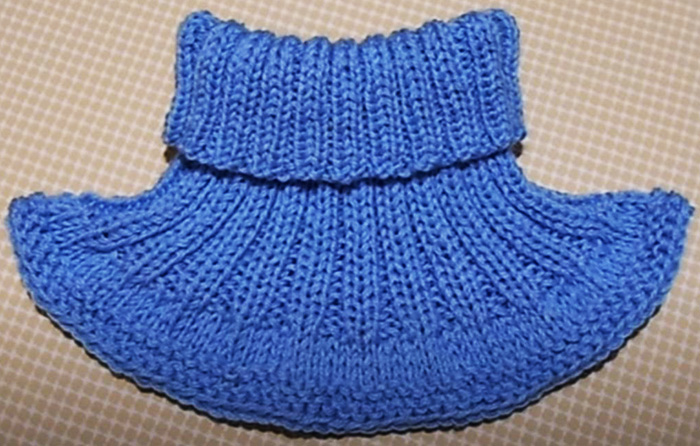
Dimensions of finished product:
- width - 17.5 cm;
- height from shoulder to bottom - 12 cm;
- neck height - 10cm.
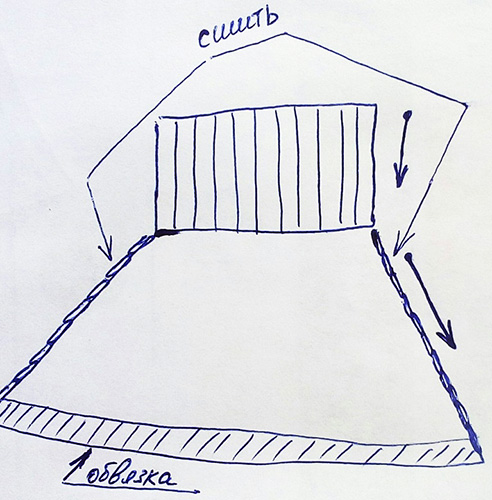
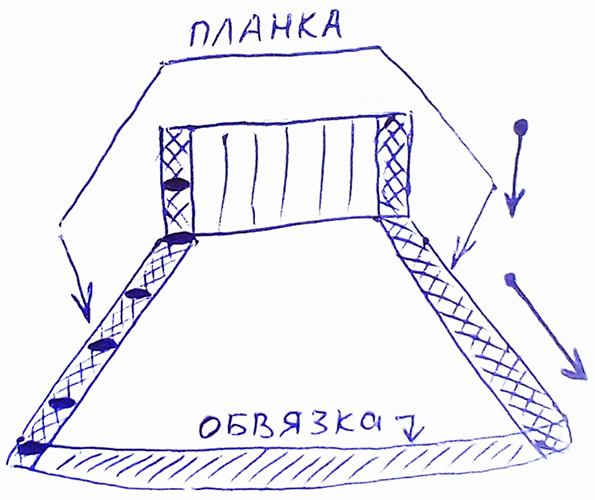
Scheme
The product is knitted in separate parts from the bottom up. It consists of two identical parts: the front and the back.
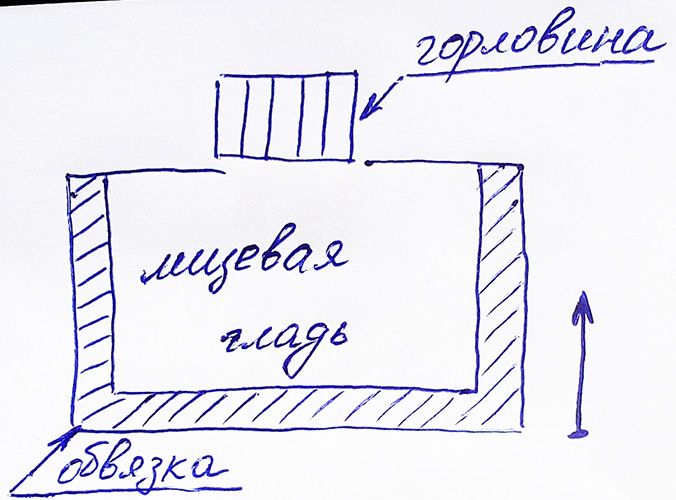
After they are connected, the neck is knitted.
Description
Cast on 35 stitches. From rows 1 to 4 inclusive, knit all stitches. There are no edge stitches, i.e. knit the first and last stitches as well.
From the 5th row, start knitting with the front surface in the central part of the product. To do this, the first 2 and last 2 loops of each row are always knitted as front loops, and the rest in the even row are knitted as purl loops, in the odd row - as front loops.
Continue knitting until the length of the fabric is 12 cm. The first part of the collar is ready. Put the knitting aside for now. Take two more pairs of knitting needles of the same size and knit the second part of the collar in the same way.
When both parts are knitted, they need to be connected with each other using a hook. Place the front and back parts so that the working thread is on the nearest knitting needle. You need to start connecting from the loop located on the far knitting needle. Insert the hook into the loop and pull the working thread through it.
After this, insert the hook into the loop located on the near knitting needle and pull the working thread through both loops. Then the procedure must be repeated up to and including the 8th loop on the far knitting needle. Return the eighth loop after knitting from the hook to the far knitting needle. In the same way, you need to make a connection on the back side.
There are 21 loops left on each of the two knitting needles, which need to be transferred to the circular knitting needles. The lower part of the collar is ready.
Knitting the neck
Knit in a circle with a 1x1 elastic band, alternating one front and one back loop, until the desired length of the neck. Close the loops using an elastic method. The knitted collar for a boy, the pattern of which is described above, is ready.
Circular knitting collar. Pattern and description
A simple collar for a boy with circular knitting needles is schematically knitted quite easily.
To work you will need:
- yarn (wool or semi-wool);
- circular knitting needles No. 4 on a fishing line or cable 40 and 80 cm long;
- scissors
Scheme
The collar is knitted with circular needles from top to bottom. Knitting begins with the neck. Then the main part is knitted and finally, the binding is done.
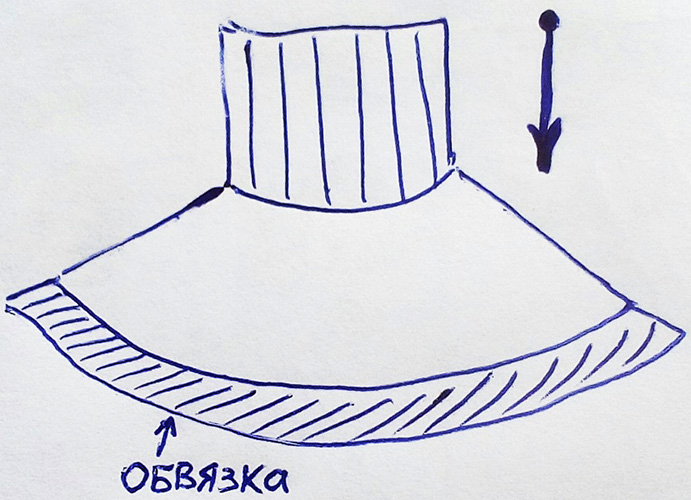
As a rule, the binding is done with garter stitch.
Description
With a head circumference of 52-54 cm, cast on 68 plus one slip stitch on #4 knitting needles. Close the knitting in a circle by crossing the first and last stitches of the row.
Knit the neck with a 2x2 elastic band to the desired length.
To knit the main part of the collar, you will need to increase the number of loops. To do this, you need to make increases before each 4th loop of the row. After the increases, you should have 90 loops on the needles. Continue knitting with front rows until the desired length is reached. Finish the collar with 3 rows of garter stitch.
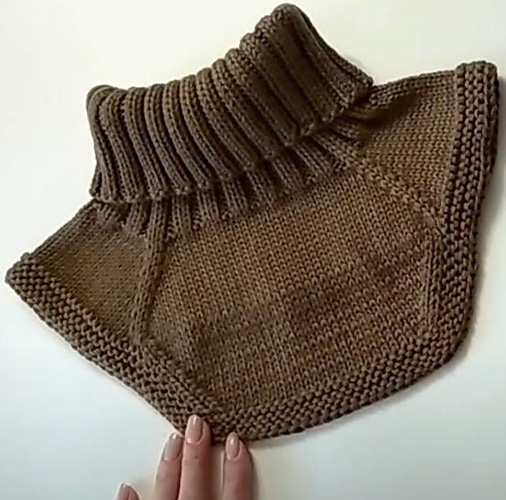
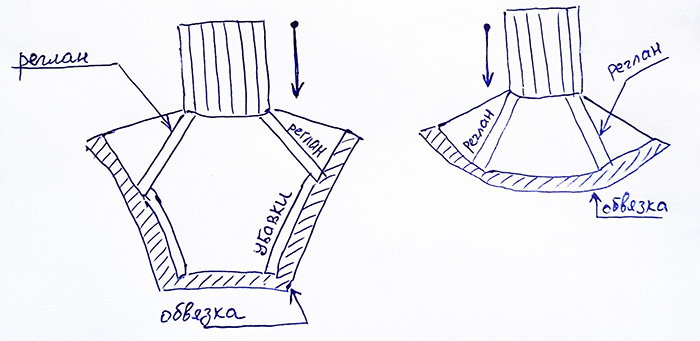
Seamless raglan bib with extended front. Diagram and description
The knitted collar for a boy, the pattern of which will be presented in this master class, has an average level of complexity. This implies possession of certain knitting skills, so this model may cause difficulties for a beginner.
To create a raglan bib, taking basic measurements is not enough. It will be necessary to additionally carry out a number of calculations, the correctness of which will determine the final result. This point should be taken into account when choosing this model.
For knitting you will need:
- Knitting yarn (wool or semi-wool);
- circular knitting needles No. 3.5 on a fishing line or cable 40 and 80 cm long;
- knitting needles No. 3 straight;
- knitting markers (9 pieces);
- scissors;
- measuring tape.
Dimensions of finished product:
- head circumference – 54-56 cm;
- neck height – 16 cm;
- length of the raglan line – 6 cm;
- length of the front to the binding – 13 cm;
- product binding – 2 cm.
Scheme
The collar for a boy on circular needles with a raglan and an extended front is knitted from the top down. First, you need to knit the neck on circular needles.
Then, knit the front and back in a circle with an extension along the raglan lines. After that, knit the front of the product on straight knitting needles in turning rows. Finally, it is necessary to tie the product in a circle with garter stitch.
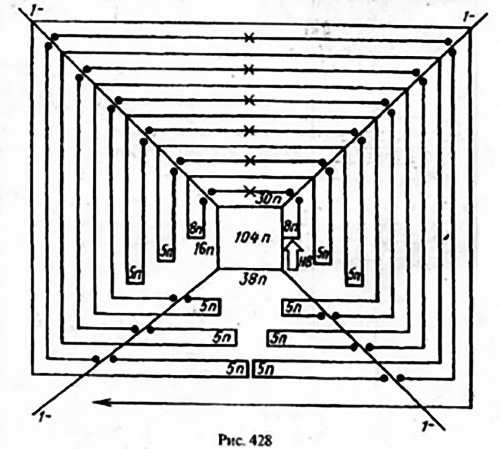
Knitting patterns for the front and back are shown in the picture:
Description
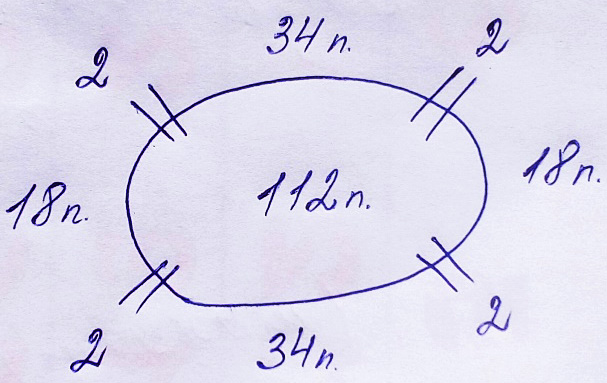
For a collar with a head circumference of 54-56 cm, cast on 112 stitches on circular knitting needles, plus one stitch to close the knitting in a circle. After casting on, close the circle, hang a marker at the beginning of the row and knit the neckline with a 2x2 elastic pattern to the desired length of the product.
Next, you need to calculate the number of loops for the raglan lines. There are 4 of them in the product. To do this, subtract the loops allocated for the raglan from the total number of loops (2 loops for each line). Then, divide the remaining number by 3. After that, divide 1/3 of the loops by 2 more. Thus, you get: 112 - 8 = 104; 104: 3 = 34 + 34 + 36; 36: 2 = 18.
After calculations, 34 loops must be allocated to the front and back of the product, and 18 to the shoulders.
When knitting the first row, mark the places of the raglan lines with markers. Hang one marker before the raglan line, the second - after. From the second row, make increases to the marker before the raglan line and after the marker behind the raglan line. Knit the raglan loops as faces. Make increases from the draw (the loops of the lower row) or by crossing the working thread.
Next, knit in a circle using the front surface stitch, making increases in every even row.
When the raglan line reaches 6 cm, transfer the front loops and the two adjacent raglan lines to a straight knitting needle. Leave the back loops and the remaining two raglans on circular knitting needles.
Next, you need to knit the front part of the collar in turning rows according to the following pattern:
- the first and subsequent odd rows - remove the edge loop, knit the remaining loops as purl;
- the second and subsequent even rows - make decreases at the beginning and end of the row - remove the edge; knit 2 into one (decrease with a left tilt); stockinette stitch. The last 4 loops in even rows: knit 2 loops into one (decrease with a right tilt); front loop; purl edge.
In total, it is necessary to make 8 decreases on both sides of each even row. Next, the transition to circular knitting is carried out. To do this, you need to transfer the loops from a straight knitting needle to circular ones No. 3 with a fishing line of 80 cm.
When moving from the front to the back, pick up loops from the edge row. In total, you need to pick up 10 loops on both sides. After picking up, knit 6 rows of the product's edging in a circle with garter stitch. The knitted bib for a boy, the pattern of which includes a raglan, is ready.
A bib on two needles
The model on 2 needles can be knitted in 2 variations: as a whole piece with a seam and with buttons. Let's consider both options.
Bib with seam
Materials required:
- yarn for knitting;
- straight knitting needles suitable for the thickness of the selected yarn;
- measuring tape;
- scissors;
- hook;
- needle for sewing knitted items (plastic or metal with a blunt end).
Scheme
The collar is knitted from top to bottom on straight needles with increases on the main fabric. Before knitting, the height of the neck, head circumference and length of the product from the neck are measured. The loops are calculated according to the sample. Initially, it is necessary to knit the neck, then the base.
Make a garter stitch binding. Sew the edges of the knitted fabric together.
Description
After calculation, cast on the required number of loops. When casting on, add two edge loops that are not included in the footage and rapport.
Knit the neck with a 2x2 or 1x1 elastic band to the desired height.
Next, you need to move on to knitting the main part of the product. We knit with the front surface. Starting from the first row, you need to make increases before each 4th loop of the row and after 3 rows (1, 5, 9 ... rows). Loops are added from the draw or by crossing the main thread.
Having knitted the required number of rows, it is necessary to move on to the binding of the fabric. Knit six rows in garter stitch (all rows are knitted with face loops). Close the loops with a hook. Cut off the working thread, leaving an end 20-30 cm long for sewing. Using a needle for sewing knitwear, connect the edge loops on both sides of the knitted fabric together.
The knitted bib for a boy, the pattern for which is described above, is ready.
Button-down bib
The model with buttons is knitted on 2 needles using the same pattern as the previous product. A distinctive feature is the presence of a bar, which is needed to attach the buttons.
The convenience of the model lies in the detachable fabric, which allows you to easily put on and take off the bib directly on the neck, bypassing the head.
Materials needed for work:
- yarn (wool, semi-wool);
- straight needles;
- scissors;
- hook;
- measuring tape;
- buttons;
- thread with a needle.
Scheme
The product is knitted from top to bottom on two straight needles with a knitted strip. The neck is not folded in half, but is knitted to the height of the neck.
The following measurements are used for knitting: neck height, neck circumference, shoulder length.
Description
Cast on the required number of stitches, plus 5 stitches for the part of the strip that will overlap the garment. First row: 5 knit stitches, alternating 2 purl, 2 knit (2x2 elastic), knit the last 5 stitches. Next, always knit the first and last 5 stitches of each row with knit stitches.
Starting from the 4th row, make holes for buttons on one part of the strip. To do this, close the loops of the strip and then add the same number of loops in the same row by crossing the main thread. This is how you get holes for buttons.
Having knitted the neck, you need to move on to knitting the main part with increases, which need to be done every 3 rows before each 4 loop. Knit the first part of the strip. Next comes the front surface: in the front row, front loops, in the back row, back loops. Then knit the second part of the strip. Continue knitting until the desired length of the product is reached.
The last 6 rows are knitted only with face loops in each row. This is how the edge of the product is bound. Close the loops with a hook. Cut the working thread with scissors and hide the tail on the wrong side of the knitting.
Sew the buttons to the part of the strip that has no holes, exactly opposite the holes. The bib with buttons is ready.
Tips for knitting a collar
- The final result will depend on the correct choice of yarn and knitting tools. The yarn should not cause discomfort when worn, prick or irritate the child's skin.
- The needles should be selected according to the thickness of the selected yarn. Also, when choosing needles, you should pay attention to the density of your knitting.
- When calculating the number of stitches for knitting, you should use a sample that has been previously knitted from the same yarn, with the same needles and the same pattern as the planned main product.
- When knitting a collar in a circle, it is necessary to use special markers to mark the beginning of a row and raglan lines.
- The calculation of the raglan plays an important role, since the appearance of the product, its shape and fit of the product depend on it.
- The pattern for a boy's collar with raglan lines is difficult to make, so beginner knitters should not choose such a model until they have mastered the principle of knitting a raglan and its calculation.
- When knitting a collar for young children, do not get carried away with decorative elements that are sewn or glued onto the product (buttons, appliques, beads) to avoid them getting into the baby's respiratory tract.
- The buttoned bib is knitted with a placket, the dimensions of which can vary up or down depending on the size of the buttons chosen. This model uses the neck circumference measurement.
- Having mastered the key points in knitting a collar, you can begin to experiment. In addition to the front surface, you can use various patterns, arans, braids and cords in the main fabric. Knit the elastic band for the neck in various variations: 2x3; 3x4; 3x1. You can also use false, French elastic and other types of elastic knitting.
Video about knitting a collar with knitting needles
Master class on knitting a collar with knitting needles:
Cool!!! Everything is very clear!!! Great!!!
Cool!!! Everything is very clear!!! Great!!! Thank you!!!