Macrame technique appeared in the 9th century BC. It is a weaving of patterns with knots. Made in many rows, they form a beautiful product intended for decoration or practical use. There are simple patterns for beginners that will help to master the art, to make things with your own hands.
What is macrame art
Macrame is a knotting technique. This is an applied art that was originally purely practical. At the dawn of its appearance, knot weaving allowed making tackle, clothing and other useful things.
Over time, weaving evolves from a routine into an art. Craftswomen are able to create masterpieces with minimal time expenditure. The technique is also beneficial for the body. It helps to concentrate and develops fine motor skills.
What threads are suitable for weaving
There are many types of macrame threads. Each has its own characteristics. The choice is usually made based on the item that is planned to be made. You can see the popular types in the table below.
| Type of thread | Features of selection | What are they suitable for? |
| Waxed cotton cord | 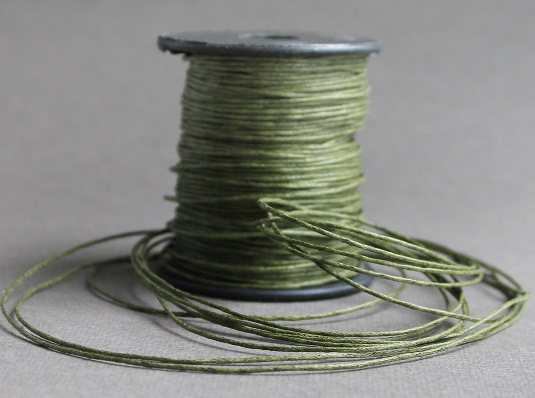 There are no difficulties with the choice, since cotton is a budget material, and it is not economically viable to counterfeit products made from it. Any product on the market will do. | Used for weaving jewelry: earrings, bracelets, necklaces.
Important: the end of the natural cord should not be fixed with heat, it should be tied inward. |
| Threads "Mouline" | 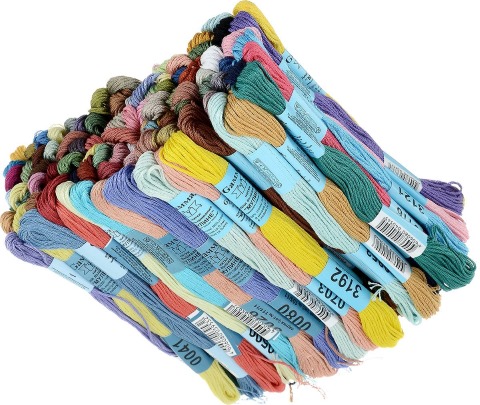
The thread should be soft and pleasant to the touch. The less fluff on the outside, the better the quality of the material, but the more expensive it usually is. | Limited use - only suitable for making baubles (bracelets that were popular with young people in the 80s). |
| Silk threads | 
An expensive material that must be natural. Study the information on the packaging; if there are synthetic additives, it is better not to buy it. | Clutches and ladies' handbags are made from this material.
Given the naturalness, the ends are tied with strong knots or treated with glue. Setting fire will not give results. |
| For beginners | They have recently appeared on the market and are specialized for teaching macrame techniques.
The choice is not difficult, there are no fakes. They are made on a synthetic basis. | Suitable for creating any product, from a pendant to a handbag. |
| Waxed thread | 
Made of nylon (100% composition). Therefore, if a different percentage is indicated on the packaging or label when choosing, it is better not to buy. | They are used to decorate finished products and create jewelry, including small ones, such as small pendants or earrings. |
| Jute rope | 
When choosing, you need to squeeze the cord between your fingers and run it a little along the length of the rope. If the pile falls off, the product is of poor quality. | Ideal for creating carpets, flowerpots and panels. Due to its fleecy structure, it is soft, but at the same time provides the necessary strength. |
Materials and tools
To work you will need the following tools:
- hard pillow for horizontal weaving.
Tip: If you don't have a pillow handy, a piece of foam will do. For many, it is even more convenient to work with.
- pins for fastening;
- crochet hooks (large sizes);
- scissors;
- tape measure (you can use a ruler, but it’s not convenient to measure with it);
- clamps - special textile clamps for fixing threads vertically;
- glue;
- hanging weights for thread alignment;
- decorations – buttons, rhinestones, beads (depending on the needlewoman’s idea).
Getting Started. Securing Threads
Macrame for beginners (weaving patterns are not all that you need to master) should be mastered from the preparation for work.
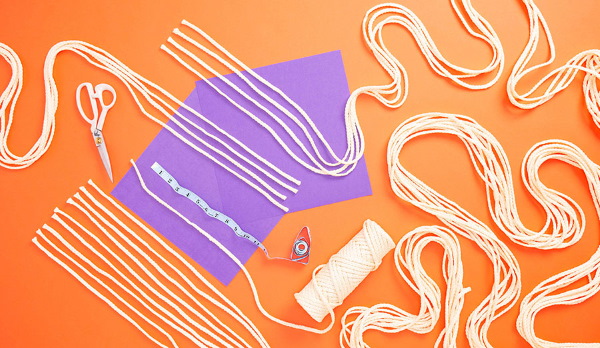
Threads are sold in skeins. For work, they are cut into the required lengths. After that, they are fixed on working tools (horizontal or vertical).Advice: it is better to learn on large cords. They are easier to work with and the nodes are more clearly visible.
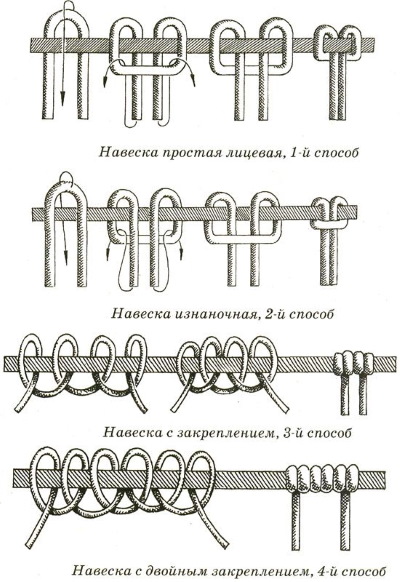
There are several simple ways to attach threads:
- they are folded in half and fixed with pins (if the horizontal method is chosen for work);
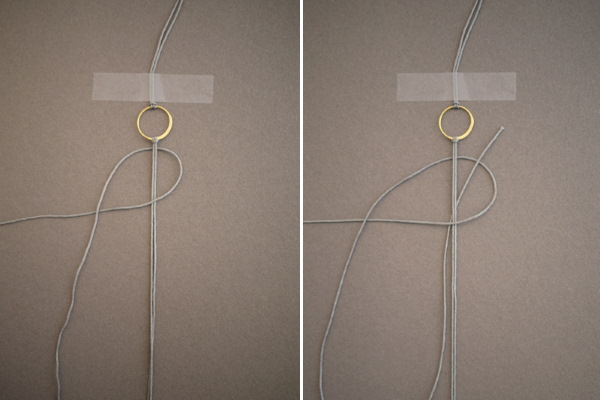
- they are secured with tape (if they do not need to be folded in half);
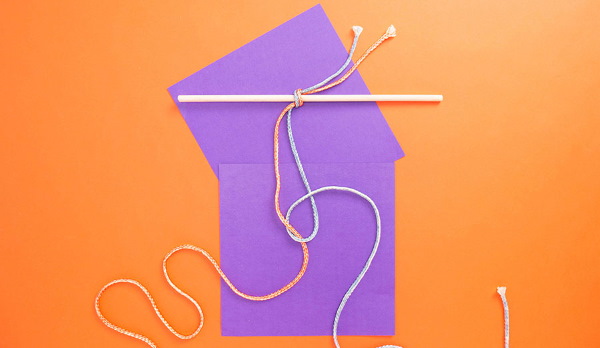
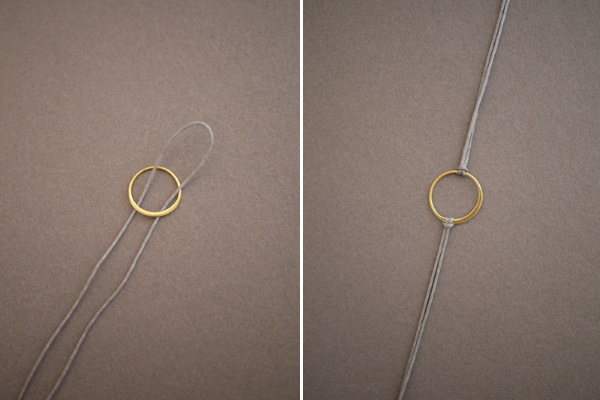
- they are tied into a simple loop (if the vertical method is chosen for work);
- They are tied into a strong, complex loop when it is planned to attach weights to the ends.
It is also better to immediately treat the ends of the threads with fire so that they do not fall apart during work. If the material is natural, you do not need to do anything with it. At the end of the work, a strong knot is tied at the very end.
Basic Macrame Knots
There are many macrame knots. Since this technique has existed for thousands of years, it has acquired its own characteristics in each country.
Weaving can be divided into several subcategories:
- workers. These are the simplest knots used in creating fabrics, jewelry or products;
- Chinese. Needlewomen always put this weaving into a separate category, since it is distinguished by its particular complexity and unique patterns;
- decorative. Such knots are made in a single copy. They serve as decoration. For example, to cover a button on a bag;
- auxiliary. These weaves are designed to securely fasten the threads after the item is finished being made.
Simple Hercules Knot
Macrame for beginners, the weaving patterns of which should be studied starting with the Hercules knot, are based on the development of skills. The better the fine motor skills are developed, the fewer problems arise with the study of more complex forms of weaving.

To make a simple Hercules knot, you need to secure 2 cords on a horizontal surface. Special tools for securing are sold in stores. Then just tie a regular knot. Then the procedure is repeated until the product reaches the desired length.
The technique is not usually used for complex things. But it is ideal for beginners who want to hone their skills. Simple bracelets and neck ornaments are made using this technique.
Right and left flat knots
Flat knots have a completely identical weaving pattern. They are called differently because you can start tying them with different cords.

Instructions for weaving a right-handed flat knot:
- 4 cords are secured, the 2 in the center will be axial, and the extreme left and right ones will be working.
- The right outer thread is placed on top of the base, while the left one goes underneath.
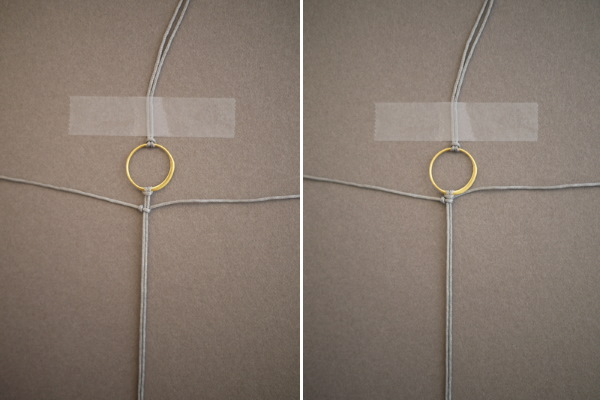
- The right extreme thread passes over the left one, and the left one passes under the right one.
- The knot is tightening.
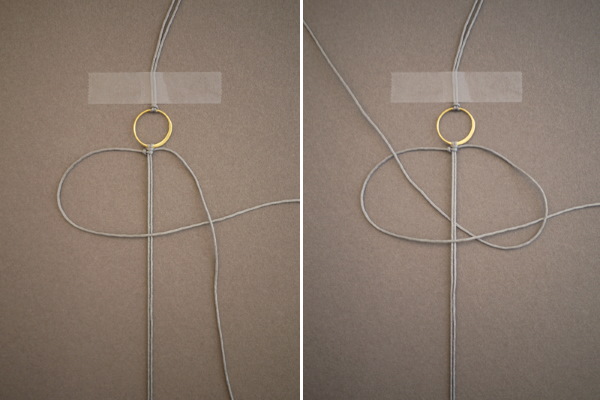
- The procedure is repeated until the product reaches the desired length.
To weave a left-handed flat knot, you need to follow the same instructions, but the leftmost thread will go over the base.
Square Flat Knot
To quickly master the square, you need to learn how to weave flat knots. The left- and right-hand patterns are compatible with each other.
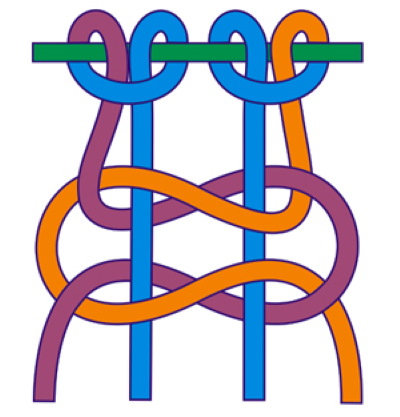
Unlike simple flat knots, here 2 threads will be working (left and right, not just 1, as in the previous version). The weaving technique is preserved except for the alternation and parallel use of threads.
Chain of square knots
Chain weaving instructions:
- Two threads are attached to the base, each of which is folded (the output should be 4 threads for work).
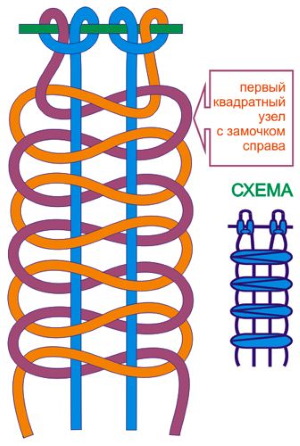
- Left-hand and right-hand knots are woven alternately.
- The actions are repeated until the product reaches the desired length.
Rep knot
This knot is universal, it is suitable for dense and openwork weaving. It all depends on how tightly the loops are tightened. A series of knots is called a "brid". You can use the left and right working thread. The rep knot must be woven on a horizontal surface so that gravity does not act on the threads. Otherwise, it will not be possible to assemble the brid.
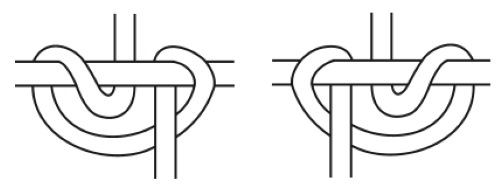
Instructions:
- 4 threads are secured.
- The leftmost thread is moved to a horizontal position relative to the others. The fold is fixed with a pin. This horizontal thread will be the base.
- The second left thread is thrown to the left, then up.
- The same thread is thrown over the base on the left, then down.
- The same thread is thrown over the base on the right, forming a loop. The end of the thread is threaded through it, and the knot is tightened.
- The process is repeated with the remaining threads in the bundle. The threads always alternate.
You can make an extended rep knot if you want to get a strong fabric. To do this, after forming a loop, the thread first turns around the base, and only then enters it. To make a vertical braid, you need to place the working threads horizontally, and the base - vertically.
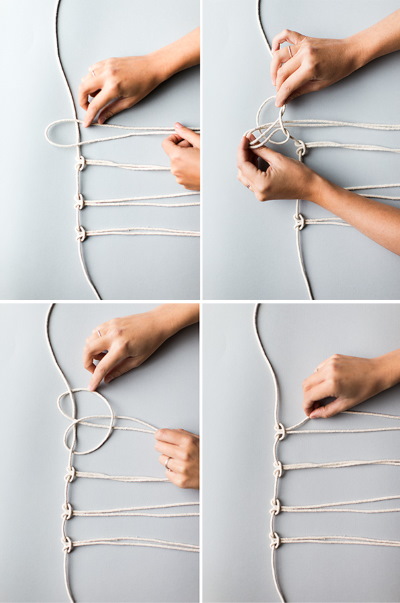
Tatting knot
Like many others, "Frivolite" can be left and right (for the working hand). To perform, the thread is folded in half so that one end is 8 rows longer than the other. The short cord is called a knot cord, the long one is called a working cord.
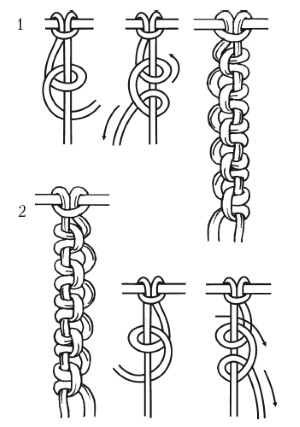
Next steps:
- The knotting thread is pulled so that the knots tied with the second cord do not bend it.
- The working thread makes a loop knot.
- The working thread passes under the knot thread.
- The loop knot is made again.
- The process is repeated until the product reaches the desired length.
Regardless of the working and knot side selected, the pattern is the same. It will only be located on the left or right side (mirror-like).
Chinese knots
Not all Chinese knots used in macrame were invented by the needlewomen of the corresponding country. They got their name due to the complex techniques. But the first complex canvases based on knot weaving appeared in China.
There are plenty of varieties of Chinese knots:
- floral. It is made from 1 thread, which forms 4 corner loops. The end of the thread passes through them one by one, then tightens to the desired strength. According to beliefs, such a knot brings good luck, so it should always be carried with you;
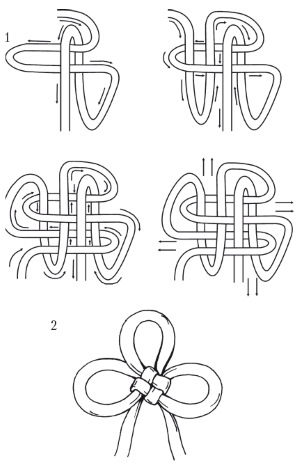
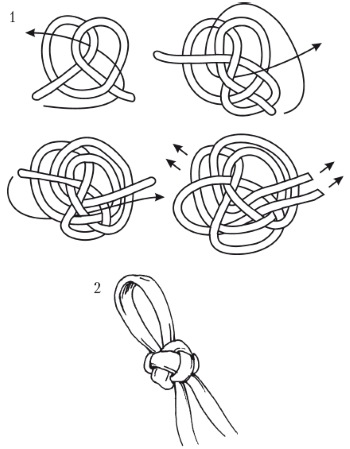
- the knot of true love. It is made from 1 thread, which forms 3 petals (top and sides). The ends of the thread symbolize the stem and are located below;
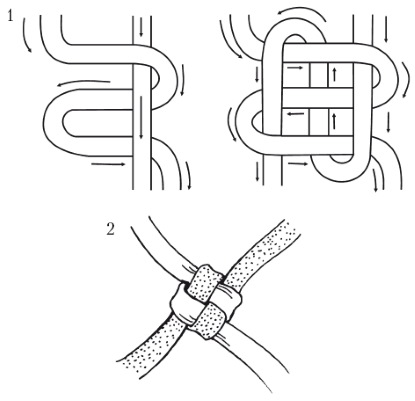
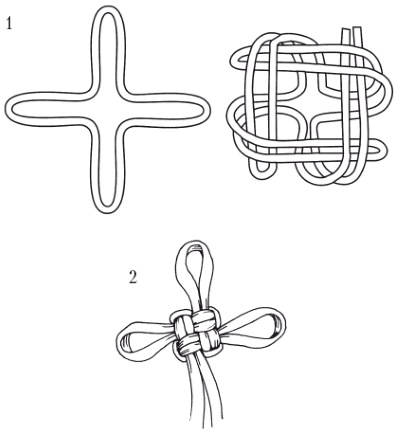
- cruciform. It is made of 2 threads, necessarily of different colors. It is tightened in the shape of a cross, for which it got its name;
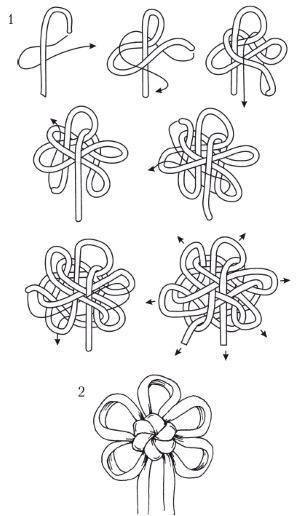
- "flower". This knot is made using the “true love” technique, only here you will need 5 petals instead of 3;
- "button". It is made from 1 thread, which creates 1 petal, and at the base a cross-shaped double knot is made.
There are many other Chinese knots, each with its own characteristics. You should not try to reproduce Chinese knots unless you have already studied and perfected other techniques. Tying one such knot is difficult, not to mention the structured weaving of various items.
Macrame weaving patterns
Macrame for beginners (the weaving patterns for the first works are the simplest) is most often learned to create things or jewelry. Complex knots are mainly decorative, from them long canvases are rarely created.
The most common schemes are:
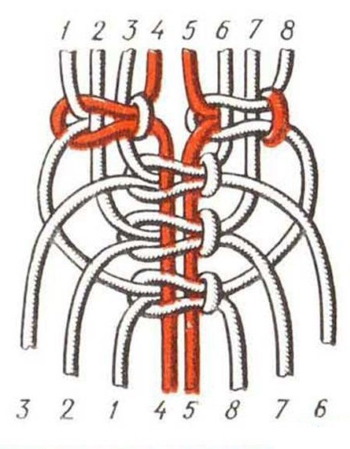
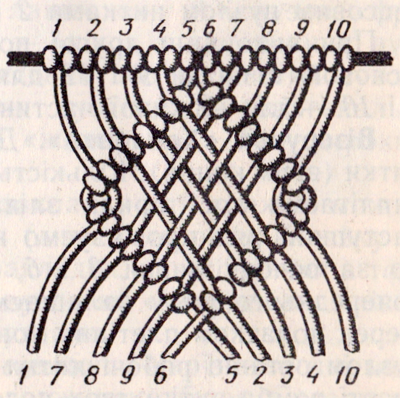
- "spider". Here, square knots are used on 8 or more original threads;
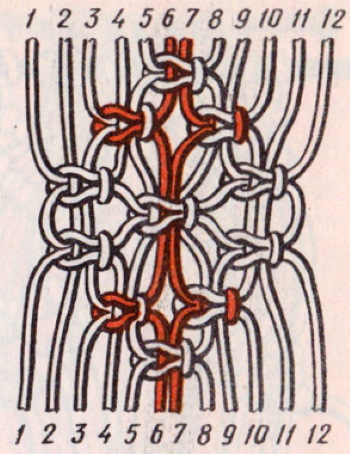
- "rhombus with lapel". The pattern allows you to create beautiful openwork fabrics that are quite strong, but not filled;
- "diamond with rep knots". A universal scheme that allows you to create both filled canvases and those with voids. Everything depends on the degree of tightening;
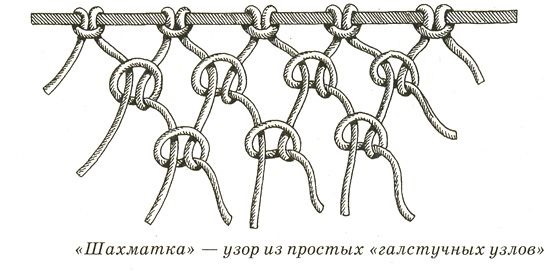
- "chessboard". One of the simplest patterns. It uses tie knots arranged in a checkerboard pattern. When pulled tightly, it creates a filled canvas;
- "attachment". A system that is performed on top of the main product. It is decorative.
Master classes and macrame patterns, step-by-step instructions for beginners
Macrame for beginners, the weaving patterns of which are based on simple patterns, provides wide possibilities in the design of the finished product.
Even beginners without experience can make beautiful jewelry or useful things for home and personal use.
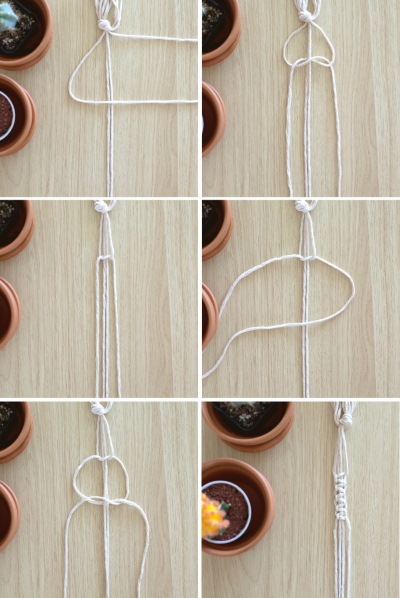
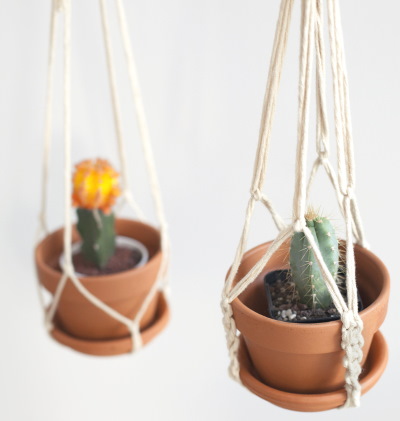
Flowerpot
To create a flowerpot you will need:
- round vase (or other shape);
- nylon threads;
- scissors;
- scotch;
- warp.
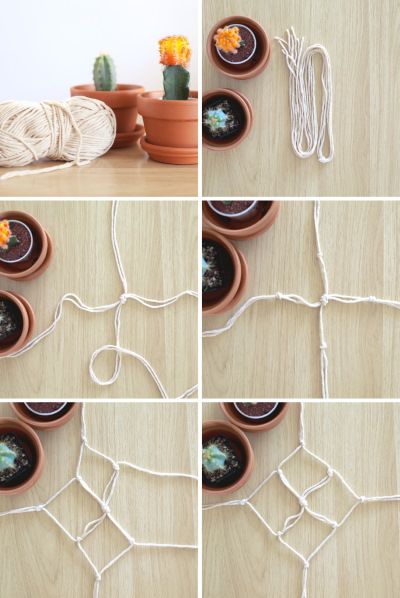
Instructions:
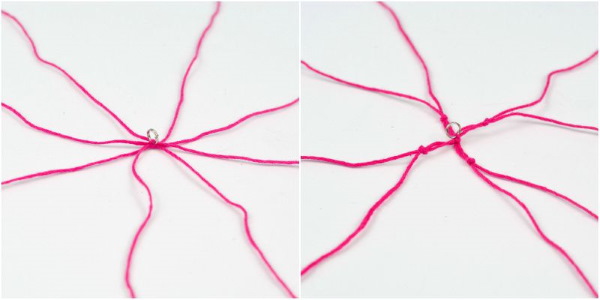
- Take 8 threads, fold each in half and secure with tape.
- An additional thread is taken, which is wrapped around the previous 8. A secure fixing loop is tied (it is not necessary to make a decorative knot, since it will not be visible).
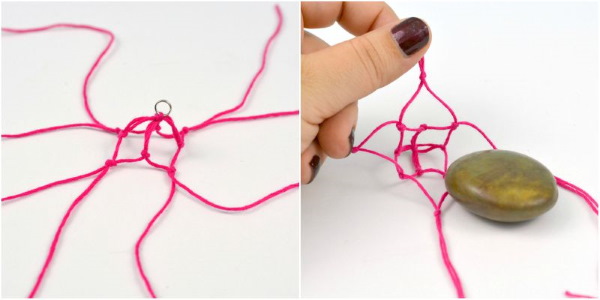
- The bundle is divided into 4 parts, each containing 4 threads.
- Flat left-hand knots are knitted in each bunch.
- The chain continues until it reaches the desired size.
- A small indentation is made (approximately 10 cm), after which left-hand knots are knitted again.
- The process with indentations is repeated (necessary to create airiness and tenderness).
- Each bundle is divided into 2 parts with 2 threads in each.
- Double flat knots are tied.
- A twisted knot is tied.
- A square flat knot is tied at the very base.
- If the threads are synthetic, the ends are treated with fire. If they are natural, knots are made at the ends to secure them.
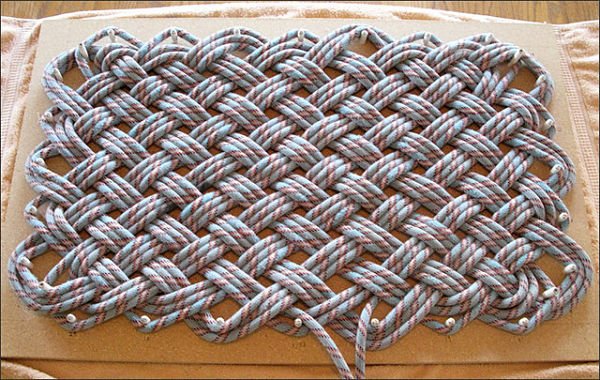
Rug
For a rug measuring 1x1 m, you will need about 500 m of polyester cord, 5 mm thick.
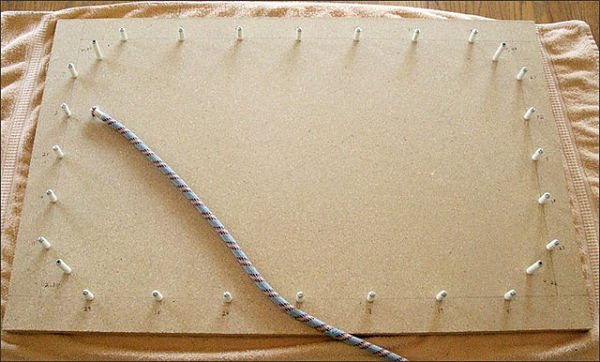
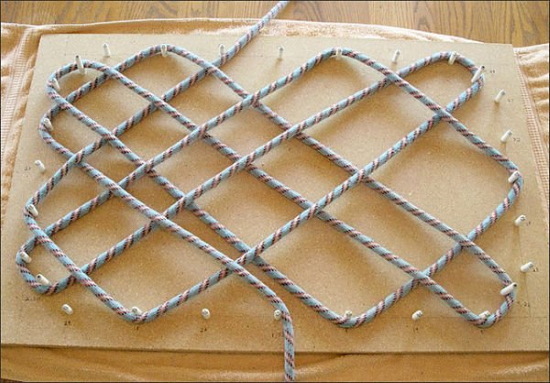
Instructions:
- The number of threads is taken to determine the width of the rug, but a multiple of 4. They are folded in half along a straight line. The middles are secured on 1 line with pins or tape.
- Fix the ends with fire to prevent fraying.
- Double flat knots are woven from the left edge. Work is carried out with every 4 cords.
- The knots are tightened one at a time on every 4 threads.
- The next row begins with the 2 outer threads being set aside. Then 2 more threads from the next row are added to the remaining 2 threads. This weaving is called "checkerboard".
- If you tighten the knots tightly, the weaving will be stronger. If you tighten them loosely, it will be more delicate.
- The next row is again done in a checkerboard pattern.
- The process continues until the rug reaches the desired length.
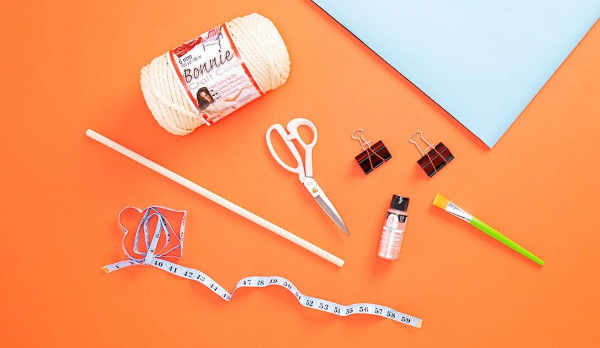
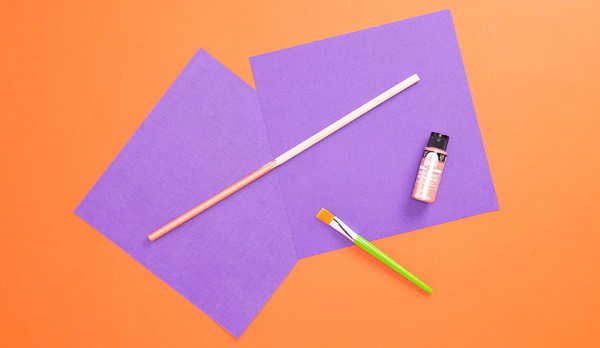
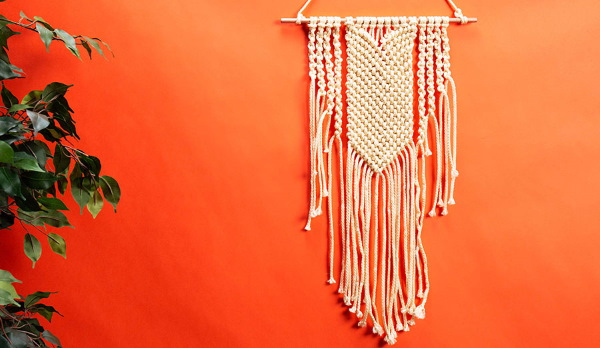
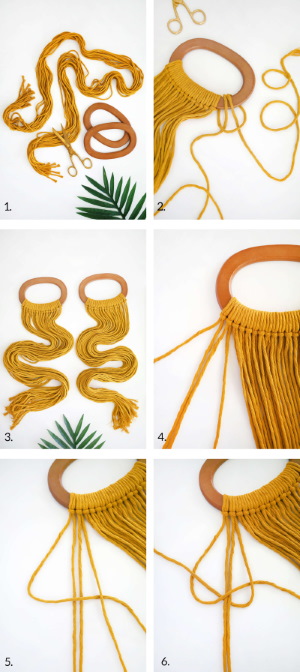
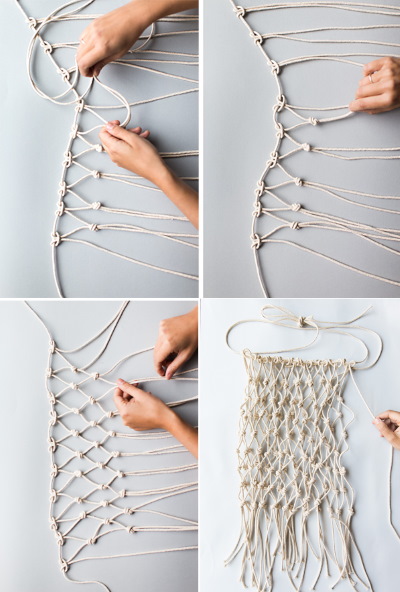
Wall panel
For work you will need 60-70 m of clothesline (other large threads are possible) and several beads for decoration. It is better to choose wooden beads, since natural materials look more harmonious.
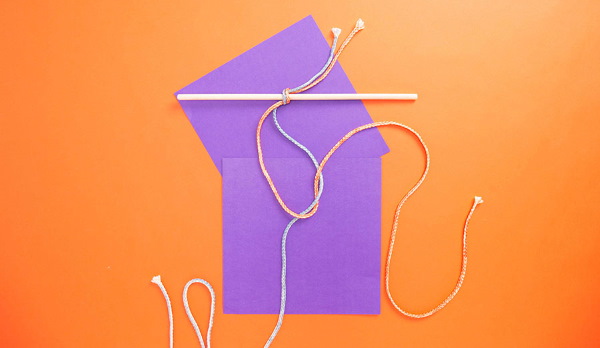

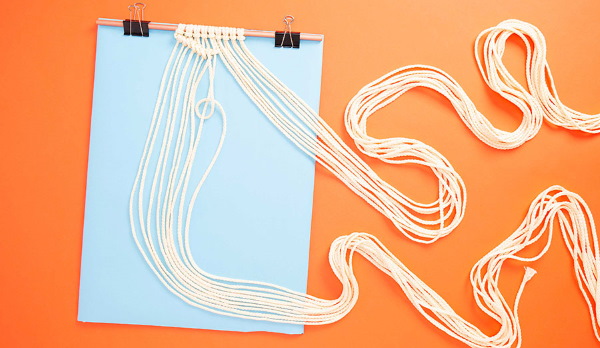

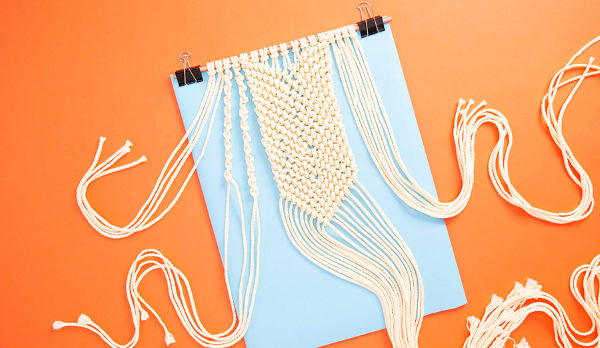
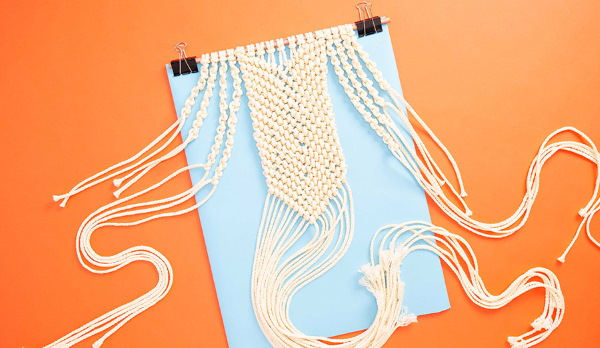
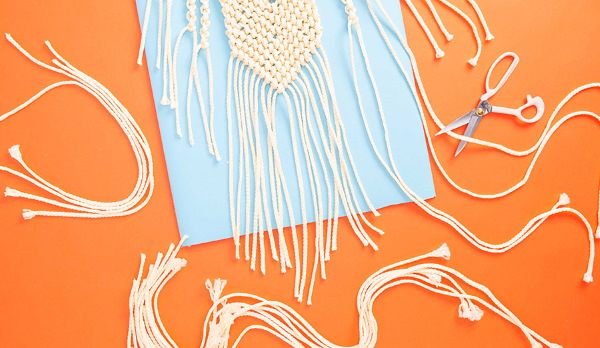
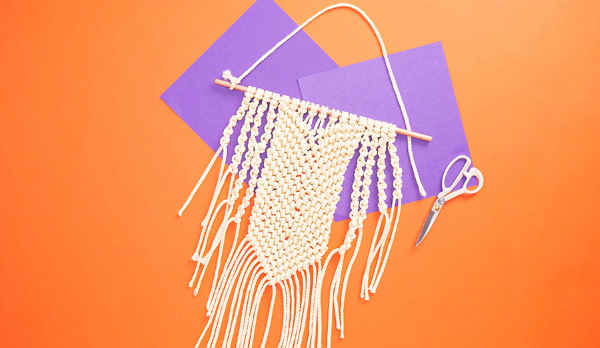
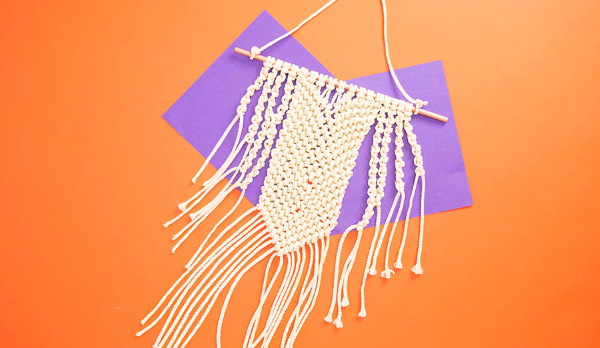
Instructions:
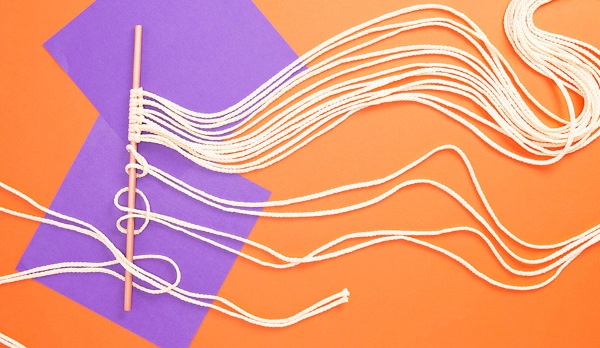
- A round processed piece of wood is attached to hangers or a hook. This will be a holder for the panel.
- The rope is cut into 16 equal parts.
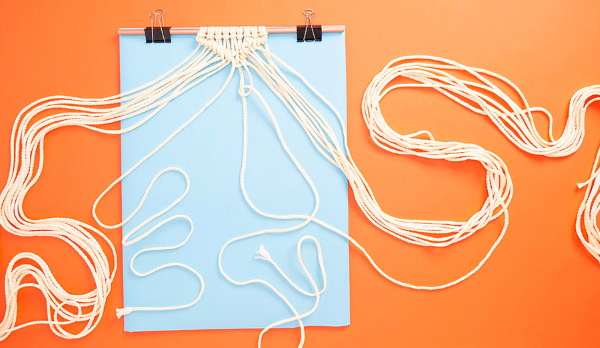
- The threads are inserted in half and secured with strong loops on the holder. They are distributed evenly along the entire length and should not be tightly adjacent to each other.
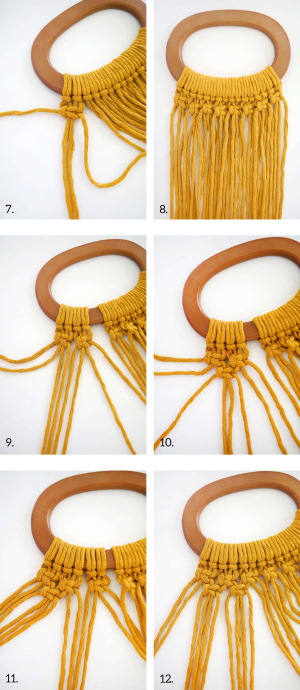
- The first fixing row is performed.
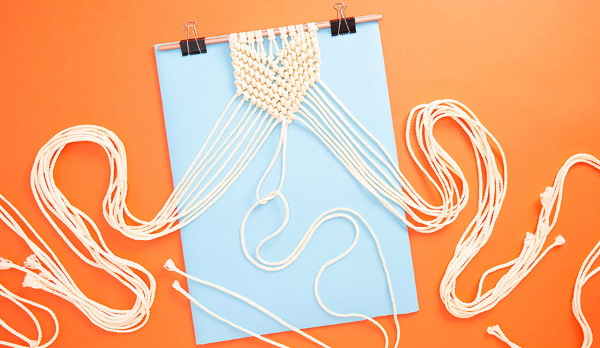
- The next row is made with rep knots.
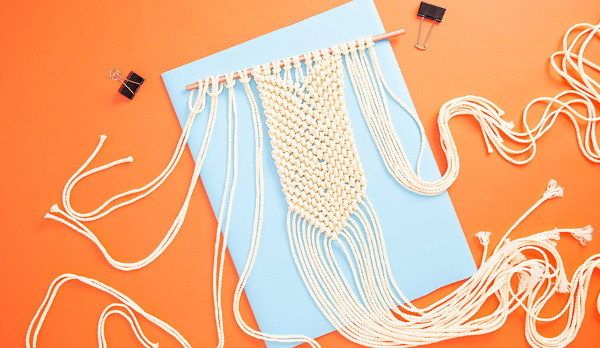
- From time to time, other knots are added to the weaving, either systematically or randomly, to add variety to the pattern of the panel.
- From time to time, beads are inserted into the weave for decoration.
- When the piece reaches the desired length, a row of double flat knots is made to secure it.
The lack of a system results in a unique panel that will suit any style.
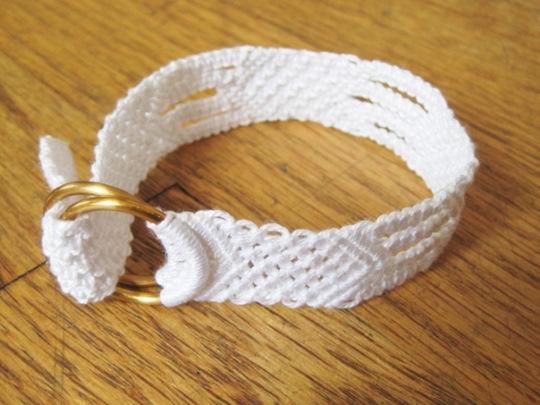
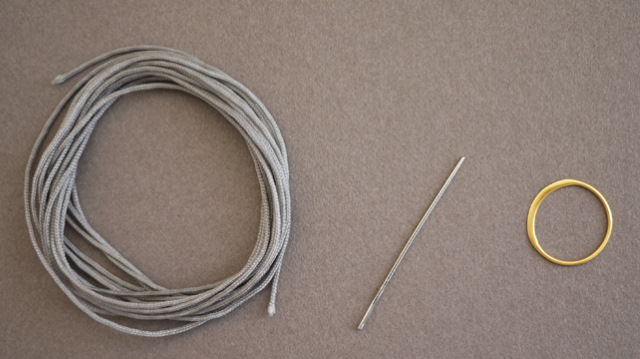
Belt
To make a belt you will need a thick cord and a buckle.
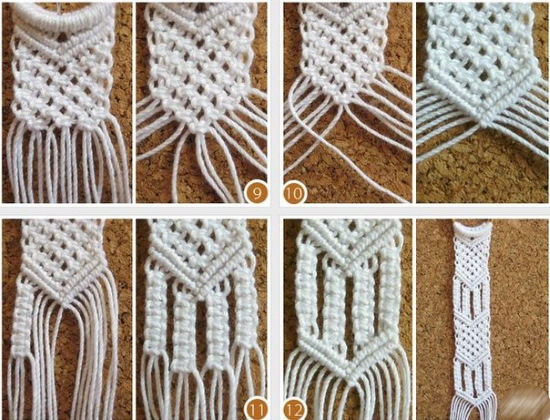
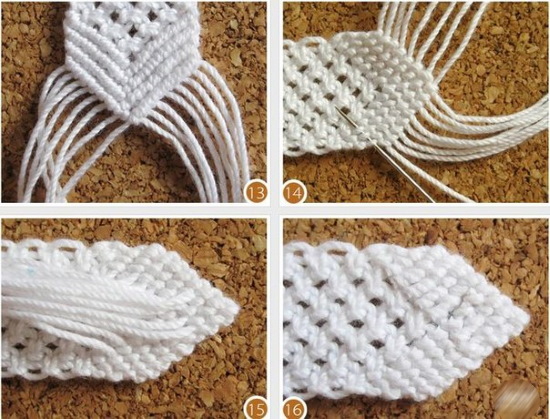
Instructions:
- Three cords are tied on the plaque, folded in half. Simple loops are used for fastening.
- Any knots can be used during the weaving process, but the chosen format must be maintained until the last row.
- When the product reaches the required length, the row is secured with double flat knots (they are the strongest).
The color of the threads is selected in accordance with the final set of clothes with which the belt is planned to be worn.
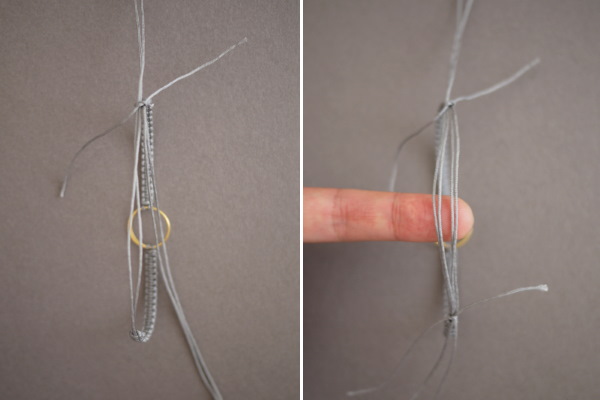
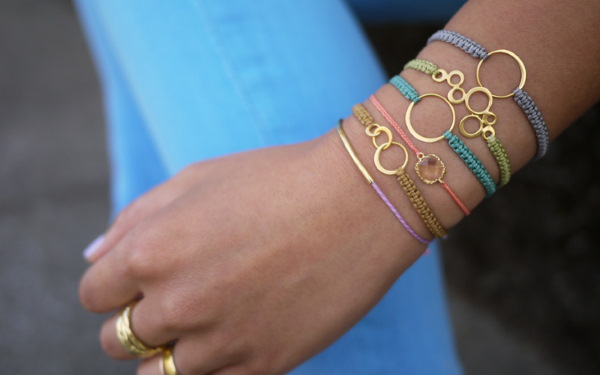
Bracelet
Macrame weaving patterns for beginners allow you to make colorful and unique jewelry for personal use. Simple knots form attractive patterns. Therefore, you can make a bracelet with your own hands, even if you have no skills.
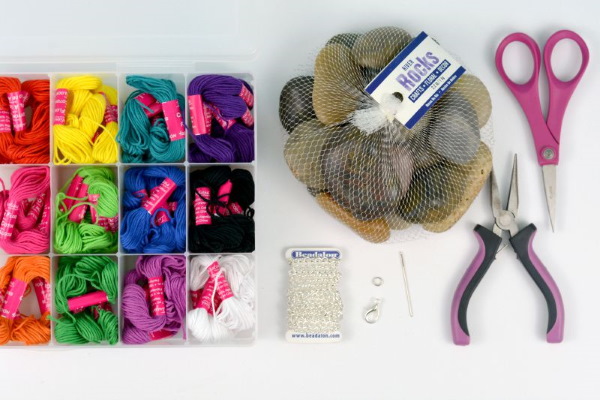
To work you will need:
- pin for fastening;
- pillow (base for work);
- threads;
- glue;
- scissors.
Instructions:
- Take 2 threads of different colors, fold them in half, and tie them into a loop at the base.
- The loop will simultaneously hold the threads and serve as a clasp, so you need to select a button or bead that matches its diameter to secure the bracelet to your hand.
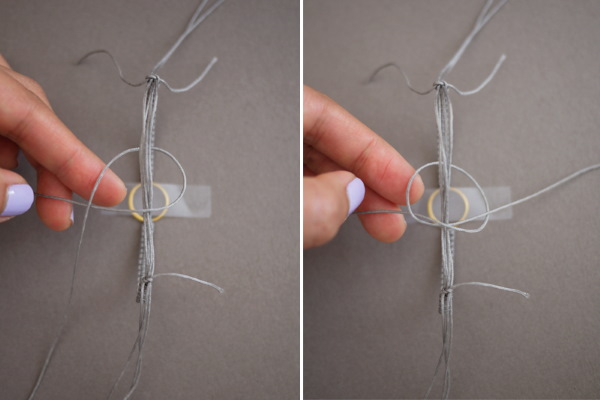
- The weaving is done with a double flat knot (or square knots).
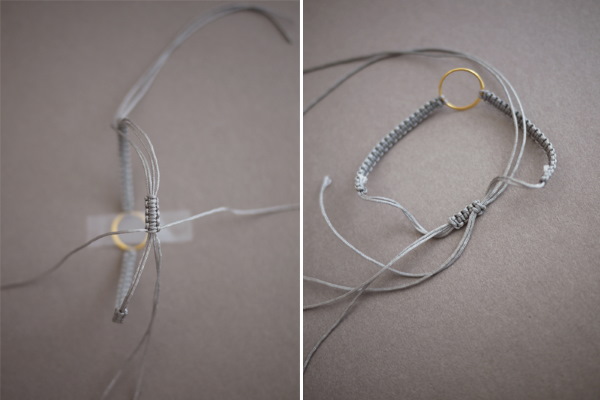
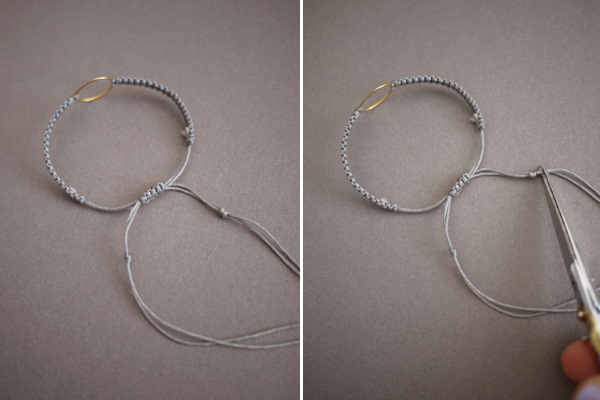
- When the product reaches the desired length, the ends are tied and burned. A button is sewn on top of them.
During weaving, the bracelet can be decorated with small beads or rhinestones.
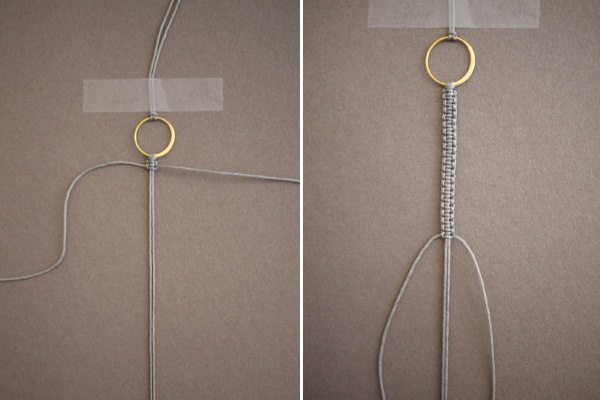
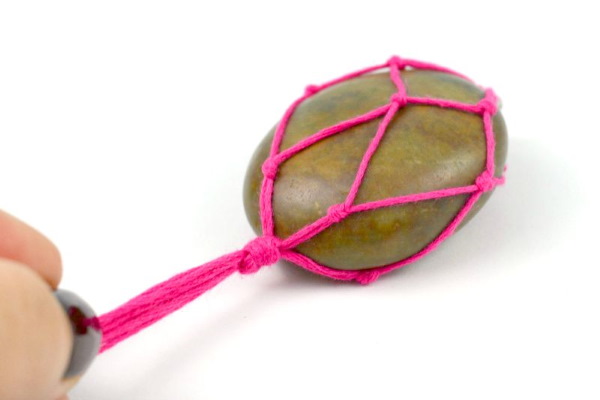
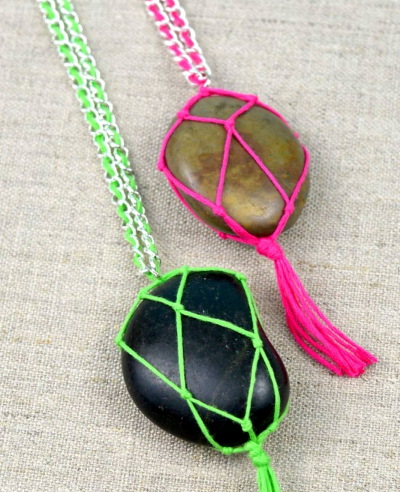
Pendant
To work you will need:
- 5 threads of different colors (it is better to choose contrasting rather than tinted threads);
- chain with clasp;
- measuring tape;
- scissors;
- pliers.
Instructions:
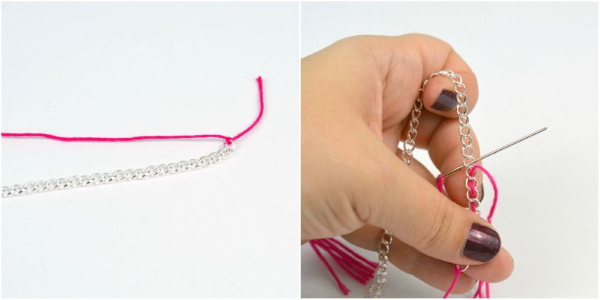
- Using pliers, cut the chain to the required length and fold it in half.
- Almost at the very base of the chain, threads are laid out in horizontal, even lines in a random order.
- The chain is wrapped around the threads, securing them with a simple loop.
- The edges of the threads and the chain are fixed with tape (it is removed later).
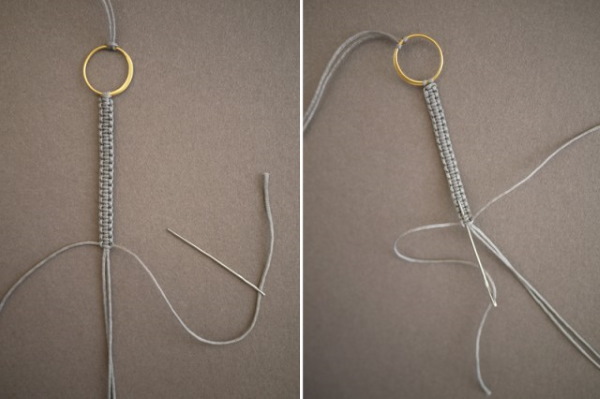
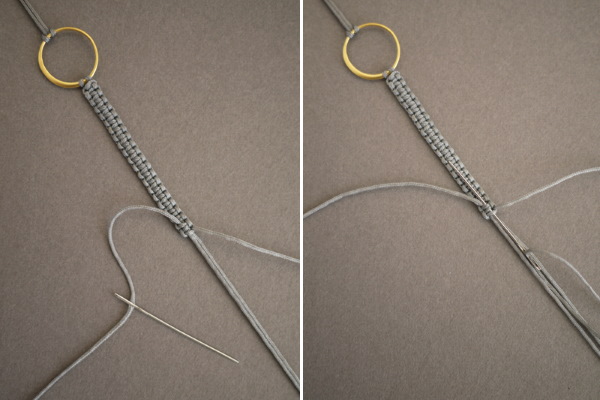
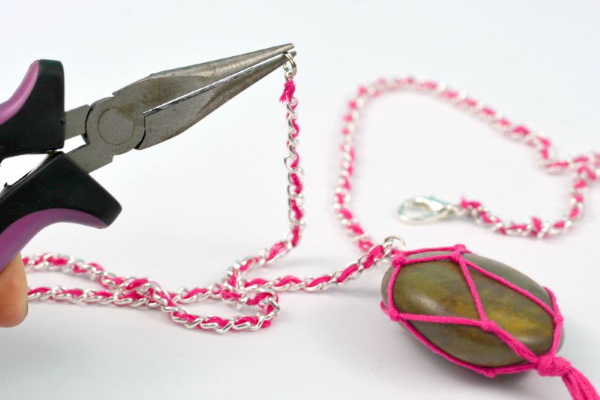
- The weaving begins. You can choose any decorative knot, edit their number and the density of their adhesion to each other yourself.
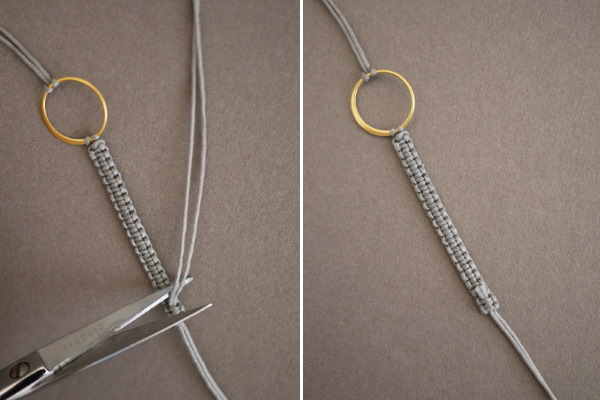
- When the pattern is ready, the threads are not cut off completely. A few cm are left to create a frame for the pendant. The ends are treated with fire.
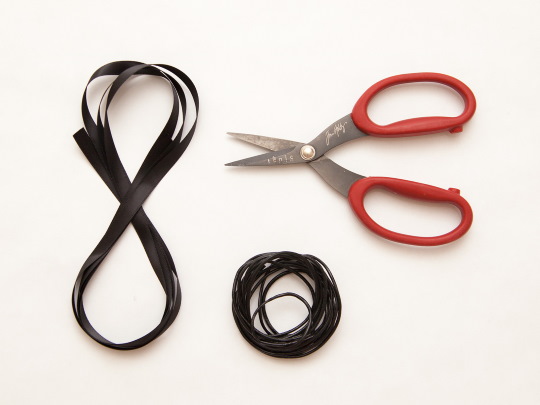
Chain
Most often, a twisted chain is made using the macrame technique. It is used not only as decoration, but also as bag handles, lacing, and woven decorations.
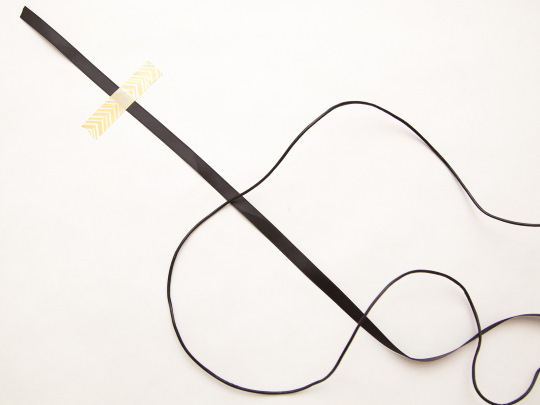


Instructions:
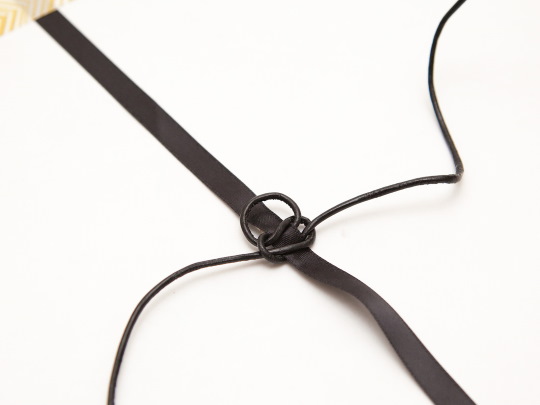
- 2 threads, folded in half, secure to the base.
- From the resulting 4 cords, flat single knots are woven. Important: other knots will not work because they do not twist the chain.
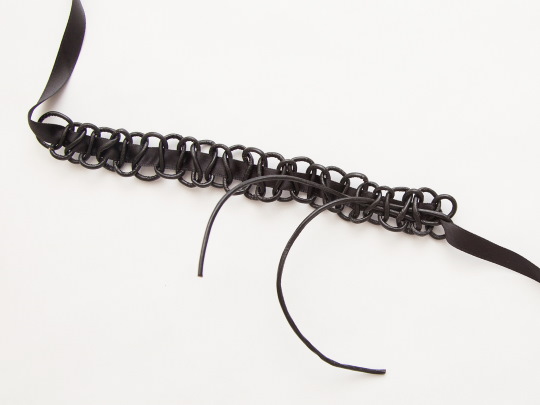
- During weaving, the chain will twist. Therefore, it needs to be turned over from time to time. Depending on the tension, the chain will need to be turned over every 4-7 rows.
- When the chain reaches the desired length, the ends are secured with a decorative knot. It is pulled tightly so that the product does not unravel.
- The chain can be additionally decorated with a colored ribbon.
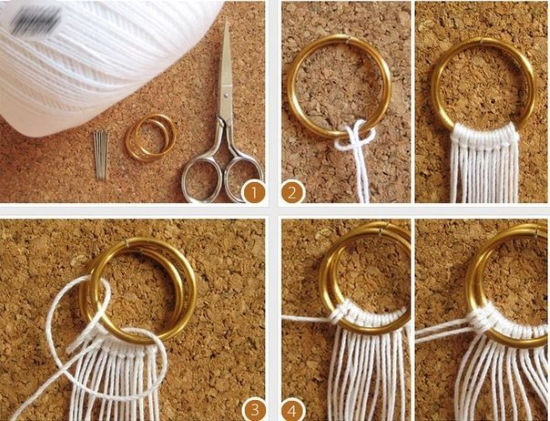
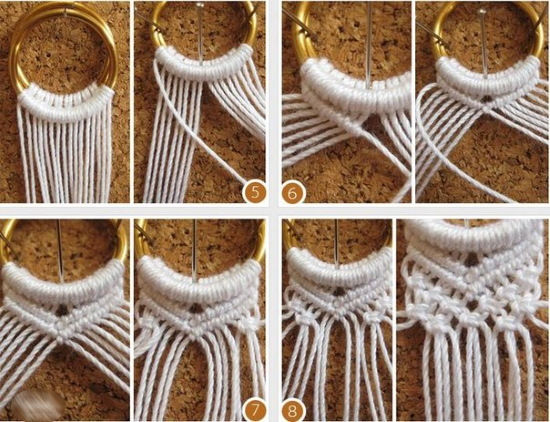
Keychain
The simplest keychain is made in the same way as a chain or pendant. But the threads here will be attached to a ring, where the keys are hung upon completion of the work.
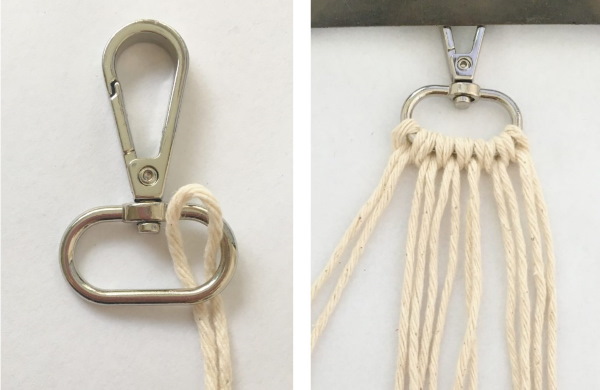
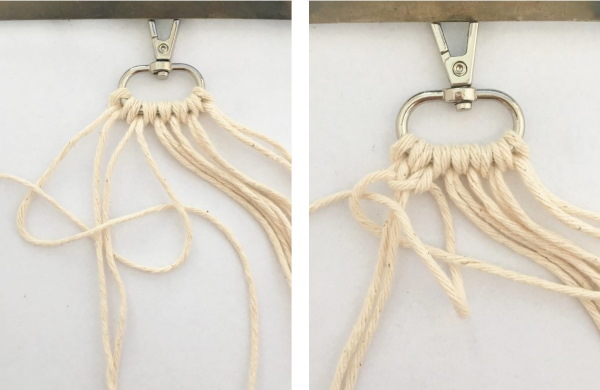

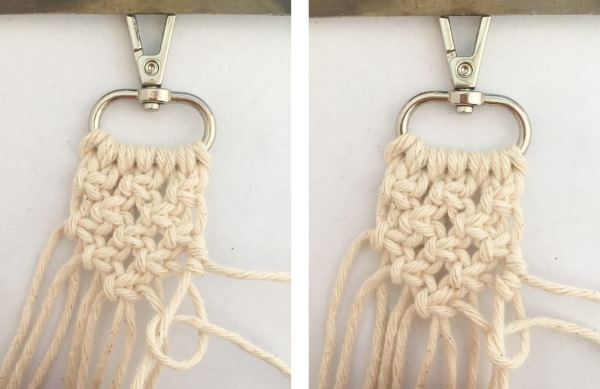
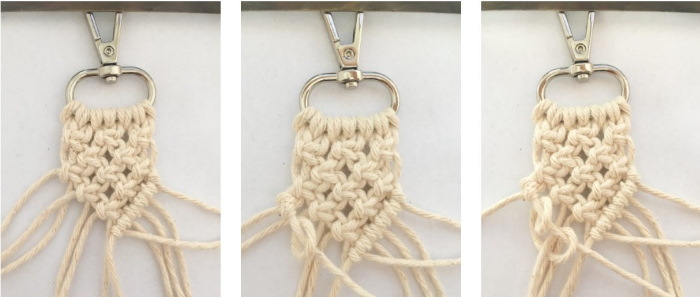
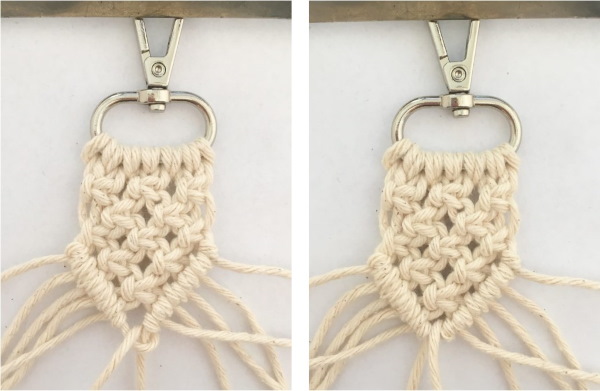

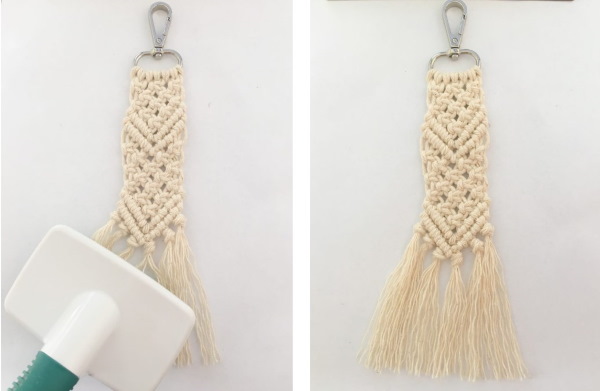
You can also make a keychain in the shape of some animal, a person, or just tie a complex Chinese knot.
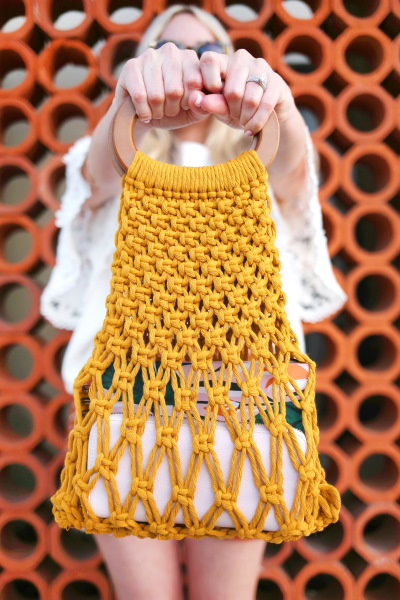
Bag
Bags made using the floss technique are stylish and unique items.
To work you will need:
- threads;
- handles (you don’t have to buy them, you can make them yourself, like a chain);
- pins and a cushion for fastening;
- scissors;
- fastener for fastening (a zipper will do, but buttons or magnets will do);
- beads or other decorative elements.
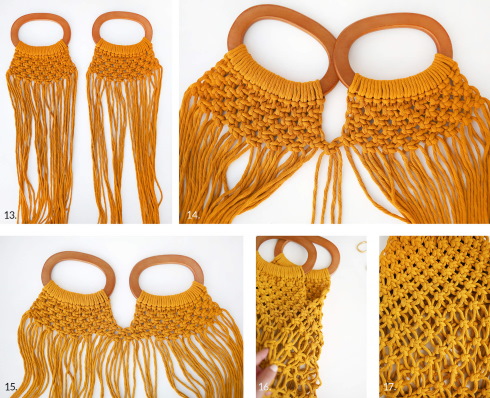
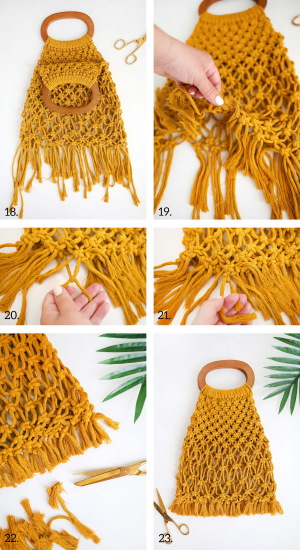
Instructions:
- Take 18 threads, 4 m each. 17 of them are folded in half and secured to the base – 18 threads.
- Rows of square knots are woven with every 4 threads.
- The rows continue until the fabric reaches 60 cm in length, the edge is processed with a rep knot.
- The canvas is folded in half.
- On the sides, 2 more threads are applied, folded in half. They are woven with square flat knots, but up to 30 cm, to fill the side space.
- Zippers or other fasteners are sewn on with regular threads. It is better to make hidden seams.
- The bag handles are sewn on.
- The front side of the product is decorated with beads, buttons or other decorative elements.
String bag
The simplest string bag is made in the same way as a flowerpot. But in this case, you need to use 4 times more threads, and also do not make indentations for airiness.

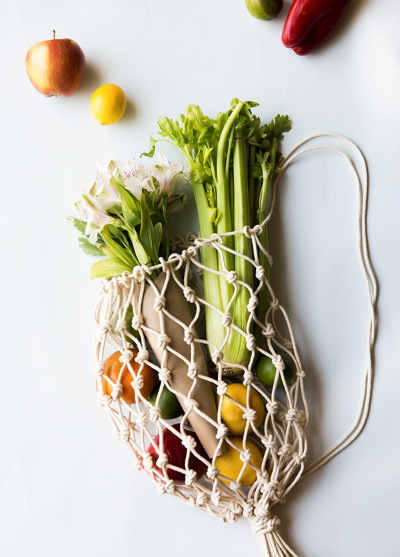
The handle is woven like a regular chain and is subsequently secured to the main product using 1 or more decorative knots.
Animalistics
You can easily make an owl using the floss technique.
To work you will need:
- 8 threads, 60 cm each (3 colors);
- 2 large beads (owl eyes);
- A few simple threads for the base.
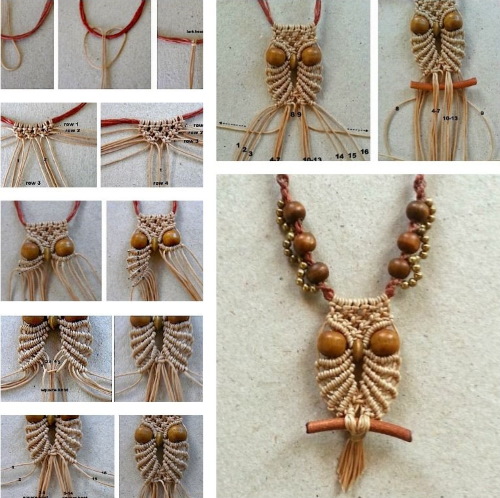
Instructions:
- The threads are folded in half and secured to the base with simple loops.
- Take 4 left threads and weave a chain from them using the “Frivolite” knot.
- The action is repeated with the 4 right threads.
- From the remaining threads, 2 on each side are removed to the side, and in the center a chain is again woven using “Frivolite” knots, but not as long as the side ones.
- Beads are threaded through the remaining 2 threads on the right and left sides.
- 2 free threads on each side are woven into the central part in the same way as baubles or bracelets are woven.
- Next, add 1 thread from each of the outer rows and weave them into the central part.
- Then add 1 more thread at a time, and so on until all 4 are used.
- The full row is woven from simple double-sided flat knots; this will be the body of the owl.
- To create the paws, select 2 threads from each side. Make 4-7 rows of simple corner knots.
- The paws are woven together, after which the bottom is processed with simple rapeseed knots.
- There is no need to cut the remaining threads, they will fray and serve as additional decoration. But you can trim them.
It is easy to make a snake from animals. It is woven in the same way as a chain, but is additionally decorated with 2 beads - eyes. The front part can be forked to make a mouth with a characteristic snake tongue.
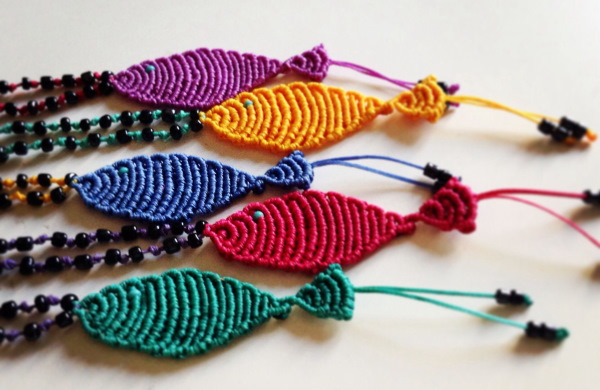
There are simple techniques for making fish using macrame technique. To make the work easier, it is better to use a pen cap or other similar form that will be braided with knots.
Instructions:
- 8 threads (if thick, then 4) are folded in half and secured at one point.
- Weaving is done using any knots that consist of 2 threads.
- After 2 rows, you need to thread the shape into the resulting ring so that you can continue the next rows along it.
- When the form is closed or the body reaches the required length, it is pulled out.
- Next comes the narrowing of the weave, from which one thread at a time is gradually removed. They are tucked into the inner part and cut off.
- Several short threads are threaded into the finished body using hooks. A number of rep knots are made, the rest are left. These will be the fins and tail.
- Sew beads on the front side (eyes).
It is quite difficult to master the macrame technique, many weaving patterns require high concentration and perseverance. But if you hone your skills and develop fine motor skills, you can create real masterpieces.
A few simple items for beginners will be enough to master the practice. And many needlewomen, having achieved perfection, earn good money on weaving. Therefore, the hobby can be monetized if you try and practice a lot.
Video about macrame
Macrame for Beginners. Weaving Patterns: