It is best to start drawing with a pencil with simple sketches that are easy to repeat. Beautiful drawings not only allow you to get a good final result, but also bring pleasure, allow you to escape from everyday problems, work and study. Gradually, as you acquire skills, you need to move on to more complex techniques and plots.
Easy pictures to copy with a pencil
Beautiful pencil drawings can be done in different ways, there are also many approaches to the technique of execution, but copying from a finished drawing is one of the simplest.
For beginners, the following plots are recommended:
- drawings based on simple geometric elements, as well as patterns, ornaments, mandalas;
- "cartoon" images of animals and anime-style characters;
- graffiti – an image of “three-dimensional” inscriptions;
- "pixel" drawings on cells.
Cool pictures for copying
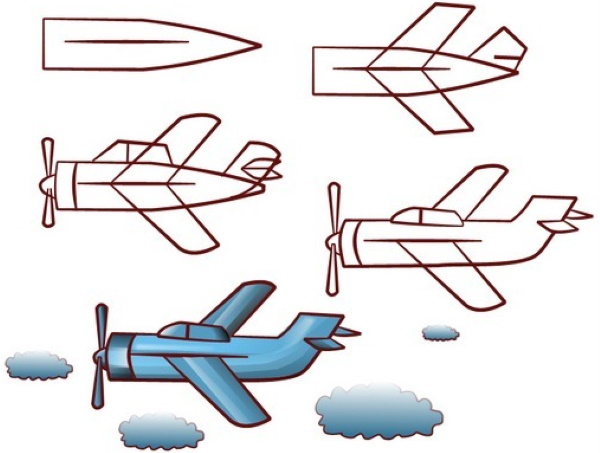
An easy way to draw a flying paper airplane:
- First, you need to draw an elongated triangle, the acute angle of which is directed in the direction in which the plane will fly. The upper line will be its middle fold line.
- Then you need to draw an angle pointing downwards from the middle line.
- Connect the free side of this corner with a straight line to the top of the airplane.
- Draw the second triangle, slightly smaller in size than the first.
- From the back of the airplane, you can draw its “trajectory” with a dotted line.
Drawing in the mandala style is a simple geometric technique, but a drawing filled with many details that you can invent yourself looks sophisticated and unusual.
It is also a great way to relax.
The general drawing technique is as follows:
- Draw a circle with a compass. Its outline will be the outer border of the mandala. If you don't have a compass at hand, it will be convenient to draw on a sheet of paper in a grid.
- Then draw 2 mutually perpendicular diameters.
- Divide each of the quarters of the circle into 3 equal parts, draw the axes of symmetry. As a result, the circle will be divided into 12 equal parts.
- The drawing always starts from the center of the mandala. Draw several concentric circles. This can be done "by hand".
- Then continue drawing from the center to the periphery of the mandala, using simple elements - arcs, "petals", which should be located symmetrically. The axes of symmetry that were drawn earlier will help with this.
- At the last stage, color the elements of the mandala with colored pencils.
Cute drawings for personal diary
For simple cute drawings for a personal diary, you can use a plot in the form of various fairy-tale creatures, which are depicted as rounded curved figures. Small dotted eyes, a smiling mouth, pastel colors and bow decorations will give them a particularly cute look.
If you add simple elements to them in the form of wings, ears, tails, you will get recognizable characters - cats, birds and others. The facial expressions of these creatures can reflect the mood of the owner of the diary. The step-by-step master classes below provide the simplest options.
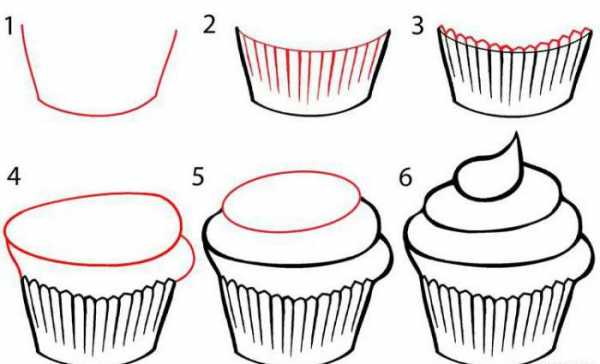
Beautiful pencil drawings in the form of cakes for a girl's personal diary can be made using the following step-by-step method:
- First you need to draw a cup for sweets in the form of a basket.
- The top of the dessert should be depicted as a “cloud”, gradually narrowing towards the top; you can make it pointed.
- Where the cup is, you need to draw big eyes with pupils and a smiling mouth.
- Color the top of the cake with a pink crayon and the cup with a brown crayon.
A slice of juicy watermelon can be drawn as follows:
- First, draw a triangle with 2 equal sides.
- After this, the base of the triangle needs to be rounded a little.
- Outline the watermelon slice more brightly, and also draw a line parallel to the base (for the peel).
- Color the "peel" with a green pencil.
- At the top of the slice, draw black drop-shaped grains in a chaotic order, as well as eyes and a mouth (this will be an animated character).
- Color the flesh of the slice with a red pencil.
Graffiti with pencil
Graffiti drawings can be done in a variety of ways, as this symbol of hip-hop culture is characterized by complete freedom.
The general technique for executing a drawing is as follows:
- First, you need to think about what word or expression will form the basis of the graffiti (for beginners, a proper name or a short word of 3-4 letters is best).
- Then write the chosen phrase on paper in thin lines using regular printed font.
- After which the letters are drawn in a wider font, giving them smooth, pointed or ornate contours to taste.
- Next, you need to think about which letters will be on the top layer and which on the bottom. They need to be outlined accordingly, and the extra lines erased with an eraser.

- To give the inscription “volume”, the contours of the letters are duplicated (creating a shadow).
- At the final stage, the inscription is painted over. If you leave unpainted areas in the middle, they will look like highlights. You can also make the lower part of the inscription in darker tones.
Butterflies
Butterflies can be drawn using the following universal and simple technique:
- First, you need to make an elongated body, which will also be the center of symmetry.
- To make it easier to draw the wings, draw a thin line that divides the body in an approximate 2:1 ratio.
- Draw the wings in parts - the upper one is larger, and the lower one is smaller. The lines should be smooth and curved.
- Next, draw a circle at the top of the body – the head.
- Two long antennae, also symmetrical, should extend from the head.
- And the most interesting stage of drawing is the patterns on the wings. Here everything depends on the artist's imagination. You just need to take into account that the elements should be symmetrical relative to the body on both wings. Therefore, it is better to use simple elements - curls, circles, "drops", performing them alternately first on one wing, and then on the other.
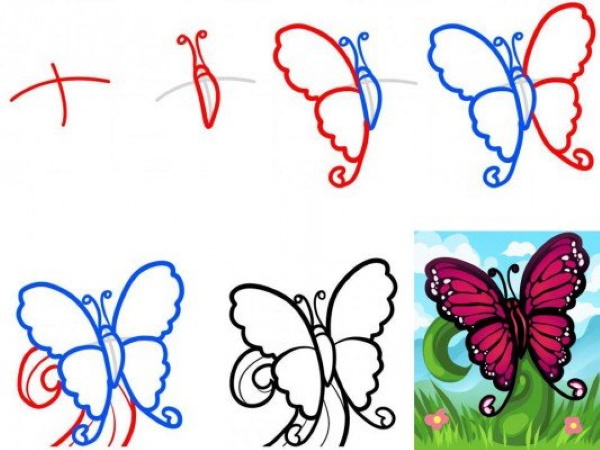
- At the last stage, you can color the butterfly with colored pencils.
Animals
Animals are one of the favorite themes for drawing, which is also the most difficult.
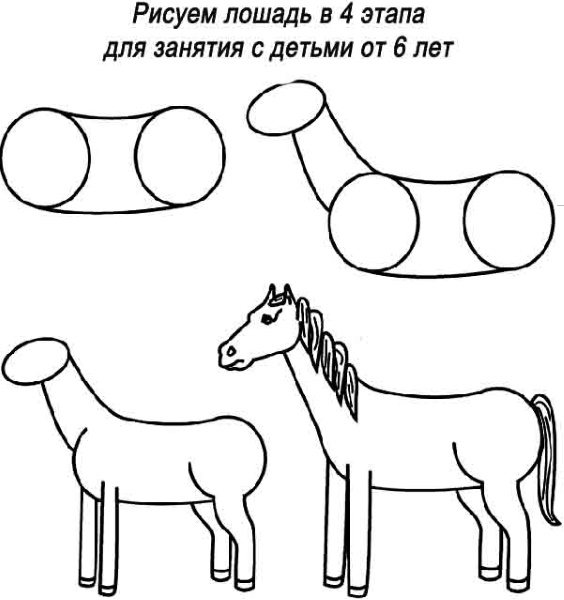
How to draw a horse in a simplified version is described in this master class:
- First, make the body in the shape of a large oval.
- Then draw the legs below (using simple lines, as if the horse's figure were made of wire). Depending on the animal's pose, you need to turn the body and bend the legs. In this case, the horse simply stands on its legs.
- After that, you need to draw a small circle at some distance from the body. This will be the animal's head.
- Mark the neck as a curved line.
- To draw a muzzle, first you need to make a middle line. Then symmetrically draw the details of the tip of the muzzle, nostrils, eyes, ears, mane.
- Then draw the neck using lines parallel to the main one.
- The next step is to depict the horse's legs and hooves.
- The body is almost ready, all that remains is to round off the transitions to the legs and add the tail.
In this step-by-step description, you can learn how to draw a funny dachshund using simple geometric shapes:
- First, you need to draw the head as an elongated isosceles triangle. The acute angle will be the dog's nose, it needs to be colored.
- Then, approximately in the middle of the triangle, draw a pair of eyes, the pupils of which are slightly slanted towards each other, eyebrows raised in surprise above the head and a mouth in the form of a short stroke.
- The body should be made in the shape of an elongated “sausage”, with a narrowing at the neck.
- Draw short legs onto the body.
- Next, all that remains is to add the ears (also in the form of a long triangle) and a thin, long tail.
For a girl
Many girls like to draw flowers, kittens, ponies, princesses and other subjects. Some of them are difficult for beginners.
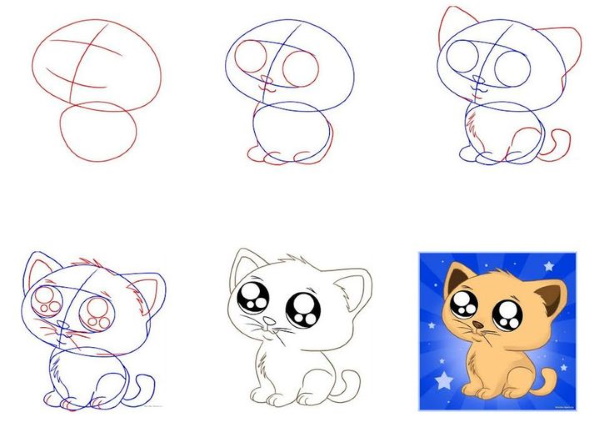
To make a simple kitten drawing, you will need the following:
- First, draw an oval that will be the animal's head.
- In the middle, paint 2 small circles, leaving the pupils white. You can move them a little to the side to make the kitten look more playful.
- Between the eyes, draw a small triangle (base up) – the kitten’s nose. Color it in with a pencil.
- On the top of the head, draw 2 ears in the form of triangles.
- The body can be made in a simplified way - by drawing it with smooth lines along with three legs (the fourth is located at the back and is not visible).
- And as a finishing touch - the kitten's tail raised up. The whole drawing can be painted in different colors as desired.
The following master class will help you create a beautiful drawing of a teddy bear with a heart, made with a pencil:
- First you need to draw a vertical axis of symmetry, then a circle that will be the head, and below it an oval (the body).
- Then the bear cub's ears are depicted with two arcs.
- Draw 2 small circles along the middle line of the head – eyes, color them in.
- Below the eyes, within the circumference of the head, draw an oval - a muzzle, at the top of which is the nose.
- On the sides of the body, make 2 small ovals - the front paws of the bear cub.
- At the bottom, add 2 larger ovals, at a distance from each other – the hind legs.
- In the center between the paws, you can draw a heart, as if the bear is holding it.
- Now it remains to complete the small details - draw a smiling mouth with a semi-arc and a couple of "fingers" with strokes on the upper paws.
For a boy
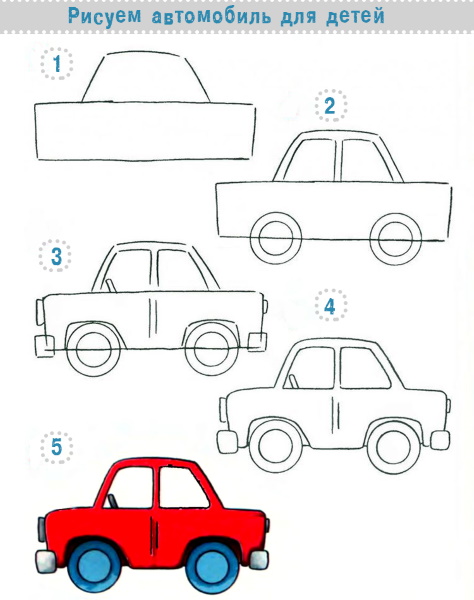
Cars are one of the favorite drawing themes for boys of all ages. Cars are quite difficult to draw because of the curved lines of the body.
The following technique will help make the process easier:
- The first step is to draw 2 elongated rectangles in a horizontal position. The longer one is below and the shorter one is above it.
- Next, you need to "cut off" the short sides to get a contour close to the real one. Erase the old lines with an eraser.
- Then draw a partition in the middle and car windows inside the upper rectangle.
- On the lower rectangle, draw 2 circles – wheels, erase the horizontal line that goes onto them with an eraser.
- Draw a line in the center that will indicate the car door.
- Draw the final details – headlights, steering wheel, door handles and color with colored pencils.
It will be a little more difficult to draw a minion. It is necessary to remember that it is necessary to strive for simple geometric figures and forms.
The step-by-step technique is as follows:
- First, you need to draw the outline of a “cartoon” creature with a pencil, which is very similar in shape to a Kinder Surprise capsule.
- Next, at the top of the character, you need to make glasses - 2 circles connected together.
- Draw dark pupils inside them, leaving a little white to create a highlight.
- Paint over the rubber band from the glasses along the edges.
- After this, exactly in the middle of the capsule, you need to draw a mouth in the form of a crescent, inside which there should be 4 small teeth on top and 2 on the bottom. The rest of the space in the mouth is painted black.
- Then you need to draw the minion's overalls - 2 straps just below the mouth level, draw the front part of the clothing outline in the shape of the letter "P". Draw a small rectangular pocket in the middle.
- Then draw the creature's arms below the straps, and short rectangular legs with boots at the bottom.
- Draw the hair on top using several short strokes.
- Color the minion's body with a yellow pencil, the jumpsuit with blue, and the boots with black.
About love
Beautiful pencil drawings about love most often contain its most popular symbol - the heart. Many draw it pierced by an arrow, but in the step-by-step master classes described below, other images are presented. Drawing "Key to the Heart".
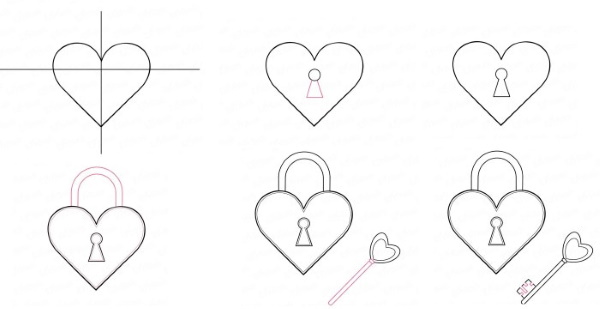
To obtain it, you will need to complete several steps:
- To make the drawing neat and symmetrical, it is necessary to draw auxiliary thin lines crosswise.
- Next, draw a heart - draw one arc to the left of the intersection of lines, and the other to the right.
- Almost in the middle draw a small circle, then a triangle with the base at the bottom. This will be the keyhole.
- Then draw 2 arcs on top, above the heart. This will create a hinged shackle for a padlock.
- Now you need to "pick" the key for the heart-shaped lock. Draw a stick at an angle next to it.
- Draw a rectangle on the lower end of this stick, in which draw several slits. Erase the extra lines with an eraser.
- On the other end of the key, draw a double heart on a smaller scale.
The following simple drawing with a human figure can be a symbol of unrequited love:
- Draw an arc at the bottom of the sheet to represent a hill.
- Draw the person's head in the form of a circle and the body in the form of a rectangle.
- The person's arms and legs are depicted as being lowered, as if he were sitting on a hill.
- Draw a small heart on the left side of the body with a red pencil.
- Draw a cloud on top, from which rain is dripping in small strokes.
- To add more life to the drawing, you can shade the shadows on the head and under the person's body.
Pictures "space"
The most difficult element in drawings dedicated to space is the image of a space rocket.
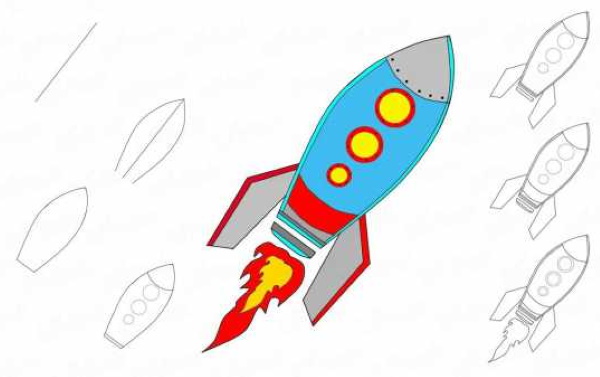
It can be drawn in a simplified way:
- First, draw the outline of the body as an inclined elongated element with a pointed end, which is separated from the rest of the rocket by a line.
- Then you need to draw the "wings" of the rocket at its bottom (in fact, these are stabilizers that provide its stability in the air). They can be drawn in different ways, but the easiest way is as beveled trapezoids. It is enough to depict 2 stabilizers on the left and right.
- Draw "portholes" in the center of the rocket in the form of concentric circles. If the rocket is long, you can make 3-4 portholes. You can also draw a line at the bottom to make it look more like a real craft.
- At the very bottom, you can depict a yellow-red “flame” bursting out of the nozzle.
You can draw other space attributes around the rocket - flying comets, planets, the surface of which can be decorated with craters or simply painted in different colors.
Seasons of the year
You can draw the seasons with pencils on one sheet of paper using the following step-by-step technique:
- Divide the sheet into 4 equal parts vertically (you can also draw 2 lines of symmetry crosswise so that each season - winter, spring, autumn, summer - is located in the corners).
- Draw a smooth curved line horizontally across the entire drawing, which will be the ground level.
- In the middle of each of the 3 vertical lines that separate the seasons, draw from left to right - a Christmas tree, a tree with a continuous leafy crown and a tree with individual leaves.
- On the far left side of the sheet, draw a simplified snowman (one circle is larger, the other is smaller), add a carrot, and depict falling snow in the form of circles.
- On the second part of the sheet, which symbolizes spring, draw flowers, butterflies, and a rainbow.
- On the third part behind the trees, depict a large sun with diverging rays (summer).
- On the far right side, draw a cloud, rain (using small strokes) and individual leaves falling from a tree.
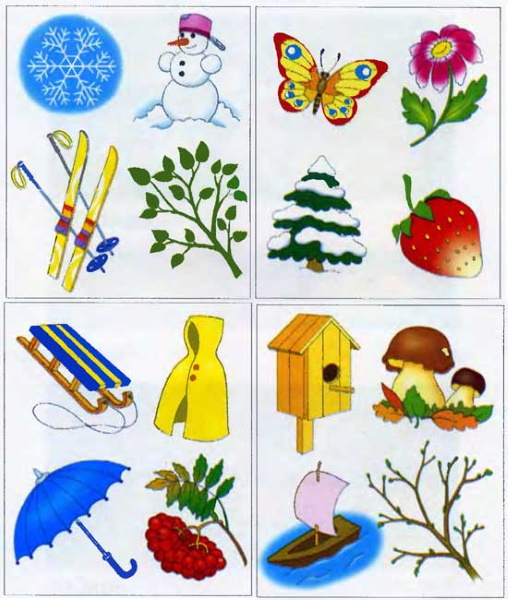
This picture can be colored with colored pencils. The part that is dedicated to winter should be in black and white shades, spring - light blue sky and dim, light green grass and foliage, summer - more saturated green tones, autumn - yellow and orange colors of leaves and grass, gray sky.
Beautiful and easy drawings on cells
Beautiful pencil drawings are easy to do using the "pixel" technique on the cells in a regular notebook. In addition, they develop logic and thinking.
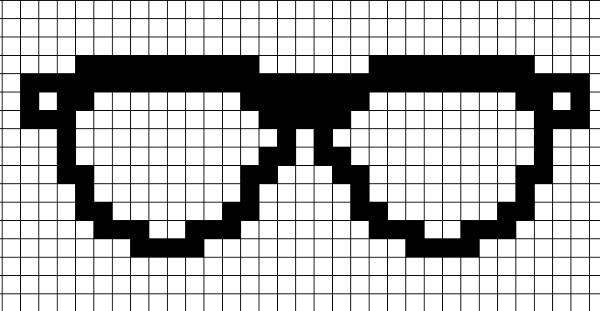
How to draw cool black glasses from top to bottom using squares:
- First, you need to mark the length of the points by putting dots in the cells. They should be located in one horizontal line and their number should be even, for example, 26 cells.
- Then you need to outline this strip with a width of 1 cell and color it with a pencil.
- After this, you need to draw the "lenses" - paint the second row of cells below the first, 2 cells on the edge, the 3rd and 4th rows - also 2 cells, shifting them one cell to the center. You will get a figure resembling a ship in the game "sea battle".
- The 5th row needs to be shifted one cell lower and painted immediately 7 cells towards the center.
- Then you need to "fill" the lens with colored cells, alternating them in a checkerboard pattern with empty ones. This will create the effect of glare on the dark lenses of the glasses.
- The central part of the glasses along the outer contour also needs to be made stepped, and completely painted inside. In total, 12 cells will be used in the second row.
- In the middle of the second row, leave 2 cells empty and draw the second half of the glasses in the same way (place the “glare” closer to the center, not on the edge).
For girls, we can recommend another simple design – strawberries.
The order of its execution from top to bottom is as follows:
- First, you need to draw the outline with a black pencil. To do this, paint 1 cell in the center of the sheet.
- In the second row, paint 2 cells, placing them diagonally to the left in relation to the first.
- Repeat the same on the right side.
- In the next row, repeat steps 2 and 3.
- In the next bottom row, paint 1 cell in the same way.
- Next, you need to paint 4 cells down to the left and right of the previous row.
- Then paint 2 cells down. This time, moving diagonally towards the center.
- In the next 3 rows, paint 1 cell diagonally.
- Paint the remaining space in the center between the right and left halves of the strawberry black (3 cells horizontally).
- In the 4th row from the left, paint 2 cells towards the center so that they touch the outline diagonally.
- Repeat step 10 for the other side and fill the cell in the middle with color, lowering it by 1 row.
- Next, you need to draw the eyes - to do this, paint 3 cells on the left and right in the central part of the figure.
- In the middle, between the eyes, paint 1 cell – this will be the nose.
- Color the top gap, consisting of empty cells, with a green pencil.
- Symmetrically paint several cells yellow – they will imitate the berry seeds.
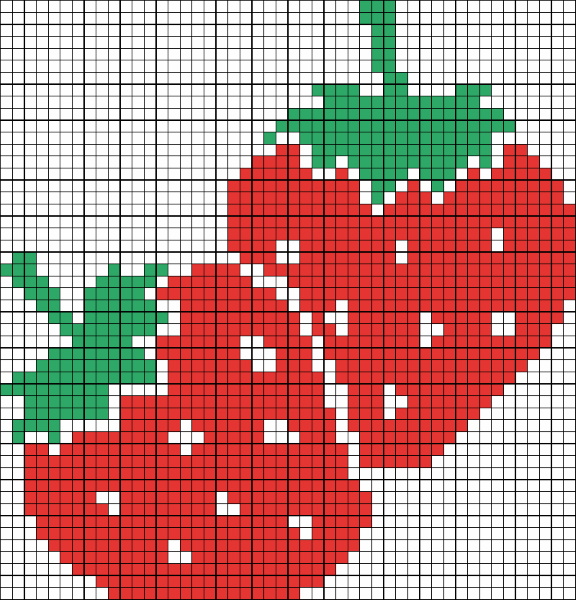
- Color the rest of the space with a red pencil.
Easy and very simple anime
A very easy and simple drawing of a girl in anime style can be done as follows:
- At the first stage, draw a round outline of the head.
- Then draw a vertical axis (using light pressure with a pencil) to indicate the line of symmetry of the face.
- Mark the position of the upper and lower levels of the eyes, nose and mouth with parallel thin horizontal lines. Since a characteristic feature of anime cartoon characters is very large eyes, the distance between the first two lines should be quite large.
- Then you should draw the most important element - the eyes. The easiest way to do this is in the form of "arches" limited from below by horizontal lines. In the middle of the eyes, draw a round iris (it can be slightly tilted, so they will look "more alive") and paint the pupils.
- After this, draw the lower part of the face with a pointed small chin.
- Draw small ears using semi-circles.
- The nose can be made in a simplified way - in the form of an “angle” facing the left side.
- The mouth should also be drawn as a short arc facing upwards. You can experiment with its tilt to give the desired expression to the face.
- At the last stage, you need to draw the hair. Make the outer contour in the form of 2 large arcs, and draw several strands on the forehead in the form of stripes with pointed ends.
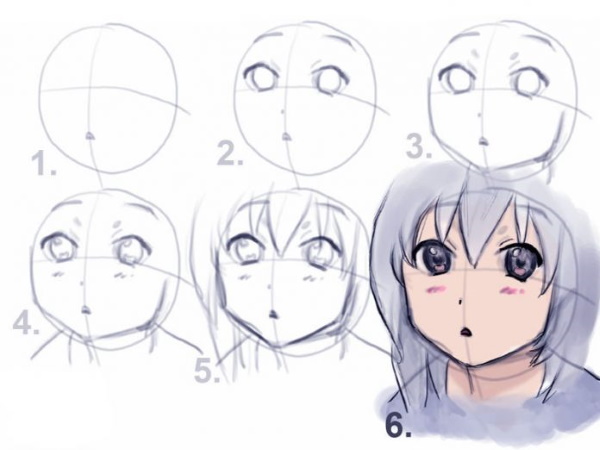
After the main elements are completed, erase the auxiliary thin lines.
You can draw an anime style kitten like this:
- First, make an oval outline of the head.
- Then add 2 triangular ears on top.
- Then draw the eyes in the form of two black dots, and the nose in the form of an inverted letter “Y”.
- The mustache can be indicated purely symbolically - by 2 short lines on the right and left of the head, crossing the contour.
- Next, draw the body in the form of a square with 2 pointed corners at the bottom, which will be the hind legs.
- Draw a tail on the side.
- In the middle of the body you can draw a small fish and simply outline the legs that hold it.
Beautiful pencil drawings, the technique of which is described above, serve only as a basis, which can be supplemented with other elements as desired. Copying is a good way to develop skills, and you can add something of your own to each of the drawings. It is best for beginning artists to sort the pictures by complexity to gradually “get the hang of it.”
Video about beautiful pencil drawings
Learning to draw. Drawings for children: