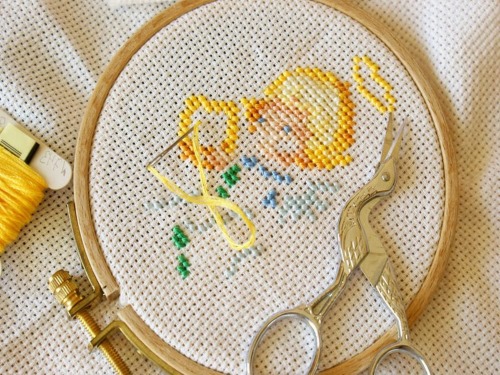
Usually, for beginner needlewomen, the question of how to cross stitch correctly is relevant. But before starting the process, it is worth understanding what will be useful in the work, and how to choose these tools correctly.
Materials and tools for work
In embroidery you will need:
- canvas;
- threads;
- needle;
- scheme;
- hoop or machine.
Additionally, you can get a thimble, a lamp, a magnifying glass, a marker, a thread cutter-ripper. Or buy a ready-made kit, which will already include canvas, threads, needles and a pattern.
Selecting canvas, its types and sizes
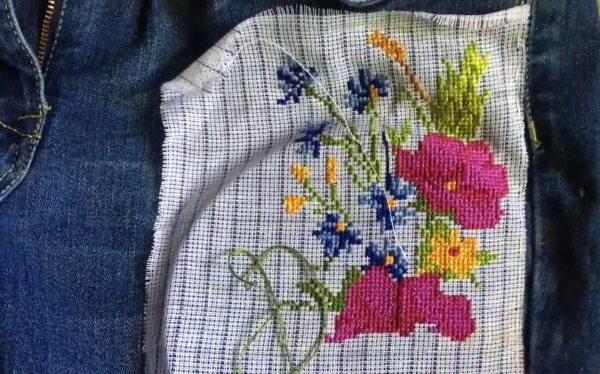
The basis of any embroidery is the material onto which the needlewoman applies stitches. These can be jeans, silk, cotton fabric, burlap, synthetic fibers and plastic. But there are special materials with a special weave of threads that forms even squares with convenient holes for stitching - canvas.
Canvases come in different compositions, colors, and cell sizes, and are divided into two types by weave: "blockweave" and "evenweave". Blockweave has a clearly defined square, while the evenweave type is a continuous canvas without division into squares.
Block canvas
The most famous block canvas is Aida. Aida embroidery is smooth and effortless. It is stiff enough to work without a hoop, and is available in a wide range of colors and sizes. The canvas number, or count, indicates the number of cells per inch. This means that the smaller the count, the larger the cross will be.
If you convert it to a regular centimeter, the numbering will look like this:
- Aida 8 - 31 cells in 10 cm;
- Aida 10 – 39 cells in 10 cm;
- Aida 11 - 43 cells in 10 cm;
- Aida 14 - 55 cells in 10 cm;
- Aida 16 - 63 cells in 10 cm;
- Aida 18 - 70 cells in 10 cm;
- Aida 20 - 79 cells in 10 cm.
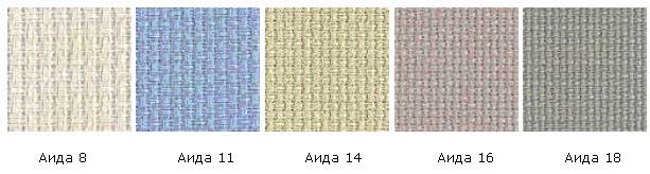
Aida 8-11 is well suited for cross stitching for beginner needlewomen and children. Its cells are large and it will be easy to make a stitch in them. It is embroidered with 2 threads, but it is possible with 3 and 4, if the pattern requires it. But with Aida 16-18 using more than 2 threads can become difficult. The cells are small, and more experienced craftsmen usually embroider on it.
On Aida 20 they work with one thread. The cross stitch comes out light, suitable for embroidering a portrait, and if you use 2 threads, then a landscape comes out well.
When buying Aida canvas, you should pay attention not only to the color and size, but also to know the manufacturer:
- Belarusian Aida is softer, but can lose its shape after washing.
- Hungarian is a little tougher.
- German (Zweigart company) does not lose shape after contact with water.
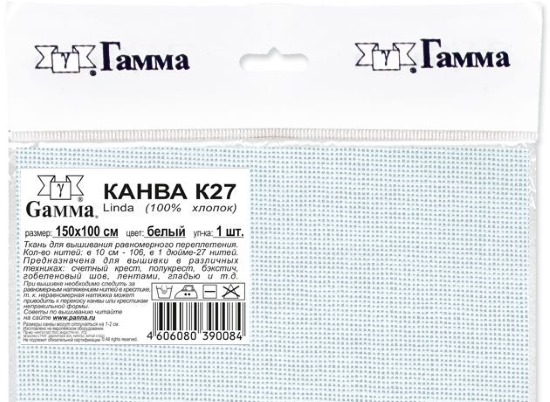
A worthy replacement for Aida is the Gamma canvas. It has the same dimensions and quality, but is much cheaper. Another block canvas is Hardanger. Its count is 22, which corresponds to 87 cells in 10 cm. Embroidering on this canvas is difficult and painstaking, but the picture will turn out as if it were painted.
These canvases are made of 100% cotton, although there are also some with synthetic fibers, metallized, with lurex or made of 100% wool.
Uniform canvases
Plain canvases come in 100% cotton, 100% linen, cotton/linen blends, cotton/viscose blends, and linen/viscose blends.
Embroidering on such material is more difficult than on Aida, but craftswomen often use it when they need to do work with a large amount of empty unsewn background or apply techniques that cannot be implemented on block canvas. The color range is also quite wide.
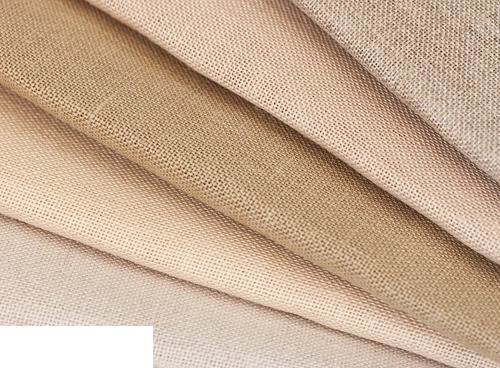
Of the natural fibers, the most durable is flax, but it is the most expensive. Mixed linen fabrics are an order of magnitude cheaper, although they are not inferior in quality. Here the embroiderer needs to decide what will best suit the idea.
For example, napkins and tablecloths are usually embroidered on linen, and shirts and dresses can be decorated on mixed linen. Uniform canvases made of 100% cotton and mixed cotton are suitable for embroidering pincushions and toys, handbags and pillows.
Stramin
How to cross stitch, for beginners, you can learn on the canvas stramin. It is distinguished by large cells, on which it is easy to understand how to apply even stitches.

Stramin is very hard and its mesh structure is suitable for creating small rugs, tapestries and embroidery on sofa cushions. Instead of stramin, you can use construction mesh.
Plastic canvas
Plastic and vinyl canvas are similar to stramin but much stiffer. Craftswomen use these canvases where crafts need to hold their shape.
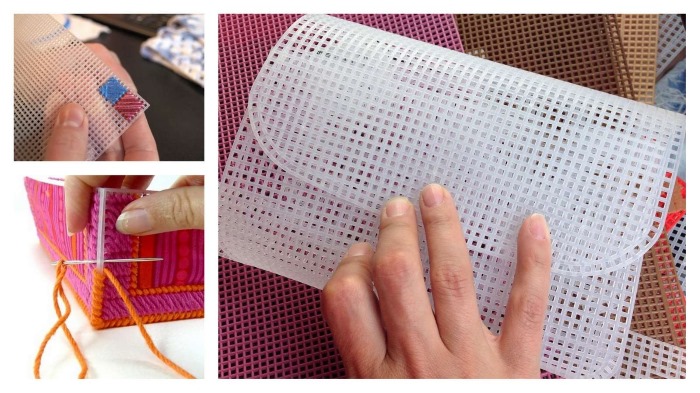
For example, in the production of magnets, Christmas tree decorations, postcards, book covers and decorations.
Canvases that delete
There are water-soluble canvases and overlay canvases. These canvases are used where the base for embroidery needs to be removed.
Suitable for applying designs to clothing, oilcloth fabrics and eco-leather.
How to choose the right threads
There are many types of threads, as well as embroidery bases. They differ in manufacturers, composition, length, quality and price.
For cross stitching, 3 types of threads are usually used:
- wool;
- silk;
- floss.
Wool
Wool threads are inexpensive, but the color palette is limited, and there are practically no transitional shades. Embroidery from them is bright and saturated, suitable for a child's room.
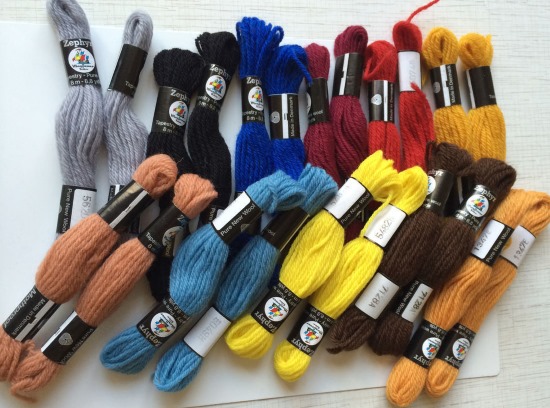
The disadvantage is that wool is not durable, it quickly wears out and breaks, even if you work with a short thread.
Silk
For a beginner embroiderer, some nuances can make the work difficult - silk threads are very slippery, and the stitches are uneven because of this, so only an experienced craftsman can work with them correctly.
They need to be unpacked immediately before embroidery, as silk threads quickly become greasy and lose their shine. It is better to handle them with clean hands and very carefully.
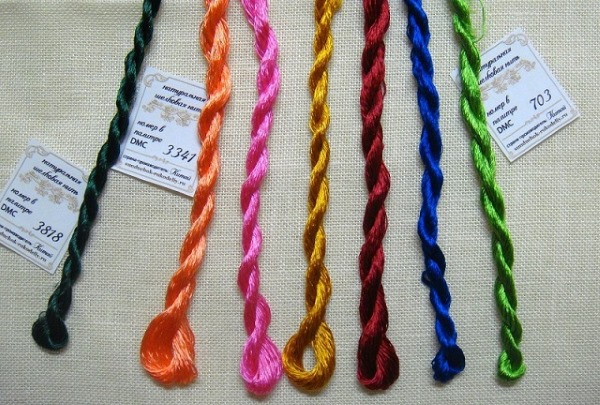
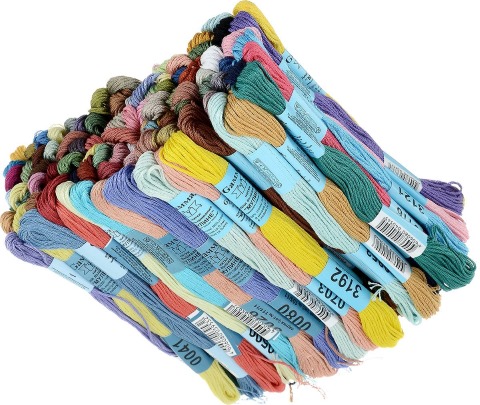
Mouline thread
Ideal threads for both experienced craftswomen and beginner embroiderers. They differ in composition, manufacturers, color range and price. The thickness of the thread is the same for all manufacturers.
Every needlewoman needs to know the main types of floss in order to choose the right one for her work:
- Cotton floss takes first place. These threads are made from 100% cotton. They are strong, resistant to chemical influences and retain their color saturation for a long time.
These threads are twisted into a skein (skein), and usually the skein length is 8 m, but some manufacturers have 10 m. The skein consists of 6 threads that can be divided among themselves. This allows you to adjust the thickness of the embroidered cross in the canvas.

- Linen floss, unlike cotton, has a natural shine and silkiness. Otherwise, these two threads are very similar.
- Metallized threads are produced with the addition of polyester. In embroidered pictures with the help of such threads it is possible to realistically depict the shine of precious metals and stones.
- Melange — is a thread, one color of which smoothly passes into another. With their help, you can depict shadows or play with light. But beginners should not take up this technique, since each cross must be made separately.
- Glowing threads are gaining popularity. Impregnated with phosphorus, the painting glows in the dark, and fluorescent ones are visible under ultraviolet light.
There are many thread manufacturers, but it is worth highlighting several well-known companies that have been guaranteeing quality for many years.
Among Russian manufacturers it is worth noting:
- Gamma company. The threads are made from 100% Egyptian cotton. The color range is about 600 colors and their shades.
The advantage over similar Western manufacturers is the price, which is significantly lower, although the quality of the material is almost as good. When embroidering, such threads do not twist and lie smoothly on the canvas, but they are a little hard to the touch and sometimes leave lint when embroidering.
- PNK named after Kirov in Saint Petersburg. The color range is over 550 shades. Threads made of 100% Egyptian cotton are soft, strong, and pleasant to work with.
Leading foreign manufacturers:
- DMC Company from France, the oldest company producing floss. Standard threads are made from 100% cotton with double mercerization. This allows the threads to shine beautifully, not stretch out and not fade. At the same time, they are not subject to fading, withstand high temperatures after washing, preserving the original color for many years.
When working with them, there are no knots, they do not twist, do not fray, do not tear, remaining soft and pleasant to the touch. Today, the palette is about 500 colors, the length of the skein is standard - 8 m.
There is also a line of metallic and linen floss. There is one downside to working with DMC threads - a significant price. One skein costs more than 40 rubles, and when embroidering an average picture in 80 colors, the cost of threads will be high.
- Anchor. Coats Crafts, the English company that owns the Anchor brand, has been producing threads for 200 years. They are not inferior in quality to DMC threads, but only if they are made in the UK or Germany.
If the packaging is marked with countries such as Pakistan and India, then the quality may differ, but not significantly. In terms of price, they are almost 2 times cheaper than DMC, which makes them even more attractive, especially for beginners in cross stitching.
- German company Madeira — the oldest manufacturer of decorative floss. The company has been engaged in this area since the 50s of the 20th century and has firmly occupied a leading position in the market. In addition to 100% cotton floss, it produces metallic, silk and viscose threads.
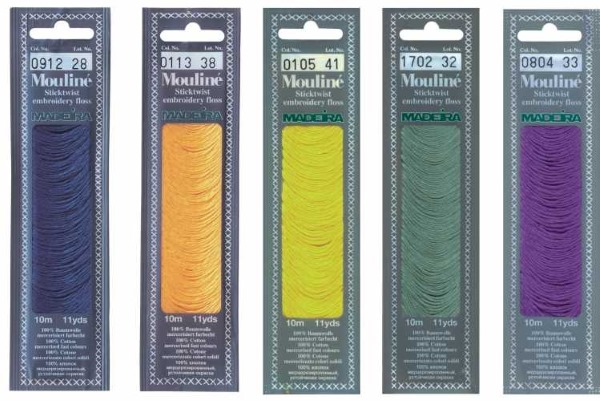
They do not fade, do not shed, withstand temperatures up to 95 degrees during washing, are evenly woven, soft and lie smoothly in the stitch. Another feature is the skein, which is 10 m long. The quality of the threads is high, and the price is reasonable, so many ready-made kits from different companies are equipped with these threads.
- Belka floss of Russian-Chinese production claims to be an analogue of DMC in Russia. The same color in each batch does not differ, unlike Gamma and PNK im. Kirov. The threads are pleasant to work with, do not twist and shine. The price is 2 times less than DMC floss.
Choosing Needles for Embroidery
When working with the “wrong” needle, you can not only ruin the thread or make a hole in the canvas that is too big, but also get hurt.
To avoid making a mistake, you need to know the types of needles and their purpose:
- Tapestries. This needle has a large eye and a blunt tip. The floss slides freely in the eye, which reduces the risk of fraying and allows you to thread several threads at once. Needles are numbered from #16 to #28.
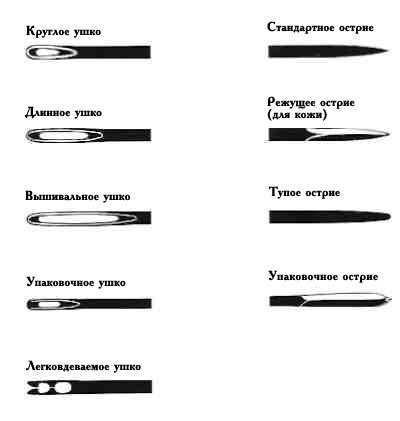
- Embroidery. These needles have a wide eye and a sharp tip. They are about medium length. They are used in embroidery with different techniques, especially suitable for the satin stitch technique. The numbering of these needles is № 16-26.
- Darning. These needles are of medium length, with a small eye and a sharp end. They are used in darning work.
- Sewing. Needles with a small eye of medium length. Used for hemming and overcasting.
How to cross stitch for beginners is best understood using a tapestry needle, as it eliminates the possibility of splitting the canvas. The higher the number of the needle, the thinner and shorter it is. Thin needles are suitable for canvas with a hard texture, while thicker needles are used for "loose" material.
The following table is provided for selecting a needle:
| Count of canvas | Needle numbering | Number of threads |
| Aida 6 | 19 | 2 |
| Aida 8 | 20-22 | 2-3 |
| Aida 11 | 22-24 | 3 |
| Aida 14 | 22-26 | 2 |
| Aida 16 | 24-26 | 2 |
| Aida 18 | 26 | 1-2 |
| Aida 20 | 24-26 | 1-2 |
| Hardanger 22 | 26-28 | 1 |
Needles from different manufacturers may differ in length and appearance, but the number indicating the diameter is the same for all.
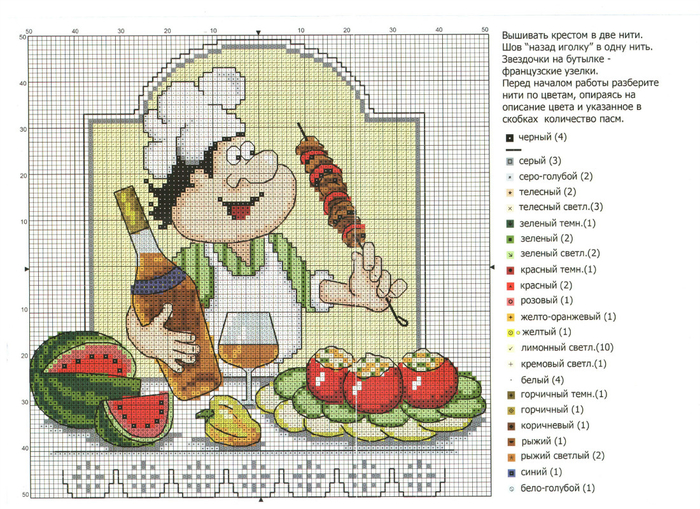
Embroidery pattern
The basis of counted cross stitch is a symbolic scheme designed to guide and facilitate the embroiderer's work. First of all, it should be readable and convenient. If the intended picture is small, then the diagram should take up the optimal space on the sheet, and not stretch over 3 pages.
Black and white schemes
Symbolic designations of such schemes are transferred in black paint to a white background. The scheme is lined with 10x10 cells for the convenience of the embroiderer. Each symbol denotes a certain color of floss with the name of the manufacturer. For example, the numbers of the Gamma or DMC color palette.
The pattern is printed on an A4 sheet, and if the pattern is more than 1 sheet, then the last row of 3 cells wide duplicates the next sheet of the pattern. This is done so that the embroiderer does not get confused when moving from one sheet of the pattern to another.
Color schemes
The symbols are transferred to a colored background using black paint.
Sometimes, if the embroidery is small and has only a few colors, there may be no symbols, but only different colors of cells. The color scheme shows the pattern well, and its background is as close as possible to the colors of the floss.
Color scheme on canvas
How to cross stitch for beginners is most clearly shown in a color scheme, which is immediately printed on the canvas.
This makes the work of a beginner embroiderer much easier, but such a pattern is only available in ready-made kits, which are usually more expensive than kits with empty canvas. After washing, the pattern on the canvas disappears.
Each diagram comes with a key that can be used to decipher it. For example, what colors do certain symbols belong to. The key also indicates the required number of threads and the number of crosses. Based on this data, you can independently select the floss for the pattern you like.
Ready-made patterns with keys can be purchased in specialized stores, viewed on the Internet, or borrowed from friends.
If you want to implement a personal idea, for example, an image of a loved one, then there are special computer programs that synchronize the image with the symbolic scheme and calculate the number of required threads in accordance with the palette of certain manufacturers.
Additional materials
You can get additional tools that can make your work much easier.
Hoop or machine
Embroidery hoops and machines are devices on which the canvas is fixed under tension. They will be needed if the canvas is soft, does not hold its shape, or you need to free your hands for greater convenience.
The hoop is more mobile than the machine. It does not depend on the supports and legs that the machines have. It does not take up much space and is easy to use. It can be round, square, rectangular, oval. It is made of wood, plastic and metal.
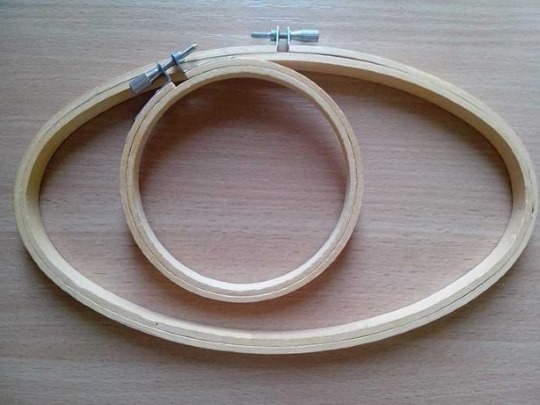
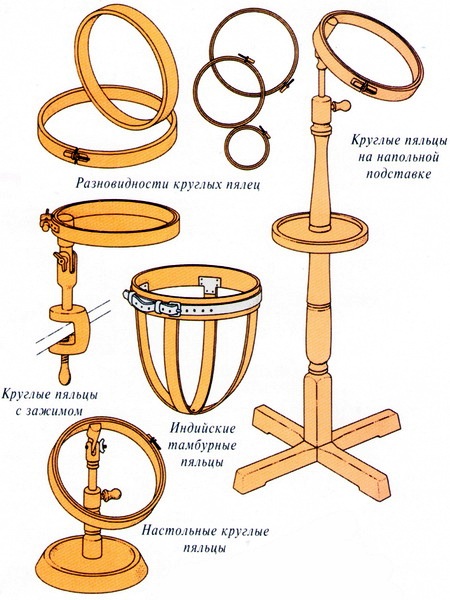
Types of hoops:
- Tambour They range from 10 to 40 cm in diameter. They are mostly made of plastic on store shelves. These hoops are light and inexpensive, but fragile. The main thing when buying is to check that they are smooth, without burrs and sharp seams, since any irregularities can deform the canvas when stretched or even tear it if the base material is thin.
- They are made of metal, but they can leave grey streaks on the canvas, and therefore experienced embroiderers do not recommend using them.
- Wooden hoops are considered to be the best ones., well polished, smooth, with a clip or screw mechanism. They are suitable for all types of fabrics.
- Frame hoop. They are also called tapestry for the ability to perform large works. They are made round and square only from wood and have different types of fastening: clips, Velcro fastening, pins or canvas is sewn on. Uneven tension is excluded, so the canvas does not deform and the embroidery stitches are even.
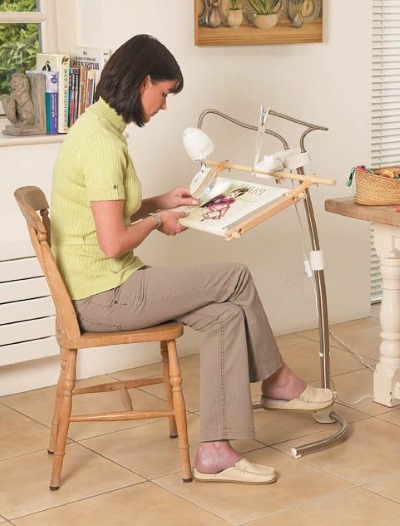
As for the machines, they are similar to frame hoops, only on adjustable legs, they can be divided into:
- Tabletop. Place it on a table or attach it to the table surface with clamps.
- Sofa. This machine has side holders, between which the embroiderer can sit comfortably. The height of the frame and the tilt can be adjusted.
- Floor standing. Convenient for use in large jobs, but takes up quite a lot of space.
The choice of embroidery machine models is quite large; the embroiderer only needs to decide which one suits her best.
Additional materials
Other tools that may be useful in embroidery include:
- When embroidering eco-leather or a thick layer of denim, it is better to arm yourself with a sewing thimble. They can be made entirely of metal, metal and plastic, or entirely of plastic.
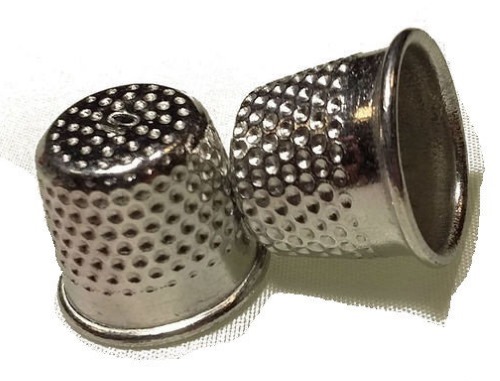
The latter, even if they are made of very hard material, will eventually become unusable, since holes form in plastic with constant contact with a sharp needle. The metal sewing thimble remains the favorite in durability, which is produced not only in the classic form, but also in the form of a ring.
- Magnifying glass makes embroidery easier, especially if the canvas has a count of 18 or higher. Magnifiers come in small and large sizes, with or without legs. You can buy them in specialized stores or in departments with soldering equipment. The cost is from 500 rubles without a support, and from 1,500 rubles with a leg or with fasteners.
- Special washable marker, with which you can mark out a 10x10 canvas and not get confused when embroidering. The main thing is not to wet the canvas until the end of the work.
- Thread cutter-ripper You should choose only well-known brands, as the tool must be sharp. It costs from 200 to 400 rubles. Or you can use regular manicure scissors.
Ready-made kits
If the embroiderer does not want to collect everything for embroidery herself, then it is worth paying attention to ready-made kits.
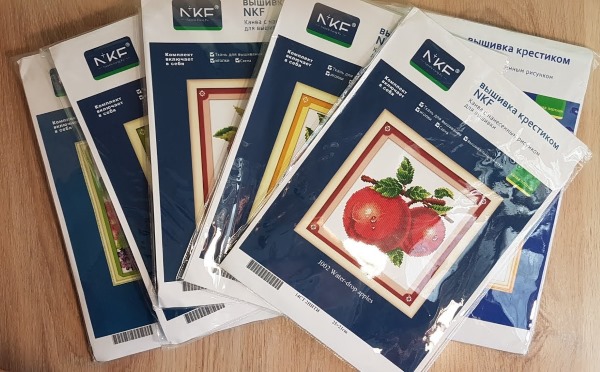
To choose your first set correctly, you should follow simple rules:
- Don't start with a big picture right away. The smaller and simpler the drawing, the faster you can see the result, and thus motivate yourself to do more complex work.
- Find a comfortable place and good lighting. It is better to direct the light so that the shadow from the working hand does not obscure the place of embroidery.
- Carefully read the key to the diagram. If you understand and comprehend the meaning of the symbols, the subsequent diagrams will be easy.
- If something goes wrong in your work, you can unravel a few stitches and go back. Kit manufacturers usually put extra threads, especially for small pictures.
- It is not necessary to achieve perfection of the back side. The main thing is to learn how to make confident and even crosses.
Cross stitch techniques
How to cross stitch, for beginners the following techniques are shown, having mastered which, craftswomen can easily make any drawings:
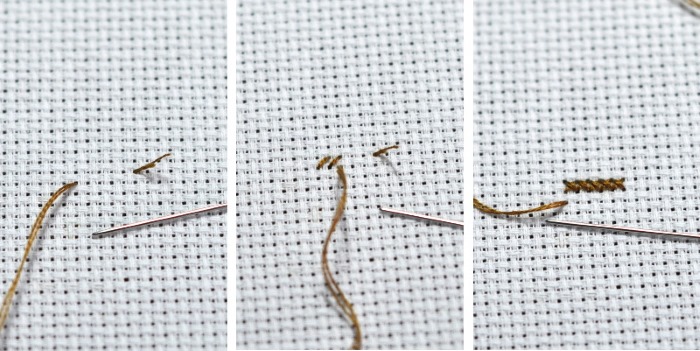
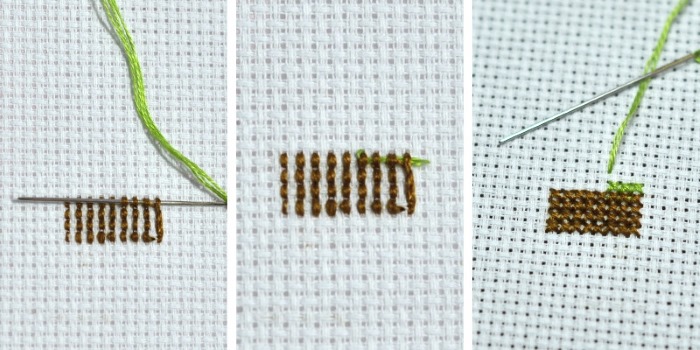
- Traditional. A method in which crosses are embroidered one by one, individually.
To do this, you need to make a stitch from the upper right corner of the cell to the lower left, and then place a stitch from the upper left to the lower right corner on top. Then the next cross. Usually, one color is embroidered first, then the other.
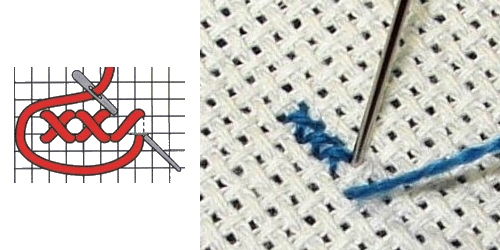
- Danish or rows of crosses. Here, several stitches are made in one direction, and then they are covered with the second halves on top.
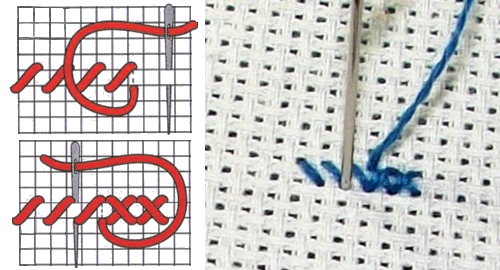
- Even rows. If the pattern requires even rows without moving to a new one, then you can embroider the required number of stitches from left to right, and then finish the crosses from right to left.
- Decreasing and increasing rows. The first time, it is best to start with the longest row, moving diagonally from left to right. The last one should be closed with a full cross, and the needle should be positioned with the point down.
Then turn the needle with the tip up and make the second row of the pattern from right to left. The last cross is closed completely, the tip of the needle is facing down again. The 3rd row is made, at the end it is completely closed with crosses - the needle is facing up again.
Types of crosses
Beginner craftswomen will find it useful to be able to embroider with different crosses, since some works use several types at once.
The basic crosses and the technique for making them look like this:
- Double-sided cross. Make diagonal stitches through 1 cell. From the wrong side, you will get half-crosses in the places where they were skipped from the front side. Then go back, finishing the started crosses. You will get full crosses from the wrong side and the front side. After that, repeat the procedure with the skipped cells.
- Braided Slavic cross. A diagonal stitch is made across 2 canvas squares in length, then covered with a traditional stitch. The next stitch is made from the point below, then also pulled across 2 squares. Closed with a diagonal half cross in one square.
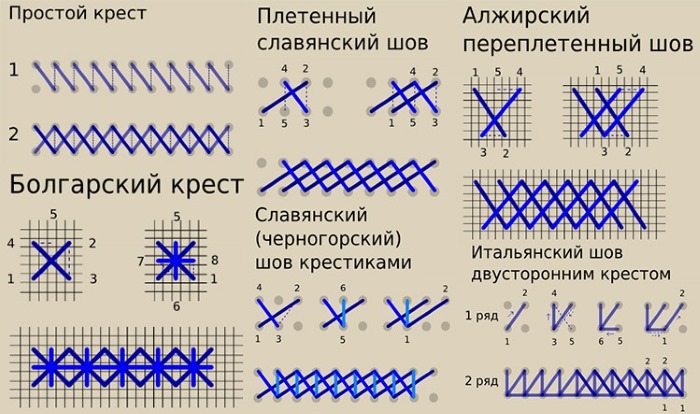
- Double-sided Italian cross. It is necessary so that the canvas is not visible between the crosses. The stitch starts from the lower left corner of the canvas square to the upper right. Then the needle should return to the starting point in the lower left, the next stitch is made to the right horizontally.
Next, return to the point where the first stitch came out, then make a vertical stitch up. The next step is to close the full cross from the lower right corner to the upper left corner.
- Bulgarian cross. It looks like a star or snowflake. Due to the convexity of this cross, the embroidery is more saturated and contrasting. Usually, at least 4 canvas squares are used to embroider this cross.
The idea is to put 1 horizontal and 1 vertical cross on top of a regular single cross. First, you need to embroider a traditional cross, then the needle goes through the middle of the distance between the lower left corner and the middle of the cross - a horizontal stitch is made to the "wall" of the canvas square. Then from the center of the upper left and right corners, a stitch is made vertically to the center of the lower corners.
Step by step cross stitch tutorial
Once you have chosen your canvas, threads, pattern and other tools, you need to learn how to use these materials correctly.
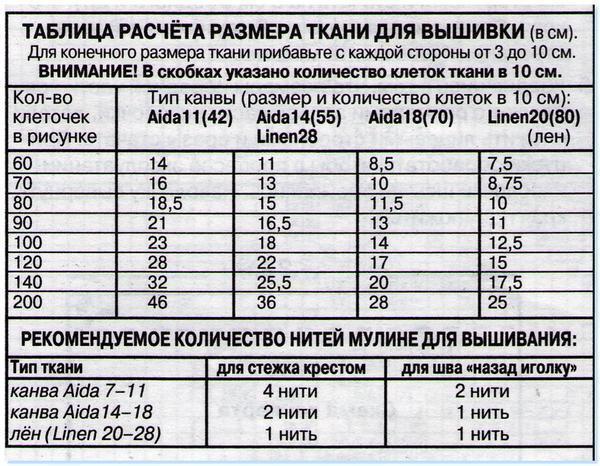
How to calculate canvas size and thread consumption
A calculator for calculating canvas size and thread consumption can be found on the Internet. You need to enter the requested values, and the program will give you accurate data. But if you can’t use the World Wide Web, there are simple calculations.
The amount of canvas = the number of crosses by width (calculated similarly by height) / count value * 10. The result will be in centimeters.
For example, you need to calculate the consumption of Aida 16 canvas for embroidery consisting of 250 crosses in width and 150 crosses in height:
- Width: 250/63*10=39.68, i.e. 40 cm.
- Length: 150/63*10=23.80, rounded up to 24 cm.
- You need to take canvas with some extra space to leave room for the frame or hoop.
Calculating the threads is a little more complicated:
- For convenience, you can take a 1 m long thread and fold it in half. This will give you a working double fold of 0.5 m.
- On Aida 14 canvas, you can embroider approximately 47 crosses with this thread, but it is worth rounding up to 50 for reserve, since beginner embroiderers do not always make even stitches.
- Now you need to see how many crosses you will need to embroider in a particular color. Presumably, you will need to make 118 crosses in green. The calculation will be as follows: 118 (number of crosses) * 100 (thread length in cm) / 50 (crosses from 100 cm of thread) = 236 cm.
- Now you need to calculate how much to cut off from 8 m of skein to get 236 cm of single thread. The following formula is used here: 236*8 (8 m of thread in a skein) / 4800 (8 m (800 cm) * 6 (addition of threads in a skein)) = 0.3933, that is, 0.40 m needs to be cut off from the skein.
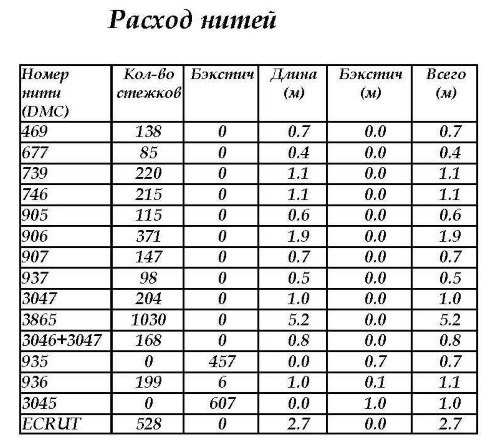
The calculation must be done for each color. If the pattern does not include information on the number of crosses by color, you will have to count manually. The rule also applies here - take threads with a reserve.
Marking the canvas
To make it easier to embroider according to the pattern, you can make markings on the canvas. Usually, these are 10x10 crosses, which corresponds to the standard pattern's lines.
There are several ways of marking:
- With the help of threads. When applying markings, you can use regular threads of a contrasting color, or use a special monofilament, which differs from regular threads in its smooth texture, so you can embroider over it and easily pull it out of the fabric after work.
- With a marker or pencil. Special markers and pencils for canvas are easy to find and they are much easier and more effective to work with than thread markings. Just don't wash them off with hot water or use them on colored canvas. And don't store them in a damp room, otherwise the markings may disappear.

- Ready-made canvas with markings. Such canvases are sold in specialized stores or on websites. The rules are the same as for pencils and markers: do not wash in hot water, do not dry on radiators or with an iron, otherwise the markings will remain forever.
To apply the markings yourself, you should start from the center of the canvas. To do this, you need to fold the material in the center, and then again and find the middle point. Draw horizontal and vertical lines from it and, based on them, continue marking.
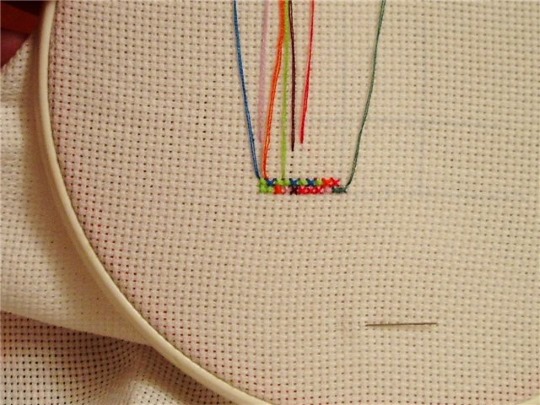
Reading schematics
To begin with, it is worth carefully examining the symbols and how many strands of thread will be used in the embroidery. The key also contains information on color mixing and color numbers on the floss organizer.
If there is no organizer in the set and the threads are included in skeins, or the embroiderer has made the set for herself, then for convenience this organizer can be made by yourself or bought ready-made. In any case, the threads should be sorted by color and signed with symbols on the diagram (or numbers in accordance with the diagram).
It is also worth paying attention to what types of crosses are used to make the work. This is also contained in the key. Only after a detailed analysis of the information in the scheme, you can start working.
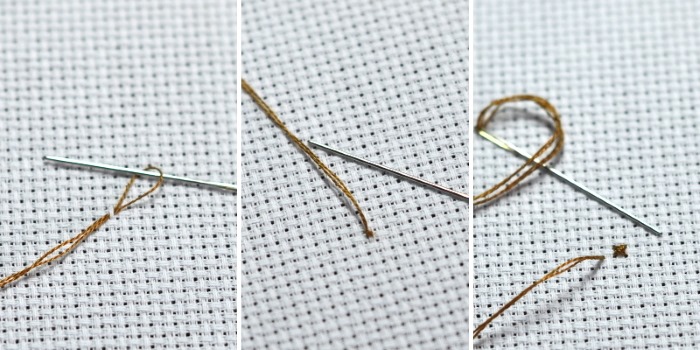
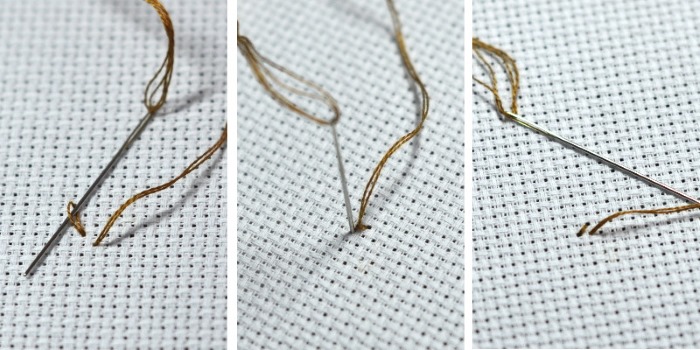
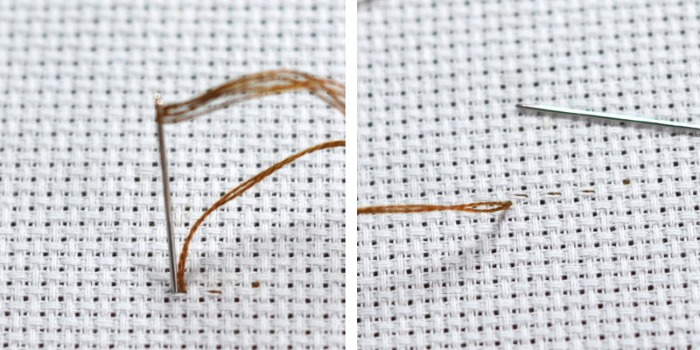
Securing threads in the fabric
There are several ways to secure the thread at the beginning of the work. To do this, you need to fold the thread in half and thread both ends into the eye. On one side you get 2 threads, on the other a loop.
Now with this thread you can make the following fastenings:
- On the front side of the canvas. Insert the needle in the upper right corner and leave a loop. Insert the needle in the lower left corner and insert it into the loop. Tighten.
- On the reverse side of the canvas. Similar to the front side, only start from the back.
- Without a knot. The needle is inserted from the back to the front side. It is pulled through, leaving a small tail. Then this tail is gradually closed with a row of crosses. The excess tail of thread is cut off.
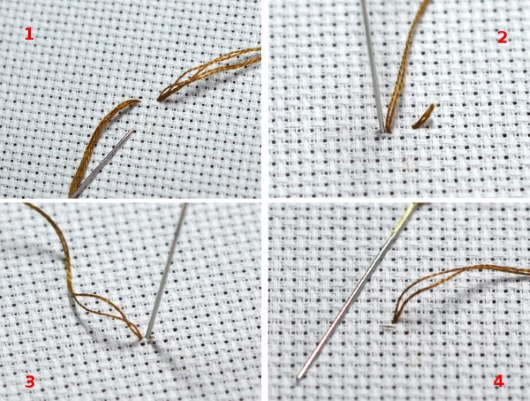
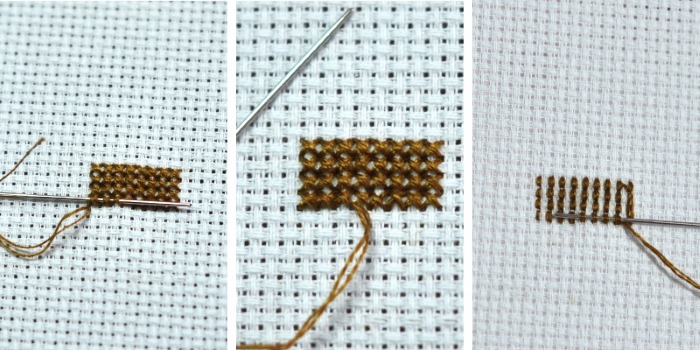
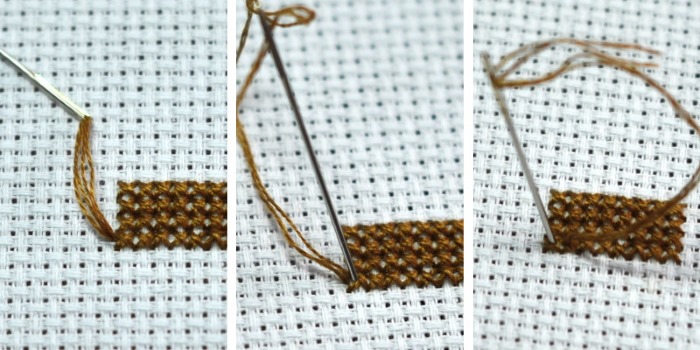
At the end of the work, the thread is secured in the following ways:
- From the front side, pull the thread under the finished crosses and cut.
- From the back, also pull the thread under several crosses and cut it as short as possible.
- Or from the wrong side, fasten it under the vertical stitches, leading the thread upwards and as if overlapping each stitch. You will get an almost perfect wrong side, since the thread is hidden vertically under the vertical stitches.
Completion of work
The product should be washed only by hand in warm water with the addition of mild detergents for colored fabrics.
If suddenly the threads start to shed, then you need to quickly transfer the embroidery to cold water and change it until the stains disappear. Then the embroidery, without wringing, is hung out to dry. Afterwards, it is ironed from the back side through a damp cloth so that the embroidery itself remains convex.
Once the embroidered picture is in order, you can take it to a framing workshop or frame it yourself.
Simple ornaments
Patterns and ornaments are good because you don't need to think about the realism of the future picture, as, for example, when embroidering flowers or animals. Ornaments are easy to embroider, but meanwhile they are effective and will never go out of fashion.
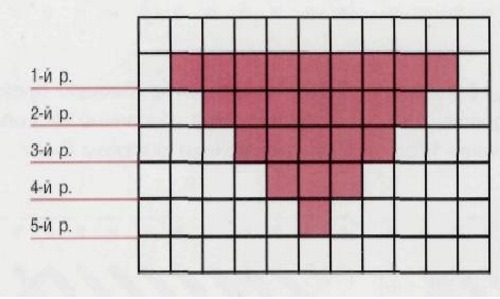
On the Internet you can find patterns and designs for any taste and theme, or you can implement your idea yourself. To do this, the rough drawing is divided into small squares in accordance with the canvas and filled with the necessary colors. This will be the pattern for embroidery. Or transfer the drawing to the canvas if the drawing is proportionate to the future embroidery.
How to transfer a pattern onto fabric
There are at least 4 ways to transfer a pattern onto fabric to make the embroiderer's job much easier:
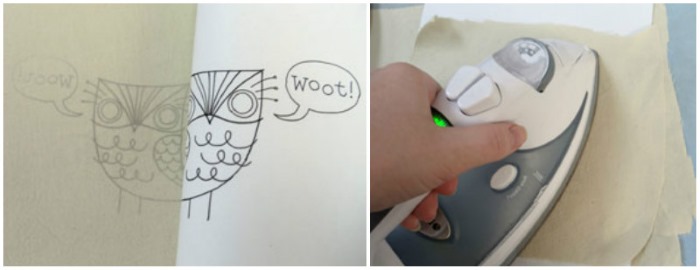
- Carbon paper. The copy paper is placed on the canvas and the outline of the drawing is traced on top.
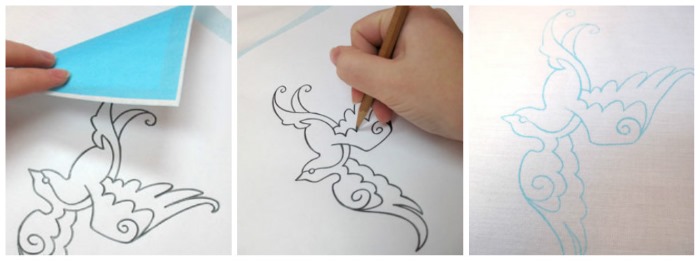
If the fabric is dark, then the design on the back side is rubbed with soap and traced without carbon paper.
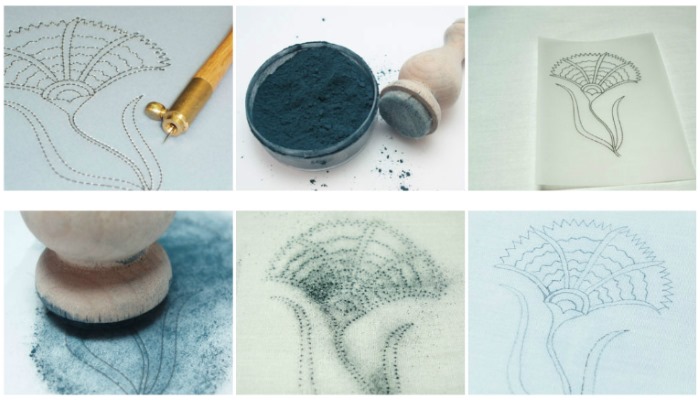
- Powder. The drawing is fixed on the material and carefully knocked out along the outline with a needle. Then sprinkled with baby powder or powder. Then the outline is outlined with a marker or pencil until the powder has crumbled. For a stable dusting, a solution of blueing and kerosene is prepared, and then a cotton swab soaked in it is drawn over the outline with holes.
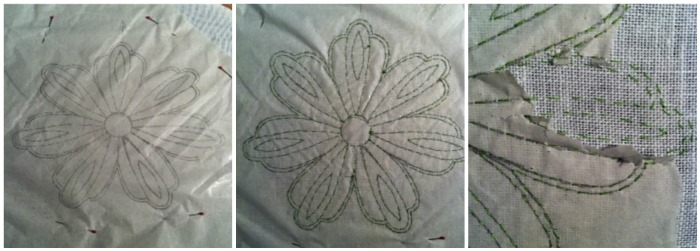
- Tracing paper and threads. The design is again secured to the fabric and overcast along the outline with threads. The paper is removed and the embroidery is placed over the design made of threads.
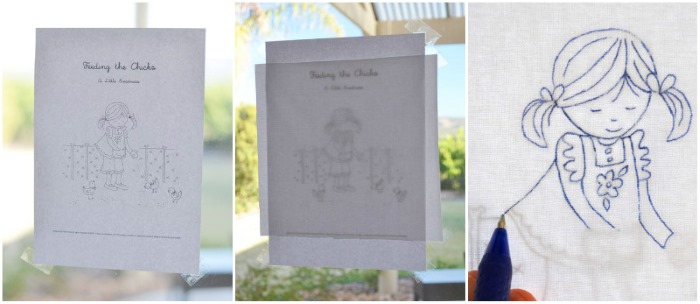
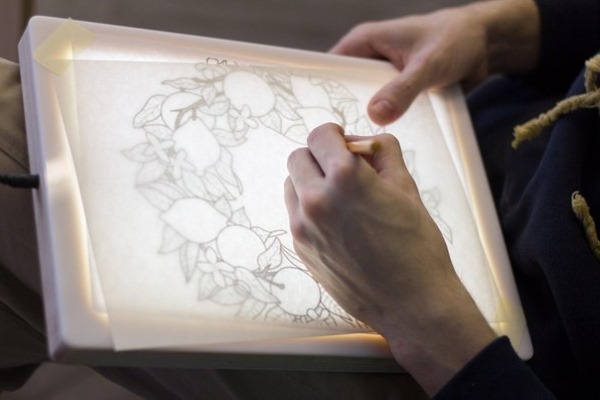
- Glass. This method is usually used for very thin fabric base. The design is placed on the glass, and the canvas is placed on top. The glass is illuminated from below, due to which the design will be clearly visible, and all that remains is to trace it on the fabric.
Embroidery on canvas with a ready-made design
The advantages of this type of embroidery are its simplicity. There is no need to constantly check the pattern and use the "counted cross" technique. In addition, the colors in the kits with colored canvas are perfectly matched, which saves time and nerves for a beginner embroiderer. Such kits are relatively inexpensive, especially simple ones with a small pattern.
It doesn't matter where and how to start cross stitching, the main thing for the craftswoman is to enjoy the process itself. Holding a real masterpiece of art in your hands, even if it is small, you can enjoy the work done.
Author: Olesya Levchenko
Article formatting:Natalie Podolskaya
Video about cross stitching
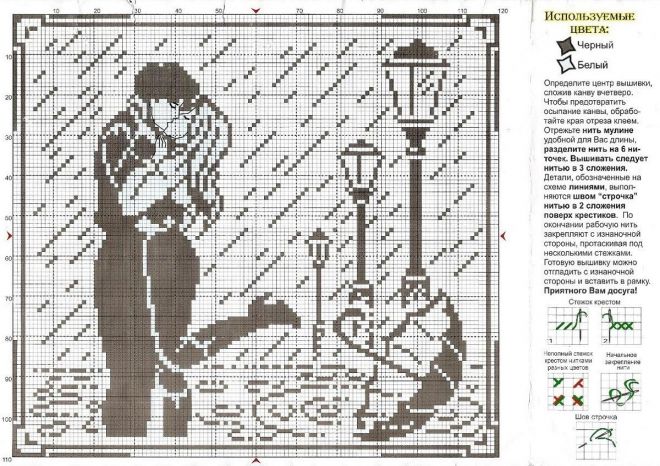
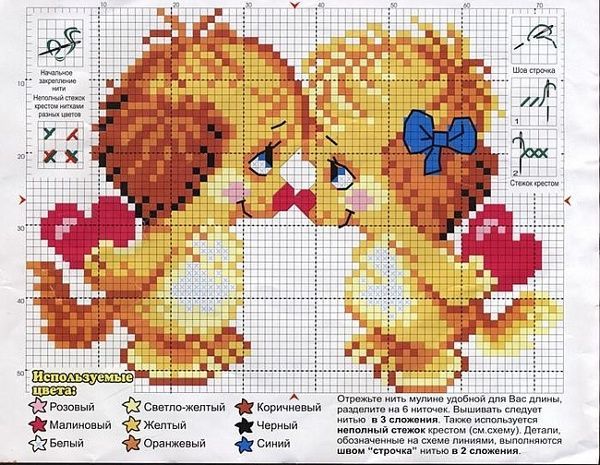
How to cross stitch for beginners (diagram):