Weaving from silicone rubber bands is a new trend in handicrafts. It has interested not only teenage girls, but has also become a hobby for many housewives. Before weaving a figurine from colorful and bright rubber bands, you need to familiarize yourself with the scheme of the work. Products made in this technique are used as decorations, keychains, souvenirs, phone cases.
What are the devices for weaving from rubber bands?
The weaving process is carried out in different ways. The latest hit is a special machine. It is a small platform with several protrusions for putting rubber bands on them. The dimensions of such machines vary.
For beginners, small, 8-column, mini Monster Tail machines are suitable. To create complex volumetric figures, machines with a large number of protrusions are used.
There are also combined options. In these cases, several elements are connected to each other and form a larger structure.
If you don’t have a machine, you can weave a figure using different colors of rubber bands in other ways:
- On my own fingers. In this case, you will get figures made according to the simplest patterns. For weaving, rubber bands of no more than 2 - 3 colors will be used.
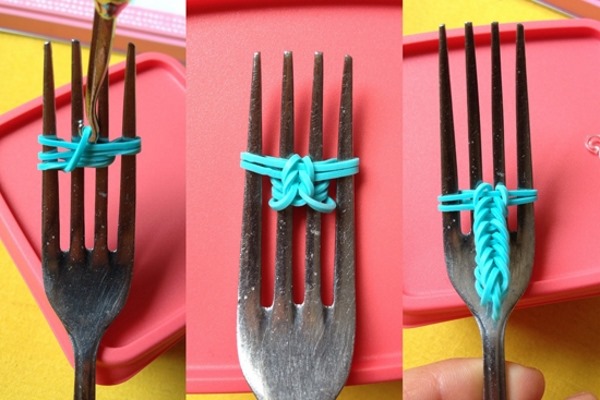
- A regular table fork. Simple items are woven on its teeth. A simple bracelet made of silicone rubber bands will work great on it.
- Pencils. They are also successfully used for weaving simple items.
- Hook for elastic bands. Even three-dimensional figures can be created with its help.
- Slingshot – one of the varieties of a weaving machine. It consists of two columns connected to each other in the form of a semi-oval.
The master classes below will tell you how to weave a figure from rubber bands in various ways. Using your imagination, you can give the products an original design. For this, you can use accessories: beads, plastic rings, etc. You can also diversify the product using color combinations.
Master class for beginners
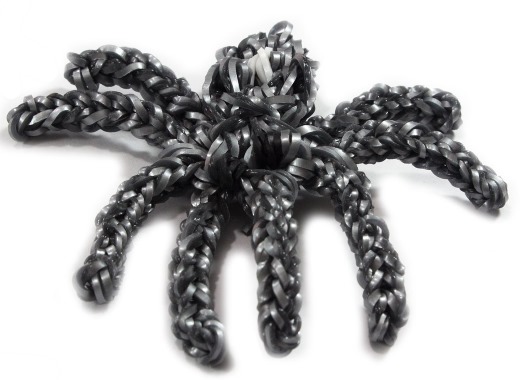
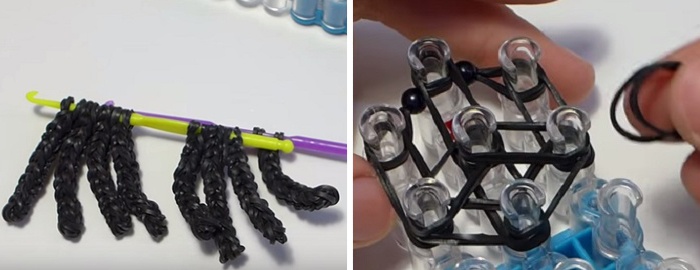
For those who have picked up rubber bands for the first time, we present a master class on making a ring called "Spider". It is made on two columns of a machine or a mini-slingshot, using a hook. Black rubber bands are used.
Further actions are performed according to the instructions:
- One rubber band is thrown onto the left column of the slingshot. The second one is put on the right one, winding it four times. The third one is put on both columns in two turns.
- Using a hook, remove the element created from four turns from the right column and throw it into the middle of the machine so that it ends up on a double elastic band.
- Form the spider's legs. To do this, take two elements, put them on top of each other, and intertwine them so that they are connected to each other. This way you get one pair of legs. You will need three pairs of legs in total.
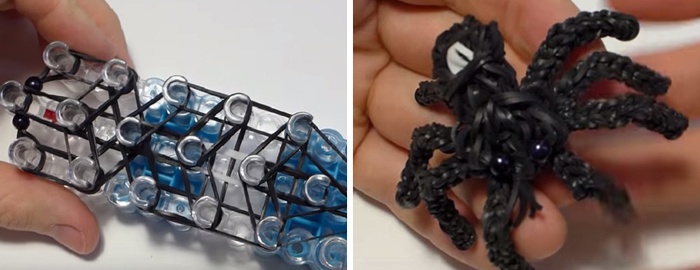
- The blanks are put on the machine one by one, each ring on a separate column. The knot is located in the middle of the slingshot, and the rings are lowered as far down as possible. Then the rubber band is put on both columns simultaneously in two turns.
- The first double element is removed from the right column with a hook and thrown into the middle of the slingshot. From the left one - first a single ring, put on first, and then a double loop.
- At the top of the slingshot, there are two double loops on each column and loops that play the role of the spider's legs. From the right side, the double loop is thrown over to the left, and, in turn, from the left, it is removed to the middle. The rubber bands-legs are cut exactly in half with scissors.
- The remaining double loop is removed from the loom with a hook. It acts as the head. Carefully, as tightly as possible, it is tightened. The whole elastic is put on the finger, and the spider is formed from the remaining elements.
It turned out to be a great accessory for kids for Halloween.
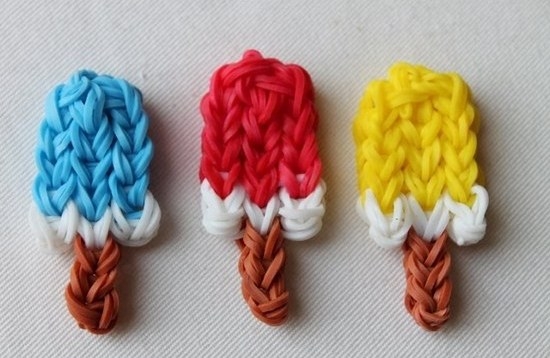
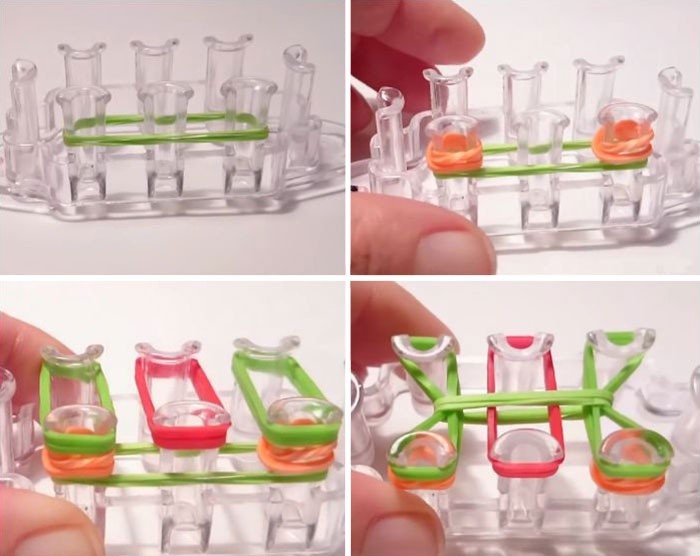
Ice cream on the machine Monster Tail
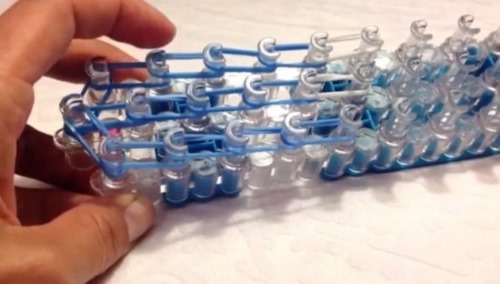
The following master class presents a version of creating ice cream on a stick from silicone rubber bands using the Monster Tail machine. It is necessary to prepare rings of three colors. Machine location: its point is on the left side. The process will be carried out using three columns at the top and bottom.
The work is carried out in the following order:
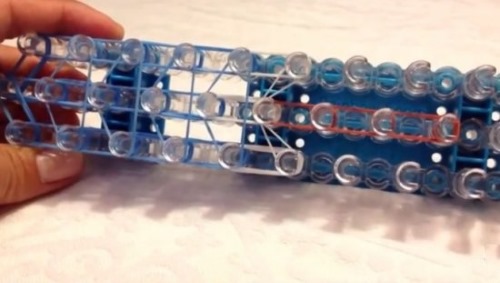
- An ice cream stick is formed. A light brown ring is thrown onto the column in the front row, twisting it three times. Then the pair is thrown onto both columns at the same time.
- The triple element is dropped with a hook and placed in the middle. There are a pair of elastic bands on the machine, with a triple element located exactly in the center.
- Then the pair is thrown on again. Successively, double loops of the previous pair are dropped from each column into the center of the work. The process is repeated several times.
- Next comes the interlayer. The white elastic is thrown onto the same columns, and the brown ones are removed onto it.
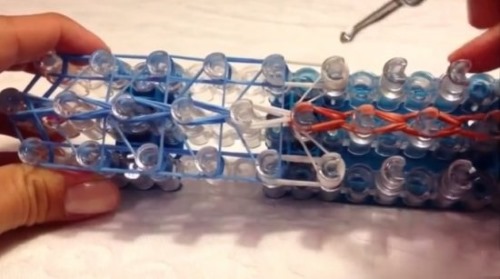
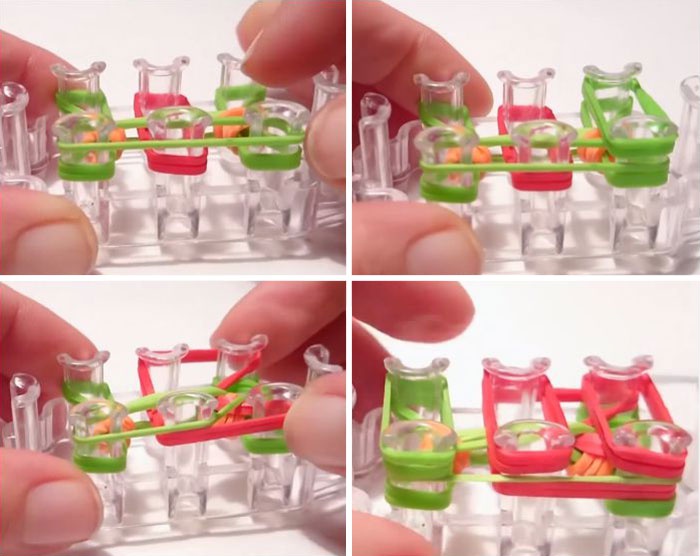
- In the top row of the loom, one white ring is put on three posts. In the bottom row, one in four turns is put on the outer ones. Then, one pair of white rings is thrown on the left and right sides. The elements in four turns and the upper horizontal elastic are removed with a hook and placed in the middle.
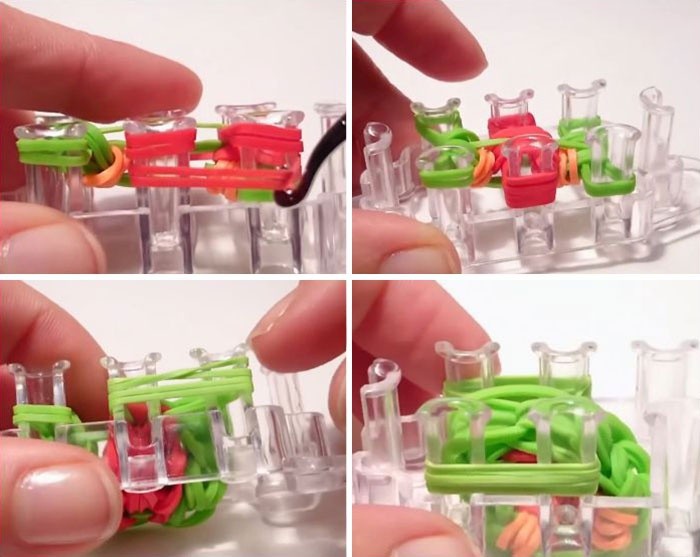
- In the bottom row, a pink ring is thrown onto three pegs. Three pairs of the same color are placed vertically. The pink ring and all the white loops are removed with a hook. Then the process is repeated with pink blanks three more times. In the last circle, the middle remains empty, and the horizontal element is thrown in two turns.
- All the loops are transferred to the central posts. Then another elastic band is put on them and the remaining loops are removed onto it. The loop is tightened.
Eskimo ice cream is ready.
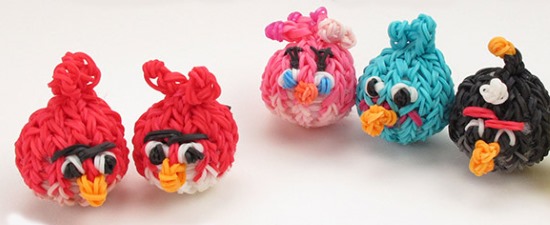
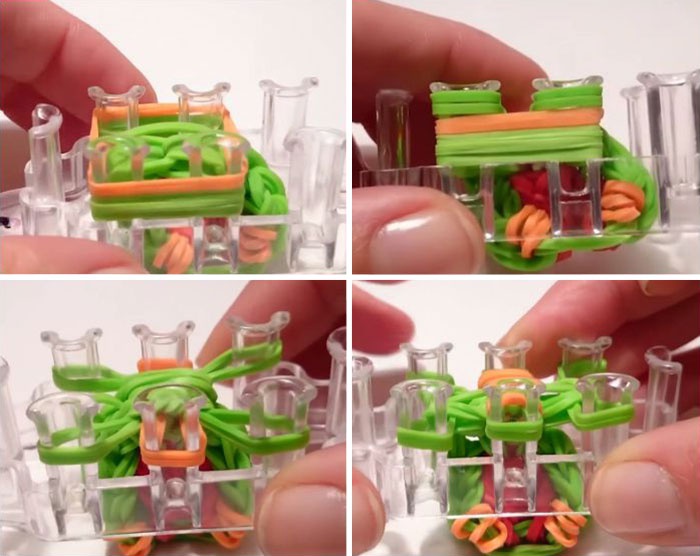
Angry Birds with a hook
The following instructions will teach you how to weave a cartoon figure of the hero of the game "Angry Birds" from rubber bands. You will need a hook and rings of 4 colors. Feathers will be formed from 2, and the remaining 2 - for the beak and eyes.
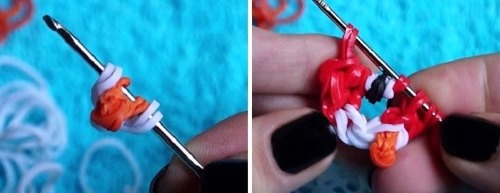
Step by step instructions:
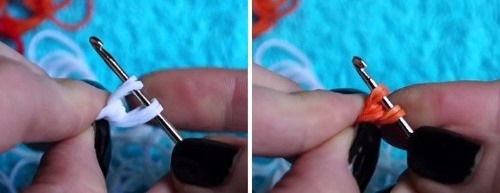
- A white rainbow is put on the hook in three turns. Then take a white ring, fold it in half, hook it by the edge and drop the triple onto it. Move it further onto the hook.
- Similar actions are done with the orange irises. This is the future beak. The orange element is pulled through one white loop and placed in the middle.
- All the loops formed on the hook are thrown onto a pair of red rings. Then another pair is pulled through.
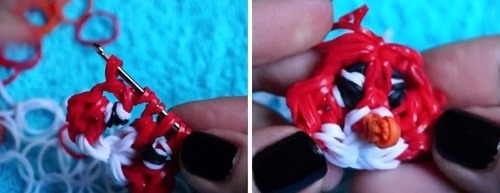
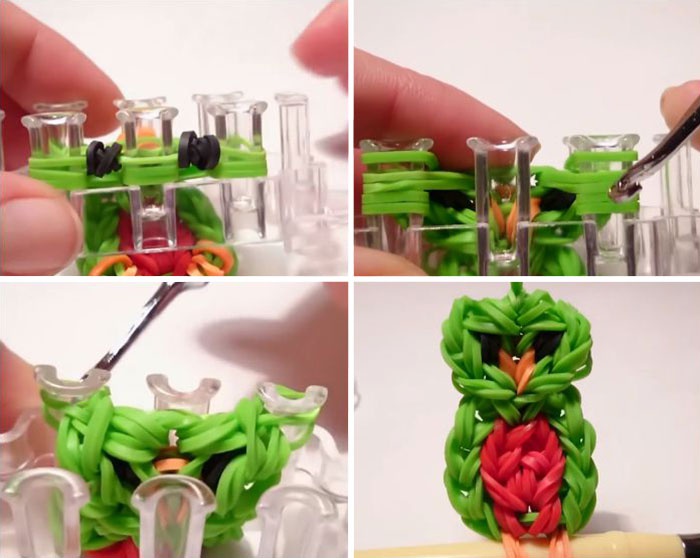
- They begin to form the next link. They put on the white iris in four turns, and on top of it they wind the black one in four turns so that it ends up in the middle of the white one. Then they hook the very first white loop. Then they pull the white pair through the first loop, and then similarly two pairs of red ones.
- Again, hook the base of the first red pair and weave two more double red elastics. Next, drop the element that protrudes as an eye onto the loop located inside the work.
- All loops are carefully removed from the hook, the work is turned around and put on again. Another eye is formed in the same way. As a result, 6 loops have formed on the tool. They are removed into a pair of red ones and the loop is tightened.
All that remains is to straighten the product and place the eyes and beak.
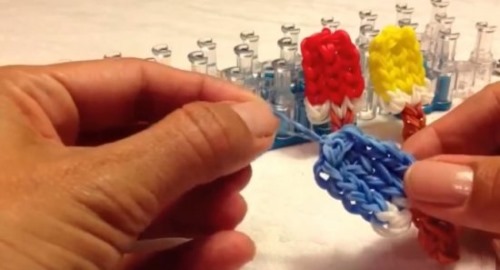
Light figures on forks
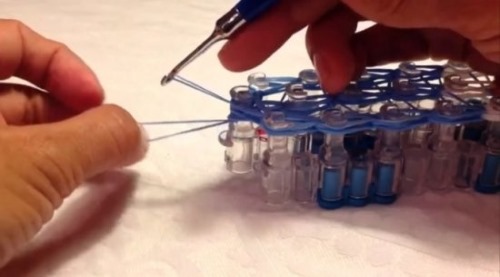
How to weave a figure on forks from rubber bands will become clear using the example of the keychain "Heart". The forks should be connected in this way. Two products are placed next to each other and fixed in this position. The resulting pairs are fixed with tape so that the backs of the forks are directed towards each other.
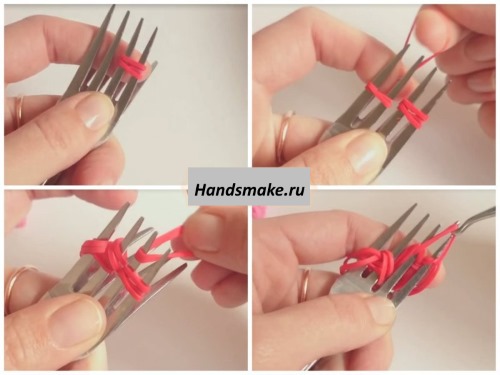
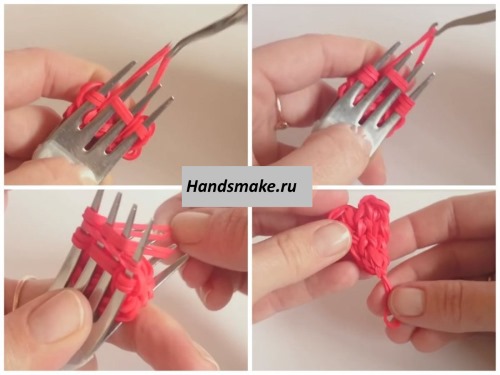
Step-by-step master class:
- The first ring is wound onto the 4th tooth in 4 turns.
- Another one is thrown over it and hooked onto a pair of opposite teeth. The first one is dropped and placed in the center. A ring is hooked horizontally on top of the three, twisting it into a figure eight. Then one pair is thrown onto the 3rd, 4th, and 5th teeth. The lower loops and the horizontal loop are dropped.
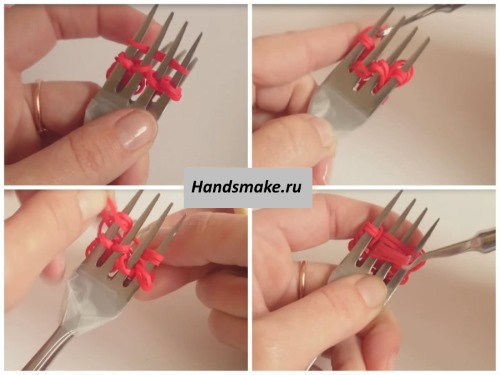
- Throw two pairs onto 5 teeth horizontally. Throw a pair again, and then remove the horizontal ring and the last row.
- The process is repeated two more times in exactly the same way, but now 7 teeth are used.
- Next, they begin to release the teeth in this order. From the fourth teeth, they transfer to the third and fifth. They throw it horizontally onto three teeth on the left and right sides, and vertically onto the opposite ones. Then they remove it as before.
- Remove elements from the 1st, 7th, 3rd, 5th teeth. Weave on the 2nd and 6th.
- At the end, the loops are removed and hidden inside.
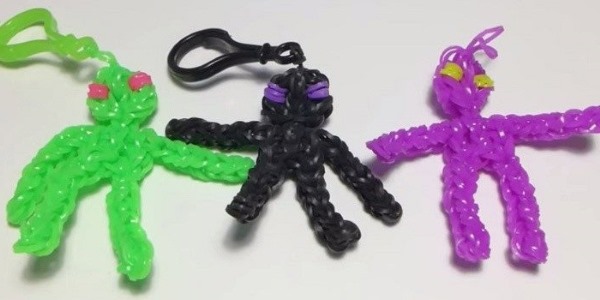
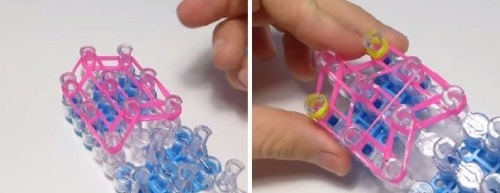
Enderman from Minecraft
You can weave an Enderman from the popular game "Minecraft". The figure is all black with purple eyes, but this is not necessary. You can choose any shades.
If the Enderman will serve as a keychain, then a ring or chain is selected. The work is performed on a machine consisting of three rows. They are placed so that the middle one is shifted by one column. Pairs of rubber bands are used in the process.
All actions are performed according to the instructions:
- Two pairs are thrown alternately onto the middle and right columns, and then onto the middle and left. Two pairs per row. To round the head, onto the third column of the middle and right, and then onto the left row.
- Form the eyes. Rings of a different color are wound in three turns on the first column of the right and left rows. Then one rubber band of the main color is wound on the second columns of all rows.
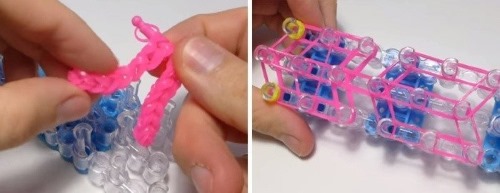
- Transition from head to body. Connect the 3rd and 4th columns along the middle row. And then all 4 of each row.
- Form the arm. Step back two columns and begin to throw 7 pairs of the main color. Throw a ring in three turns on the last column. Pull the pair through the triple loop with the hook and throw it to the adjacent column. All pairs must be removed in the same way. Throw the last loops onto the pencil. Make the second arm in the same way.
- Form the body according to the plan in point 1.
- Next, make the legs. The steps are the same as for the arms, but you don't need to take notes. The first pair is connected to the body.
- The arms are attached to the upper column of the body.
- Next, remove the elastic bands from the machine. Start with the bottom points of the legs, following the example of the arms. The loop from the column of the base of the arms is thrown to the middle row. The principle is the same - the lowest loop is pulled out and thrown to the top column for each row.
- Finally, the figure is removed from the machine pins. It is ready.
Owl made of rubber bands
The following master class will tell you how to weave an owl figurine for a keychain from rubber bands. To obtain an original effect, use striped rubber bands of two colors, several white, orange and black.
Instructions:
- One rainbow is thrown onto the first and second pins of the loom on the left and right. In the middle row, a pair is put on the second and third columns.
- Eyebrows. A pair is put on the second column of the left and right rows and the third of the middle.
- Continue to form the head. To do this, pairs of irises are thrown onto the 3rd and 4th columns of the middle row. Two pairs on the outer rows, capturing the 2nd and 3rd, 3rd and 4th pins.
- Eyes. On the 2nd column of the outer rows, put on triple loops of black color.
- Nose. The orange iris is thrown onto the 4th and 5th columns in the middle. Then the head is rounded. The 4th columns of the side rows are connected in pairs with the 5th of the middle one.
- Shoulders: Mirror the rounding of the head.
- Belly. White irises are put on the middle row - 4 pairs.
- For the body, three pairs are taken on the left and right.
- Paws. The orange iris is wound on the hook three times and dropped onto the rings of the main color. Put on the last pins of the outer and middle rows. The second paw is made symmetrically. The triple loop is thrown onto the last column in the middle.
- They begin to remove loops. From the middle row, through the triple loop, they remove the loops of their row one by one. From the outer columns of the upper part of the body, the loops are thrown to the center. The loops of the head are removed in the same way.
- At the end, the loop is tightened at the top of the head, and the product is removed from the machine.
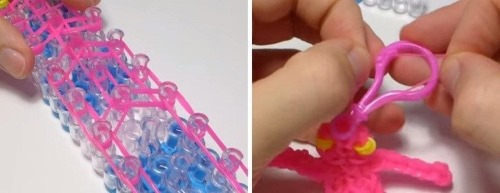
3D decoration for a pen made of rubber bands
Schoolchildren will be delighted with a 3D pencil decoration made of rubber bands. This detail resembles bright volumetric flowers. They are made both from a single-color material and with combined shades. Especially if the material has a mother-of-pearl color.
It is necessary to prepare:
- irises in the amount of 50 pieces;
- clasp;
- Hook for weaving with rubber bands.
The process is carried out in the following way:
- The rubber bands are thrown onto the hook. The more, the more voluminous the figure will be.
- Take another iris and pull it through everything on the hook. Form a loop from it and tighten it.
- Remove from the hook and distribute the pieces evenly to form a flower.
- The pencil is inserted into the middle of the part.
The pencil decoration, which was woven from rubber bands, is ready. There are many more options. With diligence and imagination, you can weave a simple figure, as well as create masterpieces from rubber bands not only according to ready-made patterns, but also according to independently invented ones.
Article formatting:Natalie Podolskaya
Video about weaving figures from rubber bands
Video on how to weave figures from rubber bands:
I really love weaving with rubber bands, I liked the patterns, thank you?
Thank you for the useful and interesting article!
Weaving figures from Rainbow loom Bands is a very fashionable modern activity. However, not everyone knows that you can weave not only bracelets from rubber bands but also rings, earrings, clothes for dolls, fruits, animals, phone cases and much more