Bookmarks for textbooks were invented to quickly find the pages you need. They can come in different shapes and textures. There are even multifunctional bookmarks that help make the learning process easier. Such products are easy to make with your own hands if you know what materials you can use and how to work with them correctly.
How to make from paper
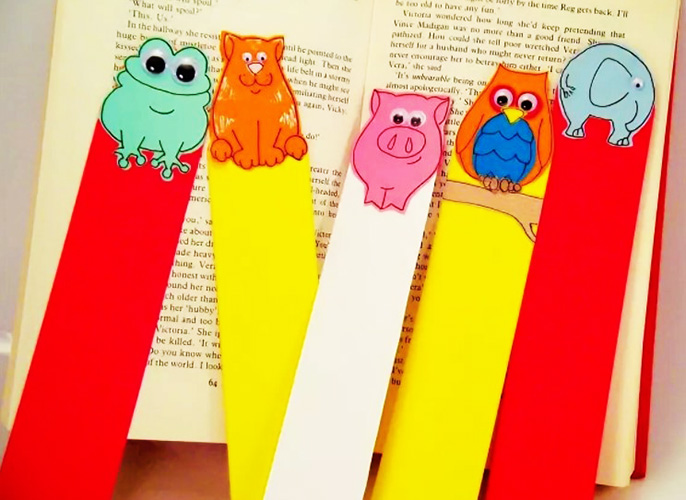
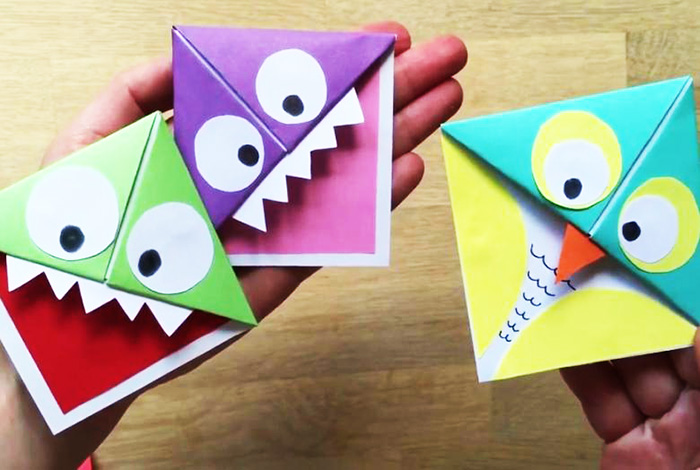
You can make a bookmark for textbooks and other books with your own hands using colored or white paper. This is the most accessible and pliable material from which products of different shapes are obtained. Making unusual bookmarks is useful for school-age children. In the process of making them, they develop imagination and fine motor skills.
In addition to paper, additional materials and tools may be required for the work:
- scissors;
- ruler;
- simple pencil;
- glue stick or PVA;
- felt-tip pens.
A few step-by-step instructions will help you make beautiful bookmarks quickly and easily.
Corner
One of the easiest ways to create a bookmark from paper. The corner is put on the page where you finished reading. It will hold securely because the rest of the book pages will press it from 2 sides.
Algorithm of actions:
- Cut out a square measuring 8x8 cm from thick cardboard. Carefully cut it out with scissors.
- Now the cardboard will serve as a template. It needs to be traced three times on a sheet of colored paper. It is important to keep the order. 1 square is placed on the lower left corner of the sheet and traced. The next time it should be placed above the previous square, and the last time the template should be traced, placing it to the right of 1 square.
- In the top and side squares, using a ruler, you need to draw a diagonal from the bottom left corner to the top right.
- Cut out the blank with scissors. You need to cut along the diagonal line. Leave the central square whole.
- The workpiece will look like a square with triangles on top and on the right. It needs to be turned so that the triangles are on top.
- Now you need to draw along the pencil lines with a blunt object to make it easier to fold the paper. For convenience, you can use a ruler and an old rod.
- Fold the workpiece along the marked lines. The part that will be at the bottom needs to be coated with glue and another triangle should be placed on top. Leave until dry.
You can decorate the bookmark with felt-tip pens or glue funny flat plastic eyes to it.
Triangle
The triangular bookmark is held in books in the same way as the corner, but you can make it without using glue. You just need to fold the sheet of paper in a certain order.
Algorithm of actions:
- Cut out a square measuring 11 x 11 cm from colored paper.
- Using a pencil and a ruler, draw a diagonal through the square.
- Press the fold line with a blunt object and fold the sheet in half. You will get a double triangle.
- Unfold the workpiece and draw another diagonal through the other corners. Press the fold line again and fold the sheet. There is no need to unfold the workpiece any more.
- Now the fold line located in the center of the workpiece will serve as a guide. The right and left corners of the triangle need to be folded so that their lower parts coincide with this line. Press the folds well and unfold the workpiece.
- Turn the double triangle base up. Bend 1 vertex so that its corner and edges coincide with the marked lines.
- Turn the workpiece upside down and tuck the right and left corners into the resulting “pocket”. Press the fold lines well.
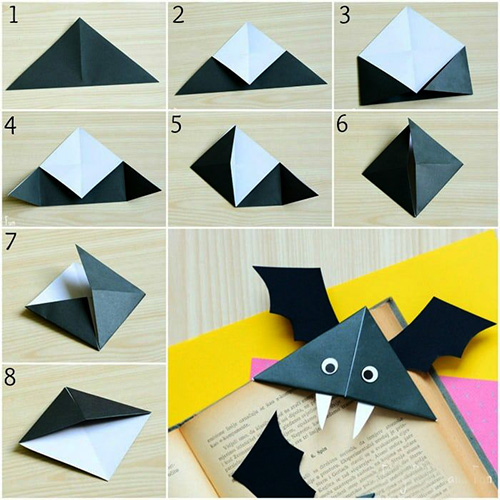
The "triangle" shape has advantages over other types of bookmarks. It can be used to secure several pages at once, since the folded paper spreads out widely.
Origami Christmas tree
You can make such a bookmark for the New Year. Looking at it, the child will feel that soon boring studies will end and the holiday holidays will begin.
Algorithm of actions:
- Cut a 10x10 cm square out of green paper.
- Fold the paper in half diagonally and press along the fold line.
- Unfold the workpiece, fold it diagonally again, but now the diagonal should go through the other corners.
- Fold the edges of the resulting double triangle, pressing the corners to the top.
- Unfold the workpiece into the shape of 2 triangles and bend its top to the corner formed by the fold lines.
- Tuck the corners of the triangle into the resulting "pocket". Press the fold lines well.
- Use scissors to make 6 cuts on the sides of the triangle. 3 on 1 side and 3 on the other. The cuts will imitate the branches of the spruce. Throw away the trimmings.
- Cut a 3x4 cm rectangle out of thin brown cardboard and glue it under the top side of the bookmark so that most of it is visible. The cardboard will imitate a tree trunk.
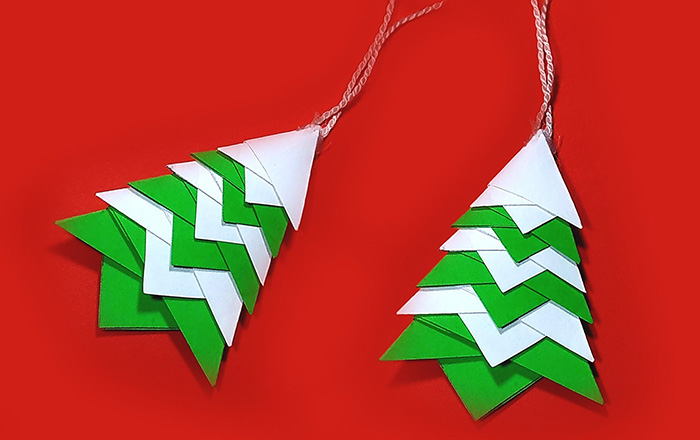
The tree can be decorated with glitter, sequins or colored paper. To cut out even colored circles from paper, you can use a hole punch. Take the resulting scraps out of the trash compartment and carefully attach them to the bookmark with glue.
Heart
This bookmark is attached to the corner of a page, like a "triangle" or "corner", but the process of making it is different from these options.
Algorithm of actions:
- Cut out a 15x15 cm square from colored paper.
- Fold the sheet in half, iron the fold line and unfold.
- Fold the square in half again so that the new fold line is perpendicular to the previous one.
- Fold the bottom of the rectangle so that its edge coincides with the center fold line.
- Turn the workpiece over to the other side and bend the upper corners so that their edge coincides with the central fold line.
- Turn the workpiece over to the other side again.
- Fold the bottom corners, pressing their edges to the central fold line. Repeat this action one more time.
- Tuck the resulting corner into the “pocket” located on top.
- There will be 2 more double rectangles at the bottom. They need to be carefully unfolded and the sides that are not cut folded inward.
- Fold the left and right sharp corners inward.
- Bend the corners of the heart so that they become smaller and smoother.

The heart-shaped bookmark has "3 pockets" at once, 1 is on the inside, where a book page is inserted, and the other 2 are located on the front side. You can hide a note or a cheat sheet in them.
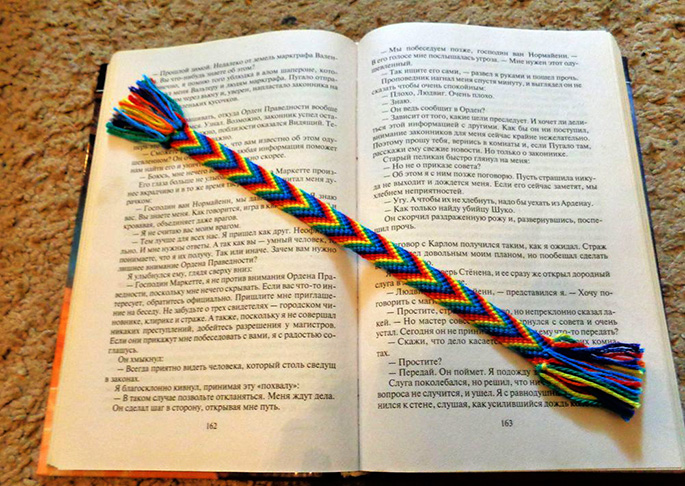
With a tie weave
Paper bookmarks are not only folded or glued, but also woven. You can master several techniques. The most popular is called "tie weaving". It is easy to make with your own hands, and the finished bookmark will look beautiful in any textbook. For work you will need double-sided colored paper of 2 colors, as well as a sheet of thick cardboard.
Algorithm of actions:
- Cut 2 strips from paper. Their width is 1.5 cm, and the length depends on the size of the sheet. For convenience, you can use a stationery knife.
- Take 2 strips of the same color and connect their edges so that they form a right angle. Grease the edge of the bottom strip with glue before connecting.
- Attach a strip of a different color with glue at the bottom, under the first one, the one that was on top.
- Place the last strip so that it forms a right angle with the previous strip of the same color. You will get a blank in the form of an angle. The top consists of fastening the strips, and its sides of 2 strips of different colors.
- Next, you need to interlace the strips in a "spikelet". All fold lines need to be smoothed out well. Carefully cut off the remaining uneven ends and fix the edge of the "tie" with glue.
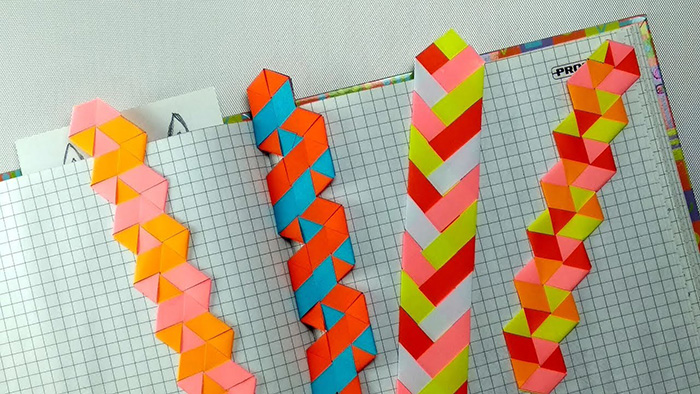
To make the bookmark more solid, you need to attach it to the cardboard and trace it. Then cut out the template and glue the "tie" on top.
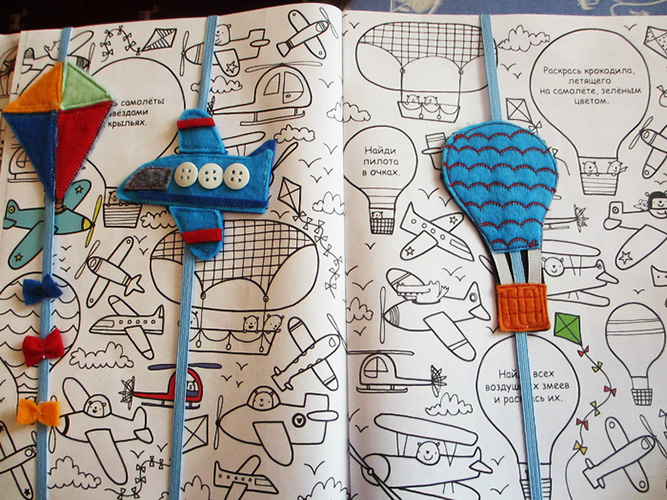
Made of felt
You can make a bookmark for your textbooks with your own hands from thin felt. The product will be bright and pleasant to the touch. The master class below describes a version of a rectangular bookmark with an owl figure that resembles a cartoon character.
For work you will need felt of 4 colors, for example, red, yellow, white and orange. You will also need a sewing needle and threads. It is advisable to choose threads of the same shade as the felt.
Algorithm of actions:
- From red felt cut out a rectangle measuring 3x20 cm and 2 circles with a diameter of 1.5 cm.
- From white felt cut out 2 circles with a diameter of 1 cm and 1 semicircle.
- Cut a circle with a diameter of 4 cm from yellow felt. Determine the location of the owl's ears in advance and cut them out along with the circle.
- Cut a small triangle out of orange felt to imitate the beak.
- Sew the rectangle with white threads, leaving 2-3 mm from its edges. The stitches should be even.
- Sew the owl's head to the top of the rectangle and finish its edges with small stitches.
- Attach the eyes to the head in the same way. First use the red circles, then fix the white ones in the center.
- Sew the beak in the middle.
- Sew a white semicircle with red threads from the bottom; it will imitate the beginning of the “chest”.
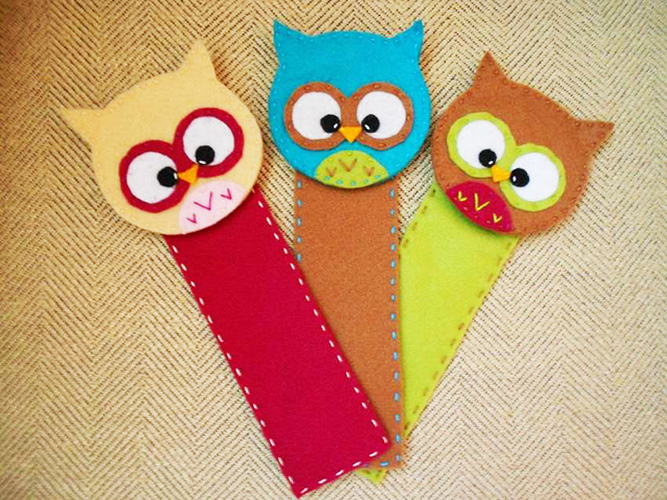
The owl's pupils can be drawn with a marker or embroidered with black thread.
From paper clips
Bookmarks made from paper clips are the easiest option, and will take 1 to 3 minutes to create. You can bend the ends of the paper clip to create a heart shape. The bookmark is simply fixed to the selected page.
Paper clips are used to make chains by fastening them together. To prevent the sharp ends from damaging the pages, each paper clip is wrapped in colored or shiny tape. Such bookmarks are simply inserted between the pages of a book.
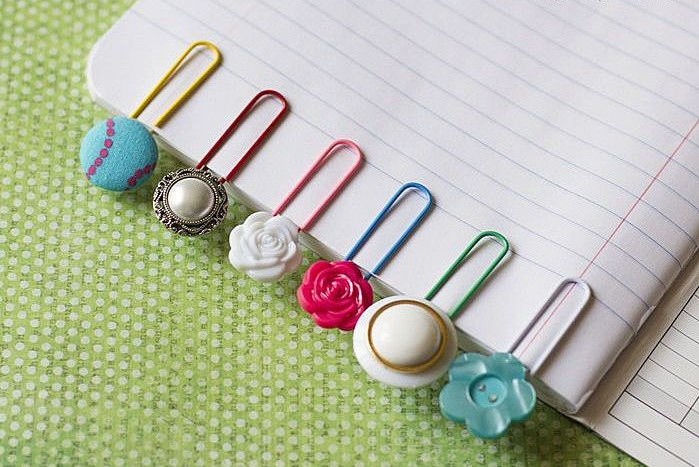
You can choose a large paper clip and decorate one of its ends with something that will be clearly visible between the book pages. The decoration processes are so simple that they can be described in 1 sentence.
Several options are presented in the table below.
| How to decorate a paper clip | How to fix the decoration |
| Large bead | Secure with hot glue. |
| Satin ribbon | Process the edges, thread through a paper clip and tie a bow. |
| Felt | Cut out a small flower, heart or any other shape from felt. Sew on with thread. |
| Polymer clay figurine | Press the paper clip into the clay before it hardens. |
| Beads | Weave a ribbon or a short chain from small beads and secure it to one end of the paper clip using fishing line. |
Stationery stores sell paper clips with ready-made decorations that can be used as a bookmark.
Magnetic bookmark
You can make a bookmark for your textbooks with your own hands from soft magnetic material and cardboard.
Algorithm of actions:
- Cut a rectangle measuring 12 x 4 cm from colored cardboard.
- Fold the workpiece in half.
- Cut 2 squares measuring 1.5 x 1.4 cm from a soft magnet.
- Using hot glue, fix the magnets inside the bookmark, parallel to each other. It is important to check in advance whether the magnets connect to each other.
- Decorate the outside of the bookmark with designs, glitter or stickers.
The bookmark is attached to 1-3 pages, which are placed between magnets.
Unusual bookmarks for textbooks
You can make a bookmark for your textbooks with your own hands from different materials. They can be of an unusual shape and attract attention. For example, a bookmark in the form of an arrow, which will help you not to lose the page where you stopped reading, and will also accurately indicate the desired line. For work, you will need colored cardboard.
Algorithm of actions:
- Using a ruler, mark a 3 cm long segment on the cardboard. Divide it in half and mark point “A”.
- From the point, step down 1.5 cm and mark this place with another point B.
- Connect the edges of the segment and point "B" with lines.
- Now step back 5 mm from the edge of the segment and mark them with points “C” and “E”. From these points, set aside 2 parallel segments 7 cm long. Connect their ends with a line.
- Cut out the resulting arrow.
- Measure 2 cm from the end of the arrow and fold the cardboard inward.
The bookmark can be used. It is attached to the side of the page so that the end of the arrow points to the last line read. However, such an arrow has a disadvantage - it is easy to lose. To prevent this from happening, you can make a reliable bookmark that will always remain in the book. For work you will need an awl and floss threads of 3 colors.
Algorithm of actions:
- Using an awl, carefully pierce the spine of the book from above, leaving 1 cm from the edge.
- Cut off any uneven areas and protruding cardboard around the hole with a utility knife.
- Pull out several "strands" from each skein of floss. Unfold them to their full length. The thickness of 1 thread should be about 5 mm.
- Connect the threads into 1 and tie them together with a knot that should be larger than the hole made with the awl.
- Pass the threads through the hole in the spine so that the knot remains on its inside.
- Throw the threads forward. To the pages and divide into 3 parts by color.
- Braid a loose braid. Its length should be 2-3 cm longer than the height of the book.
- Tie the end of the braid with thread.
- Trim off excess floss.
Now the bookmark is securely fastened and will not disappear.
This method is only suitable for those who have textbooks for personal use. You cannot pierce other people's and library books with an awl.
Instead of threads, you can use satin ribbons, thin chains or fishing line with small beads. If you like the thread bookmark option, but the book for which you would like to make it will have to be returned to another owner, then you can weave another version of the braid, with pom-poms. You will need medium-thick yarn and cardboard.
Algorithm of actions:
- Measure the height of the book. Measure a piece of thread 4 cm longer than the required length, then unwind the ball and set this distance aside 9 times. Cut the yarn and separate the ends.
- Fasten the threads with a knot at the beginning and braid, dividing them into 3 parts with 3 threads. Tie the end with a knot as well.
- Cut out 2 circles with a diameter of 5 cm from cardboard. Inside each circle, cut out another circle with a diameter of 3 cm. Put the blanks together.
- Wind a small ball of yarn so that it fits freely through the hole inside the cardboard circle.
- Wind the threads from this ball onto a cardboard “frame”.
- Use scissors to cut the threads by inserting the tool between the pieces of cardboard. Do not pull out the threads.
- Stretch a thread between the cardboard parts and tie a knot. The cut threads should gather into 1 bunch.
- Take them out of the cardboard and fluff them up. Trim the resulting pompom with scissors. So that it is neat and round.
- Make another pompom using the same cardboard blanks. Trim the same as the first one.
- Sew the pom-poms with thread to the knots on both sides of the braid.
This bookmark is placed between the pages, closer to where they join. The pompoms remain outside. They will be visible from both sides of the book. You can use yarn of different colors or one color.
Making a bookmark for your textbooks is easy. It is important to use materials that will not damage the pages of the book. The marker "corners" and "triangles" must dry completely before they can be used. Otherwise, the pigments of the marker will be imprinted on the pages.
Video about bookmarks
Master class on making a woven paper bookmark: