You can make a paper airplane using the classic pattern from a regular sheet or cardboard. To make the craft fly well, you will need to use additional tools such as a ruler, pencil, and glue. Below you can see the folding patterns for paper airplanes, where the instructions are described in detail.
Basic rules and schemes to ensure fast flight
A paper airplane (you can make a good flying airplane only if you follow the rules and step-by-step diagrams) can be made in various variations. At the same time, it will be able to hover in the air for a long time, covering a distance of up to 100 m.

To create a high-quality paper craft, you need to adhere to the symmetry of the 2 sides, which will later act as wings.
The basic rules that ensure fast flight of paper aircraft:
| Terms and Conditions | Peculiarities |
| Paper density | To make the plane hover longer and better in the air, it is recommended to use thick paper sheets. In this case, their format should be A4. |
| Symmetry | When creating a paper airplane, you need to adhere to symmetry, thanks to which the toy will stay in the air for a long time. |
| Technique of execution | The craft assembly must be done using the origami technique. In this case, there is no need to use improvised materials such as tape, paper clips, and glue. |
| Form | The shape will affect the duration of the paper craft's flight. Narrow and elongated airplanes with shortened wings will fly better and further, unlike wide and large models. |
Necessary materials and tools
It is possible to make a paper airplane (one that flies well can be made from a sheet of paper or from thin cardboard) using a small set of materials and tools.
To make the design more diverse, you will need to use the following tools:
- a sheet of paper or thin cardboard;
- glue with a ruler, scissors or a stationery knife;
- plasticine with paints or felt-tip pens;
- a regular pencil.
The paper should be white or colored. The optimal format is A4.
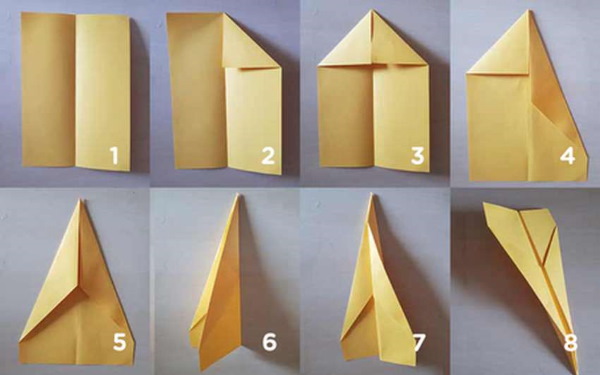
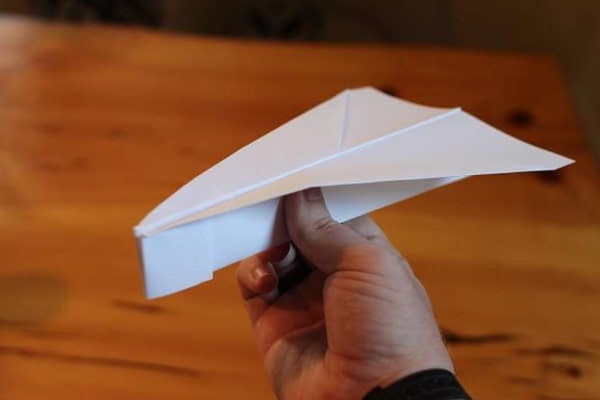
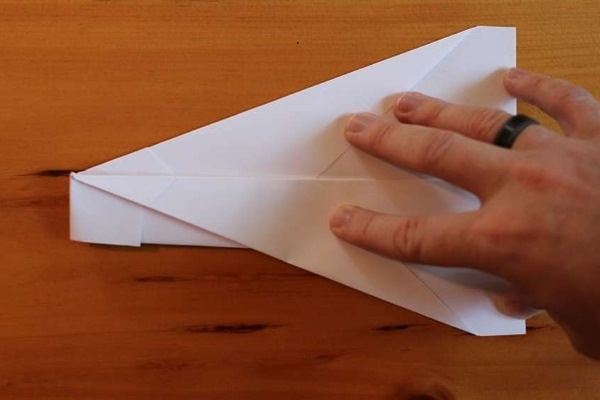
Classic version of a flying paper airplane
A paper airplane created using classic technology is a light and simple version of a craft that flies well and quickly.
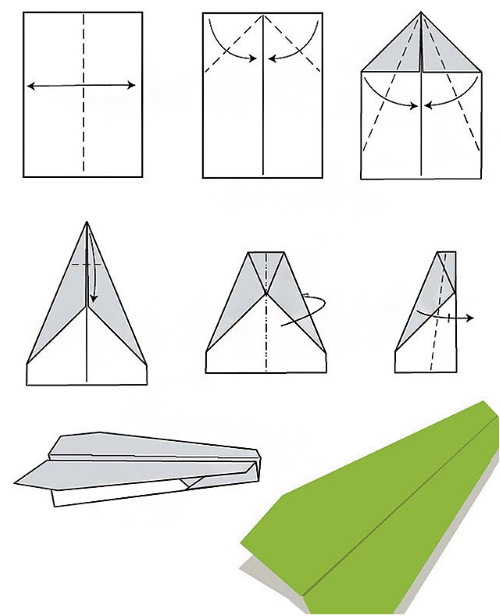
Step-by-step technique for assembling paper aircraft:
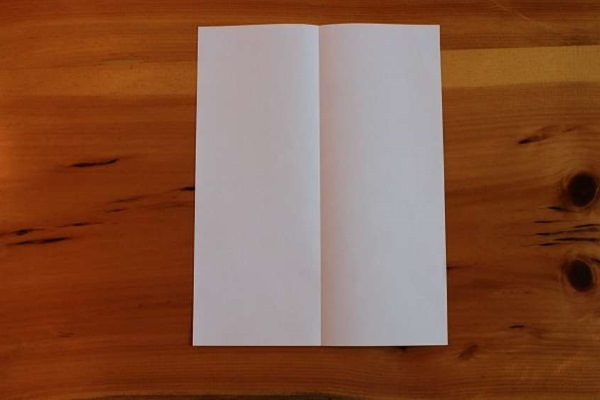
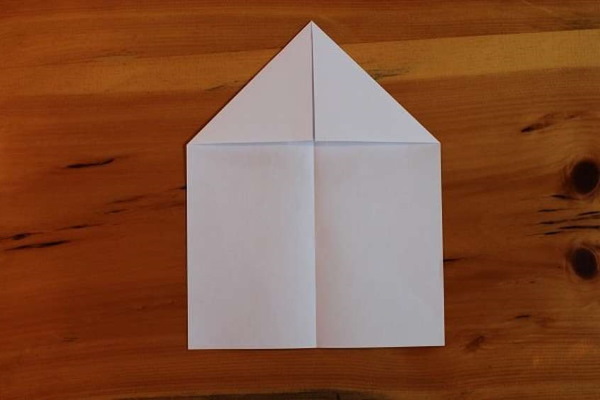
- Fold the sheet in half vertically.
- Unfold the base, placing each top corner against the central strip.
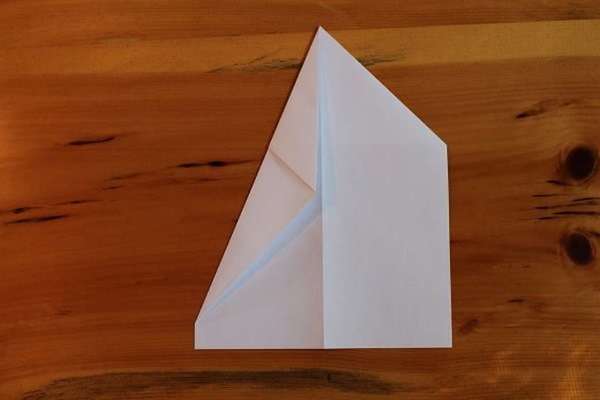
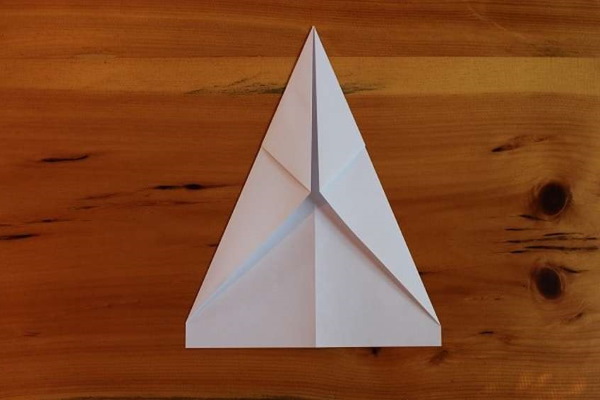
- Attach the upper ends to the central strip, having previously stepped back 2 cm in the lower area.
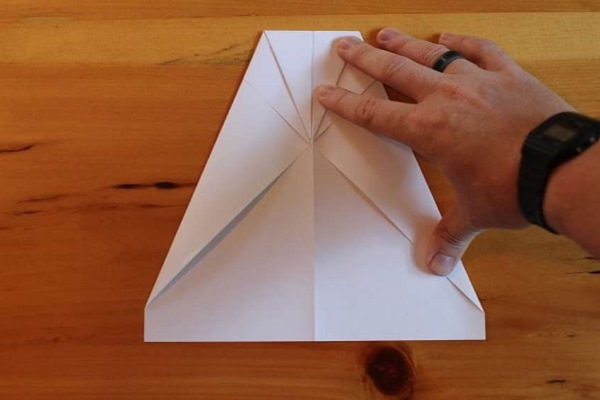
- Fold the workpiece into 2 parts.
- Lower the wings down so that the upper edges touch the lower part of the body.
How to make a liner
The paper liner has interesting shapes and excellent flying properties.
Step-by-step instructions for making a paper liner:
- Make a square from a rectangular sheet of paper.
- Fold the triangle that formed on top in half.
- Fold the corner so that its top goes behind the bottom strip.
- Fold the workpiece into 2 parts, while the triangular fold should remain inside.
- Create wings by stepping back from the main fold.
- Smooth out the first triangle.
- Lightly attach the top of the wings to the outer area of the airplane.
- Fold the corners, straightening the wings.
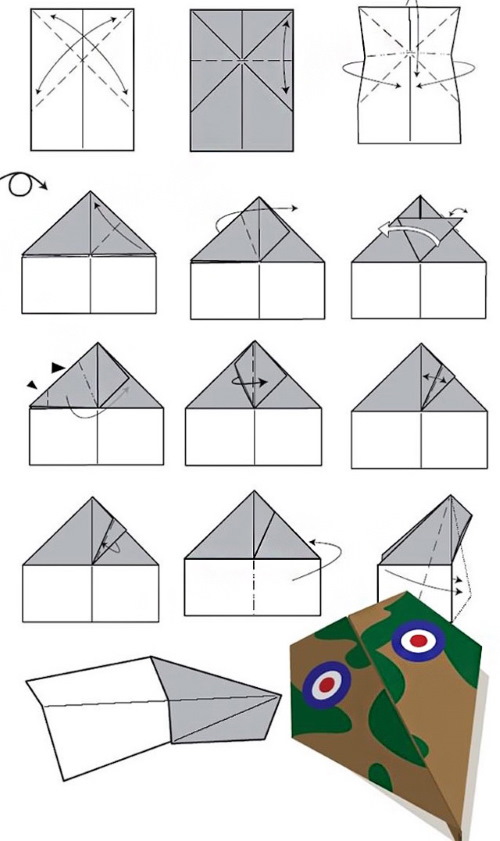
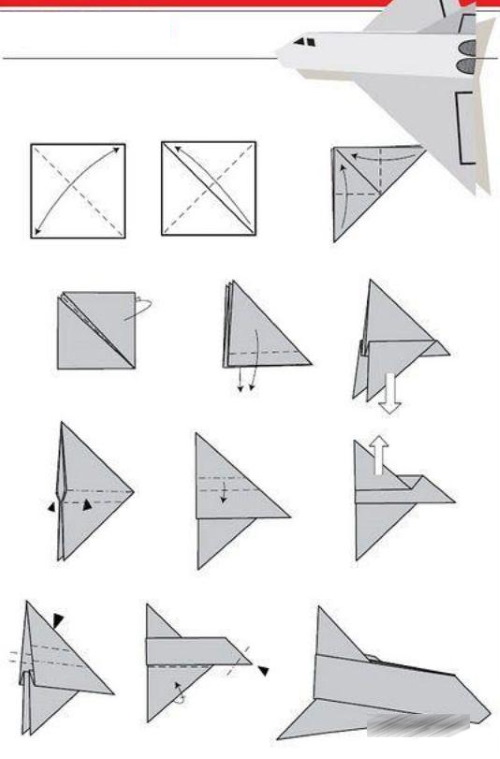
Fighter
Using origami technique, you can make a large-sized military fighter jet, for which you will need a simple sheet of paper.
Technique for creating the craft:
- Fold the paper sheet on each side at the top and bottom to form diagonally intersecting stripes.
- Fold the layout horizontally. Fix part of the sheet to the left side along the vertical axis. Place the corners on the right side inside the structure.
- Turn the paper over along the strip horizontally, placing a vertical line in the center.
- Fold the corners along the horizontal strip, placing them inside the model. Fold the piece to form a triangle.
- Bring the bottom of the outer layer to the strip horizontally. Turn the part upside down, dividing it into 2 parts. Align the lower area upwards.
- Straighten the folded ends by folding the piece along the lines shown. The upper and lower zones should be near the horizontal strip.
- The result should be a structure that looks like an arrow. Turn the part horizontally to obtain the tail section.
- Fold the upper end down along the horizontal strip. Fold one wing up horizontally through the axis. Do the same with the other wing.
- Make the nose of the craft sharp by folding the corners horizontally.
- Bend the craft completely to form a finished airplane.
- Raise the tail vertically, tucking the corners of the wings inward.
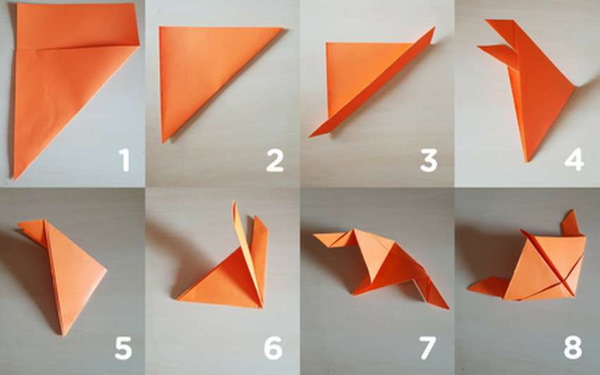
Scout
The scout is represented by a complex model of an airplane. However, this craft turns out to be original and flies well.
Step by step technology:
- Make a square from a rectangular sheet.
- Fold the sheet on the other side in the same way.
- Lower the top corner of the triangle down.
- This corner is folded back with a slight bend.
- Fold the formed piece in half.
- Unfold the wings diagonally along the axis, ironing all the folds.
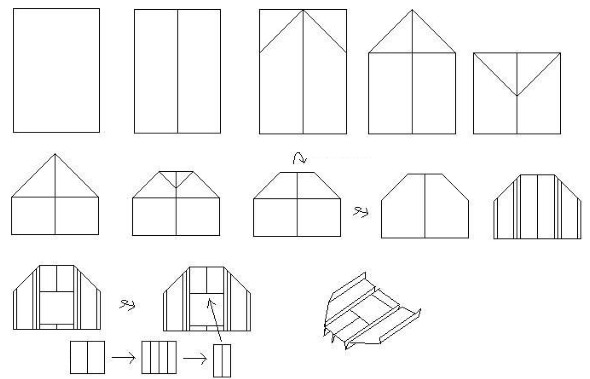
Planning
The gliding model is capable of staying in the air for a long period of time.
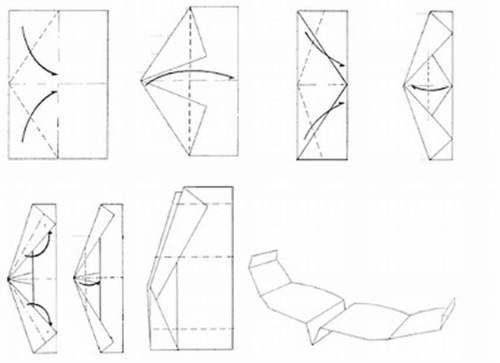
To make the craft, you need to follow these steps:
- Fold the edges of the sheet towards the center. The distance between the corners should be 3 cm.
- Bend the top end by 2 cm.
- Unfold the part, repeating the same steps and slightly increasing the interval between the corners.
- Unfold the craft again, bending it 8 times. As a result, a blank resembling an accordion should be formed.
- Fold the top edge by 3 cm, folding the model into 2 parts.
- Bend the wings and fold the ends towards the top area.
Glider
The Glider model is considered an excellent paper toy that flies high and far. Since this craft has a more complex design scheme, an adult should help the child.
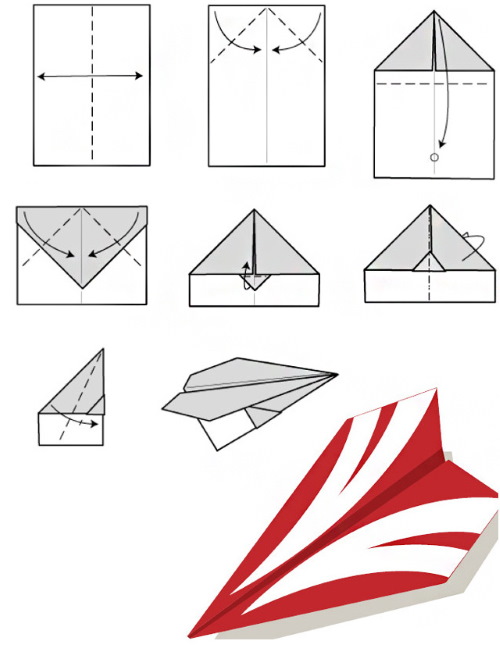
Step-by-step assembly instructions:
- Fold the sheet into 2 parts. Unfold the workpiece, placing it on the table so that the displayed strip is on top.
- Fold the edges of the blank inward to display the mark inside the paper. The resulting triangles will have even proportions, thanks to which the plane will fly well.
- Create a pointed nose by folding the corners in the middle. Position the pointed corner so that it extends beyond the edges of the sheet by a few millimeters.
- Fold the model in half, with the back part facing inside.
- At the end, unfold the wings, giving them any width.
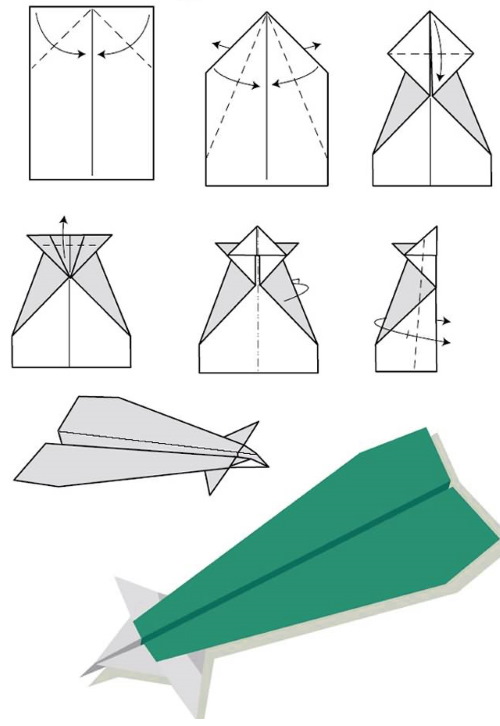
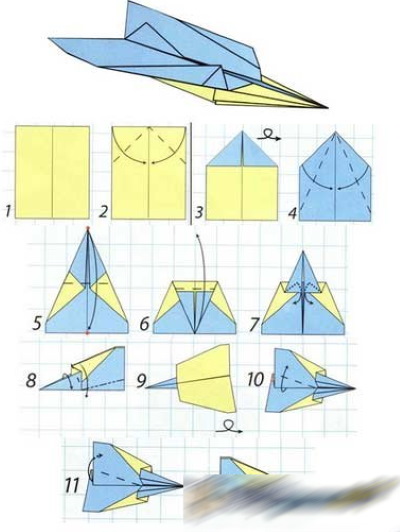
Swift
This airplane design has a medium level of complexity, since it consists of numerous folds. If you plan to make the craft with a child, it is recommended to practice on your own several times at first.
To assemble the Swift model, you must adhere to the following steps:
- Create a guide fold by folding the two edges towards the middle of the paper sheet.
- To create an X-shaped bend on the layout, bend the corners in one direction and in the other.
- Lower the edge on the right to the strip that is directed from the left end. Perform similar manipulations with the corner on the left side.
- To create a guide line, fold the structure into 2 parts.
- Fold the model in half so that the strip on top is level with the bottom line.
- Bring the upper ends of the workpiece to the strip running vertically.
- Turn the edges back to their original position.
- Bend the top end, facing downwards, up the strip that was formed from the previous action.
- The corners at the top of each side are closed with the first fold so that the edge touches the nose of the structure. As a result, the folded corners should form wings.
- Bend the wings along the fold, placing them on top of the nose piece.
- Bring the nose down to the level of the wings.
- Fold the model into 2 parts so that the wings are located on the surface.
- Lower the wings perpendicular to the lower end of the model.
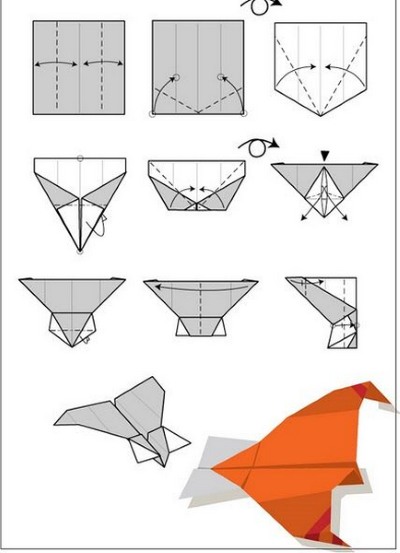
Hawk
A paper airplane (both professionals and beginners can make one that flies well if you follow the instructions carefully) is acceptable in the form of a military model called "Hawk".
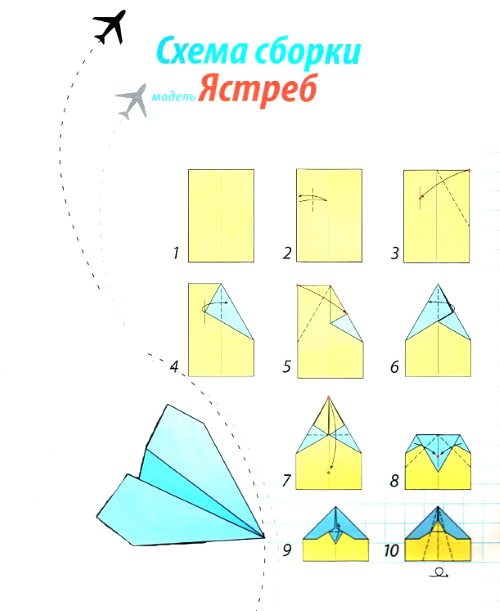
To do this, you will need to follow these steps:
- Turn the sheet of paper towards you with the shorter part. Fold the workpiece into 2 parts.
- Make 1 from the two upper ends, bringing it to the middle.
- A cross-like pattern should form on the model. Press the sides of the structure to the vertical strip dividing the sheet into 2 parts.
- Lower the 2 outer edges down so that they are level with the top. Leave 1 cm from the fold to the strip in the middle. Place the resulting horns together.
- Place the interfering pieces of paper inside.
- Carefully turn the corner located at the bottom in the other direction. Fold it up to the mark from which the horns protrude.
- Fold the model into 2 parts. If desired, you can paint it with paints.
Bulldog
This type of airplane is called "Bulldog" because the shape of the nose part looks like a bulldog's muzzle. The paper craft is very easy to assemble, so you can do it with your child, because the instructions do not include any complicated elements with bends.

Step-by-step instructions for making a paper airplane:
- Fold the sheet into 2 parts along the diagonal line.
- Fold the upper edges down into the lower area.
- Turn the model over to the other side, turning the corners down.
- Fold the resulting top corner so that the corners are at the same level.
- Fold the model in half to create the nose of the plane.
- Spread your wings evenly.
The paper airplane must be launched with smooth, not abrupt movements. The created model will immediately fly into the air, covering large distances.
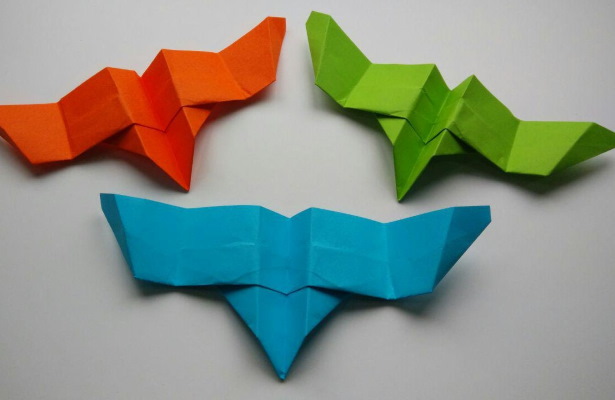
Little Eagle
The Orlyonok model has a rather complex assembly scheme, since the main component is a special triangle that stabilizes the structure.
Technique for creating a paper model:
- Fold the sheet of paper diagonally into 2 parts.
- Bring the resulting upper corners down. The distance between the folded corner and the lower edge of the model should be about 1 cm. The 2 parts should not be located at the same mark.
- The corners located at the top are folded towards the middle. A small triangle should form under the unfolded corners, acting as a stabilizer for the entire structure.
- Bring the triangle to the top to secure the other parts of the sheet.
- Fold the model into 2 parts so that the triangle is on the surface.
- Carefully align the wings on the right and left.
Lightning
The "Lightning" aircraft model is capable of covering long distances in the air.
To create it, you will need to complete the following steps:
- Fold the sheet into 2 halves. Bend the upper ends to the middle.
- Twist the model so that a blank resembling an arrow is formed.
- To form narrow wings, perform another bend.
To prevent the wings from spreading in different directions, it is recommended to use a regular paper clip, piercing the body with it. Thanks to this, the paper airplane will fly long distances. To change the direction of flight, you will need to bend the wings upward a little.
Boomerang plane
When creating this model, the plane will return to its owner like a boomerang.
Step by step instructions:
- Place an A4 sheet of paper on the table so that the narrow side is perpendicular to the direction towards you.
- Make a diagonal mark by folding the sheet into 2 parts. Fold the top edges on each side to the central strip.
- Fold the envelope down to create a horizontal stripe and even out the folds.
- Turn the model over, bending the triangular end to the center. Turn the wide part in the opposite direction. Do the same with the second half of the model.
- As a result, a small pocket should be formed. Bend the latter so that its edges are located along the length of the paper.
- Place the corner in the pocket, doing the same on the other side.
- Fold the side edges of the pocket upwards. Straighten the structure, placing the front area in the center.
- Roll up the protruding paper parts with fins.
- Straighten the layout again by folding it in half and working out the folds.
- Bend the wings upward to form a slight curve.
When choosing a lightweight material to create a craft, it will allow the structure to fly far. However, if the airplane is launched outside, it will be blown away by a strong wind. If you choose thicker paper, the model will not be blown away by the wind, but the flight range will be short.
A paper airplane can be simple or quite complex in execution technique. In order for it to fly well, it must be made in the origami style, strictly following the step-by-step instructions.
Video about making an airplane
How to make a paper airplane: