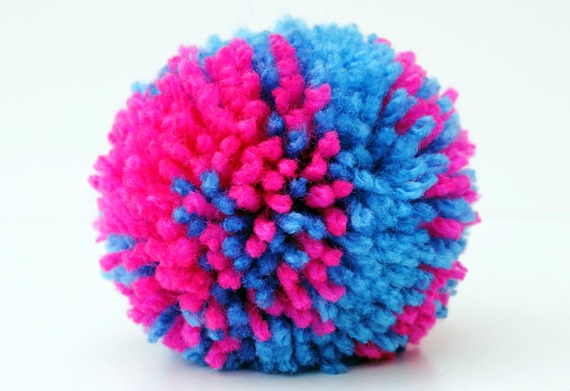
To decorate clothes and interior items, make rugs and toys, you can use a fluffy yarn pompom in the form of a neat ball with a dense texture. Methods for making it are described in the sections of this article. You can choose any, depending on the materials available.
Tips for making
It is recommended to follow the following tips to make a high quality product:
- the porous and dense texture of the yarn gives the pompoms their splendor and volume;
- If you plan to create a product with a multi-colored design, you must use a pre-printed pattern;
- It is advisable to have special rulers or templates to make it easier to create a template. Such shapes as a circle, horseshoe, square or rectangle are used as templates;
- scissors must be sharp;
- the colors of the decorated item and the pompom should not conflict with each other;
- Each of the pompoms included in the product must be tightly tied with threads in the center. This is necessary to maintain the neat appearance of the product for a long time.
Selecting yarn
For making pom-poms, it is better to use stiff yarn with the addition of natural wool.
It is best if the yarn is porous in texture. The finished products are voluminous, fluffy, and hold their shape well. However, they can be made from any yarn, for example, with the addition of synthetics or acrylic. Yarn made of 100% cotton is not suitable, since the pompoms will not be fluffy.
In the finished product, you can combine pompoms from any yarn - this will give the thing a unique look. Thick yarn gives the pompom relief. The more wool in the threads, the softer the product will be. To tighten the yarn more, you can use strong threads, such as silk, when making a pompom. They will not be noticeable on the finished product.
Pom-pom products require delicate hand washing at 30 degrees. Dry it on a vertical surface. Then carefully comb it and trim it with sharp scissors.
How to get a dense and round product
How to make a neat, dense and round yarn pompom in a way that doesn't take much time is described below. The biggest challenge is to keep it dense and round and not lose its shape over time due to the gradual loss of threads.

To achieve the desired result, it is necessary to make a constrictor. This is a special type of knot, which is characterized by high tightening force. This knot is used to secure a workpiece made of threads.
The pompom can be made strong by tying it with wet thread and tying it several times. The more threads in the workpiece, the denser the pompom will be. In order for the pompoms to retain their shape for a long time, the yarn must be straightened. If you use threads from a loose product, they must be placed under a press while wet.
If the yarn is thin
Pompoms made of thin yarn are usually used to decorate items knitted from the same material. Although it will not be of a large diameter, small items will look neat. It is best to make this pompom on a fork. You will get small fluffy pompoms. They are not very durable, but will look beautiful as decoration for things that are not subject to heavy loads.
How to get loose
To get a loose pompom as quickly as possible and without having special blanks, you need to do the following steps:
- The threads are wound around the fingers.
- The size is determined by the number of fingers on which the yarn is wound.
- The disadvantages of this option include the fact that the finished pompom does not retain its shape well.
Using cardboard rings
How to make cardboard rings to make a yarn pompom is described in this section. Cardboard blanks can be made by drawing circles on thick cardboard using a compass or using special templates. In the table below, you can see what materials are needed for the work.
| Materials | Peculiarities |
| Cardboard | Very dense for template strength |
| Scissors | Perfectly sharp to create an even pompom |
| Yarn | Matching the tone of the product or a contrasting color |
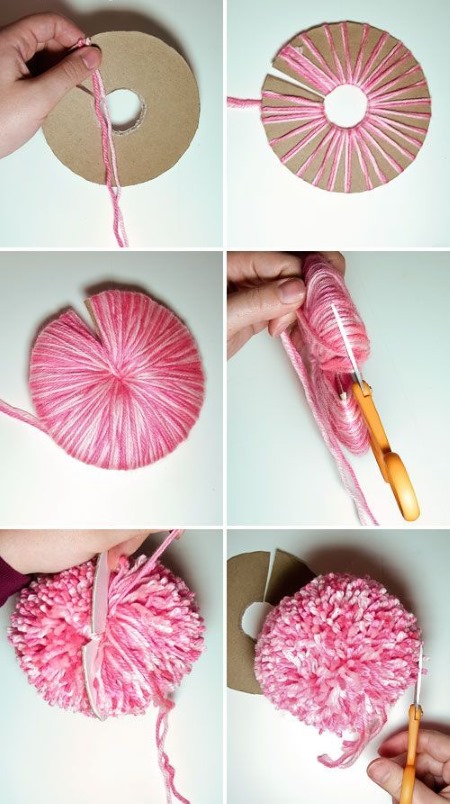
Instructions for making a pom-pom using cardboard rings:
- Create 2 ring-shaped templates from cardboard with the middle cut out (looks like a donut). The size should correspond to the size of the finished pompom. The larger the diameter of the hole in the template, the more threads can be wound and, accordingly, the more lush the product will be.
- Connect two templates together and wind yarn around them. To create a fluffy pompom, you need to use a lot of yarn.
- Carefully, so as not to shift the loops of yarn, you need to make a cut with scissors between the ring templates.
- Thread the thread and tie it tightly between the cardboard rings.
- Remove the cardboard rings after cutting them.
- Use scissors to trim the finished pompom to give it a nice shape.
Using cardboard squares
A cardboard template in the shape of a square is easier to make than a blank in the shape of a ring.
To make it you will need a ruler, but you can draw a template without using it.
The materials you will need for the work are sharp scissors, yarn and cardboard. The size of the cardboard squares corresponds to the size of the pompoms.
The stages of work are listed below:
- Cut a cardboard square on one side. Make the cut in the middle.
- Pull the thread through the slit. It is necessary to leave the free ends of the yarn in order to knit the finished product later.
- Wind a large amount of yarn (at least 100 turns) onto a cardboard square. Then cut off the thread.
- Tighten the pompom tightly using the loose ends of the yarn left in advance.
- Cut the loops with scissors and carefully trim the finished pompom.
Using a fork
This method of making pom poms does not require any pre-made templates.
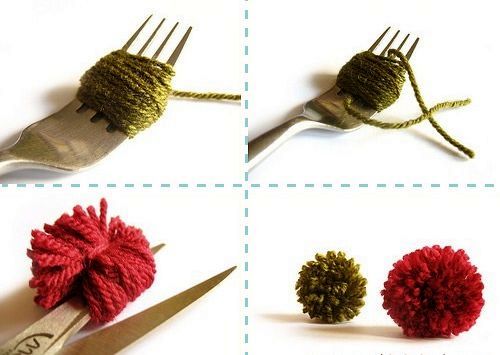
Any table fork will do. This pompom is very quick to make.
How to perform the work is indicated below in the list:
- Wind the yarn onto the teeth of a fork.
- Tighten a knot between the teeth, which will be the center of the pompom.
- Remove the future pompom and cut the loops.
- Trim with scissors to create desired shape.
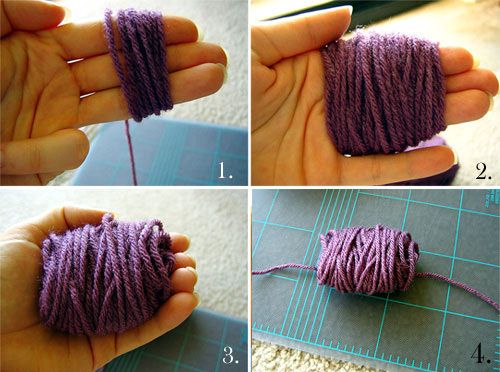
Finger-made
This method is suitable for both beginner needlewomen and those who do not have any materials for making pom-poms at hand.
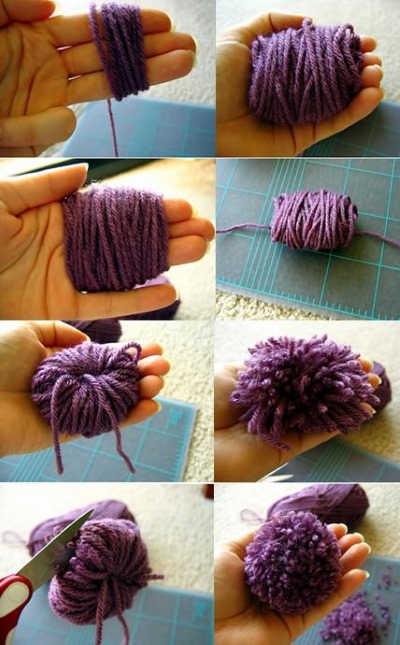
To make items this way you will need scissors and yarn.
If you wind the yarn using 2 fingers, you will get a small pompom; 4 fingers will be needed for a large pompom.
When wrapping, do not pull the yarn too tightly so as not to pinch your fingers.
Below is the workflow for making a beautiful pompom:
- Depending on the desired diameter of the pompom, wind the yarn around the required number of fingers.
- Having received the required skein, tighten it with threads, marking the center of the future product.
- The knot must be pulled tightly so that the finished pompom does not fall apart.
- Straighten the skein and cut the loops.
- Fluff up the pompom and trim it with scissors.
On the back of the chair
Even the back of a chair can be used to make neat pom-poms. Allows you to make a lot of pom-poms in a short period of time.
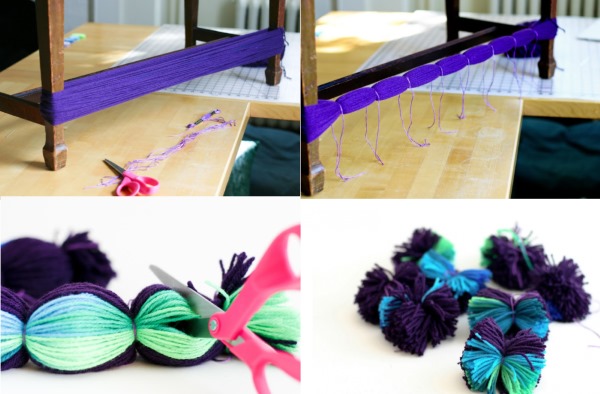
How to do the job is described below:
- Wrap the yarn around the back of the chair or around two legs.
- Tie with threads in several places, thus marking the center of future products.
- Cut the yarn with scissors between the ligature points.
- Fluff up the finished products and trim their edges with scissors.
The result will be a large number of pom-poms.
Mini pompom made from two colors of thread
Mini pompoms consisting of two or more colors are made according to a pre-drawn pattern. To make such products, you must first try making single-color pompoms. To create designer pompoms with an unusual alternation of colors, you will need experience. To make two-color pompoms, you will need yarn of 2 colors and cardboard.
Progress of work:
- Fold a cardboard circle with a hole in the middle in half.
- Place the yarn inside the circle, leaving the ends hanging freely.
- Wind yarn of one of the colors onto a semicircle in the required quantity.
- Wind yarn of a different color on top.
- Wind the first color onto the workpiece again. The volume of the pompom depends on the number of wound threads.
- Cut the edges of the cardboard semicircle with scissors. At the same time, tie the loose ends of the previously left threads into a knot.
- Fluff up the finished product and trim the edges with scissors.
In this way, you can make pompoms from two colors with any mixture of 2 colors of yarn. If you wind with alternating colors of threads, you can get a spotted pompom.
To obtain a double-sided product, it is necessary to wind yarn of one color on the first half of the workpiece, and wind yarn of a different color on the second. To create a multi-colored textured product, you must first draw a sketch.
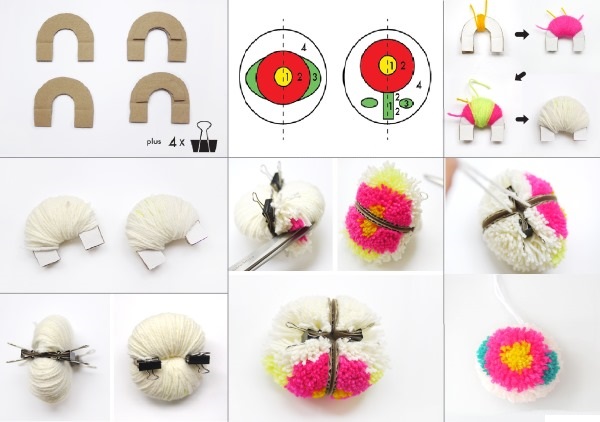
In the form of fruits
Fruit pom poms can be used as children's toys or to decorate children's clothes. The level of difficulty in making them is higher than that of single-color products.
How to make a yarn pompom to make fluffy fruits is given below. For work you will need sharp scissors, yarn to match the color of the fruit, a large needle, high-density cardboard.
It is necessary to cut out blanks from cardboard in the form of horseshoes. Then, depending on the fruit, it is necessary to wind the threads in the order described below.
Strawberry
Progress of work:
- Wind red yarn in the center of the horseshoe.
- Wrap white yarn on top of the red yarn on both sides.
- Repeat the process 2 times.
- Wrap red yarn on top.
- To make the tail, wind the green thread to the left of the red one.
- Using a large needle with a thread pulled through it, tie a knot on the workpiece by pulling the needle through the wound yarn.
- Cut the threads on one side. Tighten the knot.
- Use scissors to shape the pompom into a strawberry.
Kiwi
Sequence of actions:
- Wind white yarn onto a cardboard blank in several layers.
- Wrap black yarn around the top in several places.
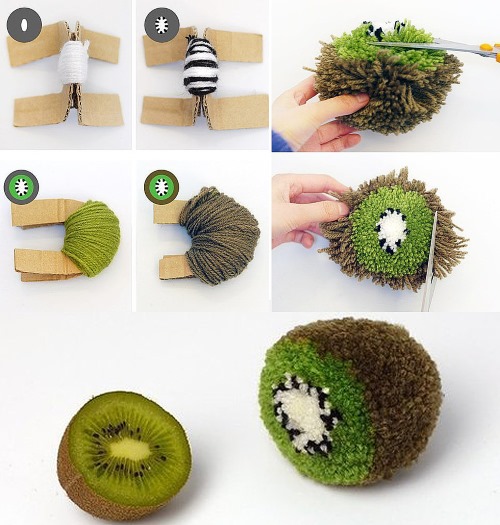
- Wrap the white and black yarn with green yarn.
- To make half a kiwi, wrap the green yarn and the remaining edges of the cardboard template with brown yarn.
- To create the second half of the kiwi, you need to wrap the entire cardboard template with brown yarn.
- Place the 2 halves of the blanks together and cut.
- Use scissors to shape the product into a kiwi.
- When cutting with scissors, do not cut the thread that holds the fruit together in the middle.
Watermelon
Description:
- Wind pink yarn onto the blank, and a little black yarn on top.
- Wrap another similar blank with green threads of two shades: dark and light. Wrap a white thread on top.
- Apply pink threads to white yarn.
- Connect two winding templates together, tie and cut with scissors.
- Use scissors to reshape the pompom until it resembles a watermelon slice.
Lemon
How to make a lemon-shaped yarn pompom:
- For the first half of the lemon, wind white yarn onto the blank.
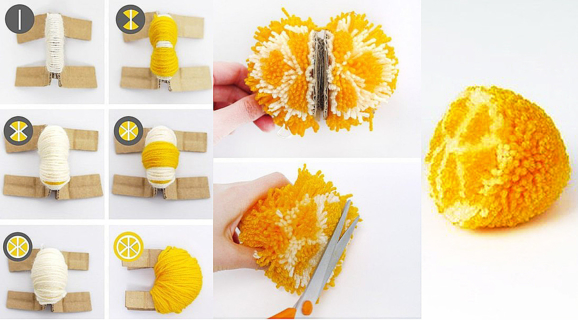
- Wrap yellow yarn around the top, leaving a small piece of white yarn in the center unwraped.
- Wrap white yarn around the center of the template.
- On top, wind a layer of yellow yarn that is smaller in width than the previous yellow layer.
- Another layer of white yarn.
- The last step is to wind the yellow yarn.
- To create the second half of the lemon, apply only yellow yarn to the template.
- Knit 2 patterns and cut.
- Use scissors to trim the shape to give the pompom a lemon-like appearance.
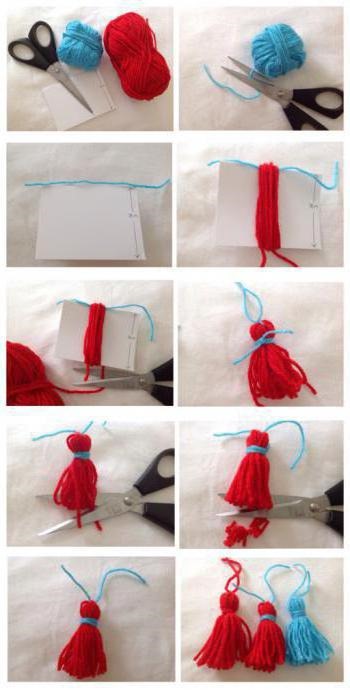
How to make simple brushes
Tassels are very easy to make. They can be used to decorate blankets, curtains, children's things, jewelry. To make beautiful tassels from yarn, it will take about 30 minutes. To do the work, you will need yarn, hook No. 3 or No. 5, needle, scissors, thick cardboard.
The manufacturing stages are presented below:
- For the cord on which the tassels will be attached, you can knit a chain of air loops. It is done with a crochet hook by knitting a row of air loops. The end of the cord is tied with a knot.
- Wind the required amount of yarn onto a rectangular piece of cardboard.
- Tie the threads on the workpiece in the center.
- On the other side of the cardboard blank, cut the yarn with scissors.
- Connect the two sides of yarn together and, stepping back from the center, knit again.
- Align the ends of the threads.
Following the above instructions, you can make a voluminous and neat pompom from yarn. Products made with your own hands carry warmth and positive energy. Such products will cheer up both a child and an adult.
Article formatting:Natalie Podolskaya
Video about making pom-poms from yarn
Video instructions on how to make a yarn pom-pom:
https://www.youtube.com/watch?v=CpHkOydhfsU
I didn't even think that you can make a pompom for a hat in the shape of a fruit, it turns out really cool
cool 🙂