If you are interested in how to make a paper pyramid with perfect shapes and edges, there is a specific pattern with dimensions so that you end up with the right figure. A paper pyramid can be an original gift made with your own hands or just an interesting craft.
How to Make a Paper Pyramid. Step-by-Step Instructions
Thanks to the ancient craft of origami, it is possible to recreate almost any figure from paper, including a pyramid. There are several ways to create an ideal figure with clear edges. For beginners in this business, there is an easy step-by-step tip on how to make a figure from cardboard. This instruction will be understandable to both adults and children.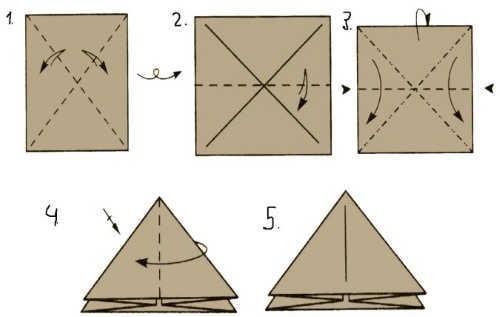
Step-by-step guide on how to glue a cardboard pyramid:
- On a sheet of paper, you need to draw one even square and three triangles. Each side of the square should be approximately 15 cm. The width of the triangle should be the same, and the height 27 cm.
- Use scissors to cut out the blanks not along the contour, but with an indent of 3-4 mm; this will be necessary later when gluing the figure.
- Apply glue to all parts, let it dry a little and put all the parts together into a single structure.
- Let the craft dry completely and you can start decorating.
How to decorate a pyramid - there can be any will of imagination. For example, you can stick figures on it, wrap it with foil or paint it with special acrylic paints.
Materials and equipment
How to make a pyramid out of paper, a diagram with dimensions, are not the only main components in making the figure.
To make origami easier to perform, you should prepare it in advance. necessary materials and tools so that they are all at hand when working:
- For making edges various materials may be needed. You can use not only cardboard, but also plastic, metal, plywood, glass, or make a frame out of wire. If the figure is created with some esoteric message, then it is recommended to cover the paper pyramid with foil from the inside. This is necessary so that positive energy accumulates in the figure and does not dissipate. If several small magnets are placed inside the pyramid, the product will have magnetic energy.
- For crafts It is worth getting some quality glue, which can be bought at a stationery store.
- Sharp scissors will come in handy, to cut out even blanks for the future figure.
- You will also need a ruler, pencil and eraser. just in case.
To make the figure you don’t need a lot of materials, all the tools for the pyramid can be found in almost every home.
We define the parameters
To make the product neat and beautiful, it is worth setting clear parameters when making blanks for the future pyramid. Each part may require a separate sheet of paper. You can download ready-made schemes, but they are also easy to draw yourself.
The main thing to know is that the width of the triangle must be equal to each length of the edge of the square.
The height of the geometric figure can be chosen any, but the recommended length is 10-15 cm longer than the width of the workpiece. It is with this ratio that the figure will look harmonious.
We are building a drawing
To make it easier to learn how to make a perfect pyramid from paper or any other materials, there is a diagram with dimensions. The drawing is the basis for further gluing of components for the future solid figure. There are several types of pyramids, each with its own drawing.
But there is one simple way that is suitable for children and beginners in this business:
- The base of the pyramid should be a regular polygon, with a height passing through its center. It is worth determining the dimensions of the pyramid in advance, for each they can be individual.
 You need to draw four squares, three of which will be needed for triangles.
- On one of the sides, you need to determine the middle of the line. From the two corners of the base, you should draw two lines to the marked point to get the top of the pyramid.
- The isosceles triangle blanks will need to be connected to the square using special indents. It is worth remembering that the blanks need to be cut out adding half a centimeter to their edges so that it is convenient to glue the figure.
Completion of the simulation
The cut out figure must be glued along the fold lines. Before joining the parts into a complete model, glue must be applied to the folds and left to harden for a while so that it adheres better. After the product is ready, it should be left for half an hour so that it does not accidentally come apart during decoration. The final stage of modeling includes the design of the work.
You can paint the pyramid with acrylic or shimmering paints and draw figures on it.
The product can be covered with foil or gift paper. Also, for those who believe in the mystical power of the pyramid, it is worth gluing natural stones to it that will match the zodiac sign of the person to whom this figure will be presented. In the children's version, the pyramid can be turned into an animal by gluing ears, a tail to it and drawing the features of the muzzle.
Method 2
This pyramid scheme involves using a ready-made template that can be downloaded and printed. This option is the simplest, since you don’t have to draw the figures yourself. The main thing is to prepare all the necessary tools and decorate the product in an original way at the decoration stage.
Method 3
There are quite a lot of tips on how to make a paper pyramid, A certain diagram with dimensions is an integral part of performing origami:
- Fold the square sheet so that the corners lie opposite each other, cut off the excess paper with scissors. This way you can make an even square.
- Fold the blank along one diagonal, open it up and fold it along the other, and unfold it again. This is how the necessary lines are marked.
- Take the halves of the square, fold it into a triangle in two layers. Fold two corners from the base to the center. Repeat the same on the second side of the figure.
- Fold the corners to the center on one side and the other.
- Bend the rhombus on each side, directing its corners inward.
- The pyramid needs to be bent so that a star with four faces is formed. The figure is taken with both hands by different ends and given a shape.
Gradually giving the object a shape, a pyramid will begin to form. It is very important to know that at the last stage you need to act carefully, trying not to accidentally tear the craft.
Method 4
Necessary tools for crafting:
- sheet of paper,
- triangle,
- scissors,
- pencil,
- glue,
- eraser.
Execution:
- Cut out a square. Fold the workpiece in half in different directions to form folds.
- Place the diagonal of the triangle on each side of the square and make marks along the folds.
- Connect the triangle to the vertices using lines. For accuracy, it is recommended to use a ruler.
- Mark the gluing lines of the sides with a pencil.
- Cut out the figure and apply glue to the gluing lines.
How to make a pyramid out of cardboard?
Making a cardboard figure with your own hands is quick and easy. You can use any color of paper, but gold, beige, 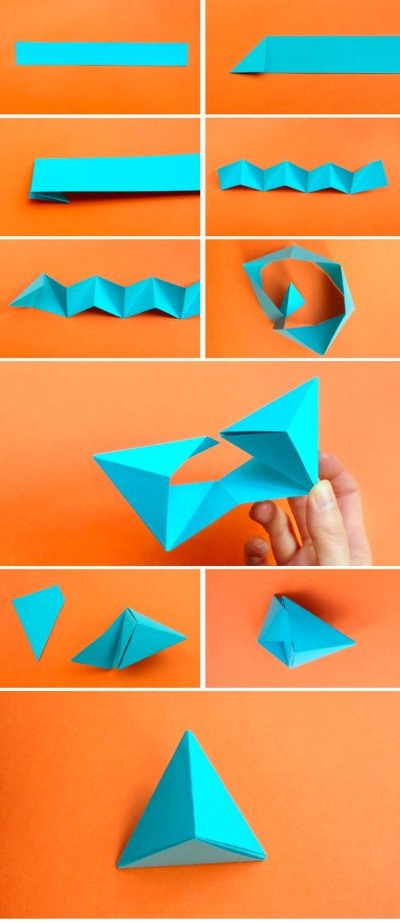 light brown.
To make the product look more realistic, you can use a needle to draw horizontal and vertical lines on the paper blank.
This will create the effect of a real mini-pyramid of Giza.
Using the above step-by-step methods, you can create a figure with edges. A cardboard pyramid is made using the same principle as from plain paper.
But there is a big plus that it can be decorated, for example with granulated sugar:
- The product can be completely covered with transparent glue and sugar sand can be applied to it. This way you can create an interesting shining effect.
- You can also sprinkle the pyramid with sand, having previously coated it with glue. The figure will acquire a realistic effect.
"Golden Section" in Pyramid Proportions
The standard of the ideal pyramid is certain correct proportions. The key to creating the correct figure is the coefficient and numbers 7.23. The number that is important in the science of mathematics and geometry, these numbers are also important in architecture and even medicine.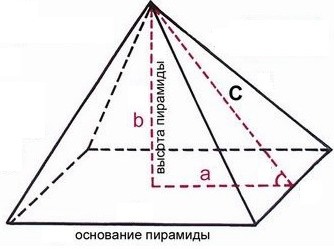
The segment of length 7.23 must be multiplied by the coefficient 1.618. The resulting number 116, 981 should be rounded to 117 cm. This length is the base of the pyramid.
Also, to obtain larger models, this number can be multiplied several times. Thus, the length of our pyramid is 117 mm, and the height is 72 mm.
Using the Pythagorean theorem, you can determine the length of the sides of a triangle.. The result will be 92.769, which needs to be rounded to 93. This data is adjusted to the ideal proportion of the "Golden Section".
How to make a development of a quadrangular pyramid?
To make a quadrangular figure you will need:
- thick paper or cardboard,
- simple pencil,
- ruler,
- scissors,
- glue.
Stages:
- First, you need to make a pattern in which the base will be 8 cm and the height 6.5 cm.
- On a piece of paper you need to draw an even square, marking the middle on each of its edges.
- Draw lines from the middle points perpendicular to the square, 6.5 cm long - there should be 4 of them in total.
- From each vertex, draw two lines to the corners of the square to form triangles.
- Cut out the blank and fold the triangles so that they come together at a single vertex. Glue the figure.
It is easy to make a quadrangular figure yourself. You can also create larger pyramids based on this step-by-step instruction.
How to perform a development of a regular pyramid?
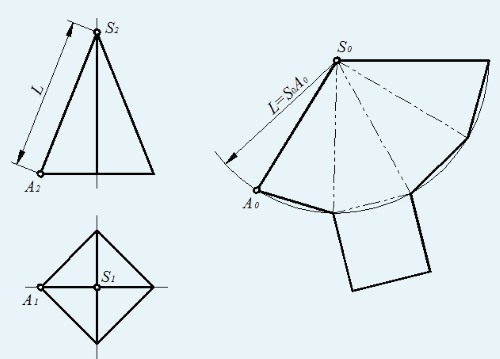
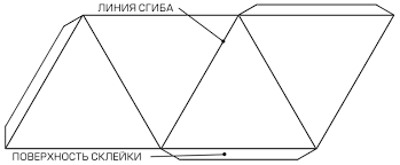
If you are interested in how to make a pyramid with a paper scan, there is more than one diagram with dimensions that will help you to correctly make the figure. When designing the scan, a regular triangle is taken as a basis. The side surface is presented as a flat drawing consisting of faces and a polygon.
First, the natural size of the base is determined and the true size of all edges (can be done with a compass). After three sides have been found, the base and side face are constructed. An arbitrary point is taken and an arc equal to the length of the side edges of the workpiece is drawn from it. Four segments equal to the base of the pyramid are marked on the arc.
All lines are connected, including with an arbitrary point. A square is drawn to one of the resulting triangles, which is equal to the base of the figure.
Complex figures: volumetric models
Figures of this type are made to acquire skills in working with three-dimensional paper products and to teach children the basics of geometry. Original gift wrapping can be made from such models. Sometimes it is difficult to develop the correct layout, it is recommended to have at least a little knowledge of drawing.
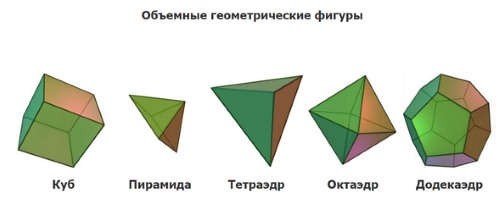
But There are ready-made stencils that can be printed from a printer. Models are used not only for entertainment purposes, but also for educational purposes. You can clearly show a child what a particular figure looks like. Complex models can be: cube, octahedron, dodecahedron, icosahedron and others.
Before you start drawing a figure, it is worth imagining it in 3D format, how many edges and dimensions it has.
On a sheet of paper, you need to draw the edges so that they connect correctly. Each figure has its own specific type of edge. The edges should also be the same length so that there are no mismatches when fastening. If the layout has the same sides, then at the time of drawing you can draw a template and use it to draw the rest of the blanks.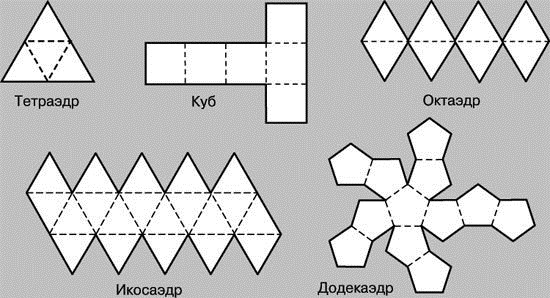
3D models are important when teaching children: they give students the opportunity to hold the figures in their hands, examine them and better understand the structure. Also, when studying some theorems (Euler), a visual aid is recommended.
Modeling of various polyhedra
To learn how to make more complex models, it is worth starting with the basics, for example, with 3D triangles. Gradually improving the skill in creating simple layouts, you can proceed to complex models. Complex figures require skills and honed dexterity when performing, for example, when unfolding or giving shape to a figure, you need to act so that it does not accidentally break.
When making a drawing, you should carefully apply markings and be able to draw figures.
If you have a question about how to make a quality paper pyramid, there is a detailed diagram with individual dimensions. You just have to put in a little effort, and then it will be difficult to make a beautiful and high-quality work that will please the eye.
Thanks to the above methods, you can easily create various pyramid models. It is not difficult to learn how to perform these techniques, the main thing is to follow all the stages gradually and carefully.
Video on how to make a paper pyramid
How to make a paper pyramid, find out in the video:
Scheme of execution of a volumetric pyramid: