Needle lace is an ancient art form of weaving openwork patterns from thin threads. It is important for beginners to know what materials are needed for work, and they should also read the instructions for weaving basic elements and look at several step-by-step master classes on making simple products, which will help to practice skills and move on to making complex elements.
Definition and features of needle lace creation
Needle lace is a pattern woven from thin threads using a needle. They can be flat or voluminous. The color and thickness of the threads depend on the weaving style.
Art historians are divided when it comes to the origin of needle lace. Some experts believe that this type of art first appeared in Italy in the 15th century. Others are sure that this weaving technique arose simultaneously on different continents and gradually gained popularity throughout the world.
A characteristic feature of this type of creativity is the minimal amount of tools and materials. All you need for weaving is needles, threads and a stencil-base. You can use paper with a pattern, cardboard with slits or canvas as a base.
After the patterns are completed, the backing is carefully removed, leaving the thread pattern. The finished elements are sewn together to create a single piece. At present, 6 types of needle lace are especially popular. In the table you can see the names of these varieties and brief descriptions of their features.
| Type of needle lace | Peculiarities |
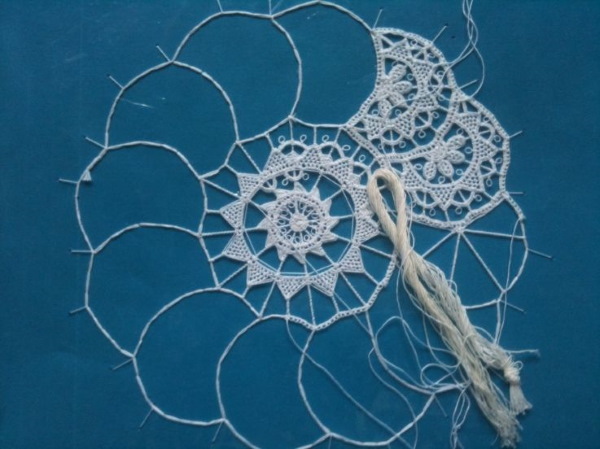
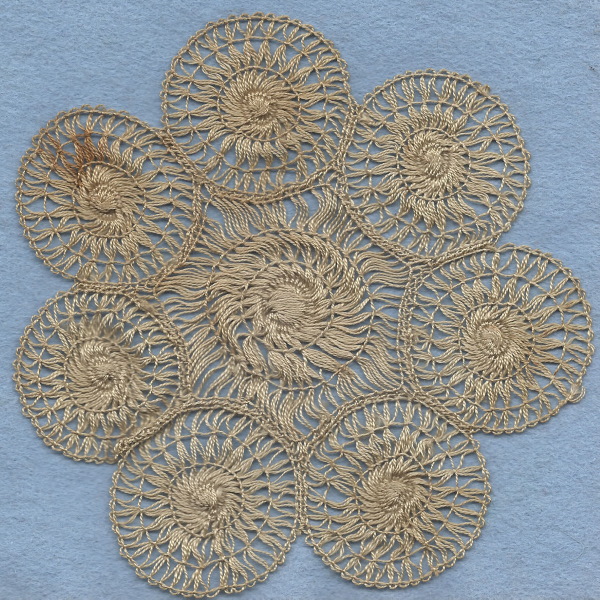
| Tenerife or sunny lace | Round elements made from plain or white threads. All parts are created separately and then sewn together into a single piece. |
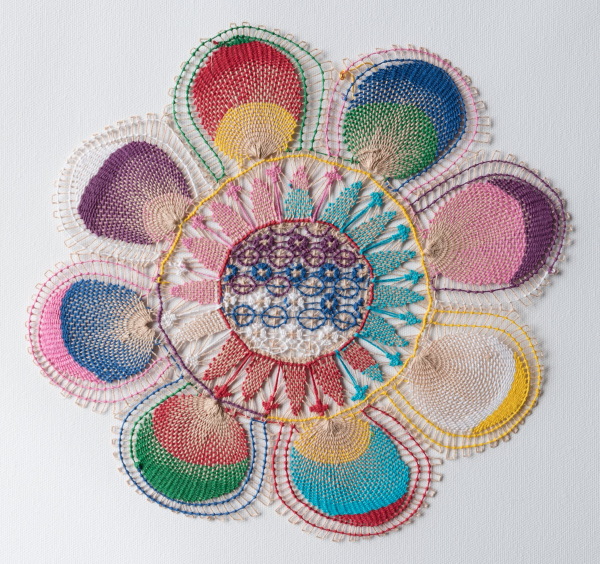
| Nyanduti | Multi-colored ornaments woven from very thin threads, like a "spider web". This lace is made on a stretched canvas with patterns, which is carefully removed after the work is completed. |
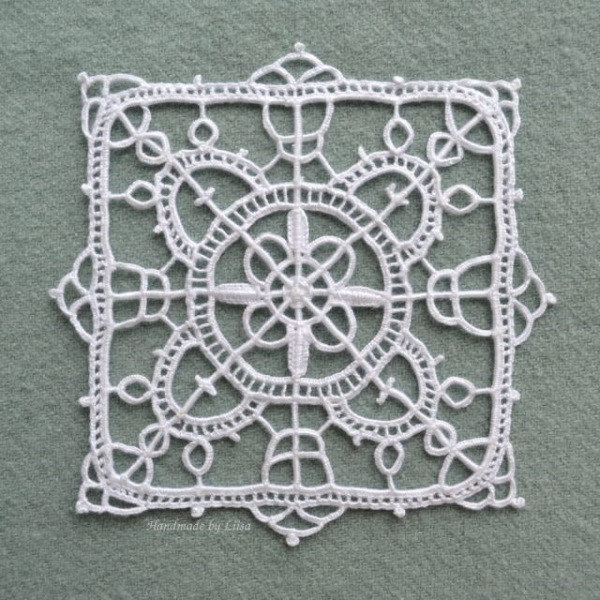
| Reticella | Lace made on a fabric or thread mesh, with a loop stitch. Most often, light, single-color threads are used for such works. The main patterns are arches, teeth, triangles, circles. |
| Punchetto | Lace made from thin threads. The main patterns are geometric shapes. For example, circles, rays, triangles. |
| Kadomsky Veniz | Weaving is done on hoops, without a backing. The main patterns are flowers and leaves. The lace can be colored or plain. |
| Vologda glass | The work is done on a fabric or thread mesh. The main elements are: seams with a layer and air loops. |
There are other directions similar to those described in the table:
- English lace;
- Alencon;
- Croatian;
- Armenian;
- Romanian;
- Flemish;
- Irish;
- hedebo;
- Turkish;
- Hungarian.
All these weaving techniques have in common the basic elements: seams and knots. You can read about how to learn to knit and embroider them using a needle further in the article.
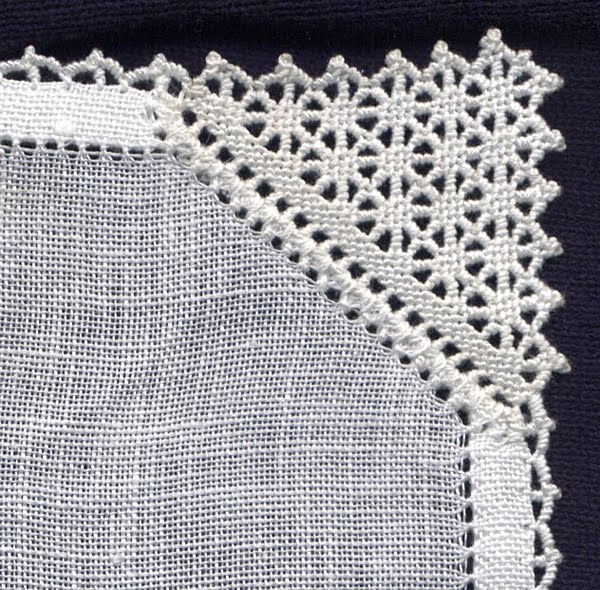
From needle lace you can create various products, for example, tying the edges of scarves, tablecloths or dress collars. From the voluminous lace "Oya" you can weave unusual jewelry, earrings, bracelets, necklaces.
Tips before starting work for beginners
What rules should you follow to get beautiful lace:
- For work you need needles with blunt ends. Sharp tools will split the threads, cling to the mesh.
- It is better to do the first work with thick threads. It is easier to tie knots and make the main seams with them.
- There is no need to tighten the threads too much. The tension should be moderate so as not to deform the backing or mesh.
- You can weave beads and small seed beads into the lace. The placement of the decor should be thought out in advance, and then marks should be made on the base so as not to miss the moment when you need to use beads.
Needle lace for beginners may seem like a difficult art to master. To get a neat product, it is important to learn how to tie knots and make basic seams correctly. Further work will become easier and clearer when the execution of basic elements is brought to automatism.
Materials and tools for work
Lace can be woven using blunt needles with a narrow and long eye. The diameter of the tool and the length of its eye depend on the thickness of the threads. Beginners will need a medium-thickness needle to complete their first work. In the future, it is advisable to purchase a set of embroidery needles so that you can weave patterns from different threads.
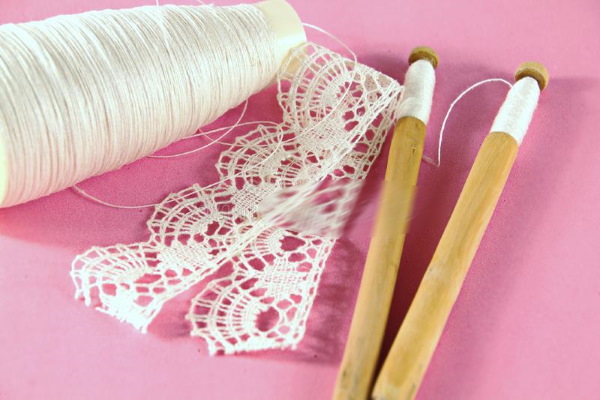
The threads for weaving must be strong and smooth. Many craftsmen prefer silk threads, floss, or linen. Fleecy threads slide poorly, which complicates the work.
You can use thin paper with a design printed on it as a backing. For weaving large and round elements, you can use cardboard with pre-made slits in it, where the threads for tension will be inserted. The canvas should be stretched on a hoop to make it easier to work.
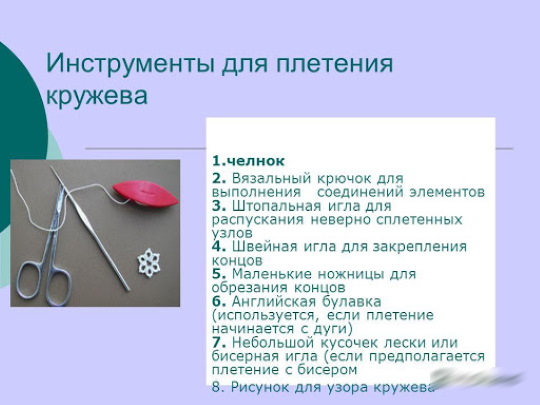
You will also need scissors for the job. It is advisable to buy 1 regular, office, and 1 small - manicure. The blades of the tools should always be sharp. Sometimes you may need safety pins to fix the threads, so you need to have at least 1 set on hand.
Basic elements, step-by-step description of their implementation
Needle lace (for beginners, detailed instructions are provided later in the article) cannot be done without the skills to create basic elements. The first thing you need to learn is knitting knots.
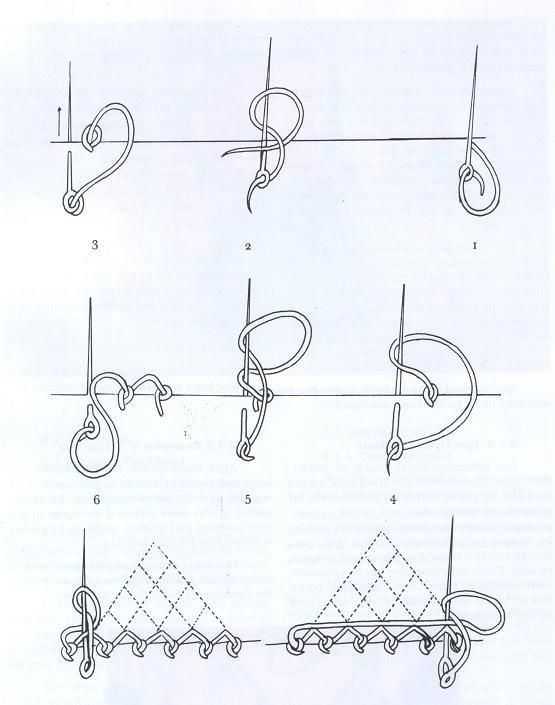
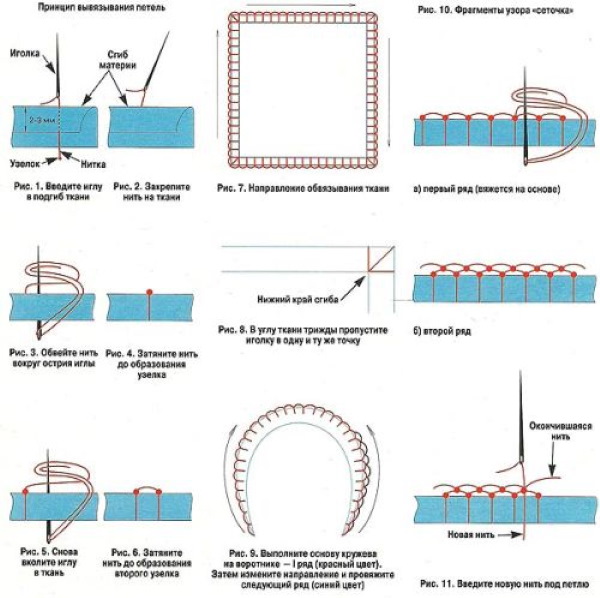
Double or full knot. The most common type of knot, which is found in most lace compositions.

How to do it:
- The thread from the spool (working thread) should be threaded through the needle.
- Place the thread over your index finger.
- Place the needle with the sharp end facing you.
- Hook the fabric or mesh thread, pass the needle under the working thread and tighten.
Pico is no less important element. It is used to attach beads or connect main parts together.
How to do it:
- Place 4 double knots on the needle.
- Tie another knot, place it on the needle separately from the previous ones.
- Secure the knot.
- Use your fingers to push the loop towards the finished knots.
- Tighten the knot.
The ring is another element used in the art of needle lace.
How to do it:
- Place 8 double knots on the needle, then make 1 picot, and then place 4 more double knots.
- Lower the collected knots down, holding them with your fingers. Pull them along the working thread, without tightening them all the way.
- In the process of pulling the working thread, at a certain point a small loop should form. The needle should be pulled out through it.
- Tighten the thread, holding the knots with your fingertips.
- Tie a knot.
- You should get a small circle. It needs to be carefully straightened with the tip of the needle.
How to connect the rings together:
- Cast on 4 more double knots.
- Turn the braided element so that the picot is turned away from you.
- Insert the needle into the picot and pull up the working thread.
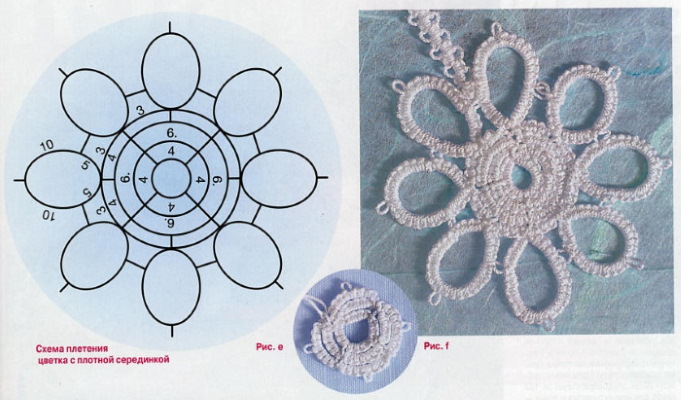
How to make a three-leaf ring flower (a commonly used element):
- Cast on 4 double knots 2 times, with 1 picot between them. You should have 16 loops.
- Drop the loops onto the working thread and close into a ring.
- Weave 2 more rings in the same way.
- Tighten and secure the thread.
An arc is an element for creating arches. They are used to connect basic elements.
How to make it (you can continue weaving on a three-leaf flower):
- Cast on 16 double knots.
- Slip stitches off the needle without joining.
- Secure the end with a regular knot.
- Use your fingers to pinch the dropped stitches and thread 4 new double knots onto the needle.
- Make 1 picot.
- Pass the adjacent loops through it.
- Cast on 2 double knots of 4, with 1 picot between them.
If you continue to weave according to these instructions, alternating arcs and three-leaf flowers, you can get an unusual bracelet consisting of basic elements. It is also important to learn how to weave at least 1 type of mesh.
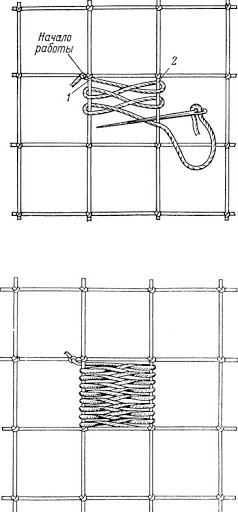
The grid is needed to cover empty spaces, as well as to connect the main patterns together. It can also be used as a base.
How to weave the simplest version of the mesh:
- Make a rectangular base from cardboard measuring 7x7 cm.
- Using a ruler and a simple pencil, mark it with horizontal lines, 1 cm apart.
- At the ends of the drawn lines, make slits in the cardboard that will hold the threads.
- Pull the thread along the lines.
- Fasten the thread to the very bottom thread, on the left. Then weaving will be done from left to right. When a new row begins, the direction will change to the opposite.
- Make a loop, twist the thread 3 times so that it is firmly secured to the main thread. Make another loop, twist the thread 3 times again.
- Continue weaving to the end of the row.
- Weave a new row in the same way, changing the direction. The places where the threads are twisted should be staggered.
The edges of the threads on the sides of the fabric should be secured with double knots and then with an overcast stitch. When a novice master can perform these elements, he will need to study the main types of seams. The table lists the names of 5 decorative seams and a brief description of their execution on a thread or fabric mesh.
| Seam name | What is it for? | How to perform on square grid cells |
| Flooring | Embroidery of geometric patterns and grid filling. | You need to select 3 cells and skip the corners between 3 vertical threads in a checkerboard pattern until the cells are completely filled. |
| Flooring with upholstery
| A stitch for filling individual pieces of lace and joining parts. | It is done in the same way as the classic layout, but on 1 cell. The needle must be passed through 2 vertical threads, in a checkerboard pattern. |
| Semicircle seam | Filling empty spaces. | The thread is thrown over the required number of cells, making 1 turn from the top. Then, the direction is changed and the thread is thrown over the sagging arcs of threads in the cells. |
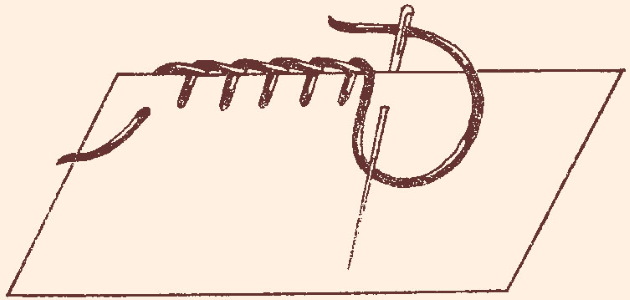
| Overcast stitch
| Securing the edges of products and overcasting the posts. | The working thread is thrown over the main thread of the net, and the needle is inserted into the resulting loop. The main thread is overcast in the same way to the end. |
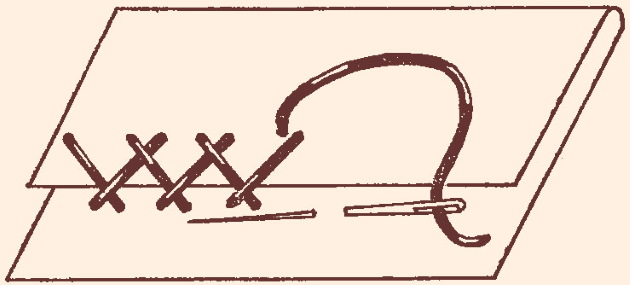
| Cross stitch
| Base of the columns. | It is performed on a square of 4 cells. The thread is twisted from left to right, passing the middle of the square between the 2 parts. The needle is inserted into the center of the line, redirected to the upper left corner. Fix, and twist the thread again, pulling it to the opposite corner. |
To learn how to sew correctly, you need to practice for a long time. For convenience, you can use graphic diagrams that indicate the direction of the needle and threads.
Progress of work
Needle lace for beginners will be easier to master by braiding the edges of a small piece of cotton fabric (10x10 cm).
Progress of work:
- The edges of the fabric need to be folded by 0.5-1 cm. Iron and hem on the machine.
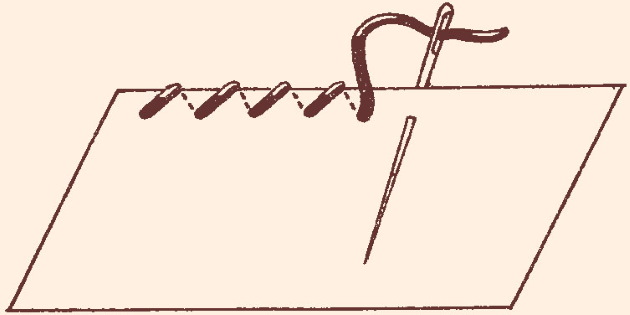
- The first row of lace is triple rays. Such stitches will make the base of the weave stronger. The needle should be inserted into 1 point three times and make 3 short rays diverging in different directions.
- By analogy, all 4 sides of the fabric should be braided.
- Weave the next row with a mesh.
- In places where the corners connect, you can make arches, then the corners will be semicircular. Each new arch in the top row should be larger than the previous one.
At the end of the work, you need to secure the thread correctly so that the knots do not come undone.
How to secure threads
It is very easy to fix the thread to the fabric. You need to pick up a small section of the material with a needle, pull the working thread out from there and pull the needle through the resulting loop. All that remains is to tighten the thread and cut off the excess with scissors.
How to secure thread to lace:
- Insert the needle under the last knitted element.
- Turn the needle towards you and thread it through the resulting loop.
- Tighten the thread.
- Insert the needle back into that place and pass it through the loop again, tighten.
- Use scissors to cut off the excess.
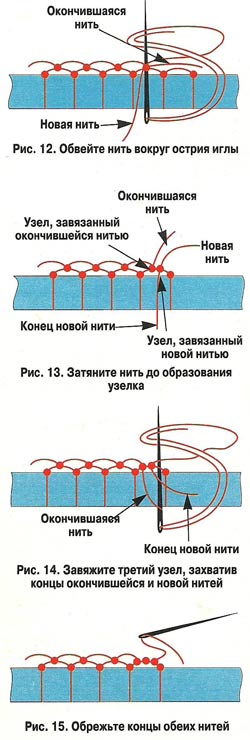
How to extend a thread that has run out:
- Place the end of the old and new thread together.
- Twist them once.
- Pull the end of the old thread through the resulting loop.
- Pull both ends and tighten the knot firmly.
Cut off excess with scissors.
Examples of patterns
Knowing the technique of making basic knots and seams, you can come up with new weaving fragments yourself. The main secret of experienced craftsmen is the correct sequence. This means that you need to be able to alternate the basic elements to get a beautiful pattern.
Examples:
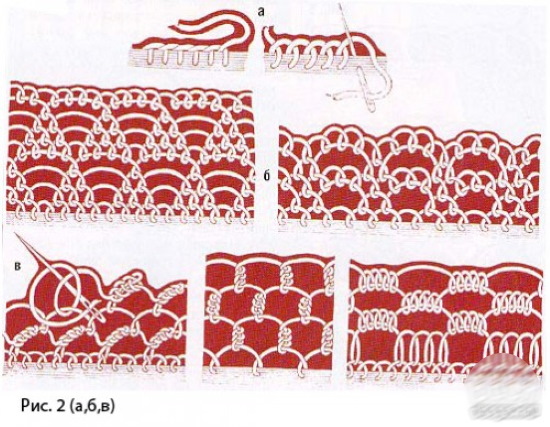
- Triangles pattern. It is woven on 3 rows. Arches and air loops alternate. On the 1st row – 3 loops, on the 2nd row – 2 loops, on the last – 1 loop. The arches increase in size with each new row.
- Small loop pattern. Suitable for decorating the edges of products. 7 double knots are collected on the needle, then carefully lowered onto the working thread, tightened and fixed into a ring.
- Fish scale pattern. Can be used as a net to cover empty spaces. You need to knit small arches that will cling to each other with posts in a checkerboard pattern.
To create original patterns, you need training. By alternating arcs, rings and decorative seams, you can create unique ornaments.
Master classes on creating products from simple patterns
Needle lace for beginners should be easy to make. It is advisable to start the first work with making large elements of decoration, and then assemble them into a single composition.
You can immediately create a small decorative element for clothes, such as cuffs for sleeves, or make an unusual souvenir for a loved one, such as a lace valentine. Below in the article are descriptions of 3 simple products that you can make yourself.
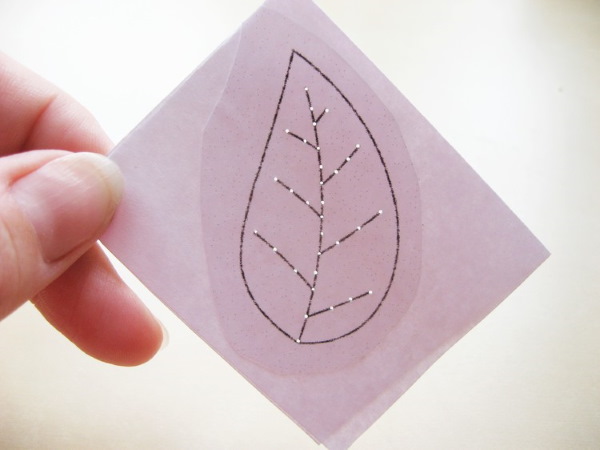
Leaf with veins
An openwork leaf woven using the needle lace technique can be used to decorate a collar or pocket of a blouse. It can also serve as the main element for an entire decoration, such as a necklace. In this case, you will need to make about 12 such leaves and then connect them together.
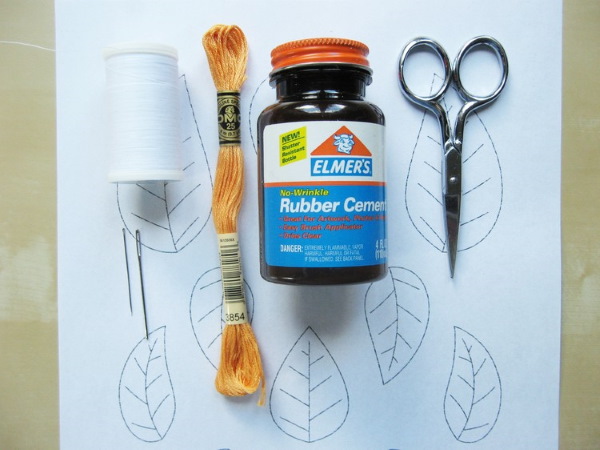
What you need for work:
- green floss threads;
- green sewing threads;
- scissors;
- set of embroidery needles;
- office glue;
- simple pencil;
- office paper.
Procedure:
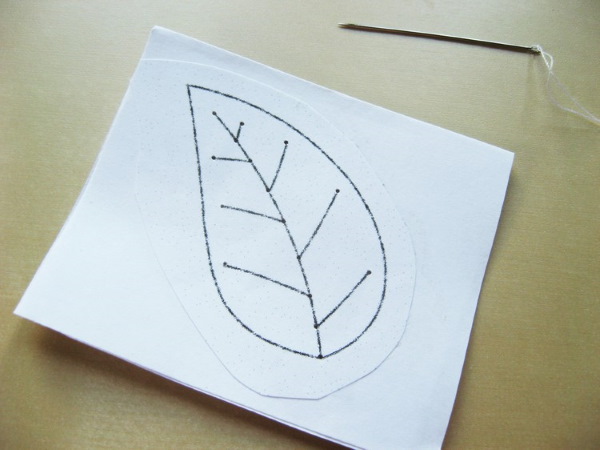
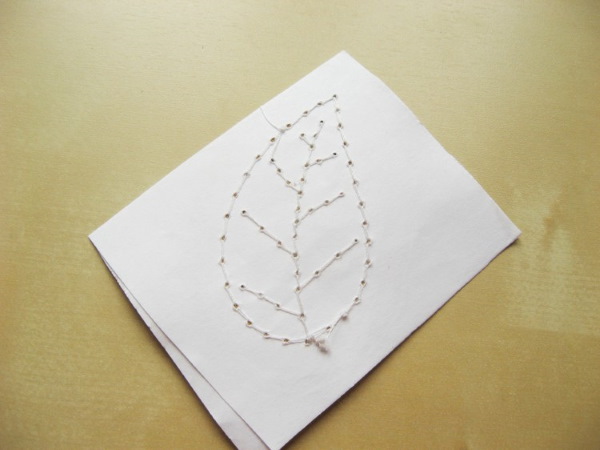
- Draw the outline of a leaf on paper.
- Cut out the template.
- Glue 3 layers of paper on the bottom. Glue should be applied to those areas where there will be no through stitches.
- Using a thick needle, make holes at a distance of 3 mm from each other to make it easier to make stitches.
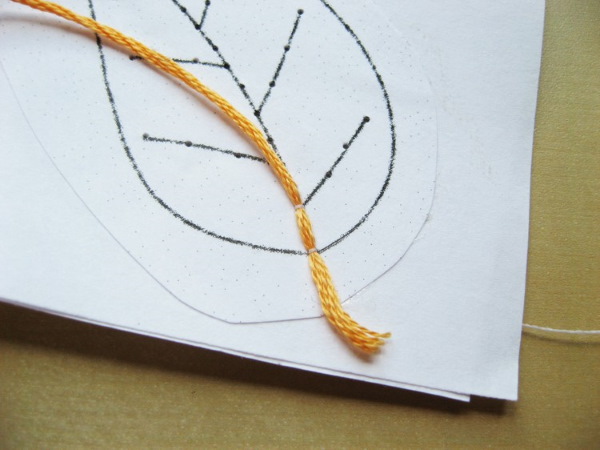
- Make 1 stitch with floss and secure the thread. There is no need to cut the end.
- Next, you need to make another stitch with sewing thread, picking up the floss threads.
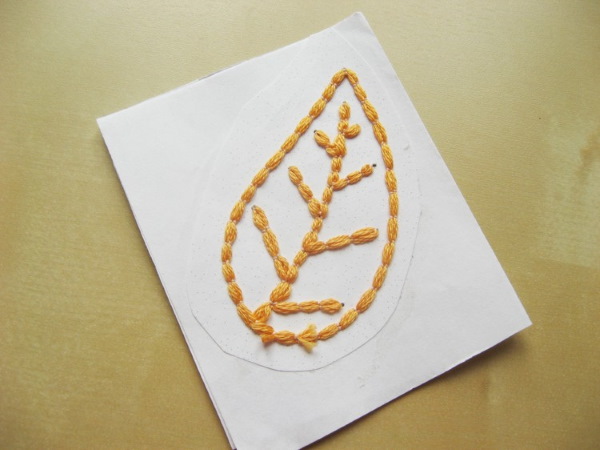
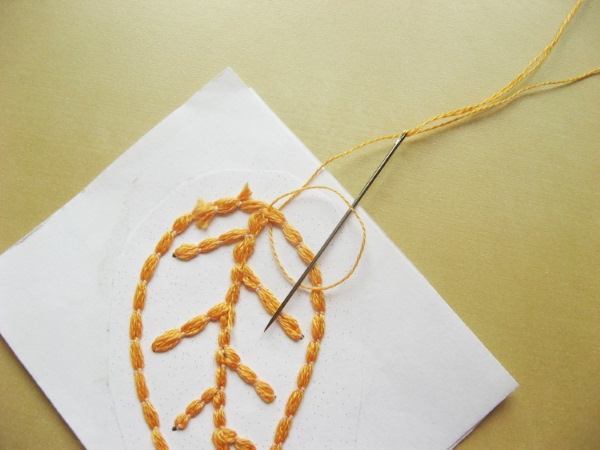
- Embroider the leaf along the outline.
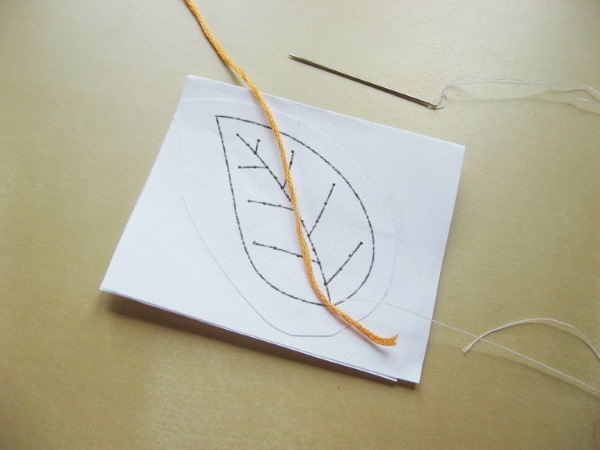
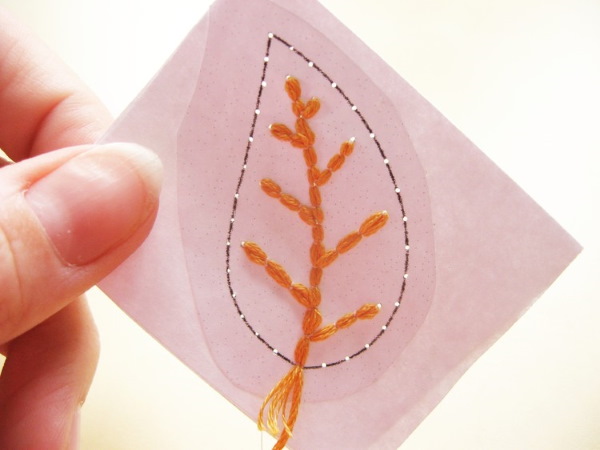
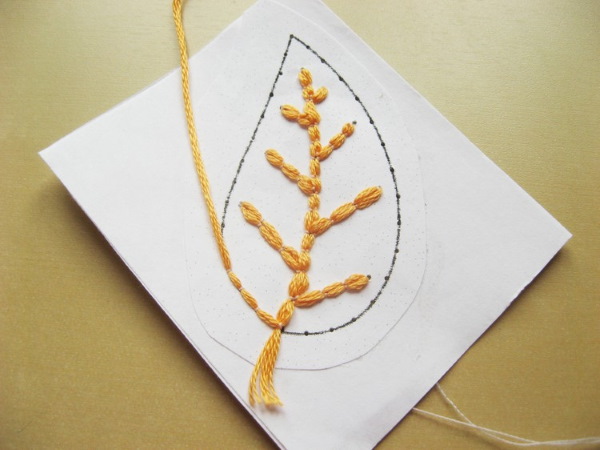
- When the threads return to the starting point, you will need to turn the workpiece over and stitch the leaf from the other side.
- Fasten the thread on the wrong side.
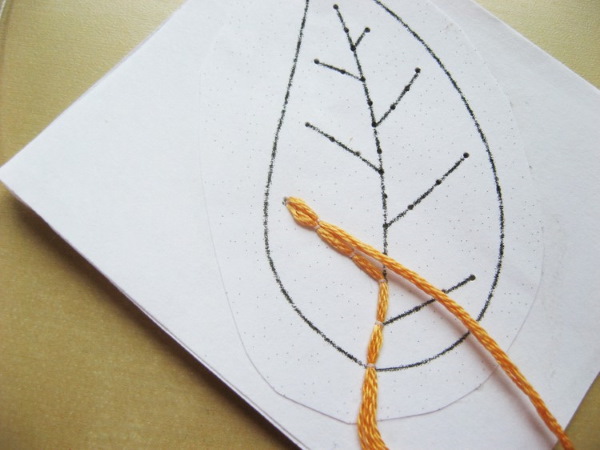
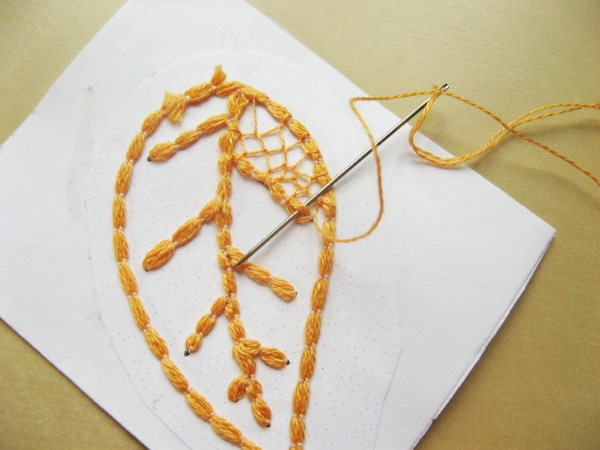
- Empty spaces should be covered with a decorative mesh. To do this, insert the needle under 1 of the 6 threads of floss, in each stitch.
- The mesh should be embroidered at the base of the leaf, smoothly rising to the tip. All subsequent stitches of the mesh should be skipped without dividing the floss. The needle should be inserted under the stitches.
- Once the empty areas are covered with mesh, you need to sew a few stitches along the outline of the leaf.
- Secure the thread to the back of the piece.
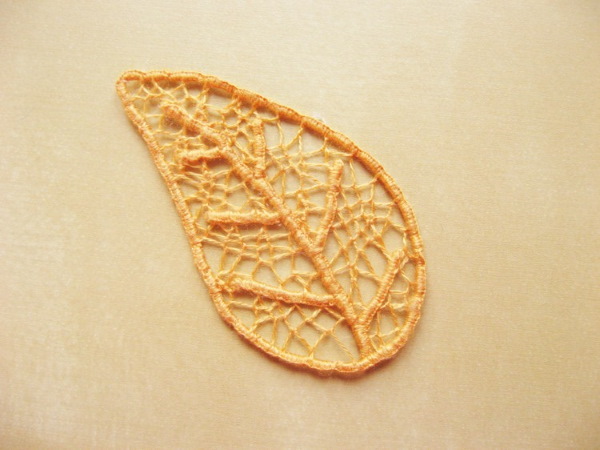
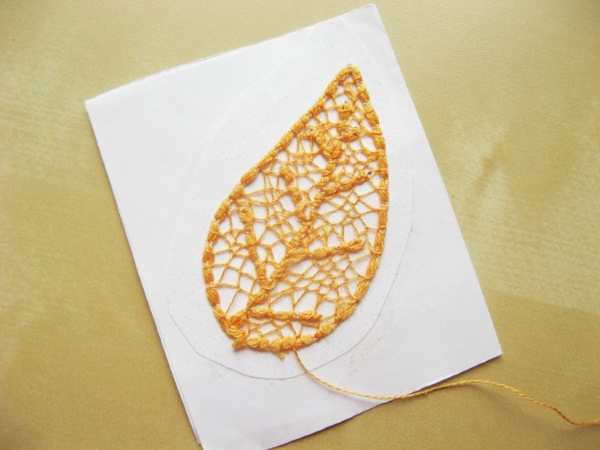
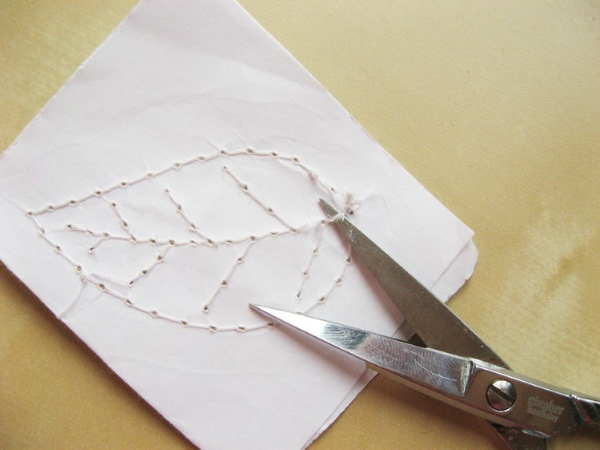
All that remains is to carefully pull the threads out of the paper. To help the source hold its shape better, it needs to be starched.
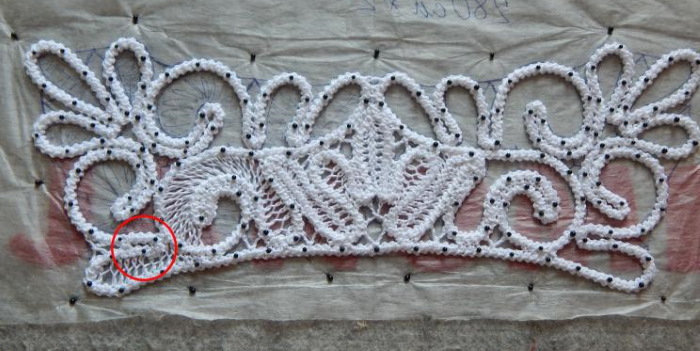
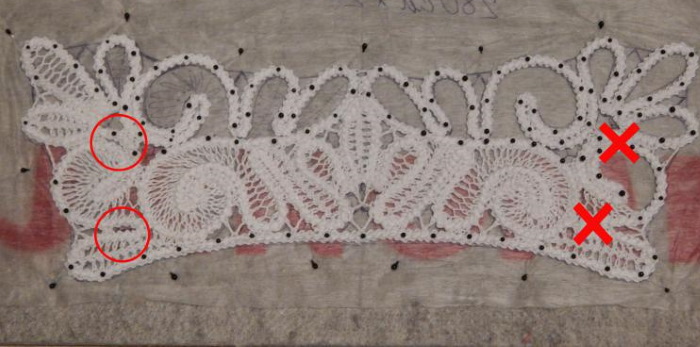
Lace cuffs
To make beautiful button cuffs, you will need:
- 6 m of white caterpillar cord (can be bought or crocheted);
- white sewing thread;
- set of embroidery needles;
- scissors;
- a piece of foam or cork board;
- paper;
- simple pencil;
- English pins.
Procedure:
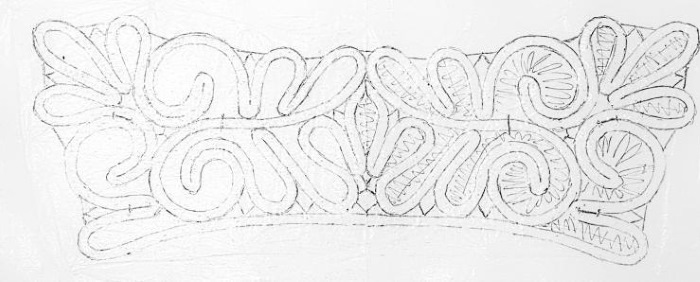
- Draw a diagram (cord arrangement) on paper. These can be loops, rings, floral motifs.
- Attach the diagram to a cork board or foam board.
- Secure the paper at the corners with safety pins.
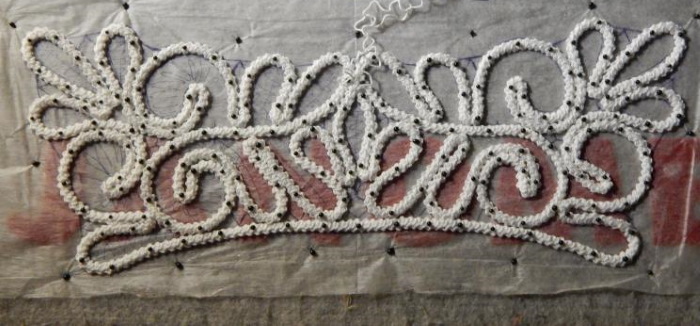
- Place the cord on the paper according to the diagram. Pin it to the paper and the backing so that it does not get tangled.
- Sew the ends of the cord with white thread.
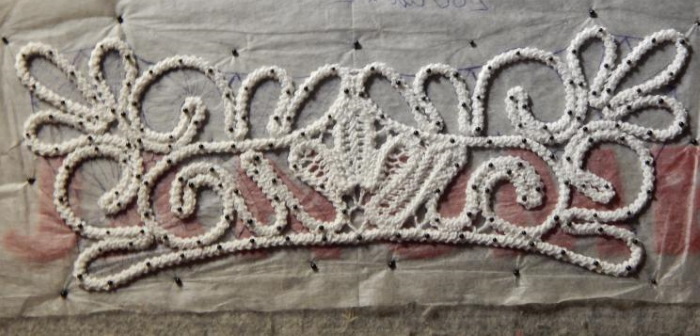
- The empty spaces where the loops have formed should be closed with a "simple Russian seam" or a fine mesh. When making a pattern, it is necessary to sew the cord loops in those places where they are close to each other.
- Before making a buttonhole, you need to measure its diameter and then mark the location for the loop.
- Remove the cuff from the paper.
- Sew the loop.
- Embroider the place for the button with a dense mesh.
- Make another cuff in the same way, turning the pattern to the other side.

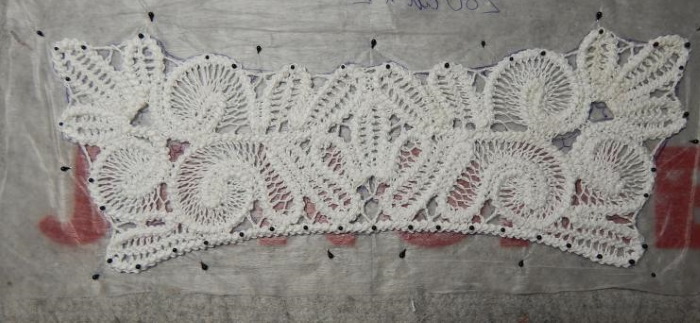
At the end of the work, the cuffs need to be washed and dried on a flat surface. Then it remains to sew on the buttons. Round buttons of white or pearl color will look good.
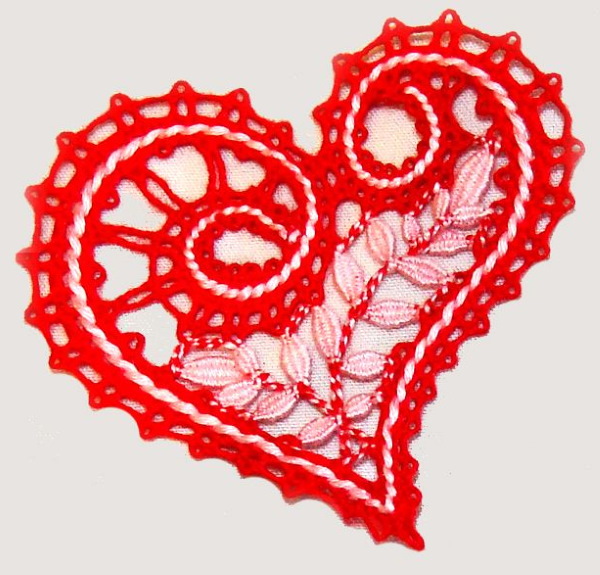
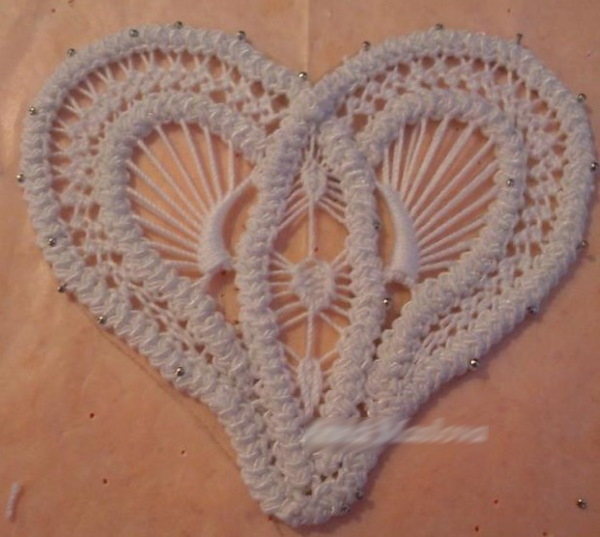
Lace Valentine
To make a lace valentine you will need:
- 1 m of caterpillar cord;
- cork board;
- paper;
- simple pencil;
- sewing threads;
- scissors;
- safety pins.

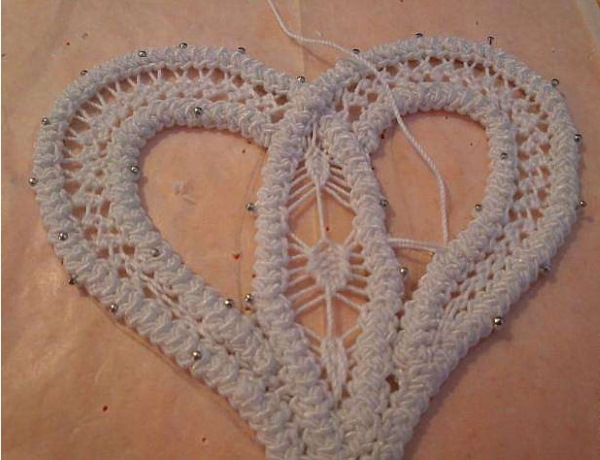
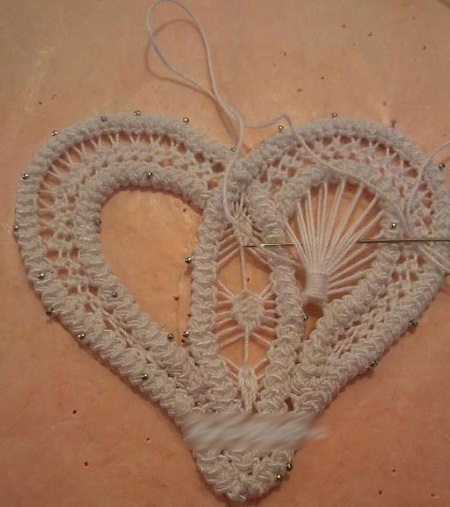
Procedure:
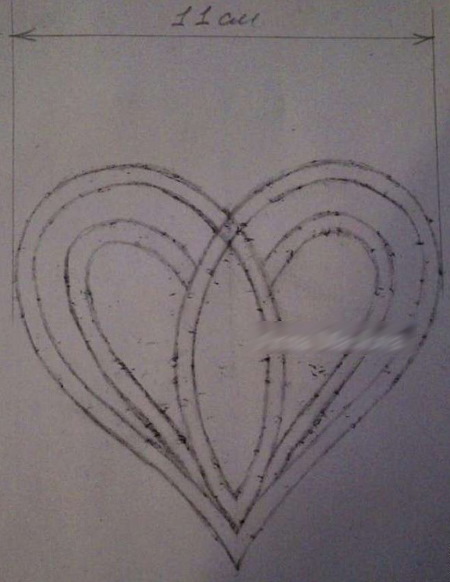
- On paper, draw a diagram of the cord arrangement in the shape of a heart.
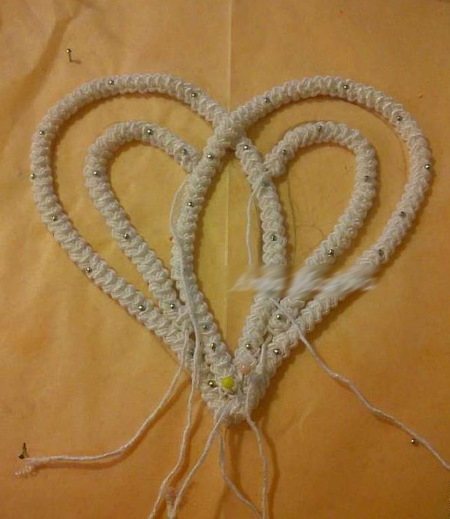
- Pin the paper to the cork board with safety pins.
- Secure the cord with pins.
- Sew the ends of the cord.
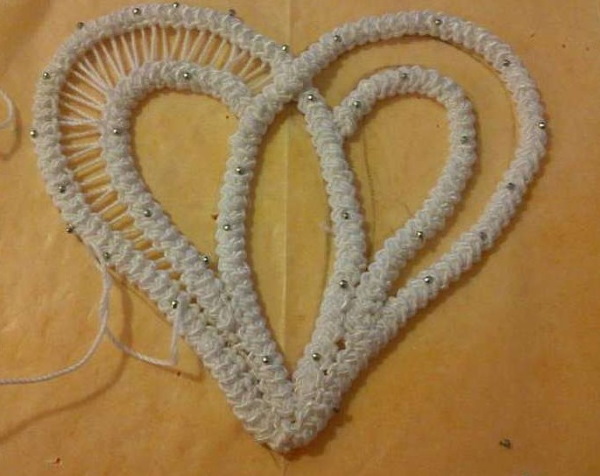
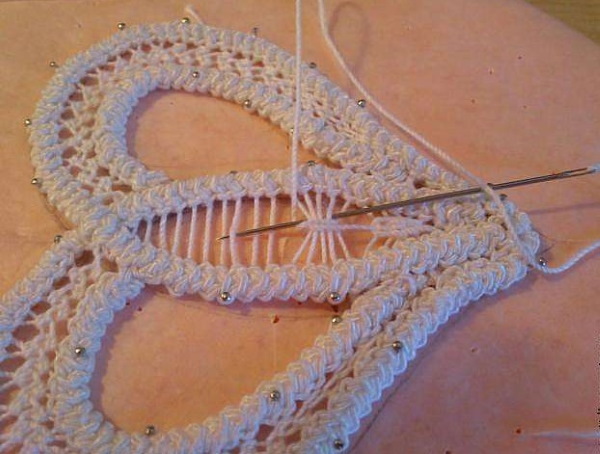
- Fill empty spaces with fine mesh. For some areas, a semicircle seam can be used.
- Sew all the cord connections together.
- Remove the valentine from the paper. Smooth the product and starch it.
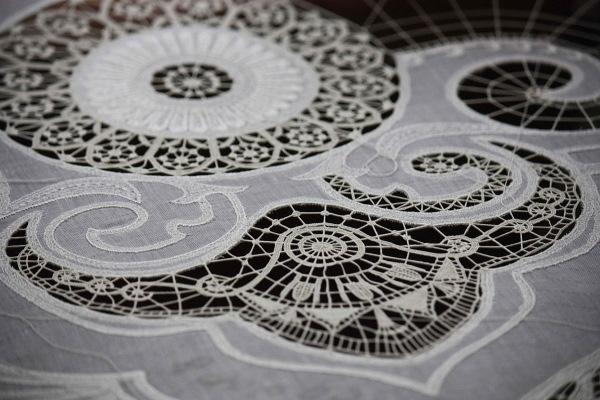
The needle lace technique can be used to create larger items, such as tablecloths, capes and bedspreads. Beginners should not despair if the work does not work out the first time. Learning the basics of this art will require a lot of time and patience.
Video about handicrafts
Needle lace for beginners:
Thank you very much, your video was very helpful.