In order for the drawing of the mother to be as realistic as possible, it is necessary to act in stages, according to certain schemesWhen drawing, it is important not to miss a single detail and to show all the details on paper.
What you need for drawing
A child can draw a mother while completing an assignment in preschool institutions and elementary grades of school. The most common tool for painting a portrait is a pencil.To make a preliminary sketch, you should give preference to a thin pencil; a complex drawing is usually done with a very soft and wide pencil.
You can draw your mother using colored pencils or regular black pencil lead.
To complete the work of painting a portrait you will need:
- album sheet or ordinary Whatman paper;
- eraser, for removing incorrectly drawn lines;
- a ruler with which you can construct the necessary lines symmetrically;
- regular black or colored pencils.
Master classes
You can use a large photograph of a person prepared in advance, in which small details are clearly visible.In this case, you can hold it up to a bright light and place a thin sheet of paper on top.
All visible lines should be outlined with a pencil. For this purpose, it is allowed to use tracing paper, it should be placed on the photograph and the main large stripes should be outlined, then apply the tracing paper to the paper sheet and, pressing hard with a pencil, transfer the lines to a regular album sheet or Whatman paper.
It is quite easy to make a portrait of a mother, the main thing is to follow the basic rules of drawing:
- the face in the portrait should be shaped like an egg, oval;
- eyes, eyebrows and ears should be positioned symmetrically;
- by dividing the oval figure into 2 parts horizontally, the location of the eyes is determined;
- the upper parts of the ears should be located symmetrically at the same level;
- The eyebrows should be located above the eyes and they should be symmetrical relative to each other;
- the distance between the eyes should be equal to the length of the eyes;
- the nose should be approximately in the center, the nasal sinuses should be symmetrical relative to the tip of the nose;
- in the middle between the nose and chin there should be a line for the mouth, with lips drawn at the top and bottom.
Sometimes a method of dividing a photograph into squares is used. This can be done electronically or on a pre-printed photo. This will make it easy to convey the proportions of the face as accurately as possible. The main condition for a person to recognize themselves in the drawing is to correctly place the necessary accents on the details.

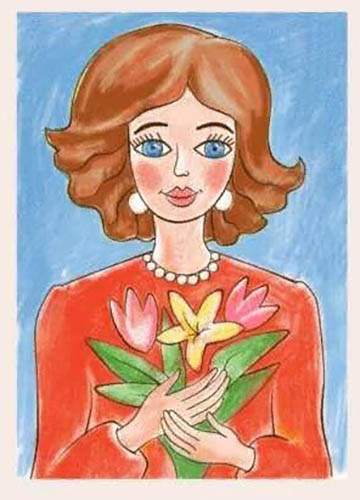
When creating a sketch, the main thing is to outline the elements of the drawing. Usually portraits are made in 2 main ways: people are depicted from the waist up or from the shoulders up. In order not to distract people's attention, as a rule, the face is depicted in focus, sometimes the person's hands are depicted in the drawings. For example, a mother may have flowers in her hands.
Do not forget about the external similarity with the original. To do this, you need to correctly convey the shape of the head, be sure to calculate the proportions of the face and small details in the drawing.
The drawing must be painted in stages, the main thing is to choose the right shade of the skin of the face. You should start applying the color from almost invisible details, gradually moving towards the middle. To give the head volume, you should apply a darker color to the neck under the chin.
When making a portrait with the image of the mother, it is recommended to use the following methods:
- Draw using strokes along the contourFor this, you can use a ready-made image, which is later painted over.
- Draw in a free style without clear contours, while creating smooth transitions of shades through halftones.
- Sometimes a combination of drawing techniques is used., when clear contours are blurred and smooth transitions are obtained.
For drawing in a combined way, you can use crushed pencil lead. To do this, the lead is carefully crushed to a powdery state, after which it is rubbed on an album sheet with a cotton swab, giving the drawing gradient smooth transitions. This method of transferring an image can be used with the use of templates.
To do this, you need to apply pre-prepared template parts to the portrait in order to obtain straight stripes and graphic contrasting fields.
Pencil sketch
In order for the image in the future drawing to be as realistic as possible, you can use a photograph as a prototype. Also, for the greatest similarity during drawing, you can use your mother as a model.
For a simple pencil sketch you need to do the following:
- Mark the boundaries of the portrait so as not to go beyond the marked limits for the harmony of the image.
- Within the marked area, draw an oval, which will later represent the face.
- The resulting oval must be divided into parts and the location of the eyes must be roughly outlined using symmetrically located arcs.
- The pupils inside the eyes should be perfectly round.
- From the inner corners of the eyes, draw 2 parallel lines towards the chin, which will serve as an indication of the width of the nose.
- At the very bottom of the parallel lines, you need to mark the nostrils; to do this, you need to make extensions in the shape of a semicircle.
- In the center between the end of the nose and the chin, the mouth should be drawn; for this purpose, a wave-like arc is applied, around which the lips are indicated.
- Above the eyes, you need to draw eyebrows; they are applied in the form of two curved lines, the shape of which should repeat the eyebrows in the mother’s photograph.
- Next, you should draw the ears, the lower part of which should end with a lobe at the level of the upper lip.
- Mom's hair can be depicted using shading according to the shape of her hairstyle.
- The portrait ends with the mother's neck, which should not be too wide or too narrow, with the correct proportions in size.
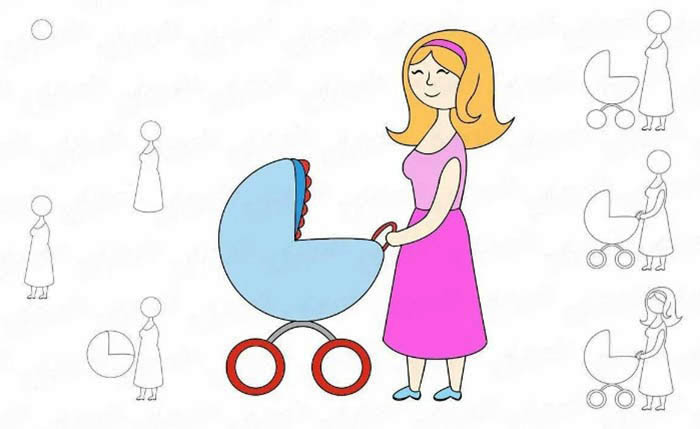
A child of any age can draw a mother using colored pencils.
To do this, you need to be able to correctly select a color palette so that the image appears realistic:
| place | color |
| skin (face and neck) | beige pink and pale pink |
| eye pupils | color black with white highlight |
| eyelids | pale brown |
| lips | soft pink and light red |
| mouth opening or lip closure | dark pink |
| hair covering | depicted according to the individual characteristics of the mother's hair |
| brows | dark brown or dark gray shades |
| iris of the eye | is applied taking into account the individual characteristics of a person |
| eyelashes | black |
Simple
First, you need to carefully examine your mother's appearance, focusing on the presence of moles, the size and shape of the lips and ears. Hairstyle and face shape play an important role in the real image.
To depict a mother with maximum similarity, you need to follow these steps step by step:
- make a sketch of mom's face;
- depict the neck;
- divide the face into 3 equal parts;
- outline the location of the eyebrows, mouth and nose;
- erase unnecessary details;
- draw hair;
- work out all the light and shadow;
- make the picture color.
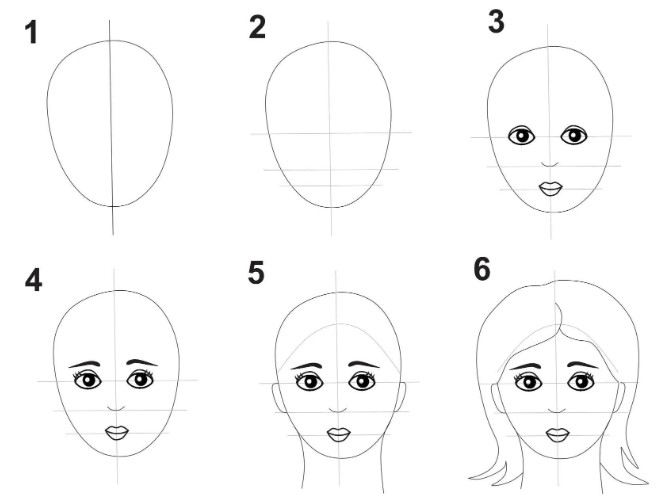
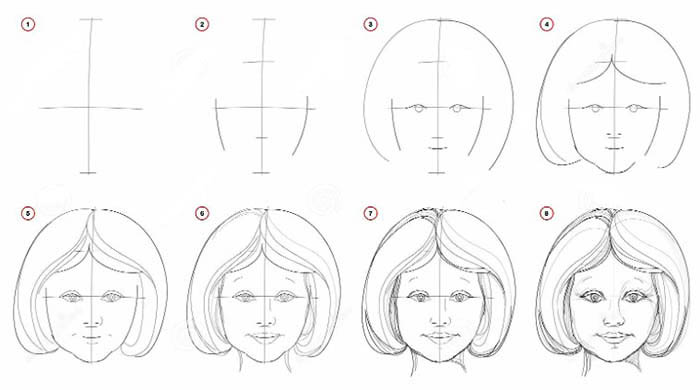
Stages of drawing:
- To sketch the face, you should make an oval, reminiscent of an egg in shape, slightly narrowed towards the bottom. The figure should be as even and precise as possible. At the bottom of the face there should be a clearly drawn chin, it is located at the very bottom of the mother's face.
- The hair will be located on the top of the oval.
- Then the mother's neck is drawn, which will consist of 2 curved lines, the distance between them should be less than the width of the oval.
- After this, the face is divided into 3 equal parts. To do this, you need to draw 1 vertical line in the center of the drawing.
- Then divide it into different parts with 3 perpendicular lines. When drawing a portrait, it is very important to maintain the correct proportions.
- After dividing the face into equal parts, it is necessary to outline the location of the eyebrows, eyes, mouth and nose.
- The eyebrows are located above the top line and should be depicted as wide as possible to make them look as natural as possible.
- The lips should be positioned in the middle between the chin and the lowest line of division on the face. The upper lip should be shaped like the letter "m", slightly stretched to the sides. The lower lip should resemble a smooth curved wave.
- The nose in the portrait should be placed in the middle part. To do this, the wings of the nose are drawn in the form of opening and closing brackets. After this, it is necessary to draw the nostrils, resembling wavy lines in shape.
- Drawing a mother in a portrait is quite easy, for maximum believability of the drawing, much attention should be paid to the location and shape of the eyes. A little below the level of the upper stripe, a downward curved line should be drawn.
- For the greatest accuracy, it is recommended to draw dotted lines from the nostrils to the eyebrows. This way, the distance between the eyes and the nose is easily determined.
- From this point, draw an arc over the curved axis; this will be the upper eyelid above the eye.
- Eyebrows need to be corrected, taking into account the individual shape of the mother's eyebrows.
- All unnecessary details are erased with an eraser.
- After this, you should start drawing the hair on the head. The main thing is to maintain maximum similarity with the original, and competent work with light and shadow to give it a natural look.
- The person's eyes, eyebrows, nose and lips should be clearly outlined and it is advisable to draw a shadow, this will give the portrait a sense of life.
- The final stage is to paint the drawing in different colors, thus giving a more natural shade to the hair, and putting an emphasis on the shade of the eyes. Additionally, you can highlight the lips with red.
A more complex option
There are options for more multifaceted and complex portraits.
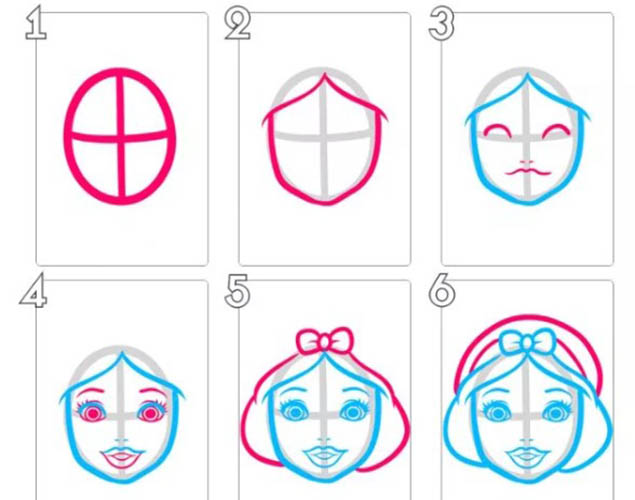
To implement them, you need to perform the following actions step by step:
- Draw an oval figure in the middle of the sheet of paper, paying special attention to the drawing of the chin.
- Draw the neck line with 2 curved stripes.
- Next, the oval is divided into 3 equal zones, for this purpose 2 lines are drawn horizontally at the level of the nose and eyebrows.
- After this, you should draw a vertical line as the boundary of symmetry.
- The hair should be drawn with smooth contours, paying attention that the hair should slightly overlap the face.
- Then you need to draw the eyebrows above the previously marked line.
- Then you need to draw the lips, for this you first need to mark the line where they meet.
- Then you need to outline the upper and lower lines of the lips, while the upper part of the lip should be smaller than the lower one.
- After this, the entire nose part is drawn, with nostrils and wings.
- Next, you need to draw the eyes; to do this, you need to draw a curved line – an axis that will serve as a guide for the eyes.
- From the nostrils, you need to draw perpendicular dotted lines upwards so that they reach the inner corners of the eyes.
- After this, you need to draw the person’s eyes, the outer and inner corners of which are located on a curved axis (the shape of the eyes should resemble leaves).
- After finishing the portrait, all additional and auxiliary lines that were applied as a skeletal part in the drawing are erased with an eraser.
- Next, you need to draw the eyelids from below and above, the pupil in the eyes and complete everything with the iris.
- Then work begins with light and shadow; you need to completely shade the round pupil and eyebrows.
- Then draw shadows under the eyelids.
- By applying strokes to the lips you can give them volume; on the lower lip you need to leave a small space for a highlight.
- On the sides of the nose, you need to apply small shadows and densely shade the nostrils.
- After adding volume to the face, you should apply shadows. Use a dark, hard pencil to darken the cheekbones.
- Then you need to make shadows under the eyebrows and on the neck under the chin.
- After this, you need to shade the hair; to get voluminous curls, you need to leave some areas light.
- The upper lip, the area under the hairline at the back and the neck area should be darkened.
Half-turn
Mom, like any other people, can be drawn using different angles. The most difficult drawings are considered to be images of a person's half-turn and his profile.
The method of drawing in this case resembles the technique performed in full face, but it has several characteristic features:
- The oval should be irregular in shape, with one side being more curved than the other side.
- The division of the future face should be carried out where the convex part of the nose will be located.
- A horizontal line should be drawn inside the oval.
- On the upper side of the face, you need to depict eyebrows.
- The tip of the nose will be located at the intersection of the horizontal and vertical stripes.
- The lips should be drawn below the very last horizontal line.
- The eyes are drawn at the level of the topmost horizontal stripe.
- At the end of the portrait, all unnecessary stripes are erased, small details are drawn and hair is added.
- If desired, the portrait can be colored with colored pencils.
By the cells
Drawing objects with a simple pencil is monochrome, and certain skills must be present to do it correctly. An interesting option for a portrait of any person can be considered the method of drawing a picture on cells. For this purpose, you may need an ordinary notebook sheet in a cage and a pencil.
First, you need to prepare the selected template. This drawing method can be used to transfer the image to the Whatman paper and to scale the drawing, increasing or decreasing its size. In this case, the image and the sheet prepared in advance are lined into conditional cells.
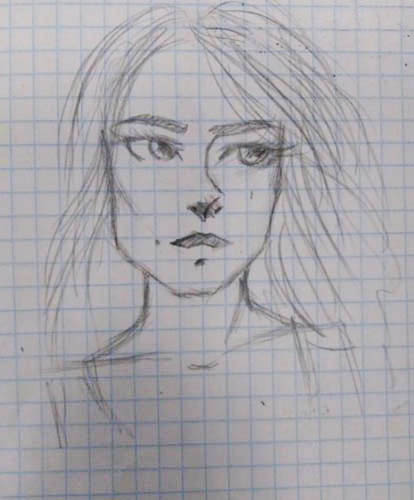
The image size can be easily changed, the main condition of this method is the correct preservation of its proportions. When transferring, the image is not drawn entirely, but its part is copied in a certain sector. With this method of drawing, it is much easier to maintain the sizes of individual elements.
When the drawing with the image of the mother is ready, it can be presented to her as a souvenir or as a gift for some holiday. It is advisable to indicate the exact date of completion of the work on the back of the drawing in order to preserve this information for a long time.
Video about drawing
Master class: drawing a portrait of a mother: