To learn crochet angels, the masters need to look at several schemes, as well as step-by-step descriptions for them. You also need to find out what materials and tools will be needed for the work.
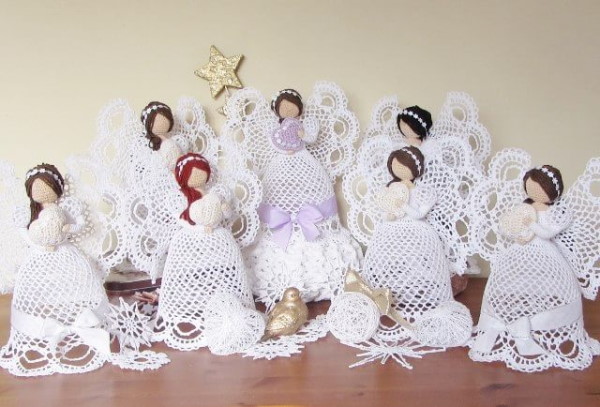
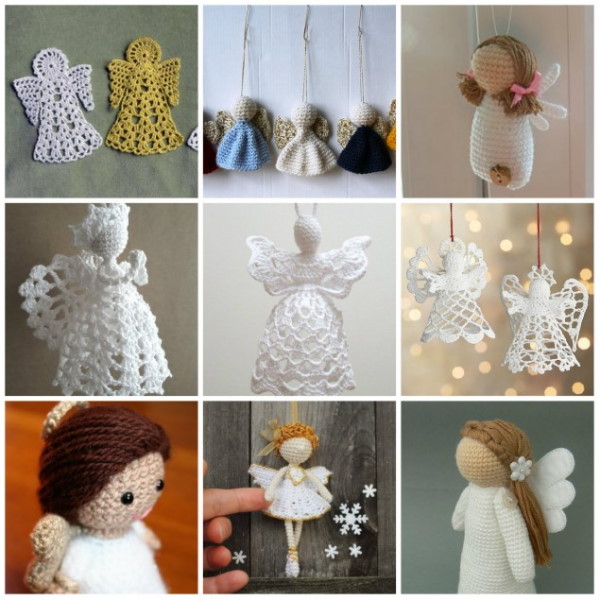
Crochet Angels Ideas
You can crochet angels using various patterns and descriptions. Small, single-color figures can become a decoration for a New Year tree. You can also make a Christmas garland from them, or decorate a door wreath. Larger items can become a decoration for a festive table. Even larger angels can be given to acquaintances and friends on the eve of the winter holidays.
Angels are usually knitted from white threads, but you can create colored figures. To decorate crafts, craftsmen often use scraps of colored threads and satin ribbons, as well as various beads, rhinestones, glitter and chenille wire.
What you will need to knit angels:
- Iris threads (white or colored, depending on the specific pattern);
- hook No. 1;
- sewing threads;
- needle.
Cotton wool or synthetic padding is suitable for stuffing.
Abbreviations and symbols for loops in instructions
To make it easier to read the descriptions, you need to know what the letter abbreviations mean.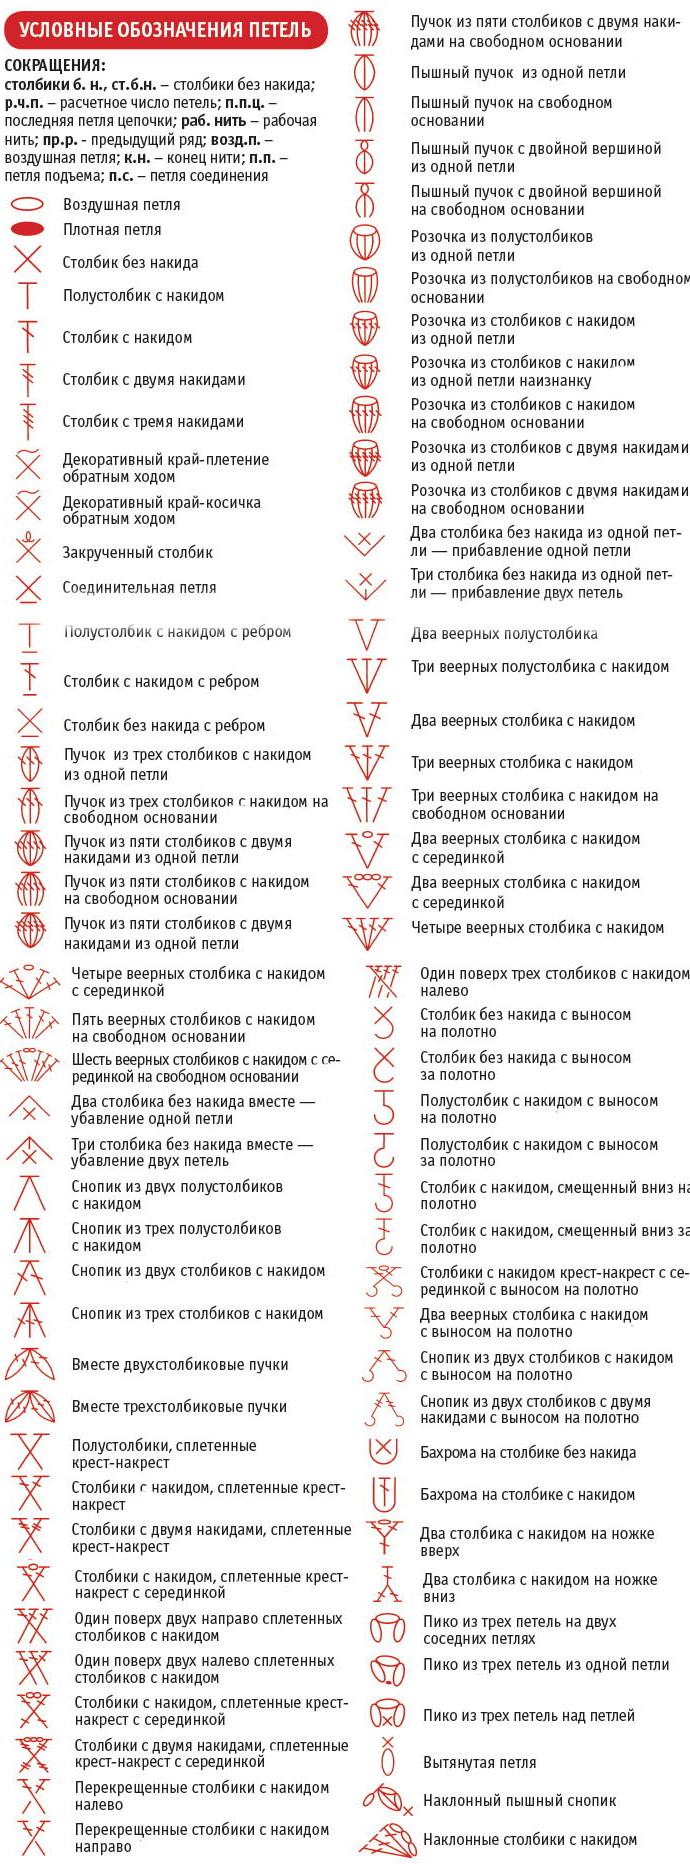
| Action | Designation |
| Air loop | VP |
| Single crochet | STBN |
| Double crochet | STSN |
| Double crochet (or more) | STS2N, STS3N, STS4N (the number indicates the number of yarn overs) |
| Connecting loop | SP |
| Half-column | PST |
 Further in the article you can look at several master classes on crocheting angels.
Master class on knitting an openwork angel with a crochet hook
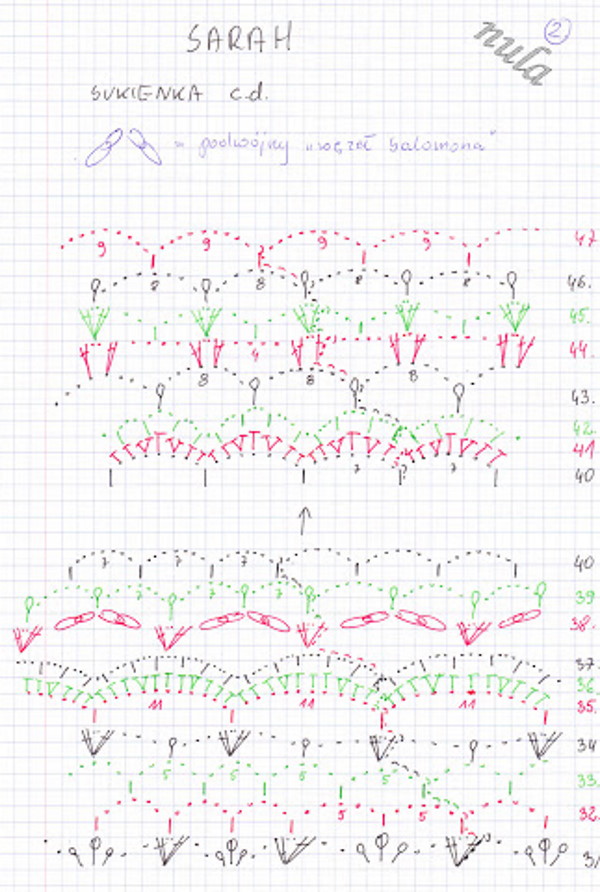
A crochet angel (patterns with descriptions for beginners can be simplified), knitted from white threads according to this master class, will turn out easy and beautiful. The patterns will resemble lace.
Sleeves and bodice
How to knit:
- Close 8 VP into a ring. Knit 18 SC through the hole, tying the loops.
- Knit 2 VP, 1 SC.
- 2 times through the next STBN knit 1 STCH.
- Knit a combination of 5 VP and 1 SC 5 times.
- Knit the reverse side in the same way.
- In the 3rd row, knit 1 new STCH through each STCH.
- After every 5 VP, knit 2 STCH, 3 VP, and 2 STCH.
- Knit the other side in the same way.
- New row: 8 STBN, 3 VP.
- 5 times under each 3 VP knit the combination: 2 STCH, 3 VP, 2 STCH, 3 VP.
- Knit the other part in the same way.
- In the 5th row: 8 STBN, 3 VP, 1 STBN, 3 VP.
- Knit 5 times: 2 SC, 3 CH, 2 SC, 3 CH, 1 SC, 3 CH.
- Knit the other part in the same way.
- In the 6th row: 8 STSN, 3 VP, 5 VP, 1 STBN, 5 VP.
- Knit 2 SC 5 times. Make a picot, then: 5 CH, 1 SC, 2 CH, 2 SC, 3 CH, 1 SC, 3 CH.
Knit the other part in the same way.
Skirt
How to knit:
- Knit 2 VP, 1 SC.
- Knit 2 VP, 2 SC 3 times.
- Connect both bodice pieces.
- Knit 2 VP.
- Knit 2 SCCH, 2 VP 4 times.
- Attach the remaining bodice pieces.
- In the 2nd row knit: 2 VP, 1 STCH, 2 VP, 2 STCH. Knit the combination 2 times: 2 STCH, 2 VP, 2 STCH.
- Knit 2 VP, knit the combination 3 times: 2 STCH, 2 VP, 2 STCH.
- 2 VP, connect the parts together.
- 2 VP, 1 dc, knit the combination 2 times: 2 VP, 2 dc, 2 VP, 1 dc, 1 VP, 1 dc.
- Knit 3 times: 2 VP, 2 dc, 2 VP, 1 dc, 1 VP, 1 dc, 2 VP.
- In the 4th row knit: 2 VP, 1 STCH, 2 VP, 2 STCH, 1 VP, 1 STCH, 2 VP, 2 STCH, 2 VP, 1 STCH.
- Knit the combination 3 times: 2 VP, 2 dc, 2 VP, 2 dc, 1 VP, 2 dc, 2 VP, 2 dc, 2 VP, 1 dc, 2 VP.
- In the 5th row knit: 2 VP, 1 STCH, 2 VP, 2 STCH, 1 VP, 1 STCH, 5 VP, 1 STCH, 1 VP, 2 STCH, 2 VP, 2 STCH, 1 VP, 1 STBN, 1 VP.
- Knit 3 times: 2 dc, 2 ch, 2 dc, 1 ch, 1 dc, 5 ch, 1 dc, 1 ch, 2 dc, 2 ch, 2 dc, 1 ch, 1 sc, 1 ch.
- Row 6. Knit the combination 4 times: 2 DC, 2 VP, 2 DC, 3 VP, 9 DC, 3 VP, 2 DC, 2 VP, 2 DC.
- Row 7. Knit the combination 4 times: 2 dc, 3 ch, 8 times (1 dc, 1 ch), 1 dc, 3 ch, 2 dc, 2 ch.
- Row 8. Knit the combination 4 times: 2 SCCH, 3 VP, 7 times (1 SCCH, 3 VP), 1 SCCH, 3 VP, 2 SCCH, 2 VP.
- Row 9. Knit 4 times: 2 SC, 3 VP, 6 times (1 SC, 3 VP), 1 SC, 3 VP, 2 SC, 2 VP.
- Row 10. Knit 4 times: 2 SC, 2 times (2 VP, 2 SC), 3 VP, 5 times (1 SC, 3 VP), 1 SC, 3 VP.
- Row 11. Knit 4 times: 2 SC, 3 times (2VP, 2 SC), 3 VP, 4 times (1 SC, 3 VP), 1 SC, 3 VP.
- Row 12. Knit 4 times: 2 dc, 2 ch, 1 dc, 1 ch, 1 dc, 2 times (2 ch, 2 dc), 3 ch, 3 times (1 dc, 3 ch), 1 dc, 3 ch.
- Row 13. Knit 4 times: 2 dc, 2 ch, 2 times (1 dc, 1 ch), 1 dc, 2 times (2 ch, 2 dc), 3 ch, 2 times (1 sc, 3 ch), 1 sc, 3 ch.
In the last row, knit 4 times: 2 dc, 2 ch, 1 dc, 2 ch, 3 times (1 dc, 1 ch), 1 dc, 2 ch, 1 dc, 2 times (2 ch, 2 dc), 2 times (3 ch, 1 dc), 3 ch.
Frill for skirt
How to knit frills on a skirt:
- Row 15. Knit 4 times: 2 dc, 2 ch, 1 dc, 2 ch, 1 dc, 3 ch, 1 sc, 3 ch, 2 times (1 dc, 2 ch), 2 dc, 2 ch, 2 dc, 3 ch, 1 sc, 3 ch.
- Row 16. Knit 4 times: 2 dc, 2 ch, 1 dc, 2 ch, 1 dc, 5 ch, 1 sc, 5 ch, 2 times (1 dc, 2 ch), 2 dc, 2 ch, 2 dc.
- Row 17. Knit 8 times: 2 SCCH, 2 VP, 2 SCCH, 3 VP, 1 SCCH, 3 VP.
- Knit the next 2 rows in the same way.
Row 20: knit 8 times: 2 HDC, picot (3 VP, 1 HDC back, through 1 VP, 1 VP), 2 HDC, 5 VP, 1 HDC, 5 VP.
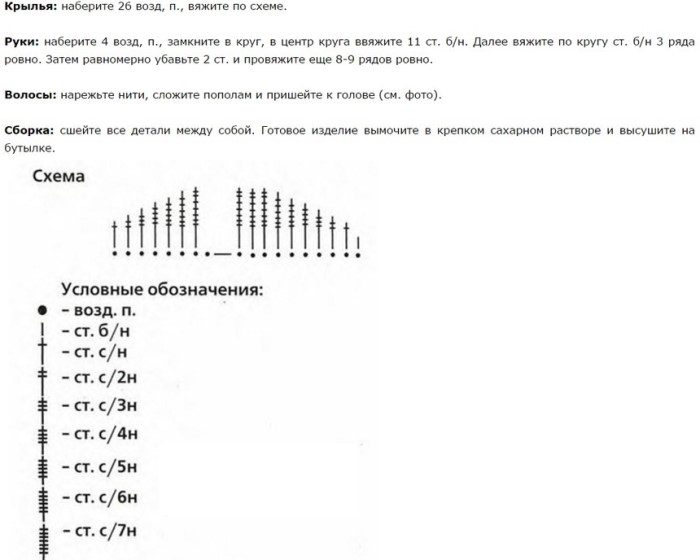
Wings
How to knit wings:
- 5 VP close into a ring.
- 1 row. 2 VP, 1 STCH, knit 4 times: 1 VP and 2 STCH.
- Row 2. 2 DC, 2 VP, 2 DC, knit 1 VP and 1 DC twice, 1 VP, 2 DC, 2 VP, 2 DC.
- Row 3. 2 DC, 2 CH, 2 DC, knit the combination 2 times: 3 CH, 1 DC, 5 CH, 1 DC, 3 CH, 2 DC, 2 CH, 2 DC.
- Row 4. 2 DC, 2 VP, 2 DC, knit the combination 2 times: 3 VP, 9 DC, 3 VP, 2 DC, 2 VP, 2 DC.
- Row 5. 2 DC, 2 VP, 2 DC, knit the combination 2 times: 3 VP, 1 DC, 1 VP, 1 DC, 3 VP, 2 DC, 2 VP, 2 DC.
- Row 6. 2 SC, 2 VP, 2 SC, knit the combination 2 times: 3 VP, 7 times (1 SC, 3 VP), 1 SC, 3 VP, 2 SC, 2 VP, 2 SC.
- Row 7. 2 SCCH, 2 VP, 2 SCCH, 3 VP, 6 times (1 SCCH, 3 VP), 1 SCCH, 3 VP, 2 times (2 SCCH, 2 VP), 2 SCCH, 3 VP, 6 times (1 SCCH, 3 VP), 1 SCCH, 3 VP, 2 SCCH, 2 VP, 2 SCCH.
- Row 8. 2 SCCH, 2 VP, 2 SCCH, 3 VP, 5 times (1 SCCH, 3 VP), 1 SCCH, 3 VP, 3 times (2 SCCH, 2 VP), 2 SCCH, 3 VP, 5 times (1 SCCH, 3 VP), 1 SCCH, 3 VP, 2 SCCH, 2 VP, 2 SCCH.
- From the 9th row, the wings are divided into 2 parts. 1st half: 2 STCH, 2 VP, 2 STCH, 3 VP, 4 times (1 STBN and 3 VP), 1 STBN, 3 VP, 2 STCH, 2 VP, 2 STCH.
- Row 10: 2 SCCH, 2 VP, 2 SCCH, 3 VP, 3 times (1 SCCH and 3 VP), 1 SCCH, 3 VP, 2 SCCH, 2 VP, 2 SCCH.
- Knit the remaining rows in the same way.
- Row 14: 2 STSN, 2 VP, 2 STSN, 2 STSN, 2 VP, 2 STSN.
- Knit 5 VP.
- Knit the 2nd part of the wings from the 9th row, repeating points 16 through 20.
- 1 row of wing binding: alternating 1 SC, 5 VP.
- At the corners of the wings: 4 VP, 2 STS3N, 4 VP.
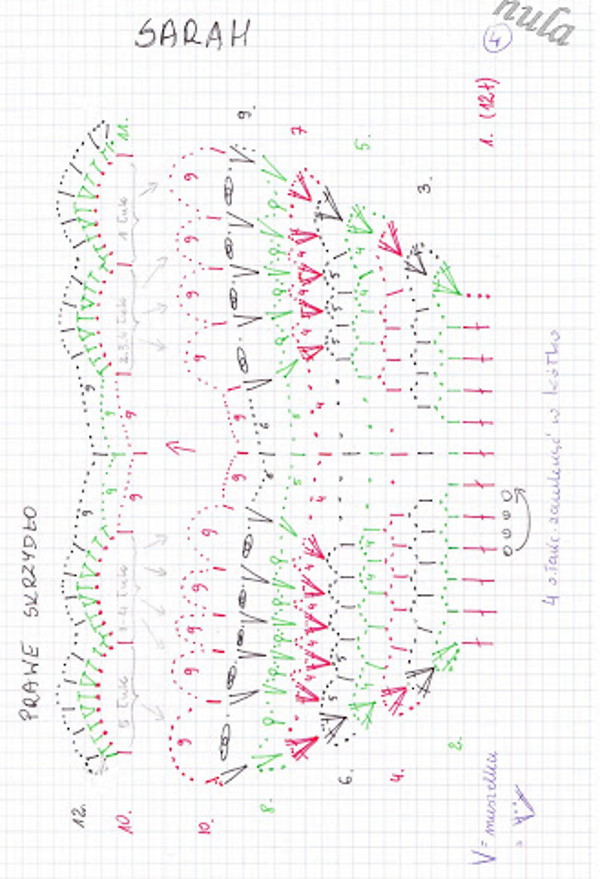
Last row of edging: 1 SC, picot, 5 VP, 1 PST knit back, through the 3rd VP, knit 2 VP.
Head and halo
The head should be knitted like an amigurumi ball:
- From rows 1 to 6, knit STBN, making 2 increases. Knit up to 36 loops.
- Knit the next 5 rows with STBN in a circle, without increases.
- Knit the other 5 rows with STBN, decreasing to 6 loops.
Stuff the head with stuffing and sew it to the angel's body.
How to knit a halo:
- 5 VP close into a ring.
- Knit 10 SC, alternating with 1 CH, through the ring.
- Knit the 2nd row alternating STBN and 3 VP.
- In the 3rd row, knit alternating 1 SC, 5 VP, 1 PST knit back into the 3rd VP, 2 VP.
Starch the piece and sew it to the head.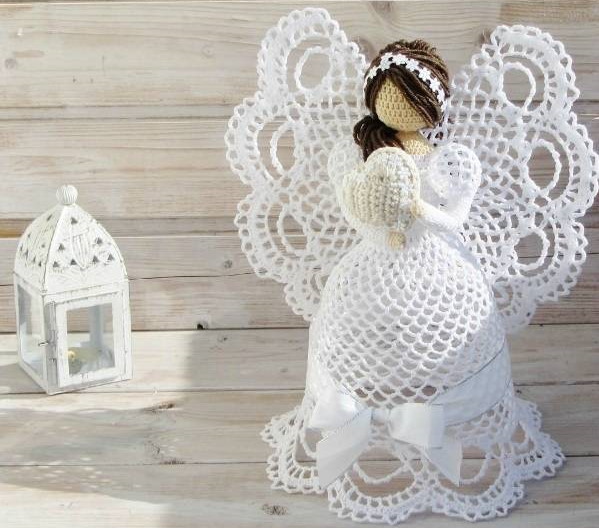
Starch and dry the remaining parts separately. Straighten the hem of the dress and put it on a glass jar or bottle neck so that it holds its shape well. After the starch solution dries, the wings need to be carefully sewn to the angel's back.
Mexican angel crochet
The crochet angel (patterns with descriptions are presented further in the article) in Mexican style should be colored. The head is knitted from light brown threads. The dress should be dark blue. Green, orange, pink and blue thread trimmings are suitable for knitting the collar and frills.
Head, collar and body
How to knit:
- 4 VP close into a ring.
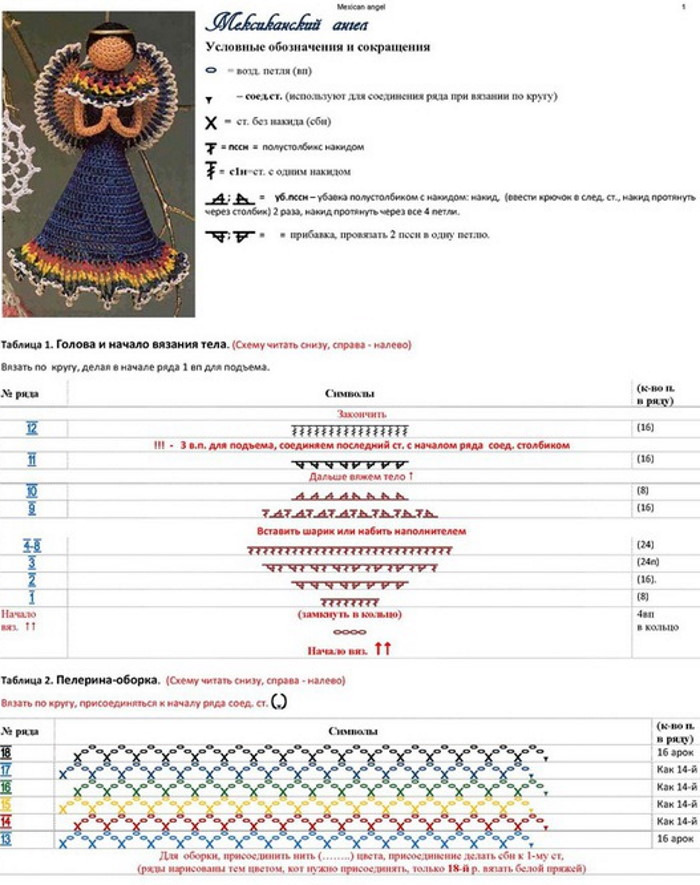
Angel crochet. Patterns with description - Knit 8 sts, skipping 2 sts through 1 loop.
- In the same way, knit 16 PST.
- Knit 2 rows of 24 sts each.
- Fill the blank with filler.
- Knit 16 PST with decreases.
- Knit 8 PST with decreases.
- Next, knitting of the body begins. 16 PST through 1 loop, 2 pcs.
- 3 VP for lifting, connect the last column SP with the beginning of the row of the adjacent column.
- Knit 16 SC.
How to knit a collar: Alternate arches of 3 VP with 1 SC, changing the color of the thread in each new row. There should be 6 rows in total.
Continuation of knitting the body:
- 32 SCCH, passing them through 1 loop, 2 pcs.
- 2 rows consisting of 32 STBSN.
- Alternate 1 dc and 2 dc coming out of 1 loop.
- 22 STSN.
- Alternate 1 dc and 2 dc coming out of 1 loop.
The last row to knit is 15 SC.
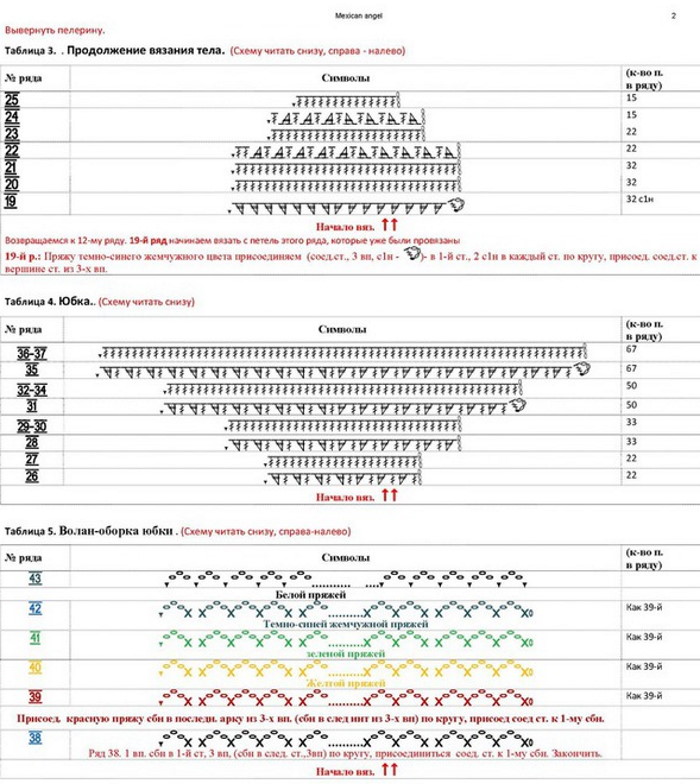
Dress, frills and wings
How to knit:
- Knit a row of alternating 1 dc and 2 dc, coming out from 1 point.
- Row of 22 STCH.
- Knit a row of alternating 1 dc and 2 dc, coming out of 1 point with increases. You should get 33 columns.
- Knit the next row in the same way, increasing the number of stitches to 50.
- Knit 50 SC.
- Knit a row of alternating 1 dc and 2 dc coming out of 1 point with increases, increasing the number of columns to 67.
- Knit a row of 67 SC.
The frills need to be knitted alternating arches of 3 VP and 1 STBN, changing the color of the thread in each new row. There should be 6 rows in total.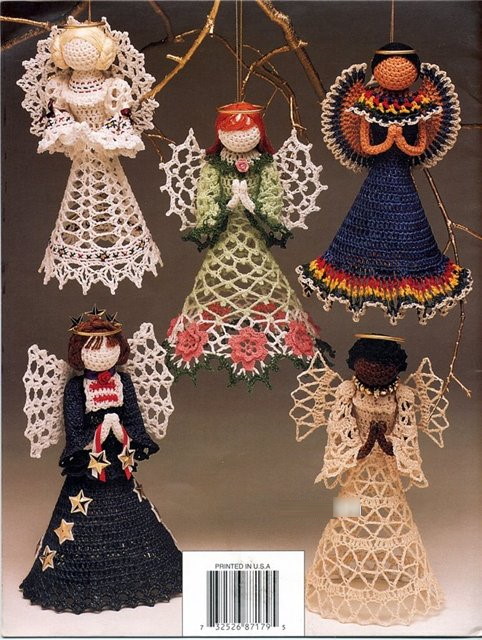
How to knit the wings: 5 VP, close into a ring. Tie half of the ring with 7 STCH. Next, knit the fabric with 3 decreases in each row. Knit 12 rows. Change the thread and knit the last row with arches of 5 VP, alternating them with 1 PST. Knit the other wing in the same way.
The product must be soaked in a sugar solution and left until completely solidified. After drying, the angel needs to have hair made of dark brown or black yarn.
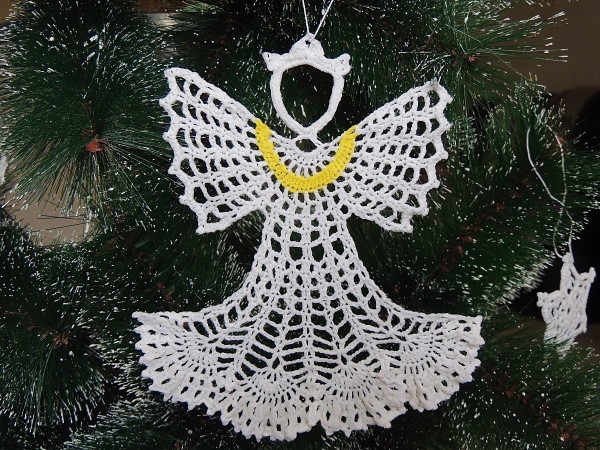
Crochet Air Angel
A crochet angel (the diagrams with descriptions can be changed by decreasing or increasing the number of loops to get a figure of a different size), crocheted according to this master class, can be made even by beginner craftsmen, because the diagram is quite simple.
Head
How to knit the head:
- 4 VP close into a ring.
- Knit 10 SC through the ring. Knit SC.
- In the 1st and 2nd rows, knit STBN, with 2 increases.
- In the 3rd row you need to double every column.
- Knit 7 rows of STBN.
- Knit a row with decreases. The number of columns should decrease to 10.
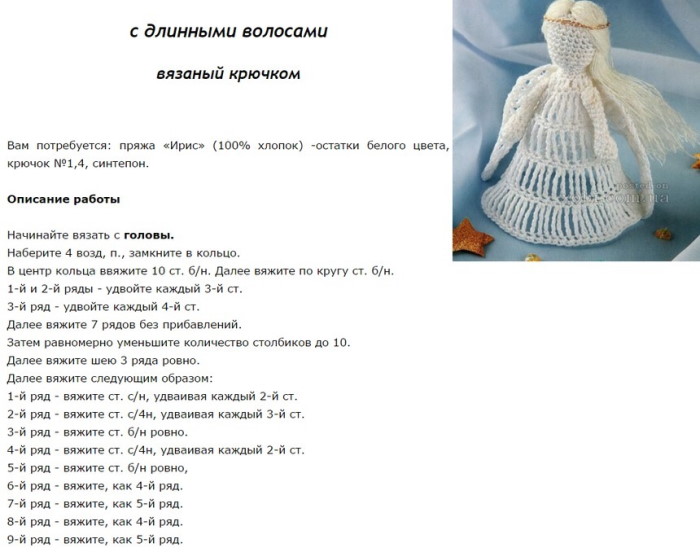
Knit the neck from 3 rows of STBN.
Dress
How to knit a dress:
- SCCH, doubling each column.
- СТС4Н, doubling each column.
- STBN.
- СТС4Н, doubling each column.
- STBN.
Knit 4 more rows like rows 4 and 5, alternating them.
Wings
How to knit wings:
- Cast on 4 VP.
- A row of 3 arches consisting of 4 VP each.
- Above each arch knit new arches from the same number of loops. Knit 4 more rows in the same way.
- Continue knitting, decreasing the number of arches by 1, until there are 2 arches left in the row.
By analogy, you need to connect the second wing.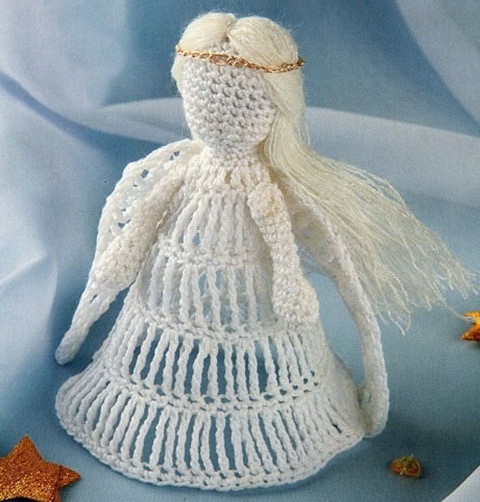
All parts need to be starched and dried. After drying, sew with white threads.
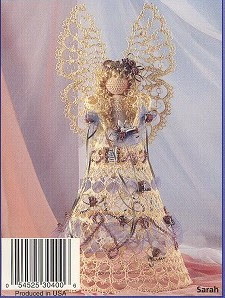
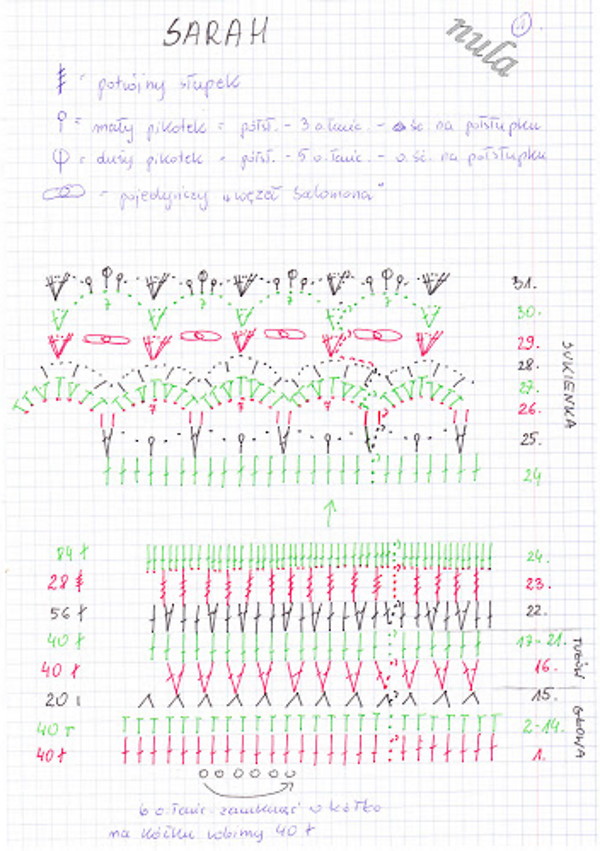
Christmas angels crochet
A crochet angel (the patterns with descriptions presented further in the article are suitable for experienced craftsmen), connected according to this master class, can be a good gift for New Year or Christmas for loved ones or friends. The craft can be decorated with beads or glitter. You can choose threads with golden lurex to create hair, so that the angel looks festive.
Head and torso
Cast on 2 VP, start knitting through the 2nd loop from the hook.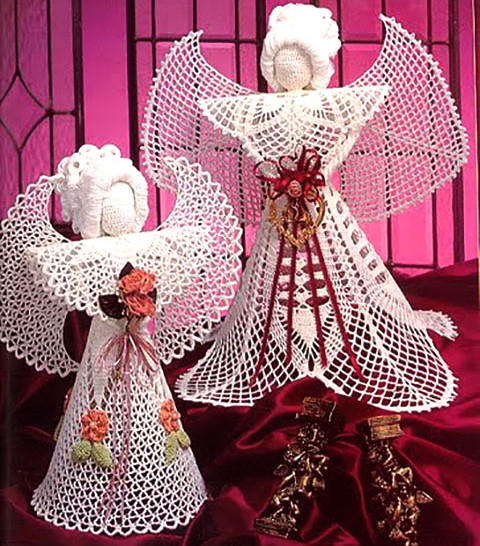
- In the 1st row 6 SC.
- In the 2nd row, make 1 increase in all loops.
- Row 3. 1 SC, increase, alternate combination until the end of the row.
- Row 4. 2 SC, increase, alternate until the end of the row.
- Row 5. 3 SC, increase, alternate until the end of the row.
- Row 6. 4 SC, increase, alternate until the end of the row.
- Row 7. 5 SC, increase, alternate until the end of the row.
- Row 8. 6 SC, increase, alternate until the end of the row.
- From rows 9 to 12, knit STBN, without increases.
- Row 13. 6 SC, decrease, alternate until the end of the row.
- Row 14. 5 SC, decrease, alternate until the end of the row.
- Row 15. 4 SC, decrease, alternate until the end of the row.
- Row 16. 3 SC, decrease, alternate to the end of the row.
- Fill the blank with filling.
- Row 17. 2 SC, decrease, alternate until the end of the row.
- Row 18. 1 SC, decrease, alternate to the end of the row.
- From rows 19 to 22, knit STBN without decreasing.
- Row 23. 1 SC, increase, alternate until the end of the row.
- Row 24. 2 SC, increase, alternate until the end of the row.
- Row 25. 3 SC, increase, alternate until the end of the row.
- Row 26. 4 SC, increase, alternate until the end of the row.
- From rows 26 to 36, knit STBN, without increases.
Knit the bottom separately:
Cast on 2 VP.
- Knit 6 SC into the 2nd loop from the hook.
- Increase in all stitches.
- 1 SC, increase, alternate until the end of the row.
- 2 SC, increase, alternate until the end of the row.
- 3 SC, increase, alternate until the end of the row.
- 4 SC, increase, alternate until the end of the row.
- 5 SC, increase, alternate until the end of the row.
- 6 SC, increase, alternate until the end of the row.
Fill the angel's body with stuffing and sew on the bottom.
Dress
The dress needs to be knitted straight from the body.
At the end of each row, you need to knit SP.
- Row 1: Knit 1 SC through each loop, alternating them with 1 CH.
- Row 2. Knit under VP 1 STCH, 1 VP and another 1 STCH. Skip 1 VP, another 1 such element. Continue knitting in the same way to the end of the row.
- Row 3. Knit in 1 and 2 ticks on a new element consisting of 1 STCH, 1 VP and 1 STCH. Knit a new tick between the ends of the one that comes after the previously knitted element. This is how the increase is made. Repeat the actions, knitting the row.
- Row 4. Knit 1 increase, just like in the previous row. Fill the rest of the row with check marks, knitting them under the previous elements.
- Knit 9 more rows in the same way.
How to tie the bottom edge of a dress:
- Row 1. Cast on 6 VP, knit 1 SC under the VP from the bottom row.
- Row 2. Knit 9 SC under the arch. Knit 1 SC under the next arch. Cast on 6 VP, knit 1 SC under the next arch. Cast on another 6 VP and 1 SC, knit the next arch. Then knit the combination described in this point from the beginning.
- Row 3. Knit 1 SC and 1 CH over each SC, placing them between the columns. You should get 9 SC. Knit 1 SC under the arch. Cast on 6 CH, skip under the arch, knit 1 SC. Repeat the pattern described in this step until the end of the row.
Last row: crochet 1 SC through each loop. Crochet 1 SC under the first VP from the previous row. Make a picot of 3 VP. Crochet 1 SC under the next VP. Crochet 1 SC under another VP, make a picot. Alternate picots over the resulting fan (there should be 6 pcs.). Crochet 6 VP and 6 SC under the arch.
Wings
How to knit wings:
- Knit 6 SC through the slip stitch.
- 1 SCCH, increase, alternate combination until end of row.
- In each STCH, knit 1 STCH and make 1 VP.
- In the first STCH, knit 3 VP and another 1 STCH. Knit check marks under all the VP from the bottom row.
- Knit a row of check marks.
- Make 5 VP and knit 1 SC through the center of the tick under the VP, alternate the combination until the end of the row.
- Knit 9 SC along the arch. Under the next arch, knit 1 SC. Cast on 6 VP, knit 1 SC under the next arch. Knit 6 VP and 1 SC under the next arch. Alternate the combination to the end of the row.
- Over each STCH, knit 1 STCH and 1 VP. Knit 1 STBN under the arch. Make 6 VP, knit 1 STBN under the next arch. Repeat the combination to the end of the row.
- Knit 1 SC in each loop. Knit 1 SC under the first VP from the previous row. Make a picot of 3 VP. Knit 1 SC under the next VP. Knit 1 SC under the next VP, make a picot. Alternate picots over the resulting fans. Under the arch, knit 5 VP and 5 SC.
Knit the 2nd wing in the same way.
How to tie the arms: Cast on 2 VP. In the 2nd loop, knit 9 SC. Knit 15 rows in a circle SC.
Hair can be made from white or colored threads. The yarn should be cut into equal pieces, put into a bun and tied with a thread in the middle. Sew the hair to the head.
Starch the wings and arms. After drying, sew them to the product.
It is not difficult to learn how to crochet different angels. Beginners should stick to the original descriptions to get the hang of it. Professionals can change and combine patterns to get a figurine in an unusual style.
Video about crochet angel
MK Angel crochet. Angel pattern: