It is recommended to create drawings in the graphic style with a pencil. For beginning artists, it is important to know not only what stationery will be needed for this type of work, but also to understand how to correctly organize the work process.
This is necessary in order to acquire basic skills drawings of simple geometric figures, it would be possible to depict more complex images in graphics, for example, people, animals, landscapes, and so on.
What is graphics, how to learn to draw in this style
Graphics (pencil drawings for beginners in this style should be done on thick paper) differs from other styles of painting in the way the outline is created.
To draw objects in a graphic image composition, it is necessary to use clear thin lines, sharp angles, as well as smooth transitions of shadows and half-shadows.
In addition to straight lines, the type of fine art in question allows the use of dots, spots and strokes, with the help of which the interior of the drawn object is filled.
What you need to get started
To create drawings in a graphic style, a novice artist will need:
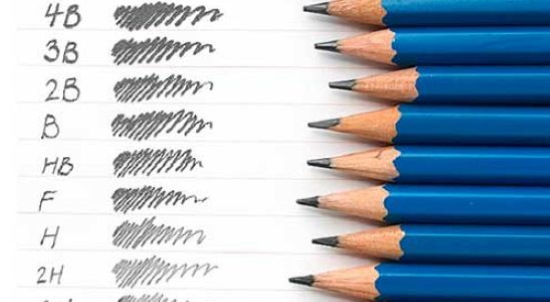
set of pencils, differing in the rigidity of the rod.
Soft pencils are recommended for shading or for filling the inner area of the depicted object; hard pencils are used to create the main contour lines, and medium-hard pencils are needed to draw auxiliary lines that must be removed at the final stage of creating the image;
thick sheets of paper or cardboard any format (thin paper is not recommended for creating graphic drawings, since their creation requires fairly frequent use of an eraser, which, if handled carelessly, can make holes in the working surface);
stencils (necessary if a child or an adult who does not have even minimal experience in the visual arts is learning to create drawings in graphics);
eraser made of high-quality rubber (low quality of the material used in the production of the eraser negatively affects the properties of the final product - it smears the pencil on the surface of the sheet and does not completely erase erroneously drawn lines);
ruler, compass, sharpener;
original images (if a novice artist plans to start working by copying ready-made illustrations).
Basics
When creating images in a graphic style, artists adhere to a number of basic principles:
contour lines should be perfectly straight, except in cases where curves are natural for the object being depicted (you can learn to draw straight lines like this: put 2 dots on opposite sides of a sheet of paper, and then, without lifting the pencil from the sheet of paper, connect them with one straight line);
Graphics - pencil drawings for beginners require following a number of recommendations
all geometric figures, if possible, should be drawn without lifting the pencil from the surface of the paper;
using shading (regular exercises to develop the ability to hold a pencil correctly, shading the necessary area of the working surface will help to train your hand in this case);
the use of tonal stretching, which involves a smooth transition in the intensity of the color of a simple pencil or marker, by varying the pressure applied to the stationery item used.
From simple to complex
The work process should be organized so that the complexity of the exercises performed moves from simple to complex. Beginners are recommended to limit themselves to creating drawings of geometric figures, dishes or simple plants. After such types of images have been mastered, the artist should learn to draw landscapes, animals or portraits of people.
Only by setting yourself feasible tasks and regularly coping with them, a person will be able to learn to create drawings in graphics for a long time. Otherwise, he will quickly lose interest and stop studying, creating negative associations with creative activity for life.
Graphic drawings with pencil for beginners step by step
Graphics (pencil drawings, which are a feasible task for beginners, should consist of a minimum number of objects), contrary to stereotypes, is used not only for drawing geometric figures, but also in creating drawings of living creatures or complex landscapes.
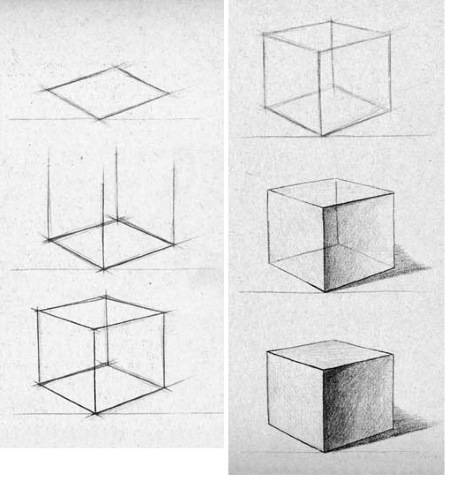
Geometric shapes
Geometric figures in graphics are drawn using secondary lines that determine the level of the corners and sides of the figures.
Example of graphic drawing
The way it is created
Mark the horizon line with a diagonal line, the lower point of which should be located in the middle of the left side of the sheet being used, and the upper point at a level of 5-9 cm from the upper right corner.
Do not extend the horizon line at the right point to the border of the working plane, but connect the diagonal with a horizontal line drawn to the right.
Shade the upper part of the working plane, making it monochromatic (without gradient or shadow).
Step back 4-5 cm from the horizon line, then draw a square so that its side edges are strictly vertical, and the bottom and top are parallel to the line connecting the extreme point of the horizon line with the right side of the working plane.
From the left and right upper corners of the square, draw diagonal lines directed to the right upper corner of the working plane.
Connect the lines with a horizontal line parallel to the top edge of the main figure.
From the lower right corner of the square, draw a straight line parallel to the line, the extreme point of which is located in the upper right corner of the figure.
Connect the edges of the square, thus creating a three-dimensional geometric figure.
Color the resulting drawing using a gradient to indicate the angle of incidence of light on the main object.
Draw a shadow to the right of the square below.
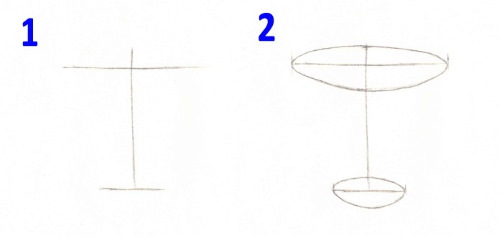
Designate auxiliary lines. To do this, draw a vertical line in the middle of the working plane, on the edges of which draw another straight line at the top and bottom, stepping back from the edges by 2-3 cm.
At a distance of 3-4 cm from the point of intersection of the lines, draw another vertical line on the right and left, parallel to the main line.
Draw rounded ovals at the top and bottom, taking the intersection points of the auxiliary lines as the boundaries of the new figures.
Erase the auxiliary lines.
From the center of the lower oval, from the top and bottom, draw one diagonal, directing them towards the middle of the right border of the working plane (shadow). The length of the diagonals should not exceed half the length of the edges of the previously drawn cylinder.
Connect the extreme points of the lines with a semicircle curved upwards.
Dishes
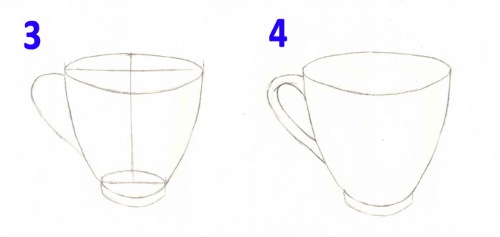
Graphics (pencil drawings for beginning artists mistakenly seem simple, especially when copying), used to create drawings of dishes, also requires the artist to strictly adhere to generally accepted algorithms.
Example of graphic drawing
The way it is created
In the central part of the sheet of paper used, draw a vertical derivative line.
Stepping back 2-3 cm from its upper edge, draw a horizontal line that determines the position of the upper part of the depicted object, so that it intersects with the vertical in the center. The length of the secondary lines should be the same.
Measure the exact distance from the top point of the vertical to the point of intersection with the horizontal.
Taking the extreme points of the lines as edges, with the intersection point as the center, draw an oval.
At the end of the vertical, draw a horizontal line at the bottom, equal in length to half the top line. The intersection point of the lines should be located in the center of the horizontal.
Draw an oval using the method described in point 4.
From the side points of the upper oval, draw 2 slightly curved lines downwards, the ends of which should be located at the edges of the lower figure.
Step back 1 cm from the bottom edge of the smaller oval and draw a semicircle equal to the length of the side of the nearest figure.
Connect the semicircle to the bottom border of the oval.
From the right side of the mug outline, draw a semicircle curved to the left (the handle of the mug).
At a distance of 0.5 – 1 cm from the semicircle, draw another semicircle, exactly repeating the curves of the first.
Apply shading to the inner part of the figure, in accordance with the angle of incidence of light.
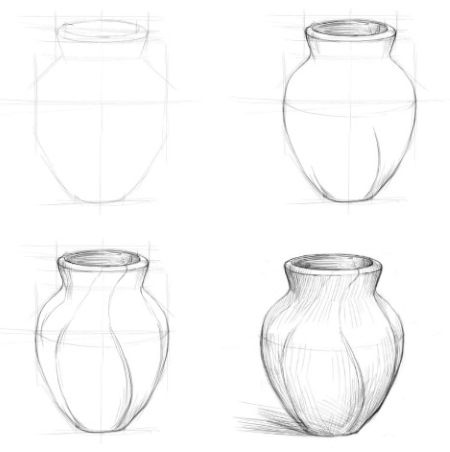
In the middle of the sheet of paper you are using, draw a vertical line, which will be the center of the vase you are depicting.
On both sides of the vertical, at the same distance, draw 2 smoothly curved lines of equal length.
Connect the top points of the lines with an oval so that their edges are located strictly on the side projections of the geometric figure (the neck of the vase).
Connect the lower points of the vase with a semicircle curved downwards.
Step back from the bottom semicircle 0.5 – 1 cm, then connect the semicircle to the bottom border of the vase.
On the right side of the bottom edge, draw a shadow using hatching.
Mark the angle of incidence of light at the top of the drawn object (oval).
Plants
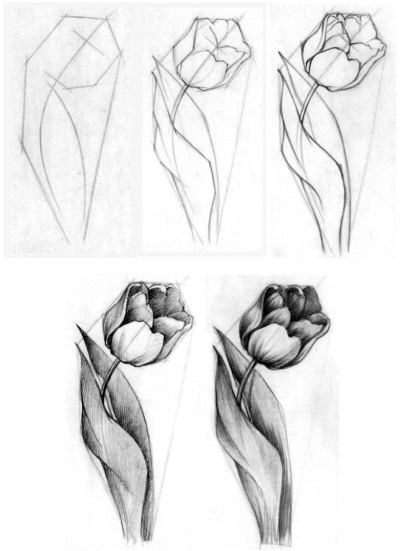
When drawing plants in graphics, when drawing the outline, you should use not only straight lines, but also smoothly curved lines.
Example of graphic drawing
The way it is created
Draw a semicircle with a deep downward bend, positioning it slightly diagonally.
Draw a small semicircle, similar in shape to the main outline, under the bottom edge of the line.
Draw the semicircle again, making the outline of the future flower bud slightly voluminous.
From the center of the inner part of the large semicircle, draw a triangle, the side edges of which are smoothly curved lines in opposite directions from each other.
From the upper corner of the triangle, draw a vertical line downwards, without reaching the lower border of the figure.
Stepping back from the top edge of the left side of the bud, draw a triangle without a base upwards. The right end of the triangle should be located 1 cm closer from the center to the right extreme point of the main semicircle.
Draw another triangle without a bottom edge, connecting it to the side of the main figure in the same way.
Fill the space between the corners, at the top, with a smoothly curved line.
Add detail to the image with additional curves, making the bud of the depicted flower more voluminous.
At the final stage, draw a vertical line downwards from the middle of the semicircle (the stem of the flower) and, if desired, draw thorns or leaves.
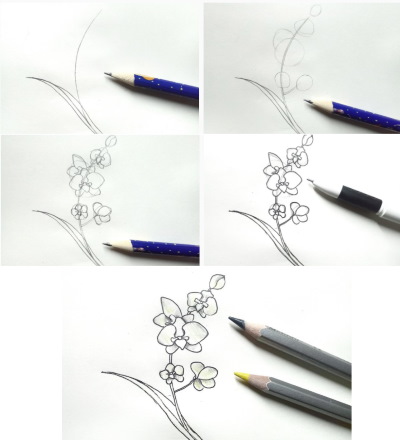
From the middle of the lower edge of the sheet of paper used, draw a line slightly curved to the right (the stem of the flower).
From the starting point of the stem, draw 3 elongated leaves pointing upwards.
Draw the outline of the leaves, then apply shadows depending on the angle of incidence of the light.
Stepping back from the beginning of the stem by 4-5 cm, depict the orchid flower so that the middle of its bud is located on the original curve (stem). To draw the bud, it is recommended to use 5 triangles (2 middle and 2 lower ones should be the same) without a base, connected to each other.
Similarly, draw 2 more buds on top, making them smaller as they approach the edge of the stem.
At the very edge of the curved line, draw 4-5 small ovals, randomly placing them on each side (unopened buds).
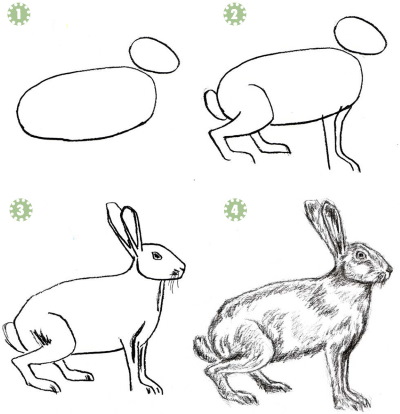
Animals
Graphics (pencil drawings, which are the most attractive for beginners, most often require the artist to have basic drawing skills), with the help of which animals are drawn, should be practiced only by those who already have an idea of the basics of the considered style of fine art.
Example of graphic drawing
The way it is created
In the center of the working plane, draw 2 small ovals, placing them diagonally in opposite directions from each other.
Between the ovals, draw a short vertical line (the hare's nose and mouth).
From the vertical line, draw a semicircle to the right with a downward bend. The length of the semicircle should be no more than 8-9 cm.
From the extreme point of the vertical, draw a semicircle to the left, the outline of which is a smoothly curved line (the outline of the animal's head).
Continue the semicircle by drawing the hare's ears using 2 semicircles extended upwards. One ear should be wider than the other, depending on the distance of the drawing from the viewer.
Draw a small oval (eye) inside the outline of the hare's muzzle.
Add detail to the image by drawing the pupils, whiskers and, if desired, the body.
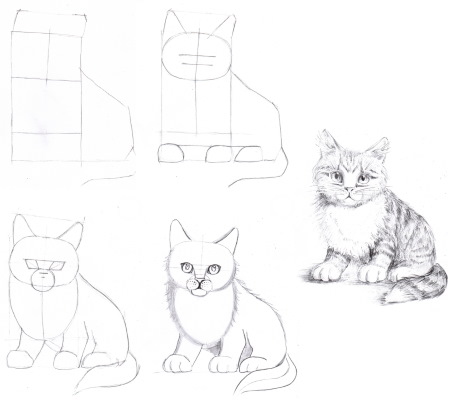
Step back 8 cm from the center of the working plane and draw 2 triangles.
Connect identical shapes with a horizontal line.
Connect the edges of the horizontal line with a semicircle, bringing it down (the animal’s muzzle).
Inside the muzzle, draw 2 rhombuses, placing them diagonally, pointing in opposite directions from each other (eyes).
Draw a circle between the diamonds (the animal's face).
From the side points of the oval - the muzzle, draw a semicircle downwards.
Step back 1-2 cm from the starting point of the right edge of the semicircle drawn in point 6, draw a smoothly curved line, using it to draw the outline of the animal’s body.
Finish drawing the front legs (standing) and the hind legs (tucked in) of the animal using straight and smoothly curved lines.
From the body on the right, draw the tail, making it slightly pointed.
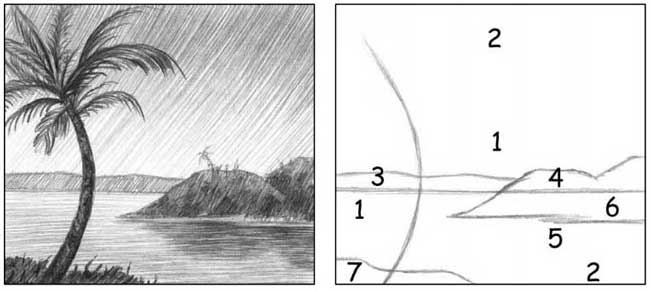
Landscapes
The easiest ways to draw landscapes are:
Example of graphic drawing
The way it is created
Mark the horizon line by drawing a straight line dividing the work plane into 2 parts. The lower area should be half the size of the upper area.
Step back from the horizon line 3-4 cm, and then draw another line at this level, with small bends in random places (outlines of the forest in the distance).
Find the starting point for the line that draws the mountain, stepping back from the dividing line 4-5 cm down and 8-10 cm to the left from the right edge of the sheet of paper used.
Having determined the starting point, draw a curved line towards the right edge of the working plane (mountain outline).
Shade the inner surfaces of the drawn objects, thus indicating the angle of incidence of light, as well as the relief of the main objects of the composition.
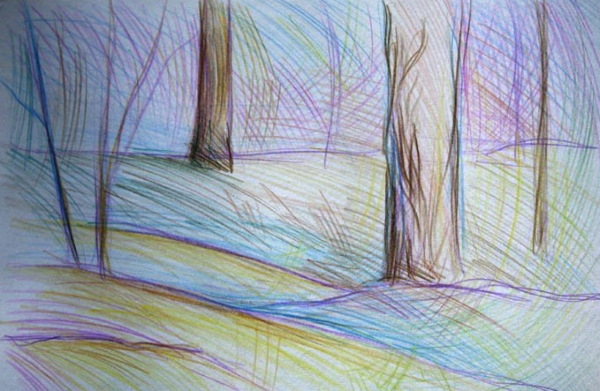
Mark the horizon line with a straight line dividing the working plane into 2 parts, where the upper one should be half the size of the lower one.
Fill the lower area of the drawing with randomly placed semicircles and diagonals (terrain relief).
From the horizon line, draw 2 vertical parallels, connecting their upper points with a horizontal line (tree outline).
Draw the trees in the foreground in a similar manner.
Using medium-hard, multi-colored pencils, color the resulting landscape and mark the terrain.
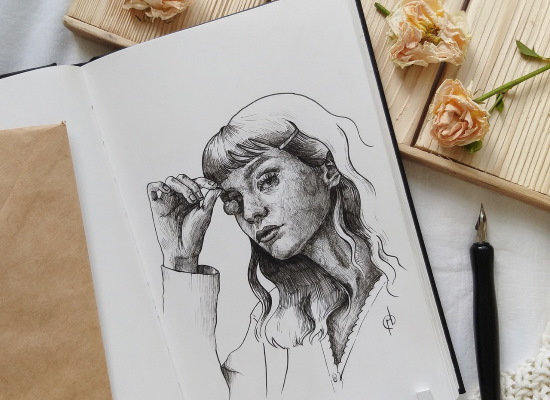
People
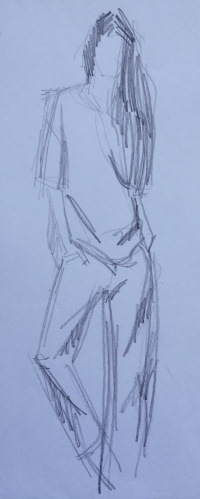
Drawings of people created in graphics with a pencil may seem extremely difficult for beginning artists. In reality, a schematic image of a person takes no more than 30 minutes, provided there is no need to draw the picture in detail.
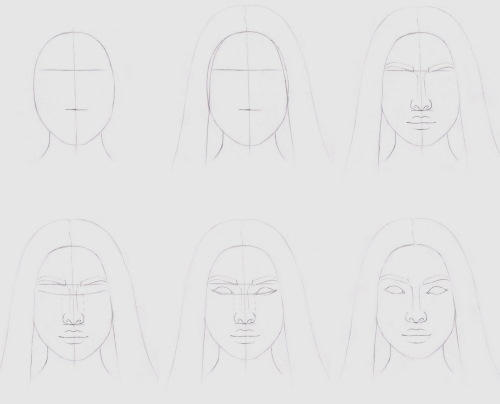
Example of graphic drawing
The way it is created
From the lower border of the sheet of paper used, draw 2 vertical lines. The extreme points of the lines should be located in the middle part of the working plane.
From the end of the left straight line draw a diagonal directed to the lower left corner. The length of this line should be equal to half of the verticals.
Take the second half of the vertical length out of the diagonal, directing it to the lower right corner of the working plane.
At a distance equal to the space between the verticals, draw 2 more straight lines that repeat the direction of the original diagonals.
Connect the top points of the lines with a horizontal line.
Finish drawing the upper part of the human body using simple geometric shapes: a rectangle (torso), an elongated rectangle (arm), an oval (face), and so on.
Add detail to the image by adding the person's hairstyle and marking the fold lines of the clothing, making the picture more realistic.
Draw auxiliary lines in the center of the sheet, perpendicular to each other.
At the bottom, use a semicircle to mark the eye level for the future portrait.
From the auxiliary straight line, draw 2 verticals with small semicircles at the ends (nose with nostrils). In this case, the auxiliary vertical should be taken as the middle.
Draw a mouth under the nose (an oval where the upper border is slightly curved downwards exactly in the middle).
Draw eyebrows in the upper part of the plane, placing them at the same level, close to the auxiliary horizontal line.
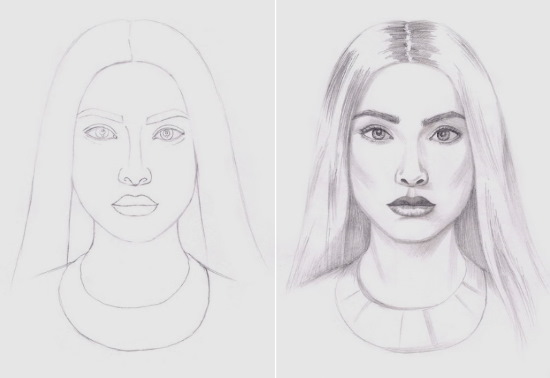
Add detail to the image by adding hair, pupils and, if necessary, characteristic features of the person’s appearance.
Birds
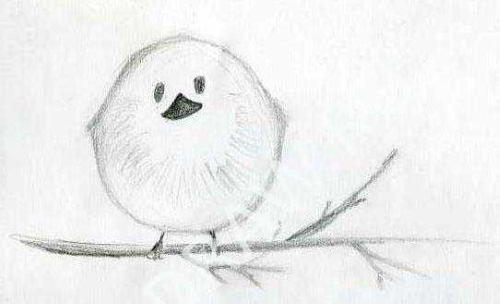
Beginners are recommended to draw birds in graphics like this:
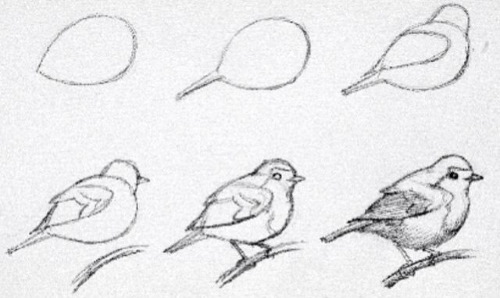
Example of graphic drawing
The way it is created
Stepping back from the bottom edge of the sheet of paper being used, draw a horizontal line (branch) from the left edge.
Draw small branches close to it.
In the middle of the horizontal line, mark the area where the drawn bird will sit (put 2 short strokes - paws).
Draw a circle so that the lower boundary of the geometric figure connects the upper points of the strokes.
Draw small triangles on the side of the circle, at the same level. Erase part of the edge of the circle, making the triangles (wings) part of the bird's body.
Inside the circle, draw 2 black ovals on top and an equilateral triangle between them (eyes and beak).
Shade the image and apply shadows depending on the angle of incidence of light.
In the center of the sheet of paper, draw an oval, making one of its sides (the left one) pointed.
From the corner of the figure, draw an elongated triangle, directing it to the lower right corner of the working plane.
Draw a semicircle curved upwards on top of the oval (head).
From the upper border of the previously drawn oval, draw a semicircle inside the figure with a strong bend to the right (wing).
Detail the bird's appearance by drawing its plumage, eyes, beak and, if desired, secondary objects of the composition, for example, a branch or a bunch of berries held by the bird in its beak.
Pencil drawings in graphics should be created in accordance with the basic rules of this style of fine art. For beginning artists, the best option for learning is to copy ready-made images, adhering to a clearly formulated algorithm.