Plasticine is an ideal material for playing with children. It not only develops finger motor skills, but also teaches how to work with your hands, shapes your imagination and improves your memory. You can create various figures from plasticine that can supplement the missing parts of the main toys.
Benefits of Modeling Plasticine Figures for Children
Modeling helps children develop motor skills, fantasize and pay attention to small details. When creating figures, you can explain to the child the transformation of one form into another. For example, roll a sausage and cut it, clearly showing the process of turning a long figure into a short one. Plasticine helps to understand the world around us by creating objects.
How to choose good plasticine for modeling
When choosing plasticine, there are a few things to consider:
- Good plasticine does not stick to your hands and does not stain your fingers.
- It should easily take the shape the child is trying to make.
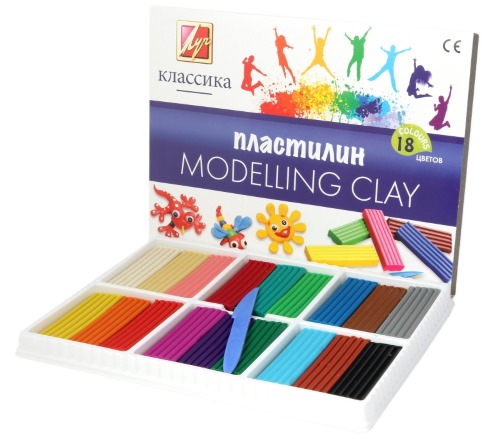
- Parts made from plasticine should be easy to glue together.
- The packaging must indicate that it is not toxic or harmful to the child.
Plasticine modeling with children aged 1-2, 3-5, 6 years and older: features of activities, interesting ideas
You can start making things with plasticine with children from the age of 1 year. A one-year-old child can be shown how to roll a ball, a sausage, and knead it in his hands. With the help of plasticine, colors are easily remembered (it is recommended to introduce only the basic colors so as not to overload the baby's brain with information).
As they grow older, they are shown modeling mushrooms, bananas, cucumbers and other vegetables, which are easier to make. A child who has reached 4 years old skillfully uses harder material, a knife and has better control over his fingers. For such children, you can use more colors and make more difficult figures from them.
Children from 6 years old can take various kinds of accessories for modeling. At this age, they can independently work with plasticine and combine colors.
Below is a table comparing age and occupational characteristics:
| Age | Type of plasticine | What can be sculpted | Features of the classes |
| 1-2 years | soft, pliable | Objects of the same shape |
|
| 3-5 | more dense | Objects consisting of several figures |
|
| 6-7 | solid | Compositions consisting of several objects |
|
How to make food for dolls from plasticine?
Plasticine is an ideal material for creating doll food. To make it more interesting for a child to play, you can come up with various dishes, cakes, sweets, which will then be offered to the dolls. Before you start “cooking” food, you should try on the dishes in which it will be served, so as not to miscalculate the size.
Plasticine broccoli cabbage
To make broccoli, you will need 3 shades of green plasticine. Make a broccoli leg from the lightest part - roll it into a thin sausage and make several cuts on one end.
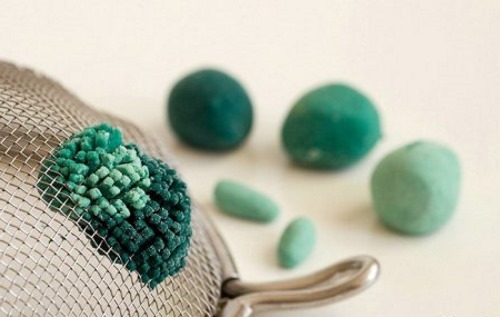
Glue the remaining colors together and pass them through a tea brewing mesh. Form heads from the resulting blanks and glue them to the cuts.
Sausage
The sausage is made very simply from pink and white plasticine. Roll out the pink plasticine into a thin rectangle.
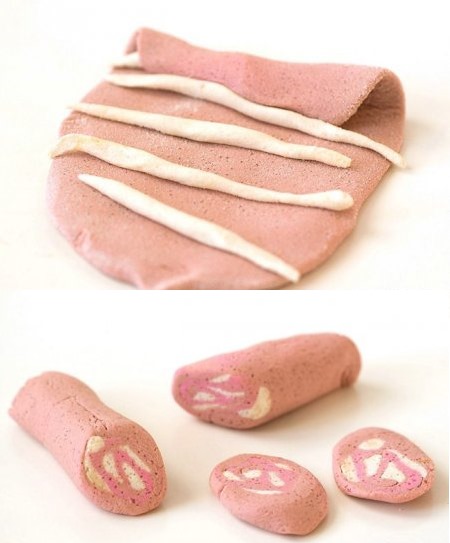
Divide the white plasticine into several parts and roll each into a thin tube. Place the tubes on top of the pink plasticine and roll into a sausage. Put the sausage in the cold for a while.
Ice cream
To make ice cream, you will need white and waffle-colored plasticine. Roll out the waffle-colored plasticine into a thin layer. Use a knife to make stripes on it, like a waffle. Cut out a wide triangle and twist it into a cone.
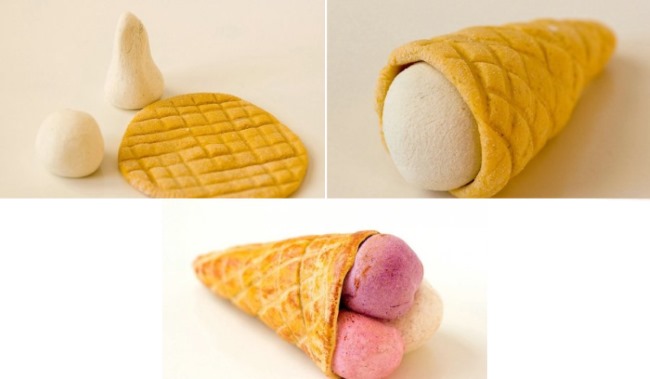
Make a ball from white plasticine, the size of the cone hole (it should not fall into it) and attach it to the "waffle". You can make a "filling" from red, brown or black plasticine. The balls can be of different colors and sizes.
Cheese
Cheese can be molded in several ways - a whole wheel or a small piece, for viewing in a section. You will need yellow plasticine.
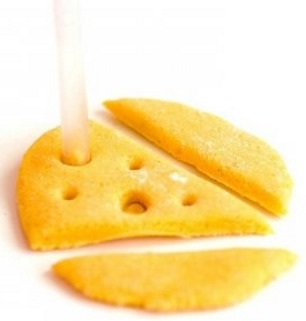
Step by step actions:
- Make a circle out of plasticine and press it down, forming a head of cheese. Level the sides.
- Use a knife to draw patterns on the top and bottom of the head.
- From another piece of yellow plasticine, mold a circle. Use a knife to cut off the sides, giving it the shape of a triangle. Slightly flatten the top and work the corners with your fingers.
- Use a knife to cut holes of different sizes on the sides.
Cake
To make a bright cake, you need plasticine of different colors.
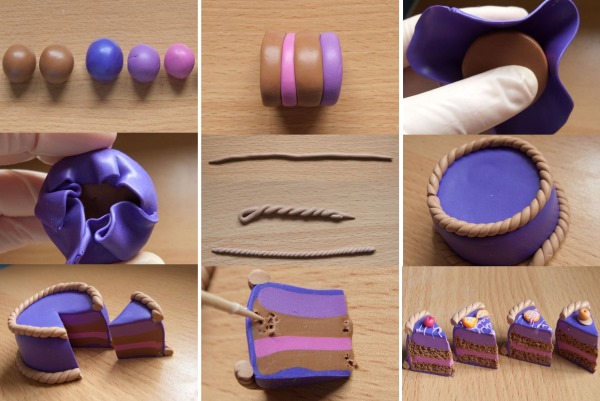
It is done as follows:
- Divide the available plasticine into equal parts. Make a circle out of each and flatten. Make sure the edges are even.
- Place the resulting flat cakes on top of each other, pressing lightly with your hands.
- Roll out a large thin sheet of white (or any other color) plasticine and cover the resulting cake with it. Cut off excess pieces and carefully align the edges.
- Decorate the cake as desired. You can make figures from the remains of plasticine, flowers, or draw patterns on the cake itself with a knife.
- Cut off a piece of cake.
Watermelon
To create a watermelon, you need to have plasticine of the following colors on hand:
- light green;
- dark green;
- red;
- dark brown;
- white.
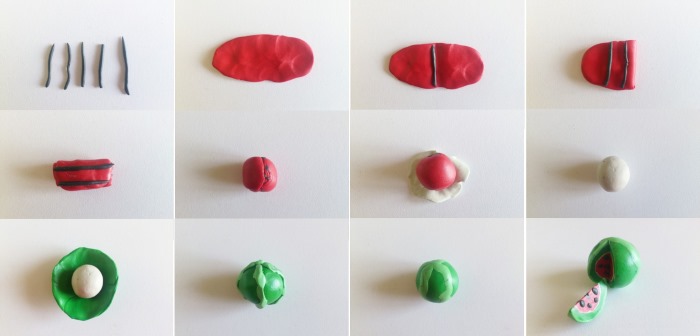
Step by step actions:
- Make a thin oval out of red plasticine. Put brown plasticine rolled into a thin sausage in the middle.
- Fold the oval in half. Insert the brown sausage again and fold. Repeat one more time. Form a three-dimensional ball from the red plasticine.
- Roll out the white plasticine thinly and cover the red ball with it.
- Make a thin flat cake from dark green plasticine and insert a white circle into it. Carefully close the holes at the edges with your fingers.
- Turn the light green plasticine into stripes and glue it to the outside of the watermelon, pressing it into the base with your fingers.
- Make a tail from a piece of brown plasticine and attach it to the watermelon. Press lightly. Cut the watermelon.
Animals from plasticine
Plasticine figures for children will be a good addition to other toys. For example, you can create animals not only those that exist in nature, but also come up with new creations.
Giraffe
To create a giraffe you will need 4 matches and the following colors of plasticine:
- brown;
- black;
- orange;
- white.
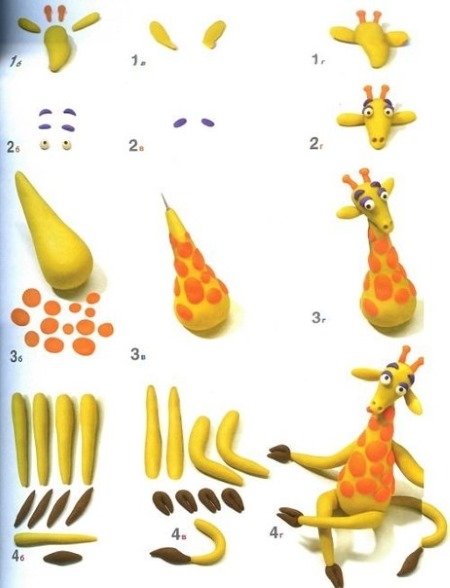
Step by step actions:
- Make an oval out of orange plasticine and give it the shape of a giraffe's head, slightly extending the lower part forward.
- Glue on the eyes and make nostrils and horns from brown plasticine.
- Make ears from orange plasticine and attach them to the head.
- Set aside some orange plasticine and mold the body and neck from the main part. Stick them together, smoothing the attachment points as much as possible, and attach them to the head.
- Divide the set aside orange plasticine into 5 parts. Cover 4 matches with orange plasticine, leaving a little bit of it off the top. Stick brown plasticine hooves to the bottom and insert the matches into the body.
- Make a tail from the remaining orange plasticine and attach a tassel from brown plasticine to it. Glue it to the body.
- Peel off a piece of brown plasticine and make a sausage. Press it down and use a knife to cut the edges, giving it the shape of a mane. Glue it from the beginning of the head to the end of the neck.
- Make small cakes from brown plasticine and glue them to the body randomly.
Cat
Plasticine figures for children can be molded in different positions.
For example, a cat can be made:
- sitting;
- lying down;
- standing;
- curled up into a ball.
Cats can be of different colors, solid, striped.
One of the ways to create a cat from plasticine is presented below:
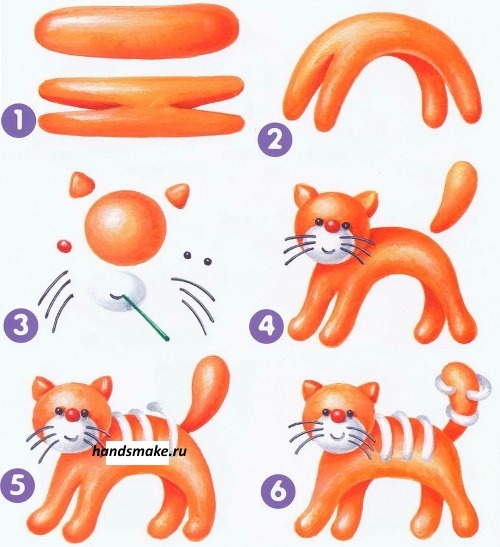
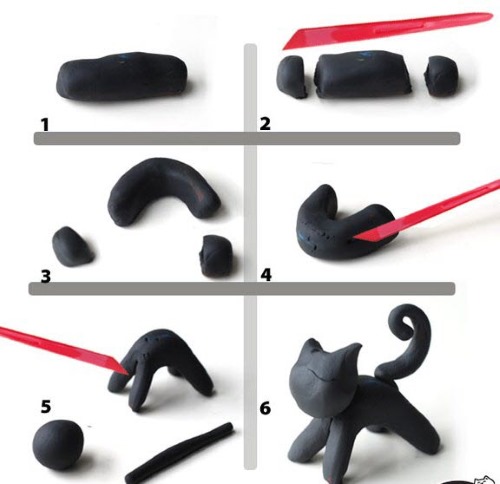
- Using the main color of plasticine (for example, brown), form an oval volumetric circle (the body).
- Make a round head from the same color and attach it to the body. You can use a match, breaking it into 2 parts.
- The paws should be in the form of short sausages and the same size. They are attached with matches. In the lower part of the paws, make cuts with a knife in the form of claws.
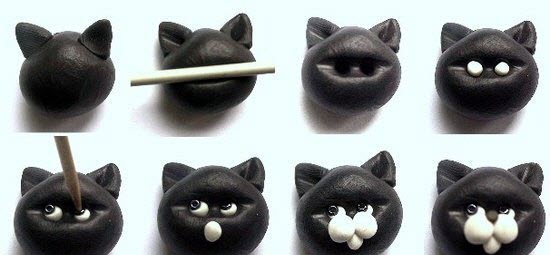
- Make triangular ears and glue them to the head.
- From light brown plasticine make 2 small circles and one voluminous semicircle. Attach the circles next to each other in place of the nose, and the semicircle below in the middle.
- Make a small, three-dimensional triangle with pink plasticine and attach it to the nose.
- Use light brown plasticine to make fluffy fur in place of the chest. To do this, mold a voluminous elongated circle in the shape of this part of the body. Attach it and adjust it to size with your hands.
- Make small flat cakes (eyes) with white plasticine. Glue a pea-sized piece of plasticine of a different color into the middle of each. Attach to the head.
Ladybug
The ladybug is molded from plasticine of two colors: dark blue and red.
It is done this way:
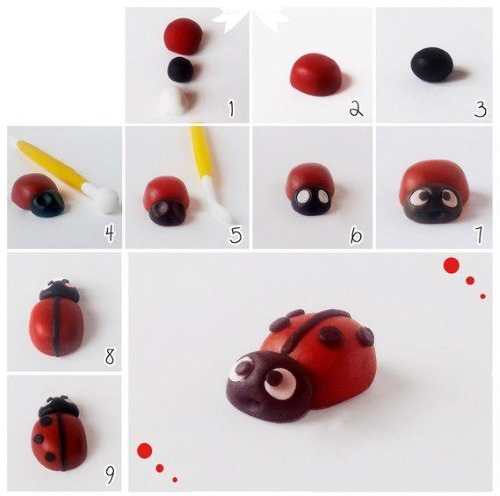
- Make an oval out of dark colored plasticine and flatten it.
- From red plasticine create an oval circle and put it on the blue part. Using your hands, adjusting the size to each other, create the body of the ladybug. The red part should be more voluminous, and the dark one should be flattened.
- Turn the workpiece with the bottom part towards you and make a vertical cut along the entire body with a knife. From this line, draw horizontal lines to the carved sides to the end.
- Form 6 long thin tubes (legs) from dark plasticine. Attach 3 pieces on each side opposite each other.
- Turn the body over and on the red part draw one vertical line from the middle to the end.
- Make small circles from dark plasticine and flatten them. Place them on the body symmetrically on both sides of the drawn line.
- Make a circle out of dark plasticine and attach it to the body, pressing lightly (the circle should lose its shape and turn into a semicircle)
- Make 2 thin tubes from dark plasticine and attach them to the head (antennae).
- Make eyes and bend the legs slightly to one side.
Pony
The pony is made like this:
- Make a thick sausage out of pink plasticine and pull one side up (neck).
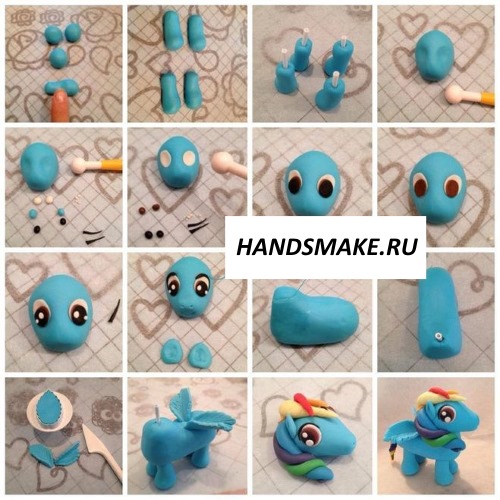
- Roll a ball and attach it to the neck. Pull the ball forward slightly, giving it the shape of a pony's head. Make nostrils with a knife.
- Make pointed ears.
- Make 4 small cones and cut the edges diagonally from the narrower side. Attach this part to the body. Pull the lower parts of the hooves slightly and tap them on the table to give them a stable position.
- Roll several sausages and connect them together. Attach them to the body (this will be the mane) and separate with a knife. The tail is made in the same way.
- Use white plasticine to make slanted eyes and insert a brown pupil.
Caterpillar
Plasticine figures for children can be molded, turning the process into a fun game. For example, a caterpillar can become multi-colored, which will help to simultaneously show the child colors and how to roll balls.
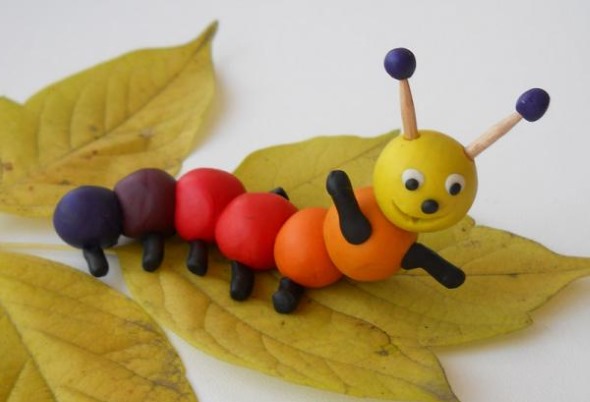
To create this insect you will need a small amount of plasticine of different colors (leftovers will do).
How to make a funny caterpillar:
- Make circles of different sizes from the remaining plasticine.
- The largest circle will be the head. Glue the remaining parts to it as they decrease in size.
- Attach a circle a little higher one ball from the head, and place one of the small circles on it.
- Attach a larger ball at the same distance under the small ball, and another ball under it. This creates a crawling effect (this part can be skipped).
- Glue the eyes and mouth onto the head.
Plasticine cartoon characters
Plasticine figures for children do not necessarily have to be animals or food. Cartoon characters molded from plasticine will bring a lot of positive emotions to the child, for example, smeshariki.
Owl
Sovunya is made as follows:
- Roll the purple plasticine into a smooth ball. It will be the base. Attach triangular ears to it.
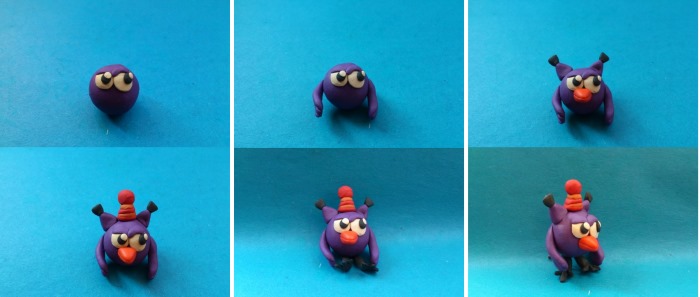
- Roll 2 small circles from white plasticine and flatten them. These will be the eyes. You can insert a circle of black plasticine as a pupil.
- Make 2 small circles from purple plasticine, flatten them and cut them in half. This will be the visor over the eyelids.
- Form triangular ears and glue to the head.
- Roll a small piece of orange plasticine into a cone (beak) and attach. Make a cut.
- Glue 3 small tubes (paws) to one end of 2 short sausages made of purple plasticine. Attach to the body.
- Form 2 wings, attach them and use a knife to make cuts similar to plumage.
Barash
The lamb is made from pink plasticine in the following way:
- Roll a ball out of pink plasticine.
- Roll several small pieces into circles. Flatten them and glue them to one half of the base.
- Make 4 pink tubes and glue a piece of brown plasticine (hooves) to one end of each. Attach the legs to the body.
- From brown plasticine make 2 short, not thin tubes (horns) and attach to the top of the head, twisting away from each other. Make a nose and form eyebrows.
- The eyes are molded from white plasticine. Insert a pea (pupils).
- Roll a thin tube out of red plasticine and make a mouth.
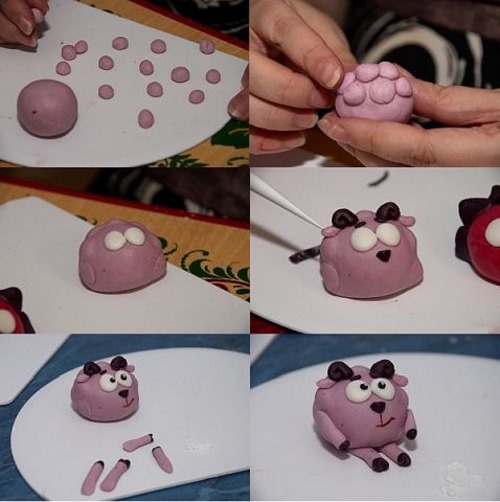
Hedgehog
To make a hedgehog, you should:
- Make a ball out of red plasticine.
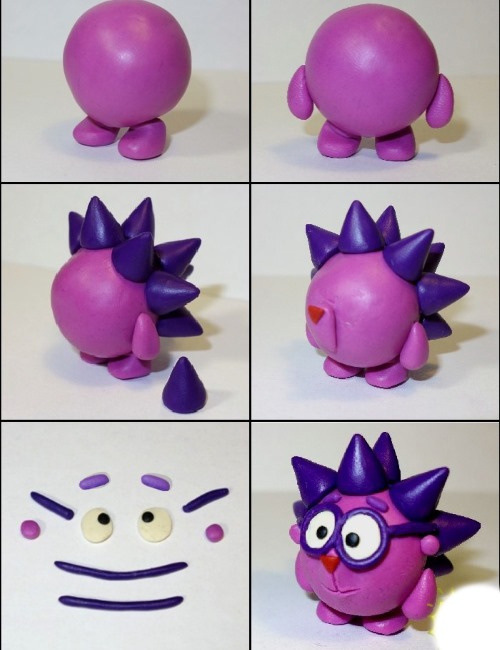
- Separate pieces from the brown plasticine and make cones. Attach them to one half of the body (needles).
- Make 2 small round cakes from white plasticine and cover them with brown plasticine. Insert a pupil into the center (peppercorns or clove seeds are fine). Glue to the head.
- Roll short tubes for the frame of the glasses using brown plasticine and attach them.
- Make paws from red plasticine, and roll a thin tube from brown plasticine to form a mouth.
Losyash
Losyash is made as follows:
- Roll a ball from sand plasticine. Make eyes from white plasticine and pupils from black. Glue on eyebrows.
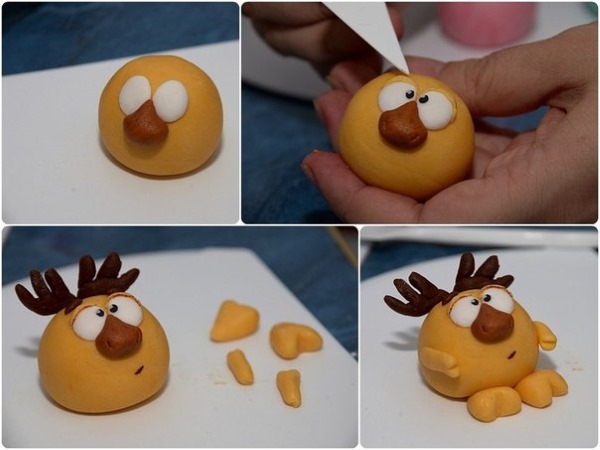
- Use brown plasticine to mold the horns. To do this, roll 1 tube and attach several shorter tubes to it on 2 sides.
- Make a nose in the shape of a flattened cone from brown plasticine. Use a knife to mark out the nostrils.
- Make 2 tubes with sand plasticine, flatten them slightly and make a cut at one end. These will be the upper hooves.
- Make the lower hooves cone-shaped and cut with a knife from the wider side. Glue the hooves to the body.
Krosh
The crumble is made like this:
- Roll a ball out of blue plasticine. Make long ears and attach them to the top.
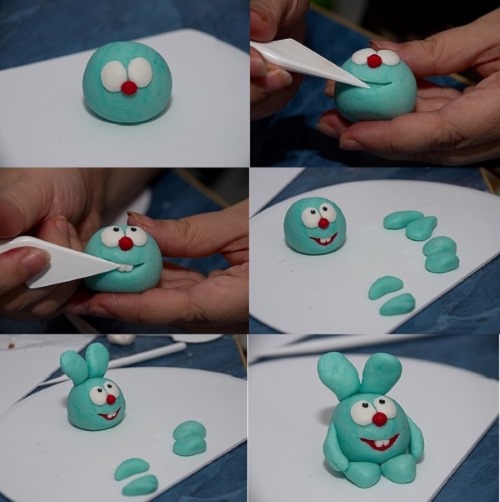
- Use white plasticine to make eyes and insert a black pupil.
- Make a cut with a knife in the shape of a mouth. From white plasticine, mold 2 small squares and insert them into its upper part (teeth).
- Make a nose in the shape of a ball from red plasticine, flatten it slightly and make nostrils with a knife. Form a thin tube and glue it to the place where the cut for the mouth was made earlier.
- Using blue plasticine, mold 4 paws and attach them to the body.
Nyusha
Nyusha is made as follows:
- Roll a ball out of pink plasticine. Make eyes with white plasticine and glue in pupils.
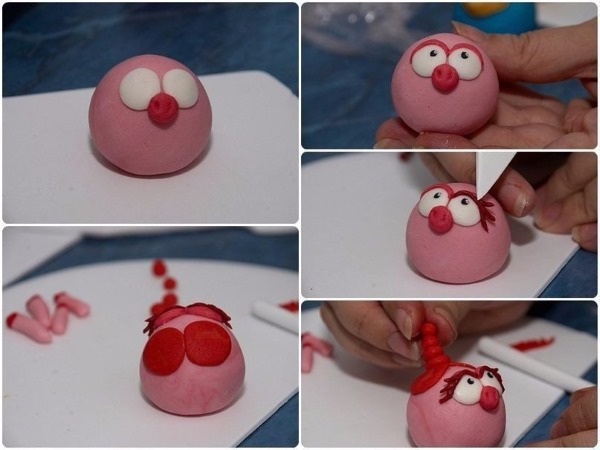
- Roll a tube with red plasticine and attach it around the upper part of the eyes. Attach several thin, shorter tubes (eyelashes) of the same color to it.
- Make 2 small flat cakes from red plasticine and glue them to the top of the head. Attach 4 small flattened circles to it (this will be the braid). Roll a tube with red plasticine and make small cuts on one side with a knife. Twist it and attach it to the circles on the head. This will be the end of the braid.
- Roll sausages and glue a piece of red plasticine to the end of each. Make cuts (hooves) and attach to the body.
- Make a small circle (nose) with red plasticine and make 2 cuts (nostrils) on it with a knife. Roll the red plasticine into a thin tube and form a mouth.
Pin
The pin is made this way:
- Roll a ball of black plasticine. Glue on eyes from white plasticine with pupils inserted.

- Make a beak with orange plasticine.
- Make a flat cake out of white plasticine and glue it to the lower part of the body, adjusting it to size and smoothing the attachment points.
- Make a circle with black plasticine and flatten it slightly, making the corners more distinct with your hands. Make a flat cake with another piece. Put these parts on top of each other and glue to the top of the head. This will be the hat.
- Make 2 wings from black plasticine and 2 paws from red. Make cuts with a knife.
Modeling birds from plasticine
You can make a beautiful and colorful parrot from plasticine.
Required colors:
- yellow;
- blue;
- orange;
- white.
If desired, you can use other available colors.
Step by step actions:
- Make an elongated volumetric circle from blue plasticine. This will be the body.
- Roll a ball with yellow plasticine and attach it to the body. Flatten the ball, making the attachment point invisible.
- Make a flattened triangle with slightly defined corners from white plasticine and attach it to the place where the head and body are attached. Use a knife to make cuts that look like plumage.
- Use white plasticine to make eyes and insert pupils.
- Make several small cones with yellow plasticine and stick them to the head and upper body at the same distance from each other.
- Make the paws and beak with orange plasticine.
- Make a rhombus from blue plasticine (this will be the tail) and attach it. When gluing, lightly press the upper part into the body with your hands, removing the attachment point. This way, this part of the tail will be glued.
- Make wings from blue plasticine and use a knife to make cuts in the shape of plumage.
Other figurine ideas
You can make many different figures from plasticine.
To teach children to pay attention to surrounding objects, you can sculpt:
- a basket of vegetables or fruits;
- vase with flowers;
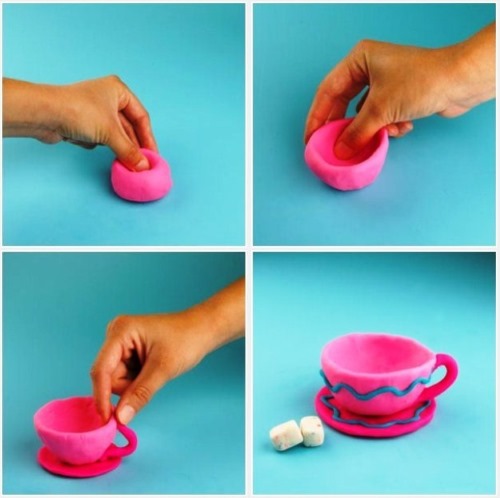
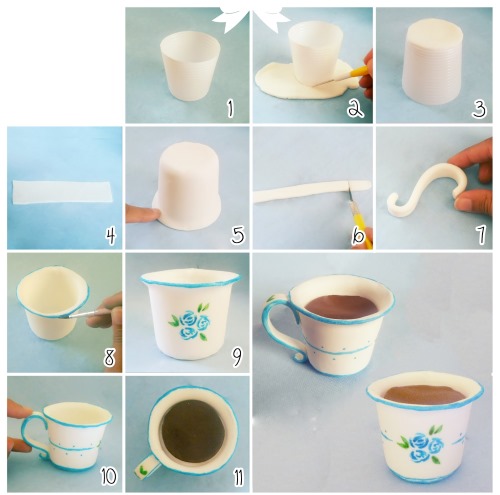
- cup;
- plates;
- house;
- bracelet.
Modeling with plasticine is not only a good way to spend time with your child, but also a useful activity. From this convenient material, you can create many different figures, while simultaneously explaining the constituent parts. In the process of modeling, children learn new colors, objects, and learn to work with their hands.
Article formatting:Natalie Podolskaya
Video about modeling figures from plasticine
Plasticine figures for children:
I made a hedgehog, it turned out cool, I like it