Fairies are fairy-tale creatures that are often used in the folklore of European countries. They are also called "good people" or "little people". Fairies are also introduced as characters in movies and cartoons - Cinderella and her fairy godmothers, tooth fairies, Tinker Bell.
There are also separate series about the lives of little characters - Winx and Charodeika. You can draw a fairy-tale creature using a general template, but for children, a drawing that they associate with their favorite character is more suitable.
Pencils, paper and supplies
The following set of tools will help children draw a fairy:
- pencil. It is better to use with soft and hard lead;
- a clean sheet of paper;
- eraser and sharpener.
The classic set of tools can be diversified with compasses and rulers. If the child is small, you can use figures and other things for outlining.
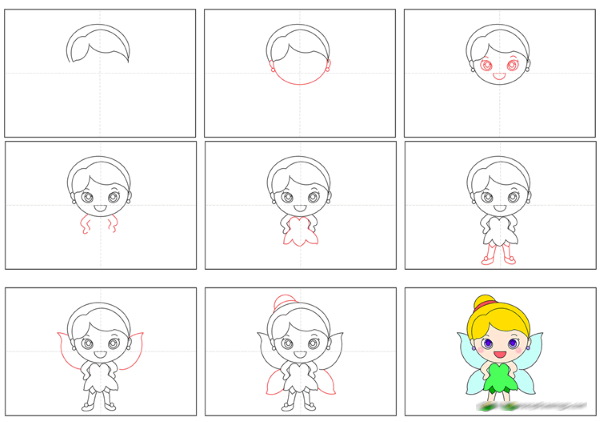
Simple Fairy for Kids
Fairy (drawing for children in pencil, standard template) is a winged, beautiful creature. Most often, a female image with a beautiful appearance is represented.
Step by step process
Algorithm for performing work:
- On a clean sheet of paper, use a compass or any other handy tool to draw a circle. It will be the basis of the character's head.
- Attach an unfinished, slightly curved triangle to the bottom. You can also draw it using additional elements, using an isosceles triangle as a base.
- On each side, where the dress and head intersect, draw small circles with a soft pencil. Visually divide the circles into 4 parts and draw them. Erase 3 of 4 with an eraser to form neat dress sleeves.
- On the circle that forms the head, in its upper part, draw 2 arched lines that connect to each other approximately in the middle. In this way, you can separate the hair area from the face area.
- Draw the legs at the bottom of the dress. The fingers need to be extended, as fairies are flying creatures.
- Separate the feet from the legs with a light arched line, separating the shoe area. You can add small bows or flowers - as laces or fasteners on shoes.
- On the left side of the drawing, where the dress sleeve is drawn, add a semicircle line. Draw another one next to it, forming a tapering figure. Draw 5 fingers at the end.
- Visually measure the middle of the palm. Draw a straight line along the marked line, which will be the back face of the cube. Draw the remaining lines to form all the surfaces of the figure. On the right side, draw part of the fingers and palm, which will embrace the resulting element of the drawing.
- The lower part of the dress should be duplicated to give it a neater and more beautiful appearance. The gift should be painted and decorated as desired.
- Add a magic wand to the fairy's right hand. It's easy to draw - just draw a slightly slanted line with a star at the end.
- Draw a crown above the head. It can be depicted in the form of a shell - with a rounded top and a narrow base. You can also make it with a top in the form of sharp zigzags and a wide base - your choice.
- Behind the fairy's back there should be wings. They resemble butterfly wings and have the shape of an elongated oval. In total, you can see 4 elements of the wings.
- The final stage is drawing the fairy’s face and filling in individual elements with a pencil.
The finished drawing can be colored as you wish or left as is.
Fairy Tinker Bell
Fairy (drawing for older children with pencils) Tinker Bell is a cartoon character. She is the most recognizable cartoon character (in her category). In the 1953 cartoon, she is presented as very tiny - only 13 cm, so you can draw her in full size.
Step by step process
Step-by-step process of completing the work:
- Drawing of the character begins with the head. To do this, oval outlines are created on a clean sheet of paper, and then the figure is divided by 2 curved lines - in the middle of the face (vertically) and at eye level.
- Visually divide the top of the head (from the place where the line is drawn to the top point) into 2 parts. Draw another line similar to the one drawn earlier. It will be the border of the character's hairstyle.
- Draw an ear under the eye line, on the side of the head. Its shape resembles an oval, sharpened at the top.
- Draw the shape of the hairstyle as shown on the line.
- On the left side of the drawing, add a small circle using a compass.
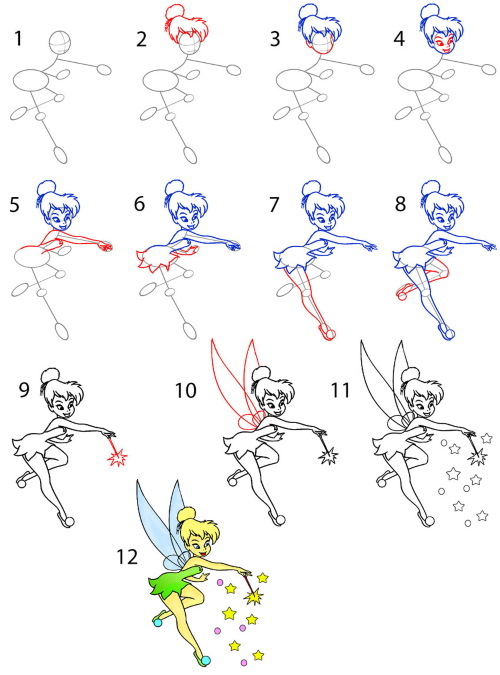
- Draw the outlines of the face from the shapeless figure. The chin should be slightly narrowed, cheeks and cheekbones protruding. In the designated places of the eyes, make a slight notch, and then outline the curves of the forehead with smooth lines.
- Make "notches" on the initial lines. They should outline the outer and inner corners of the eyes, mark the location of the lips and nose. The approximate location of the facial elements can be seen in the drawing.
- Place the fairy's eyes along the marked line. Tinker Bell has a distinct look and large eyes, shaped like sunflower seeds. Also draw the borders of the eyelid, the eyeball and the pupil.
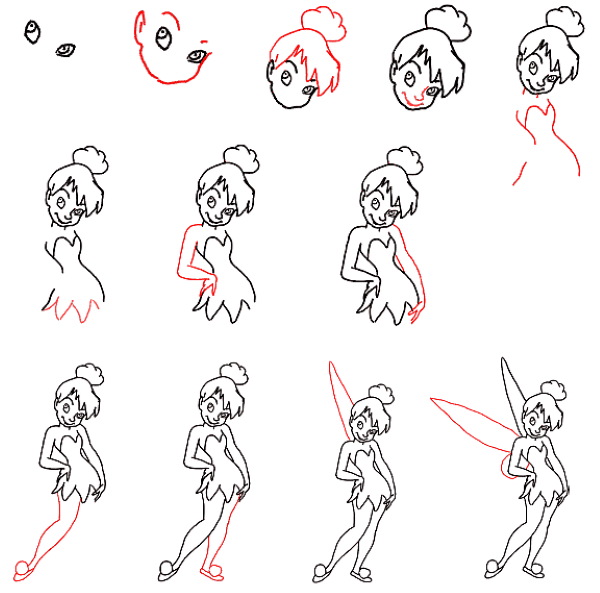
- Just below the hair are the eyebrows. The fairy's eyebrows are neat, small and quite thin.
- Place the nose and lips on the marked "notches". The nose looks like an unfinished drop. Small in size, neat.
- The upper lip is thinner than the lower lip. The upper lip has a fairly deep curve. You can draw the fairy both smiling and relaxed.
- The main part of the facial elements is ready – you can start drawing the hair.
- The hairstyle is rather sloppy, which is explained by the constant movement of the character.
- The strands fall in curls on the forehead and face of the fairy. From the previously drawn circle, a lush bun is formed, tied with a thin ribbon into a beautiful hairstyle.
- Inside the ear, add a short line to form the auricle.
- On the lower part of the head, measure the approximate location of the outer corners of the eyes. From this point, draw a thin, neat neck. Add a little torso - arms, not reaching the elbow, chest.
- Remove all unnecessary elements of the drawing using an eraser.
The finished drawing can be colored with a simple pencil, adding shadows or texture to the image using hatching, or with pencils and paints.
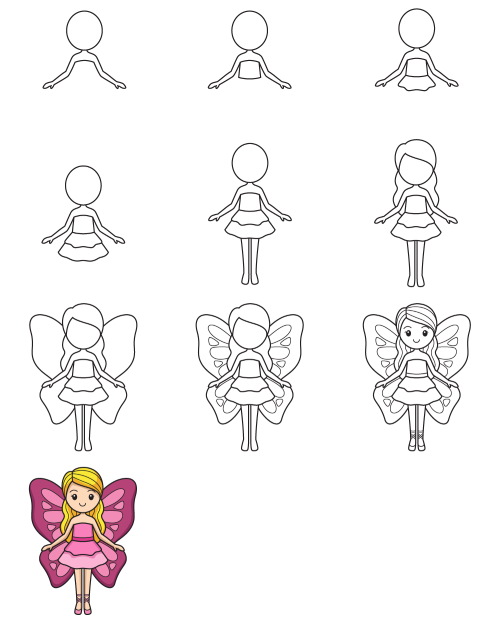
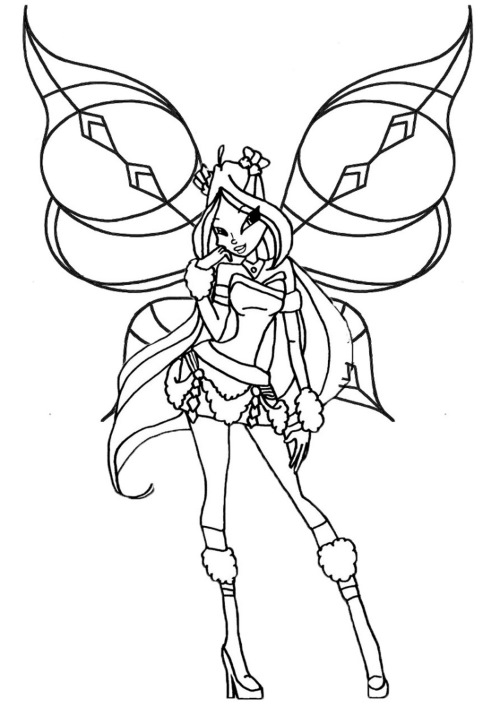
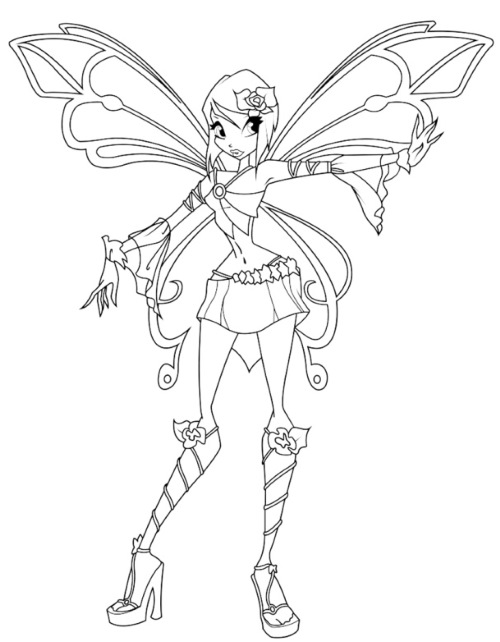
Fairy Stella
Fairy (drawing for children in pencil) Stella is a character from the animated series for children "Winx". The character is liked by viewers for her pleasant appearance, sense of style and humor, as well as her abilities and love for friends. The drawing is quite complex, as it requires good drawing and patience.
Step by step process
Algorithm for performing work:
- On a clean sheet of paper, draw a small oval, elongated vertically.
- From the oval, draw a thin neck, add sharp outlines of the shoulders, and then depict a very thin waist.
- Use smooth lines to create a transition to the character's hips, and then finish the figure with a slightly protruding downward line connecting the two sides of the body.
- From the shoulder line, draw 2 rectangles, gradually narrowing downwards. Finish the figures in the area of the previously drawn waist. Erase the partitions between the figures of the arms and the previously drawn shoulders.
- Separate the clothes from the body lines. Draw the bottom edge of the top near the waist with several curved lines.
- Using a continuous, smooth line, draw the top of Stella's skirt, as shown in the picture.
- Finish drawing the top. To do this, draw the side outlines of the top and the neckline with slightly curved lines.
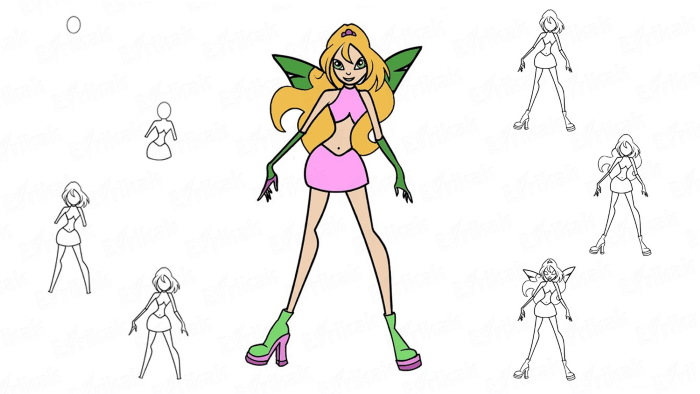
- Add randomly scattered curls above the head. The hairstyle should continue the contours of the head from above, adding volume.
- Draw long and very thin legs. As you can see, the calves are quite pronounced.
- Finish drawing the arms. Continue the arms from the elbow to the fingertips just below the hip line. The fingers are long, the arms are drawn with slightly curved lines.
- Draw the remaining fingers, add the legs. Since Stella is quite a stylish fairy who follows fashion, she is wearing platform shoes with high heels.
- Add the bulk of the hair - light, voluminous curls.
- Draw triangular wings behind the hair. If you look closely, you can see that the veins in them are located in small triangles.
- Stella has a small crown on her head. On her face, draw almond-shaped eyes, a graceful nose and a small mouth.
- Add larger pupils.
The finished image can be colored with paints or left as is.
Fairy Wings
Fairy (drawing for children with a simple pencil using additional tools) is a fairy-tale creature. Despite this, any character on paper can be turned into a fairy if you add the appropriate attributes.
Step by step process
How to draw fairy wings:
- Place dots on the prepared drawing at the shoulder locations. They are the base of the wings.
- Draw 2 lines from the designated point. One as a continuation of the body, and the other at an angle of 30 ℃.
- At the end of the top line, place a point, and then draw another one, almost parallel to the floor.
- Draw the second line of the wings. Place the features below those previously drawn. When drawing the details, refer to the photo.
- Connect the elements together, joining them with the uneven edge of the wings. Form the surface of the wing so that it resembles a sail.
- Draw the curves of the wings to make them more “alive” and real.
- Add light scuffs, show folds and remove all unnecessary elements from the drawing.
Additional decorative elements can be drawn according to your taste.
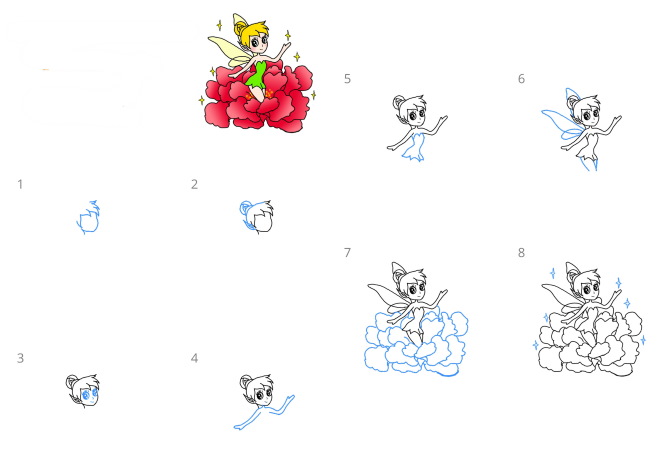
Fairy Tale Fairy
You can also draw a fairy tale fairy.
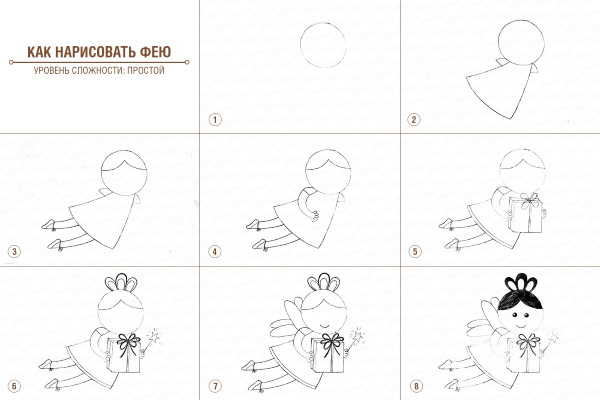
Algorithm for performing work:
| Stage | Description | Image |
| 1 | Draw the head on the drawing without applying the initial elements. Slightly sharpen the chin and leave natural folds. Draw a thin neck and graceful shoulders. Add the outlines of dresses. When drawing characters, you can use any clothes to implement the idea. | 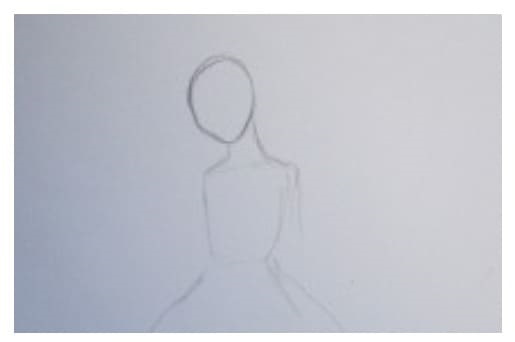 |
| 2 | Draw the arms, bent at the elbow and gathered at the waist. Draw the puffy sleeves of the dress and detail them at the folds. Design the cuffs and draw the fingers on the hands.
Add a magic wand to the hands. To do this, use a ruler or draw a thin long rectangle by hand. Draw a star or any figure of your choice at the end. | 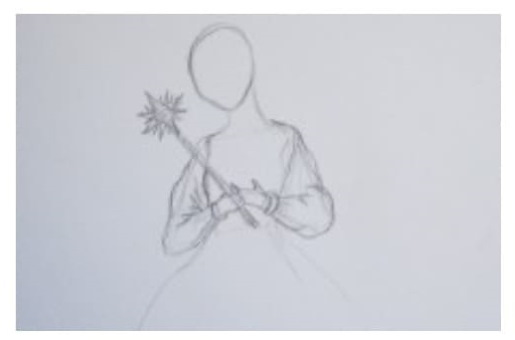 |
| 3 | Draw the top of the dress. Decorate the V-neck and turn-down collar with beautiful curls. Draw the folds of the dress on the shoulders.
Add a belt at the waist. Also depict folds on the belt. | 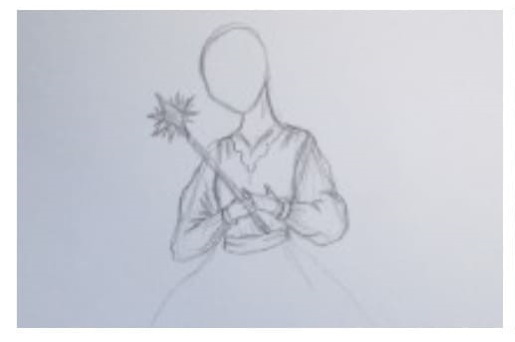 |
| 4 | Draw the neat features of the character's face. Add large eyes, immediately draw the eyelashes and eyebrows, pupils and mark the places of glare in the eyes. A small nose and mouth.
Using the top contours of the head as a starting point, show wavy hair with a slight styling. You can draw a different hairstyle if you wish. | 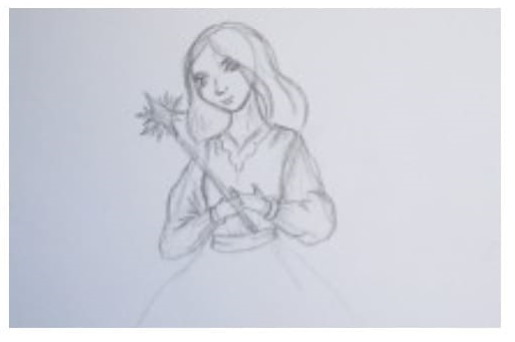 |
| 5 | Add the outline of the lower part of the dress, and also mark the level of the legs and shoes. Draw the outline and a light pattern on the wings. The wings are shaped like a butterfly, but you can make any other using different drawing techniques. | 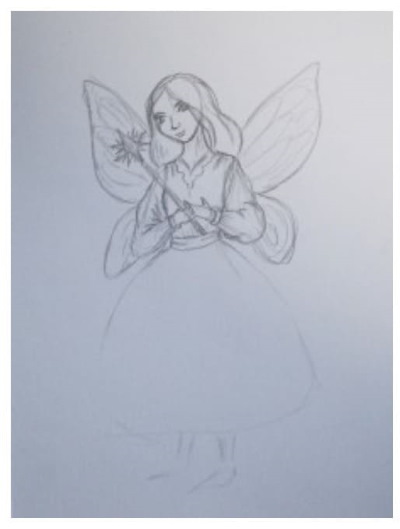 |
| 6 | Add wavy ruffles to the skirt of the dress, make the lower part of the clothes more detailed. Draw wavy stockings on the legs, immediately marking the dark stripes with a pencil. For footwear, use shoes with sharp, curled toes, reminiscent of elf shoes. |  |
| 7 | Draw all the details of the drawing well. Add a crown on the head, and you can draw a flower under the feet. | 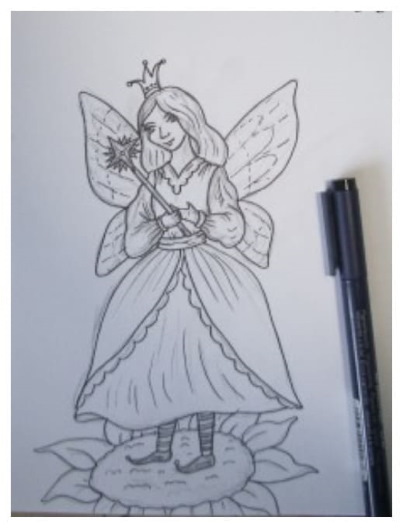 |
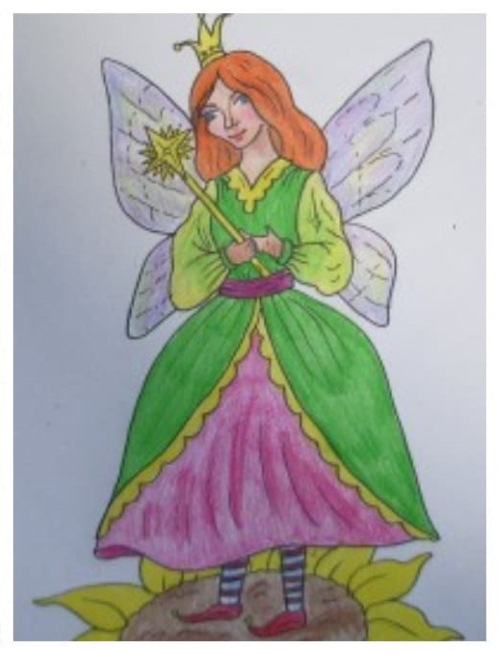
The image can be given rich colors. Fairies look more advantageous in bright green, yellow shades.
Useful tips
When drawing characters, you can use the following recommendations:
- When drawing a person with wings, it is necessary to maintain the proportions of the body. If a cartoon character with a certain body structure is not taken as a basis, then it should be given a more "human" appearance;
- when drawing a face, you can use auxiliary lines. They will help determine the symmetry of the features, and will also help you easily determine the correct position of the eyes, mouth and nose;
- to make the drawing more real, you can add individual shadows and colors to the face. Light strokes showing the texture of the skin and the location of certain elements can easily make the image better;
- It is also necessary to carefully monitor the drawing of the face in profile. Portraits should be distinguished by special detailing of eyelashes, lips and eyes, since all attention is drawn to these elements of the drawing;
- If cartoon characters are drawn, a certain template must be taken into account. Such characters have a sharp chin, a low forehead, small lips and nose, wide cheekbones and pronounced, large eyes;
- You can train your imagination in a simple way. To do this, just draw the outline of the character on paper, and then let the child draw clothes and any wings to taste. You can also let the child carry out his plans without any extra difficulties;
- It is quite easy to get a beautiful pencil drawing. After finishing the work, you can outline all the lines with a thin black marker, a sharp pencil or a gel pen.
Using these guidelines, you can easily draw a fairy with either a human body or a cartoon character.
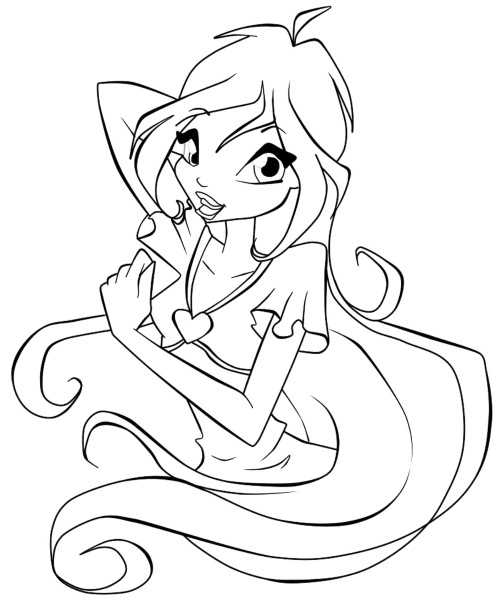
Coloring pages
If the child is still too young to draw even the simplest fairy on his own, he can be offered coloring books:
- Fairy Bloom - a popular character among the Bloom fairies. Distinguished by her abilities, kindness and attractive appearance. Suitable for children who prefer to work with reddish-brown colors, bright shades;
- Fairy Flora - a Winx Club member whose abilities are related to nature. Suitable for children who like to work with delicate pinkish and pleasant green shades;
- Tecna - is a fairy of technology. Often shown in the cartoon with computers and other devices, positioned as a diligent student. Suitable for children who like light shades of purple;
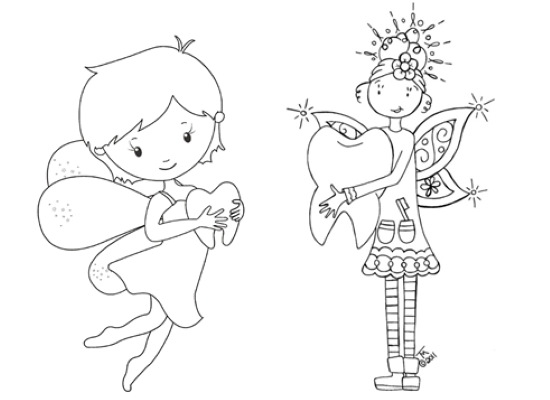
- Tooth Fairy – a character that parents often tell their children about. You can draw and color it in different ways.
When coloring, it is not necessary to fit the child to a template. With the help of different colors, it is necessary to give the child the opportunity to express himself.
Fairy is one of the many characters of folklore, a category of creatures. Many groups, divided by elements, are included in it. Fairies of the sea are often called undines, nymphs - creatures associated with the earth and nature. Each fairy can be drawn in different ways.
Depending on what power they have, they select colors for coloring. To make it easier for children to master the skill of drawing, you can use step-by-step instructions.
Video about drawing
Fairy drawing for kids: