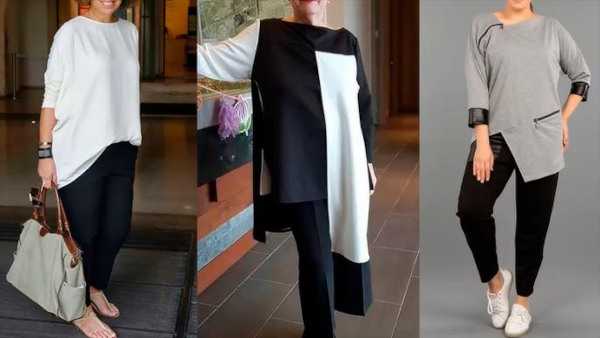
Tunic - this is clothing that is characterized by a loose cut, therefore, it fits plus sizes. It is knee-length or below and is often worn as outerwear.
The pattern of the tunic should take into account the features of the woman's figure.
Historically, the tunic was a typical garment for the inhabitants of the Roman Empire and Greece. It was a wide dress reaching to the knees or mid-thigh. The tunic was a symbol of social status: the richer the person, the more elaborate and decorated his tunic was.
In the modern world, the tunic has become a popular clothing model. It can be made of different materials - from lightweight cotton to silk or wool. The ideal option would be natural fabric, such as cotton, linen or silk. They will provide maximum comfort and excellent quality.
Tunics can have different styles – from simple and strict to more expressive and decorated with embroidery. Due to their versatility and convenience, patterns can be for different situations – from everyday look to formal evening.

They are often decorated with various decorative elements: embroidery, appliques or lace. You can choose a model with flounces, yokes or various decorative elements. But you need to take into account the individual features of the figure when choosing a pattern.
Schemes with description of works for beginners
When sewing a tunic, it is important to cut out its parts correctly. You can't rush, beginners should take measurements several times for accuracy. You also need to remember about seam allowances when cutting out each part.

The process starts with the shoulder seams, followed by edging the neckline and armholes if the garment is sleeveless. The side seams connect the front and back halves into a single structure. If the model has sleeves, then they need to be sewn in. Then the bottom of the tunic should be edged and ironed for a neat look.
At each stage of the process, it is recommended to iron the seams so that they fold easily and do not cause discomfort when worn. The seams should be pulled out to get rid of excess fabric and folds. It is also worth paying attention to the choice of stitches that will be used for sewing - they should be durable and aesthetically pleasing.
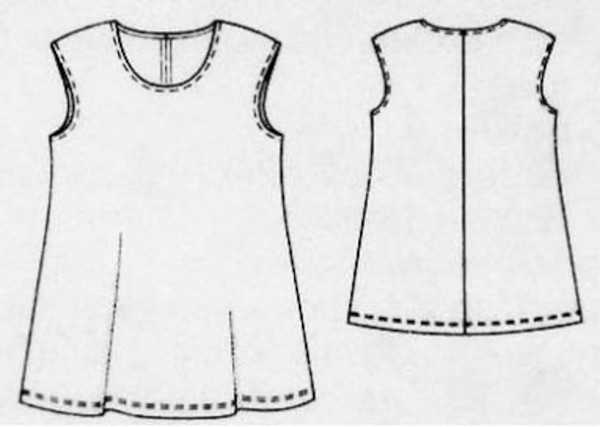
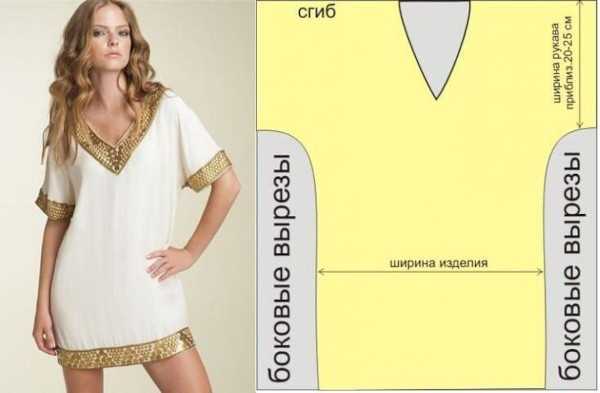
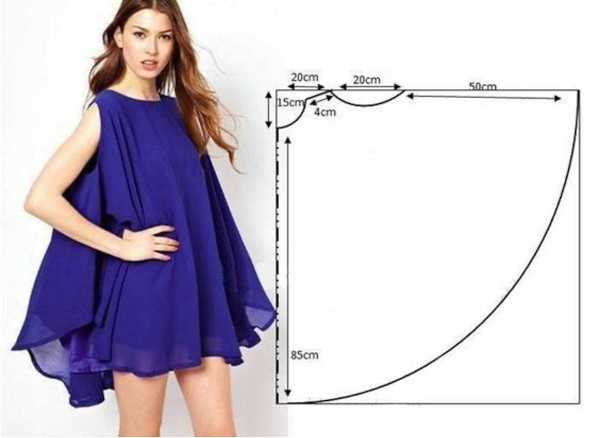
Sleeveless with flared hem and round neckline
To sew such a tunic, you will need a light and durable fabric, such as chiffon. Cotton jersey fabric is also an excellent choice, as it will provide comfort and ease of wear. Knitwear "smooth jersey" or "interlock" will do.
These fabrics have good elasticity if they contain stretch fibers, are pleasant to the touch and hold the shape of the product well after washing. One of the suitable fabrics can be viscose jacquard knitwear. This will provide the tunic with a stable shape when worn and washed.
The fabric consumption for sewing such a tunic for size 50 is approximately 0.8 m with a width of 150 cm. If the width is 100-140 cm, then about 1.6 m will be required. For the tunic, you will need the main parts: front and back.
Seam allowances are 1 cm for all parts except the neckline, where it should be increased to 2 cm. When sewing on an overlock, it is recommended to use a 4-thread stitch to ensure the strength of the connection of the parts.
To successfully create a sleeveless tunic, it is recommended to follow the steps and tips given:
- The tunic, the pattern of which is presented in this section, consists of the following parts: front, back, and 4 strips for edging the neck, bottom and armholes. Do not forget about seam allowances. Before starting work, it is worth applying the pattern to the body to make sure that the sizes and style of the tunic are correct.
- Sew the shoulder seams, joining the front and back panels. You can use an overlock or just sew with a sewing machine using a zigzag stitch.
- Sew on a strip for edging the neck. Secure it to the fabric and stitch along the edge, then carefully fold it to the working side and attach it with a blind stitch. This will make the neckline neat and even.
- Begin edging the armhole by basting the strip and fabric. Fold and sew the strip with a blind stitch.
- Join the side seams by sewing the front and back halves along the side edges. Hem with a straight stitch or overlock to prevent the fabric from unraveling.
- Secure the hem strip and hem it, revealing the hem. Finish the edging with a blind stitch.
- Iron the tunic. This will make it neater and give it a finished look. It is recommended to use the "cotton" setting on the iron and go over the entire surface of the product, carefully smoothing out folds and pulling out all the seams. Make sure that all seams are cut and ironed.
When working with knitwear, it is recommended to use a new sewing machine needle to avoid stretching the fabric. You need to choose a needle No. 65, 70 to avoid damaging the fabric. To preserve the shape of the tunic, it is recommended to wash it by hand or on a delicate cycle in a washing machine at a temperature not exceeding 30 ° C.
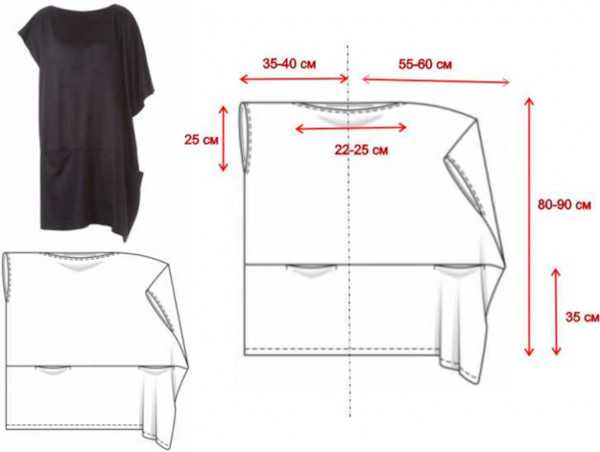
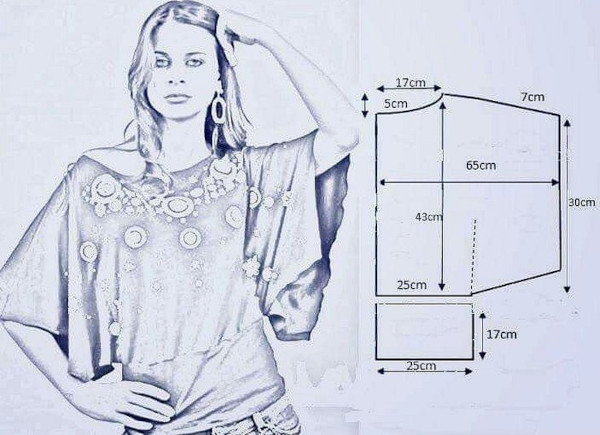
Loose tunic with boat neckline and one-piece sleeves
A loose tunic with a one-piece sleeve is a model that is very popular in the fashion world. It combines comfort and style, is great for everyday wear and is quite easy to sew.
For sewing this tunic, it is best to use a light cotton material that will be pleasant to the touch and will hold the shape of the product well. It is best to use a soft and light fabric such as cotton, chiffon or cambric.
When calculating the consumption for size 50, it is recommended to purchase about 1.5-2 m of fabric, depending on the length of the product and the width of the selected material.
In addition, when sewing, you need to use appropriate stitches: for the main seams - straight, and for the edging of the neck and bottom - decorative. It is important to remember that at each stage of sewing it is necessary to iron. This will make the seams more neat and will avoid folds or unevenness.
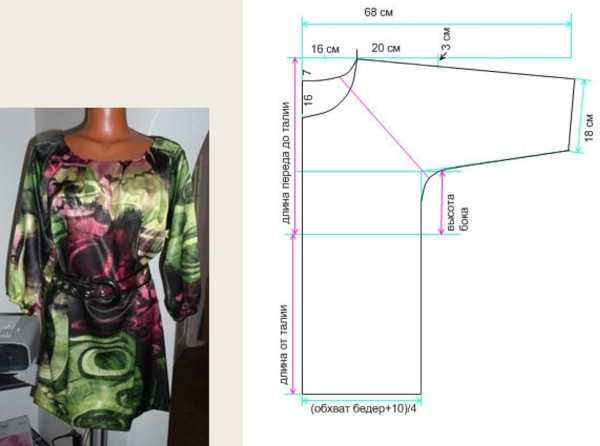
- Pattern details. The tunic consists of 2 main parts: the front and the back (back) with a one-piece sleeve. To create a spectacular boat neckline, you need to pay special attention to the formation of the neckline. Seam allowances of approximately 1-1.5 cm should be added to each detail to ensure a comfortable fit.
- Connect the back and front pieces along the shoulder seams. To do this, place the pieces face to face and stitch them together manually with thread and needle. Sew on a machine or overlock, pull out the basting.
- Neckline edging. Here you can use a lining tape or a pre-prepared piping from the main fabric. Apply the piping to the neckline with the right side facing the right side and baste it along the edges of the neckline. Stitch, remove excess threads.
- Sew the side seams. To do this, first connect the sleeves, and then continue sewing the side seams from the armpits to the hem.
- The hem of the tunic is folded using 2 seams. First, sew the seam allowance to the bottom edge of the wrong side of the tunic, then turn the hem and attach it with a straight stitch. In the first case, 1-2 cm inward, and in the second, 3-4 cm outward.
- Ironing. Carefully iron all seams and folds to ensure a neat and even appearance. It is recommended to use an iron with adjustable temperature and steam for best results.
Straight cut with a bob neckline and wide set-in sleeves
A straight cut tunic with a bob neck and wide sleeves is stylish and comfortable clothing that is easy to wear on a daily basis. This clothing model is easy to sew and requires a minimum number of parts.

First, you need to choose the right fabric. Light natural materials such as cotton or linen are best. You can use viscose or staple. The approximate consumption for size 50 will be about 0.85 m.
When choosing a fabric, you should consider its density and structure. The fabric should be soft and elastic to ensure a comfortable fit of the tunic. You should also pay attention to the selection of threads - they should match the color and quality of the fabric.
Step by step sewing process:
- Pattern details. You will need the following pattern pieces: front and back, sleeve halves and neck strips. Be sure to add seam allowances, approximately 1-1.5 cm on each seam.
- Start with the shoulder seams. Transferring the front half to the back half with the right sides facing inward, stitch the shoulder seams at a distance of 1 cm from the edge. They can be done with a regular stitch or use the “French seam” method for a neater look.
- Neckline edging. Fold the edges of the neck inwards by 0.5 cm and pin them. Then stitch the edging at a distance of about 0.2 cm from the edge. You can use a special tape for edging or stitch it on a machine and then process the border.
- Sew in the sleeves. It is important to choose and measure the sleeve length correctly so that it matches your personal preferences. Place the sleeve halves on the cut armhole halves, placing them with the right sides together. Secure with pins and stitch, leaving 1 cm on the seam. It is recommended to use a blind stitch for reliability and neatness.
- Side seams. Place the front and back parts of the tunic with the right sides together and stitch the side seams at a distance of 1 cm from the edge. It is important to apply the fabric pieces correctly and stitch the seams carefully so that they are even and do not cause discomfort when worn.
- Hemming the bottom. Here you can use the double hem method or simply stitch the edging on the machine. To do this, fold the edge of the tunic inward by 1 cm and attach it with pins. Stitch at a distance of 0.5 cm from the edge.
- The last step is ironing.
After each step outlined, iron the seams and individual parts of the tunic. It is recommended to straighten and gather the seam lines so that they lie evenly and neatly.
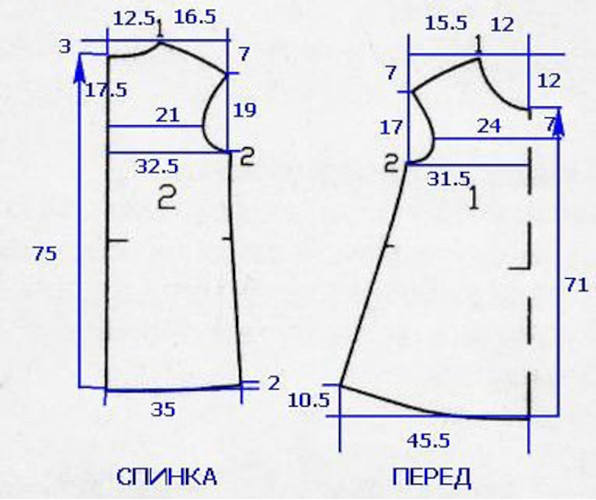
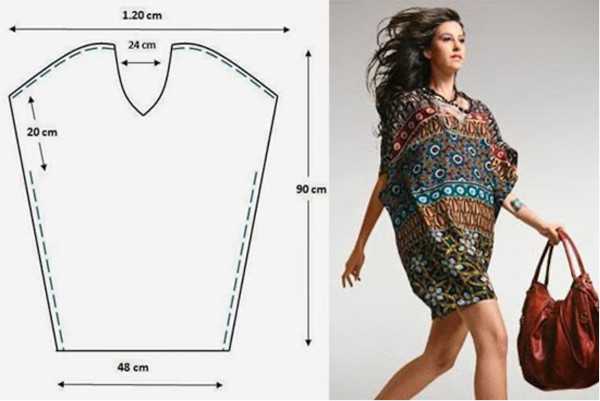
Beach tunic, tapered at the bottom, with a V-neck, sleeveless
A beach tunic is an essential part of a summer wardrobe, which allows you to emphasize femininity and create a stylish look on the beach. A sleeveless tunic tapered at the bottom is a particularly attractive option.
However, in order for such a tunic to fit perfectly on the figure, it is necessary to take into account some details when sewing it. Firstly, the choice of fabric plays an important role. It is advisable to choose a light and transparent fabric, such as chiffon, to create a spectacular beach model.
This material is ideal for beachwear as it is lightweight, soft and drapes beautifully. For size 50 you will need approximately 1 m of fabric depending on the width.
In addition, seam allowances should be no more than 1 cm to avoid excess volume in the fit area.
The tunic, the pattern of which is made before the sewing process, consists of the front and back parts of the product, as well as strips for the neck and armhole. It is necessary to prepare the most accurate measurements possible so that the tunic fits perfectly on the figure.
Sewing process:
- Connecting the front and back parts of the tunic with shoulder seams. Before sewing, it is recommended to iron all the edges of the parts to get even and neat seams.
- Finish the neckline edging. It is worth using a special tape for edging the neckline - this will help the product to retain its shape even after repeated washing. Put the strip for the neckline along the neck opening and sew them together using a zigzag stitch or another decorative stitch suitable for chiffon. Be sure to iron the edging for a neat and even look.
- Finish the armhole for the sleeves. Finish the side seams within the armhole, sewing them together. Make sure the fabric is stretched so that no folds or excess stretchy material form. This will help achieve a more aesthetic and comfortable silhouette.
- Sew the side seams, starting from the armhole and moving towards the bottom of the tunic. It is recommended to use elastic. This seam allows the fabric to stretch and not tear the threads when worn. Iron so that the seams lie in one direction.
- Hemming the bottom of the tunic. Measure the desired length of the beach tunic and make a hem, securing it with a double stitch on the machine. Iron the hem to complete the design of the bottom of the tunic.
- Iron the finished tunic at medium temperature through damp gauze or thin fabric.
It is necessary to iron each stage of work to obtain even lines and a harmonious appearance of the tunic.
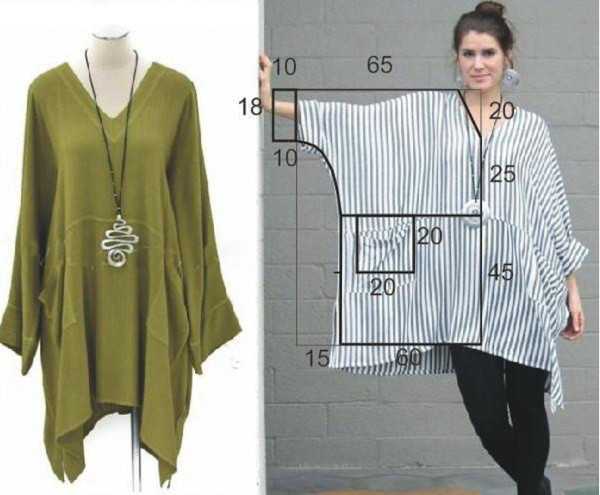
Boho with a V-neck, one-piece sleeves and patch rectangular pockets
The tunic, the pattern of which is presented for large sizes, is a model with one-piece sleeves and patch rectangular pockets. Boho is suitable for a variety of occasions - from everyday walks to evening events.
To sew such a tunic for size 50, you will need a soft and elastic fabric, such as knitwear. It is best to use natural materials, such as jersey or footer. They have the necessary elasticity and also hold their shape well. The fabric consumption for making this model is approximately 2 m.
To sew it, you need to do the following:
- Pockets. Cut out rectangles of fabric of the desired size with seam allowances (approximately 2 cm on all sides). Iron the seam allowances to the inside of the pocket. Then sew the pockets to the front of the tunic, holding them in place with 2 stitches.
- Shoulder seams. Connect the front and back halves of the tunic, applying and sewing them along the shoulder seams. Iron the seams towards the back of the tunic.
- Neckline edging. Cut the edging along the neck from jersey. Sew the edging to the neck, matching the edges. Iron the seam allowance of the edging down. Make a stitch of the edging on the neck to secure it.
- Sleeves. Fold the sleeves in half and sew along the seam allowance line. Measure and mark the sleeve length with seam allowance (about 2 cm). Iron the seam allowance to the inside of the sleeves. Attach the sleeves to the armhole, aligning and sewing them to the armhole. You can sew the sleeves with a straight stitch to ensure the reliability of the product.
- Side seams. Connect the front and back halves of the tunic along the side seams. Sew and iron the seams towards the back.
- Hemming the bottom. Make a hem at the bottom of the tunic, determining its length. Iron the seam allowance to the inside of the bottom of the tunic, and then stitch on the hem to secure it.
- Ironing. Iron each seam well, as well as the entire tunic as a whole. This will give the product a neater look and help it retain its shape.
It is important to remember to use the correct stitches to ensure a neat and durable product.
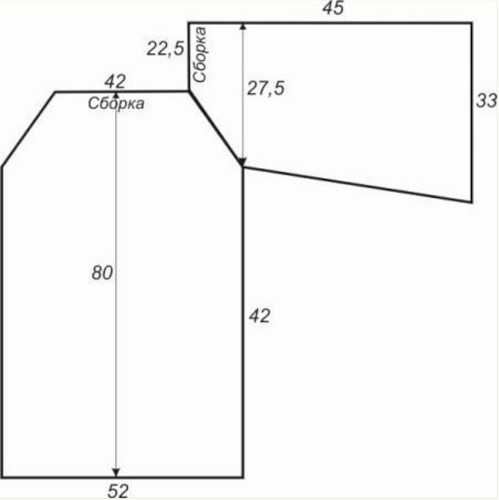
With a deep round neckline, one-piece wide sleeves and a narrow wide belt
An important aspect when creating such a tunic is the choice of the right fabric. To achieve the desired effect, it is recommended to use a soft and elastic fabric, such as "cold oil". The fabric consumption for a size 50 tunic will be about 1.5 m.
Before sewing, it is important to make a pattern. First, you need to determine the main details: the front and back of the tunic with one-piece sleeves and a belt. You should pay attention to the seam allowances, which are 1 cm on the side seams and armholes and 1.5 cm on the rest.
Steps for sewing a knitted tunic using a pattern:
- Shoulder seams. Place the front and back of the tunic with the right sides together and stitch the shoulder seams using a straight stitch.
- Neckline edging. Sew the neckline trim, positioning it along the edge of the neckline. Use a zigzag stitch for a neater result.
- Armhole edging. Sew the armhole edging, connecting the back and front of the tunic along the side seams to the armhole line.
- Side seams. Sew the side seams of the tunic, starting from the lower part of the armhole and ending at the bottom. Use a “straight” stitch.
- Belt at the bottom of the tunic. Sew on the belt by folding it in half and stitching it along the edge of the lower part of the tunic. Secure it with a straight stitch.
- Ironing. Use an iron with the knitwear setting.
It is important to remember the importance of ironing at every stage of the sewing process. This will help to achieve even stitches and make the product more neat. It is also recommended to use special ironing products to avoid damaging the material.
When working with knitwear, it is recommended to use seams such as "stretch" or "zigzag". They provide elasticity and prevent the material from stretching.
"Sun" with a round neckline, sleeveless
The sleeveless Sun Tunic is stylish and comfortable clothing that is suitable for any occasion. It can be made from various fabrics, depending on preferences and season.
It is ideal for the summer season, as it provides comfort and freedom of movement. Light and pleasant to the touch materials such as cotton or silk are best. The calculation of fabric consumption for size 50 will be approximately 1.8-2 m.
The tunic, the pattern of which can be made independently or taken ready-made, is presented with a round neckline suitable for the "Sun" model. Seam allowances are usually 1-1.5 cm.
Once the pattern is ready, you can start sewing the tunic:
- Sew shoulder seams. Place the front and back parts of the tunic with the right sides together and join them at the shoulders. Sew the seams on a machine or overlock. Carefully iron the seams.
- Hemming the neck. Fold the edges of the neckline inward and secure along the entire length of the neckline. Machine stitch with a low stitch density. Iron the neckline so that it lies flat.
- The armhole hem is done in a similar manner. Fold the edges of the armhole inwards and pin them in place. Machine stitch and iron the armhole.
- Sewing side seams. Place the front and back parts of the tunic with the right sides together, join the side seams and sew them on a machine or overlock. Iron the side seams.
- Hemming the bottom. Fold the edge of the tunic inward and secure it with pins or basting. Using a single or double stitch, machine stitch and iron the bottom.
- An important step is to iron the entire tunic.
Modern designers offer a variety of tunic styles, creating different patterns that can be combined with both classic trousers or skirts, and with more daring combinations such as leggings or jeans.
Video about women's tunic
How to sew a summer tunic: