The polar bear is considered the king of the northern regions of the plan. It is accustomed to harsh conditions and is able to survive at temperatures of -50 ° C, while swimming in the cold waters of the Arctic Ocean. It is the largest animal among predators. It is almost impossible to see it in natural conditions, so adults and children visit zoos or admire it in paintings or photographs. If desired, it you can draw it yourself, armed with a sheet of paper and writing instruments.
How to draw a bear with a pencil
Drawing a polar bear for children will not be difficult if you follow the tips and the order of the drawing stages. For a simple drawing, you need to prepare a sheet of paper, a sharpened pencil and an eraser.
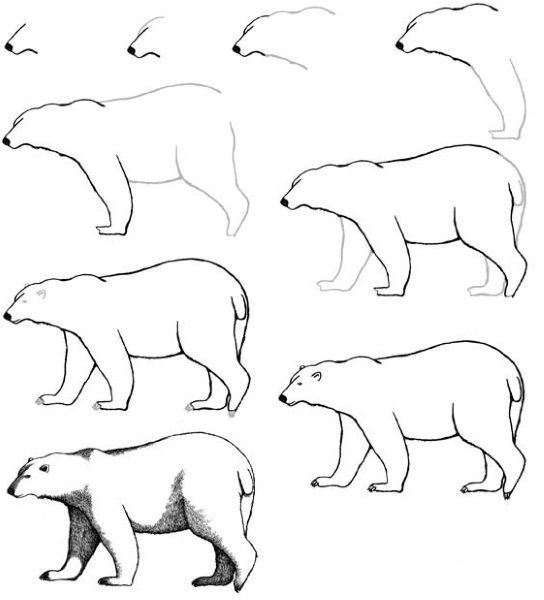
The work can be conveniently divided into 4 main stages:
| No. | Stage | Description |
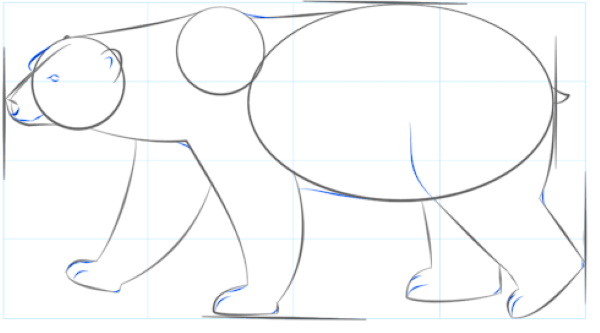
| 1 | Working on the image of a bear | 1. To make the animal look realistic, sketch its head, body and short legs. At the same time, you should try to give the bear's legs power. All the legs should be the same size. 2. On the head, mark the place where the eyes will be located. This is done with a horizontal line. 3. Draw small ears on the top of the head. When drawing the details of the head, do not press too hard on the pencil so that you can always correct any mistakes that may appear. |
| 2 | Detailed drawing of eyes | 1. Draw small round eyes.
2. From them draw a thin line of the nose, and finish it with a small triangle. This will be the tip of the nose. 3. Below the nose, place the mouth, which is easiest to draw by drawing a short arced line. 4. Use an eraser to remove everything that is no longer needed and begin drawing the volumetric fur. All auxiliary lines, as well as pencil marks that were drawn accidentally or by mistake, are subject to removal. |
| 3 | Working on the bear's fur | 1. Draw abrupt smooth lines. The fur should be present almost everywhere: on the head, limbs, stomach. It is also important to remember that the bear has a so-called wool "collar", which is located near the head.
2. For more fur, use your imagination to add strokes all over the body. |
| 4 | Adding the finishing touches | 1. Highlight the eyes.
2. Shade the nose with a pencil. 3. Make the contour lines more distinct. When shading the nose, make the nostrils darker. |
How to paint with gouache
A polar bear painted with gouache will require the following materials:
- paints;
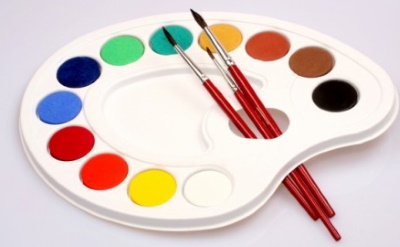
- stencils;
- A4 colored paper;
- palette;
- several brushes No. 1-3.
The stages of work are as follows:
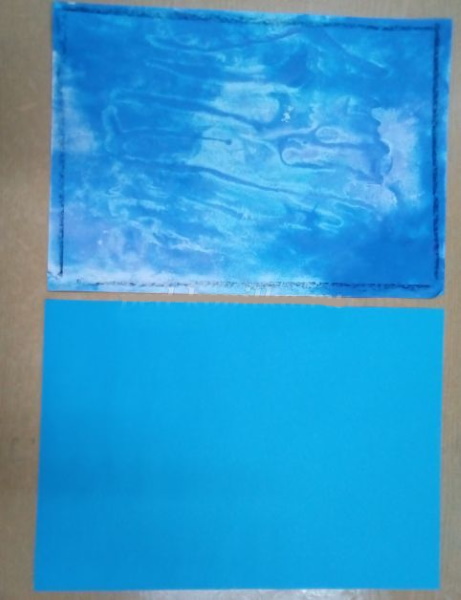
- Prepare a background sheet. It should be blue. It is recommended to paint several sheets in different shades of blue, then, without letting them dry, put them on top of each other and then, shifting, separate. After drying, you will get a background with blue streaks.
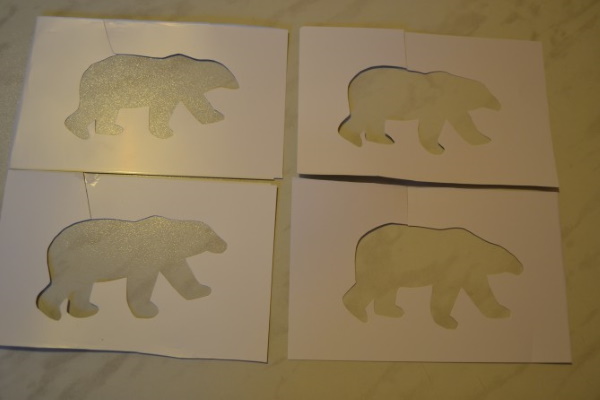
- Make stencils using a bear silhouette and carbon paper. The image needs to be divided into several parts. The back side is covered with tape. Then you need to carefully cut out, leaving small bridges. When drawing bridges, the main parts of the bear's body should be separated from each other. We are talking about the head, body and limbs. You can arrange the stencils on the sheet at your discretion, but you should think about their location and quantity in advance.

- Place the stencil, which has the same color as the background, on the sheet. Then press both sheets firmly against each other.
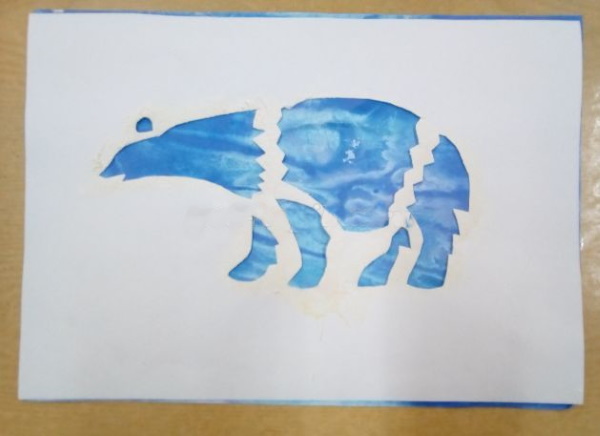
- Perform careful stamping of each fragment.
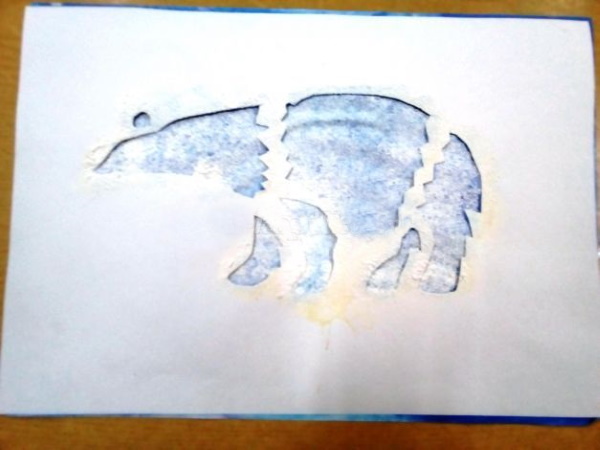
- Remove the stencil before the gouache dries. Be careful not to smear the paint. Paint over the remaining white stripes to make the bear's silhouette whole.
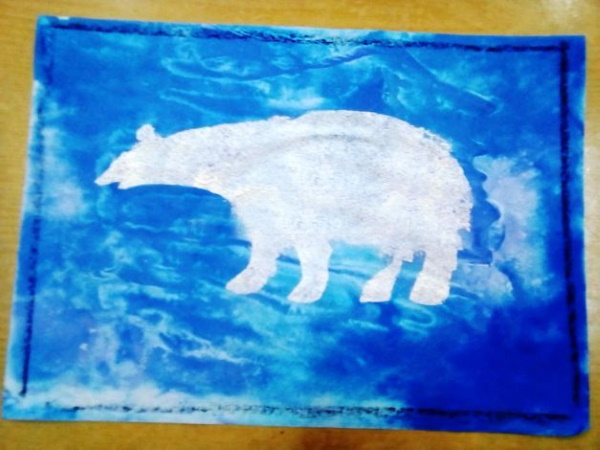
- Paint the ice floe on which the bear stands with all his paws. In this case, you need to work with a wide brush, creating horizontal traces. A little space needs to be left for the crack near which the white animal stopped.
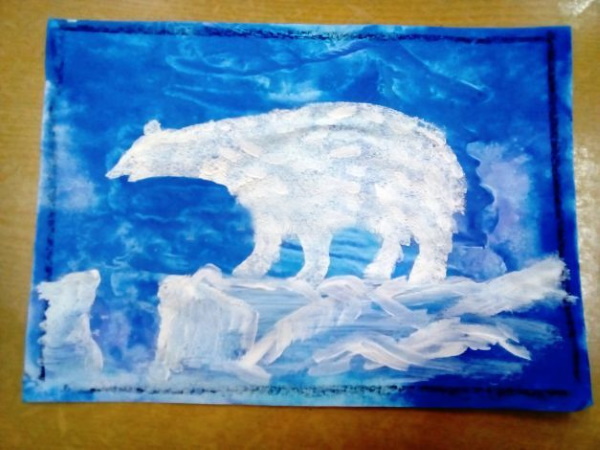
- Depict small snowdrifts.
- Show water or dark ice in the crack.

Using a thin brush and black paint, add a nose and an eye to the face, and several claws to each of the 4 paws.
With paints
To draw a polar bear for children with paints, you should prepare:
- flat brush No. 8, round brushes No. 3 and No. 5;
- container with water;
- palette;
- paints;
- blue cardboard.
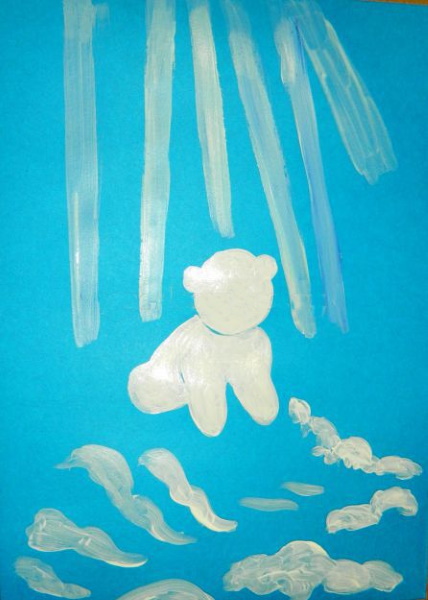
The steps for creating the image are as follows:
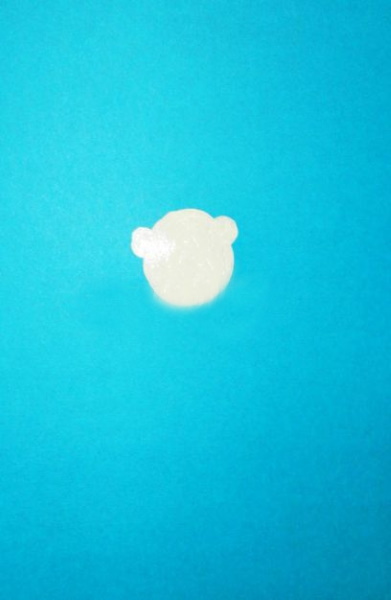
- In the center of the sheet, use brush #5 to draw a small circle that will become the bear’s face.
- On the side, just above the middle of the circle, draw the ears, which are also drawn in white.
- Proceed to drawing the body and 2 front limbs. Since the bear is sitting on a hill, its back legs are not visible in the drawing.

- The background will be northern blue, so at the top of the sheet, above the bear, draw many vertical stripes using white color for this.
- Draw white snowdrifts at the bottom of the sheet.
- Mix white gouache with a small amount of blue and draw several stripes on the top of the sheet, placing them between the white ones. The same color is used to shade the snowdrifts.
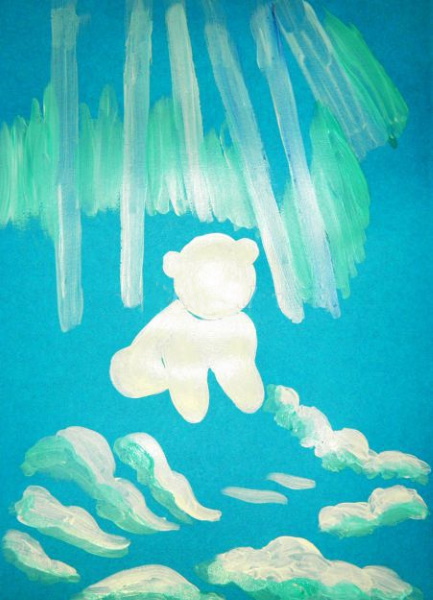
- Mix white with yellow and use the resulting mixture to add flowers to the bottom of the glow. Make a few strokes on the snowdrifts.
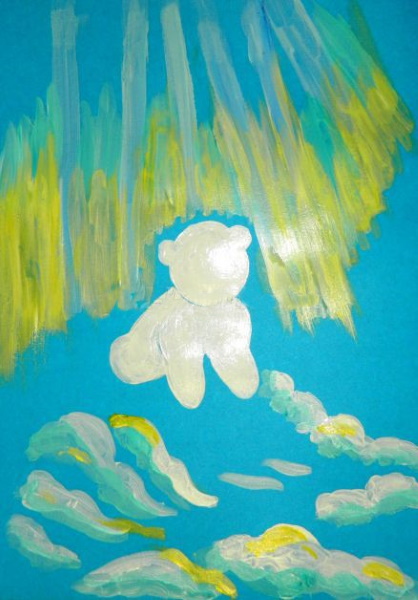
- Ruby color mixed with white, which should result in a soft pink. This mixture is used to add flowers to the top of the glow. Also, the snowdrifts at the bottom should have soft pink reflections.
- Use purple to draw the horizon line, but it should be wavy, not straight. The same paint is used to outline the hill on which the bear sits.
- Detail the teddy bear.
- Use black to draw round eyes and a nose, as well as a mouth line and claws on the paws. There should be light brown strokes on the ears.
Ready.
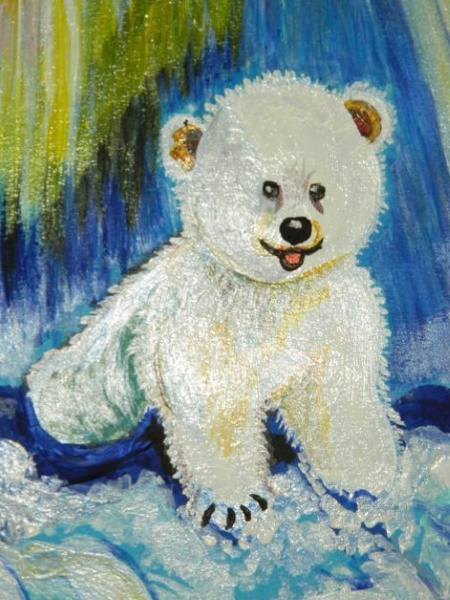
Bear's face
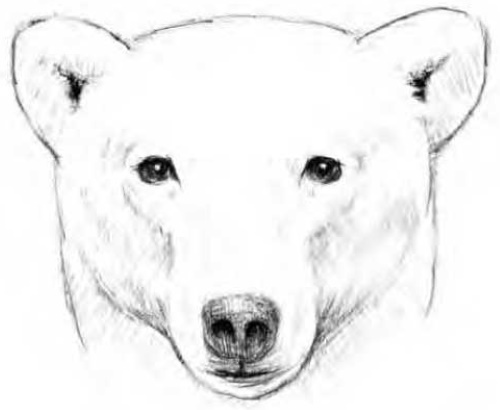
The muzzle is one of the most important parts of any animal. It should be drawn with maximum precision and realism.
To maintain the correct proportions, it is important to adhere to a certain sequence of work:
- Make the contours of the head. You should start not with a circle, but with a rectangle. It should be depicted horizontally: the figure should be positioned so that its 2 horizontal sides are longer than the 2 vertical ones.
- Inscribe an oval into a rectangle. Then use a pair of perpendicular lines dividing the oval into 2 symmetrical halves on the left and right and into 2 symmetrical halves on the top and bottom to determine the center of this oval.
- Draw one diagonal from both upper corners of the rectangle. They should both “meet” in the center of the oval. In the place where they intersect, outline the eyes. It is important to remember this feature of the structure of the polar bear’s visual organs: its eyeballs are set wide apart. They need to be carefully drawn to reflect the expressiveness of the bear’s gaze. Many draw the eyes as black circles along the contour, and leave white highlights in the center. It is important to monitor the proportions of the visual organs in relation to the entire muzzle. The eyes should not be too large or, conversely, too small.
- The ears are placed slightly above the eyes. They should be designed taking into account the direction of the fur and their location. You need to start detailing the ears with simple shapes, layering more and more elements with each subsequent step.
- The point that is the center of the oval will be the upper part of the nose. This part of the muzzle is easy to draw. First, you should emphasize its depth in the center. Then it smoothly diverges in different directions. First, draw a circle. Then divide it with perpendicular lines and depict the nostrils. The remaining roundness of the muzzle is from the center and perpendicular axes, depending on what breed the bear belongs to.
- Draw the mouth and chin.
- When all the details of the face are drawn, move on to the neck. This animal has a very short neck.
- To make the drawing of a bear's muzzle more realistic, remember about shadows. Thanks to them, the picture will also become more rounded and elongated. You can play with lightening and darkening to create different effects. Highlights and shadows are best seen near the nose.
- To depict the fur, use the soft shading technique. It should be applied from the nose to the rest of the muzzle.
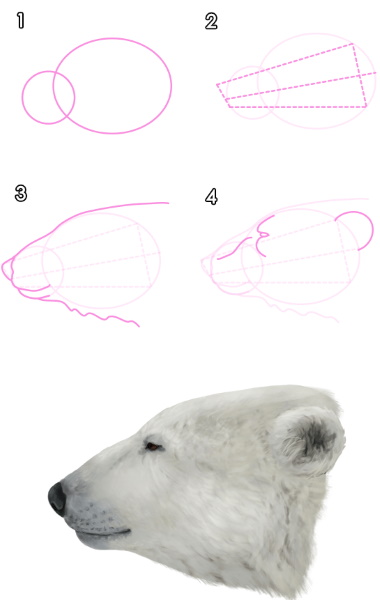
When drawing a bear's face in profile, the following guidelines should be followed:
- This work begins with outlining the main contours. At the same time, markings are placed.
- The head should always be represented by a pair of ovals. A trapezoid is drawn on top of them, which should be divided into 2 equal parts.
- The angle of the figure depends on what breed the bear belongs to.
- All the main details of the upper part of the face - eyes, nose and ears should be located on one line. The ears are usually given a place between the two upper lines of the trapezoid.
The eyes are where the ovals intersect. The line running through the center is responsible for the tip of the nose. And the bottom line determines where the chin will be directed.
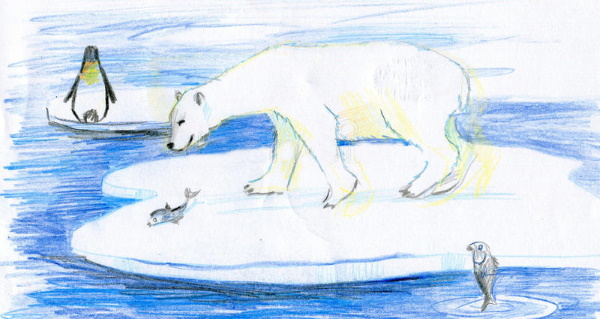
On the ice floe
A polar bear (a drawing for children can include cartoon characters) sitting on an ice floe can be drawn as follows:
- Draw an oval on which draw another one – a little bigger. The two ovals should intersect so that the first one protrudes slightly upwards. This will be the outline of the head.
- Remove all internal lines.
- Draw a tuft of fur on the top of the head – a kind of bangs. To do this, apply short curved lines. Draw the ears in a similar way. In this case, there should be one arc line inside each organ of hearing. Then you can delete the guide lines from the bangs and ears.
- In the middle of the muzzle, draw a couple of ovals that will become the eyes. Above each eye there should be a short arc. These will be the eyebrows.
- Draw another oval at the bottom between the eyes, which will become the nose.
- Draw an oval shape around the nose using 2 curved lines. Between these lines, under the nose, there should be a mouth, which is also depicted using an arched line.
- From the head down, draw curved lines outlining the front paws. At the end of the paws there should be short curved lines to distinguish the toes.
- Draw ovals inside the eyes. These will be the pupils.
- Draw one oval next to each paw - to the right of the right paw and to the left of the left paw. These will be the hind limbs. There should be an arc at the top of each of these ovals. Immediately below it in the foot are 3 small circles, and even lower (approximately in the center of the foot) is an oval stretched horizontally.
- The bear itself is drawn. It remains to "plant" it on the ice floe. To do this, you need to draw an irregular rectangular shape under it. The figure should look like a rectangle, but with wavy lines.
- In the resulting irregular figure, draw several horizontal wavy lines that will show cracks in the ice.
- Draw a wavy line from the left end of the paper sheet to its right end behind the bear cub, just below his neck. This will be the horizon. It should be wavy to indicate the presence of water. Also draw several short wavy lines horizontally around the ice floe.
Colour the picture using:
- blue color – for water;
- blue – for ice floes;
- gray – for feet;
- black – for the nose;
- pink - for the pads of the feet and the inner surfaces of the ears.
Beast with fish
Polar bears in natural conditions feed mainly on fish, so you can draw the white predator with prey in its teeth. It can be located on an ice floe. It is drawn according to the same principles that were used in the above examples. You can also put a fish in the bear's paws, place it on an ice floe or depict it jumping out of the water.
The fish itself is drawn simply:
- its body can be represented as an oval;
- there is one fin at the top and one at the bottom, each of which is a triangle;
- at the back a tail is visible, resembling a crescent moon;
- In the front part of the oval there is an eye, represented by a small circle.
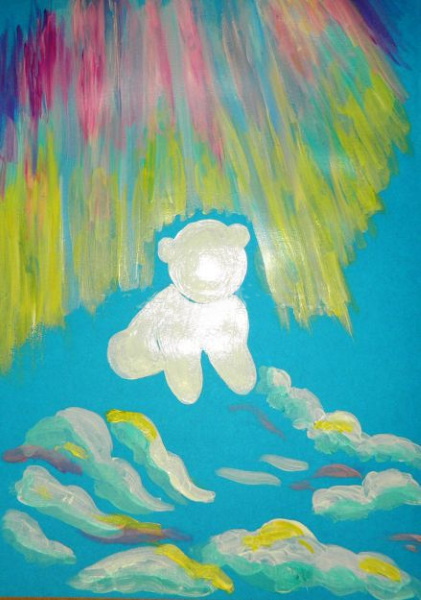
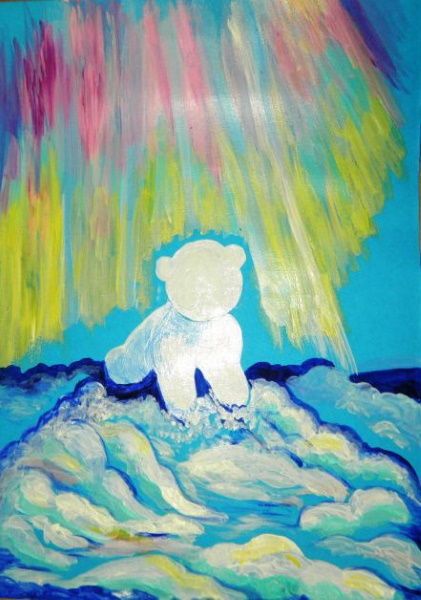
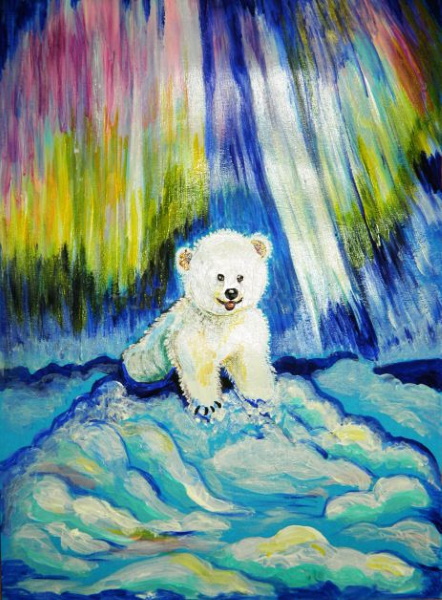
With the Northern Lights
The child will love the polar bear, which is set against the backdrop of the northern lights.
To work you will need:
- colored cardboard;
- gouache;
- simple pencil;
- several hard brushes of different sizes;
- vessel with water;
- palette;
- Polar bear stencil.
The stages of the image are as follows:
- Make a stencil. To do this, you need to apply a sheet of paper to the screen and trace the outline. Then, cut out a figure along the outline and attach it to the cardboard. Now you can cut out the same figure from cardboard.
- Prepare a background for the drawing. Since the northern lights can only be seen at night, you should take black paper. This will be the night background.
- After applying the stencil, trace around it. Do not press too hard on the pencil.
- Proceed directly to working with paints. It is necessary to take white gouache and paint the outline of the bear, using the technique of "poke with a hard brush".
- Choose the right colors for the shine. You can opt for a cold range. Add a little white to each color you choose.
- To draw the shine, use a dry sponge. Move it from top to bottom. The colors can be used in the following order: blue, green, emerald.
- Detail the bear's face. Using the sharp end of a brush dipped in black paint, outline the eye, nose, and mouth. The eye and nose will be represented by a dot, and the mouth by a short arc.
- Use a sponge to draw ice floes and snow around the bear.
To draw a polar bear beautifully, you don't have to be a professional artist. It's important to explain this to your child before they start drawing. It's enough to practice drawing the animal a few times to make it seem more realistic. Even children can do this.
Polar Bear Drawing Video
How to draw a polar bear: