To make a good drawing of a hippopotamus, you must first pay attention to the proportions of its body. This is a massive animal, whose weight reaches 4 tons or more (the same as an elephant). But it has short legs and it is difficult for it to move on land, since it spends most of its time in the water.
For children, you can choose different interesting options for master classes to beautifully and easily draw a hippopotamus with a pencil.
Simple drawing of a hippopotamus
Hippopotamus (drawing for preschool children) can be depicted in the form of elementary geometric figures, facilitating the construction of its body. For work you will need colored pencils or markers.
Step-by-step drawing of a hippopotamus is done in the following sequence:
- Draw a medium-sized circle slightly to the left of the center of the sheet; this will be the animal’s head.
- To the left of the head, draw an angle that will later become the hippopotamus's open mouth. In real animals, the mouth really does open very wide - 150°, and the width of the jaws themselves reaches 70 cm.
- Draw an arc at the top of the head.
- Add a slightly smaller arc at the bottom.
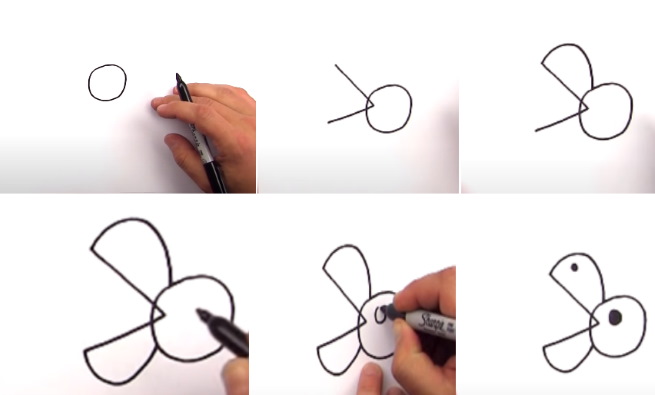

- At the top of the head, draw a small circle and paint it black – the hippopotamus’ eye.
- On the upper jaw, draw a smaller circle – a nostril.
- Draw a large square tooth in the mouth.
- Draw the same at the end of the lower jaw.
- Make a small round ear on the top of the head.
- To the right of the head, draw a large oval body.
- Draw 4 short sections from the abdomen.
- Connect two adjacent sections together at the bottom.
- Draw a line in the middle that will divide the strip into 2 legs.
- Do the same with the second pair of legs.
- On the back of the body, draw a small triangular tail.
- Colour the hippopotamus with a blue pencil or marker.
You can also show the ground level in the drawing with a horizontal line and color the bottom of the drawing green.
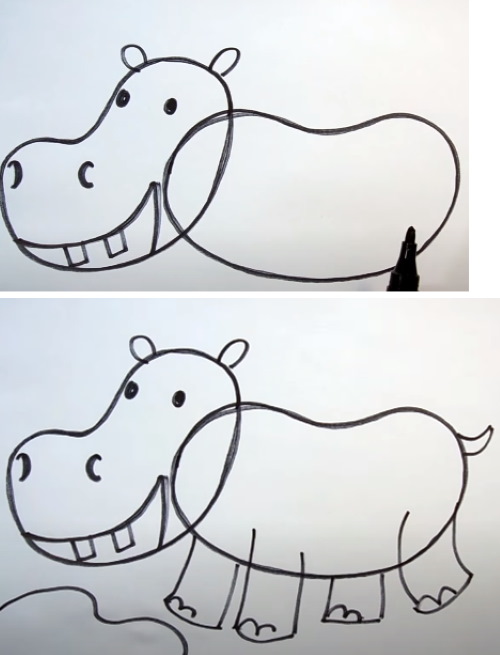
Cartoon hippopotamus
In this example, the hippopotamus is also drawn using simple shapes. To create a cartoonish look, the animals have large eyes and pupils, and the mouth is depicted as a long curved line. Streamlined, round shapes also give the drawing a childlike naivety and spontaneity. To create the drawing, you need colored pencils or markers.
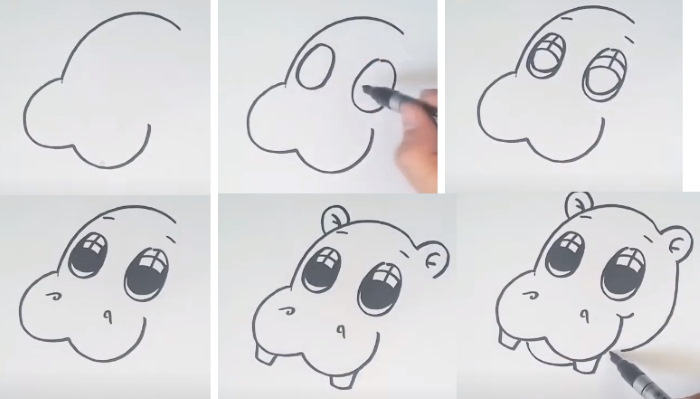
The drawing process can be described as follows:
- At the top of the album sheet, draw an arc tilted to the left.
- Continue the outline, adding another arc at the bottom – the hippo’s cheek.
- Draw the same arc on the right – the second cheek.
- Draw two large oval eyes at the top of the head.
- Draw short, raised eyebrows above the eyes.
- Inside the eyes, make two convex arcs that divide them approximately in half.
- Draw two crosswise lines at the top of the eyes (these will be highlights).
- At the bottom of the eyes, draw another arc that will form the outline of the pupils.
- Paint the pupils as shown in the picture below, leaving the “windows” – the highlights on the eyes – white.
- Draw 2 curls under the eyes – the hippopotamus’s nostrils.
- Draw the front teeth in the form of trapezoids. Real hippos have several large fangs that can stick out even from a closed mouth. They are used by the animal as a weapon, not for chewing food.
- Draw two ears on the head. Make the right one larger in size, since it is in the foreground.
- On the right, the animal's head is limited by a smooth line.
- The lower jaw is also shown as a short arc between the teeth.
- Draw the animal's body with an "S"-shaped line. Show the neck as short.
- Draw the front paw. The hippopotamus will stand on its hind legs, so it is raised. Show the plane of the sole with a small arc at the end of the paw.
- Draw 3 toes along the upper contour of the sole. Real hippos have 4 toes on each paw, at the end of which there is some semblance of hooves. Between the toes there are membranes that help the animals swim in water, and on land these membranes create a large support area, thanks to which the hippopotamus does not fall through the mud.
- Draw the second front paw, bent towards the first.
- Draw the animal's belly as an arc hanging down under the paws.
- Draw the hind leg as a short rectangle, bent approximately in the middle.
- Draw the second hind leg in the background as straight and shorter.
- Draw the tail in the form of a short triangle.
The finished cartoon hippopotamus can be colored blue or pink. Real hippos have a gray-brown skin with a pinkish tint. There is practically no fur on it. The skin on the belly is pinker.
Hippopotamus in the water
The hippopotamus (the drawing for children in this master class can also be made by younger children) spends most of its life in the water. It allows them to reduce the heavy load on their paws. When the animal comes out on land, its skin, which can be up to 4 cm thick, dries out very quickly.
In this example, the animal will be drawn in the water, where it sits with its head or part of its back sticking out. The hippopotamus feeds, coming ashore at night.
To do this work, you will need colored pencils. The contours can be pre-marked with a simple graphite pencil, which can be easily corrected with an eraser. To make the contours brighter, they are outlined with a black felt-tip pen or marker.
Drawing is carried out in the following sequence:
- Draw a pear-shaped, massive head of a hippopotamus.
- Draw the animal's eye in the shape of a large oval, and make 2 more ovals inside.
- Paint the middle part of the eye black.
- Make a second one just like this one, close to this eye.
- Draw two small arcs one under the other on the left side of the muzzle. This will be the nostril.
- In the lower right part of the muzzle, make a second nostril of the same type.
- Draw small ears at the top of the head.
- Draw 2 protruding fangs in the form of rectangles on the jaw.
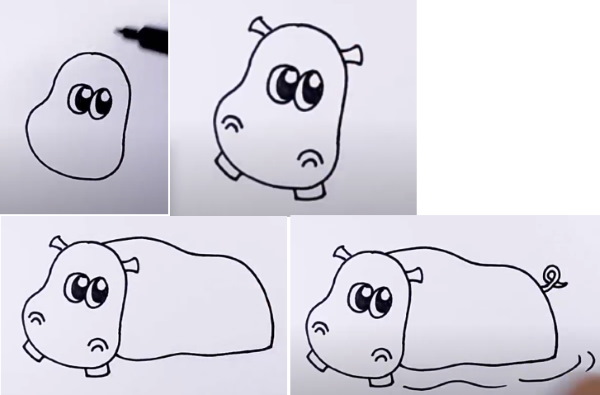
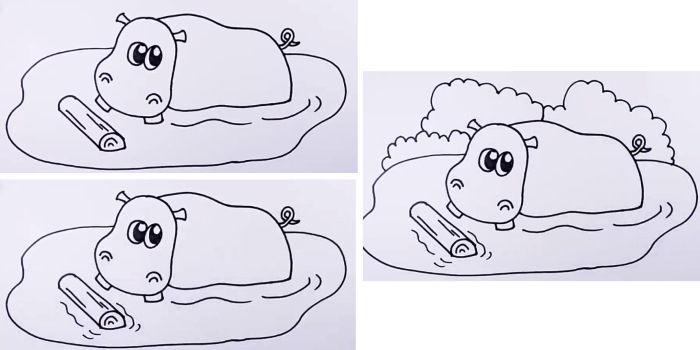
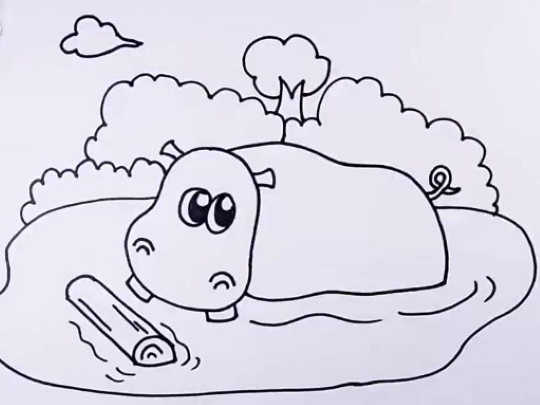
- The animal's body should be shown in the form of a large "potato". It should be slightly flattened at the bottom, since the hippopotamus will be in the water.
- Show the water in the belly area as parallel lines - circles diverging across the water from the animal's carcass.
- The tail can be depicted as a "curl", like a pig's. In real hippos, it is thick and triangular at rest, but when raised, it takes on approximately this appearance.
- Draw 2 parallel segments in front of the hippopotamus's muzzle - this will be a log.
- Between the segments draw an arc - the cross-section of the log, in the lower part make it in the form of a slightly curved line, and inside draw the lines of the rings.
- On the top of the log, also draw a few straight lines that will better show its round shape.
- Draw an oval line with jagged edges – the “lake” in which the hippopotamus stands.
- Near the log, use thin parallel lines to show circles spreading out across the water.
- In the background, draw the bushes in a simplified manner using a wavy line.
- Draw a straight tree trunk and a tree crown.
- In the sky, make one cloud in the form of a wavy outline.
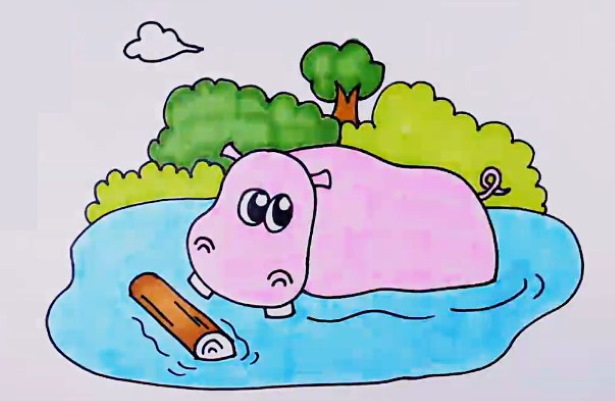
- Paint the hippopotamus's body and head pink, the log brown, the water blue, and the bushes in the background and the tree green.
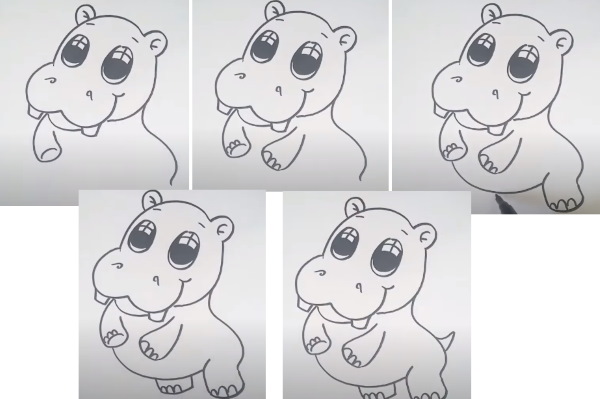
With pastel pencils
The hippopotamus can be drawn not only with traditional hard pencils, but also with pastel ones. This material is suitable for children because it is environmentally friendly, easy to use, and the drawing is very bright.
This master class uses oil pastel. It is produced in the form of regular pencils or bars, and its oily structure allows you to create the effect of painting. If you need to make thinner and clearer contours, then the pencils can be sharpened, but they are very fragile and break quickly.
Oil pastels, unlike dry ones, do not crumble and do not release dust into the air, which can cause an allergic reaction in a child. They also do not require additional fixation on paper, but since they never dry completely, storing such drawings can cause certain difficulties.
Despite this, this master class can be used to master new artistic materials and drawing techniques. To draw contours, you can use a simple graphite pencil, felt-tip pen or marker.
The process of creating a drawing with oil pastels is as follows:
- Draw a large oval outline in the shape of a "bean" - the body of the animal.
- On the left, make a second similar figure – the head of a hippopotamus.
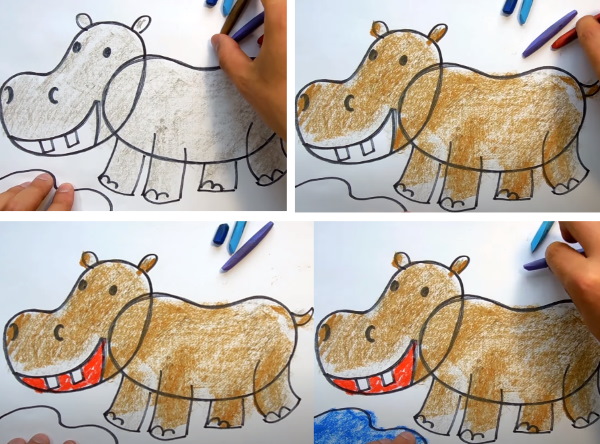
- Draw small oval ears and eyes at the top of the head.
- A little lower, on the same line with the curve of the muzzle, draw 2 nostrils in the form of crescents.
- Draw the mouth as two arcs and the teeth as squares.
- Draw a tail at the back of the body in the shape of a triangle.
- Draw the paws in the foreground thick and rectangular in shape.
- Make the paws in the background shorter, but the same width. Draw a pair of semicircular toes at the bottom of the paws.
- Draw a wavy outline of water under the muzzle.
- If the contours were created using a simple pencil, then erase the extra lines. In this master class, a marker was used to make the lines more visible.
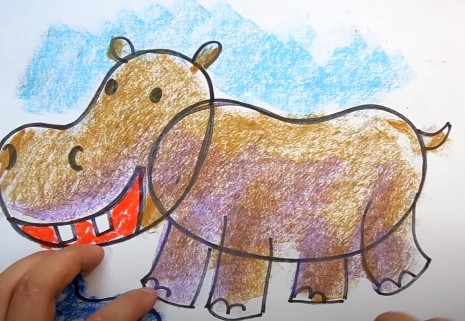
- Apply the first layer of gray pastel to the hippopotamus. You don't need to paint it too much, as several more layers will be applied later.
- Using a brown pastel pencil, color the hippo directly over the first layer.
- Color the inside of the mouth with red pastel.
- Use blue pastel to paint over the area of water in the left corner of the picture.
- Paint the space behind the hippopotamus blue. You don't have to cover the entire area, just make a few strokes. Apply purple pastel to the lower part of the animal and legs.
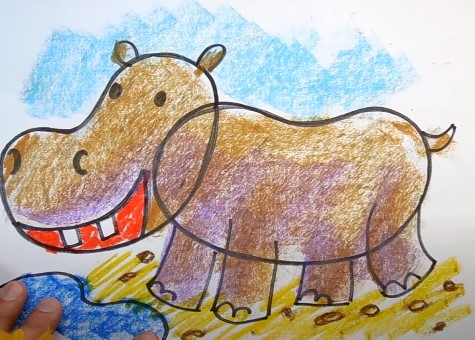
- Using a brown pencil, draw pebbles under the hippopotamus's feet in the form of ovals of different sizes and color the background yellow.
Oil pastels can be shaded with a finger or a piece of paper. This will result in smoother transitions between colors. This artistic material is more suitable for working with large elements than for detailed drawing.
Hippopotamus from the game "Children's Doctor" ("Dentist")
The hippopotamus (the drawing for children in this master class is made in the form of a funny animal that is getting its teeth treated in a popular children's game) can be depicted using either pastel pencils, which were mentioned above, or felt-tip pens.
To do this, you need to do the following:
- In the center of the album sheet, draw a large oval - the mouth of the hippopotamus.
- Draw small semicircles on top – the animal’s nostrils.
- Draw the handle of the toothbrush using curved lines.
- Make the bristles in the form of a jagged line.
- Add bristles to it - short lines.
- Draw another arc above the mouth – the top of the head.
- Add 2 close-set eyes in the center.
- Draw pupils inside them.
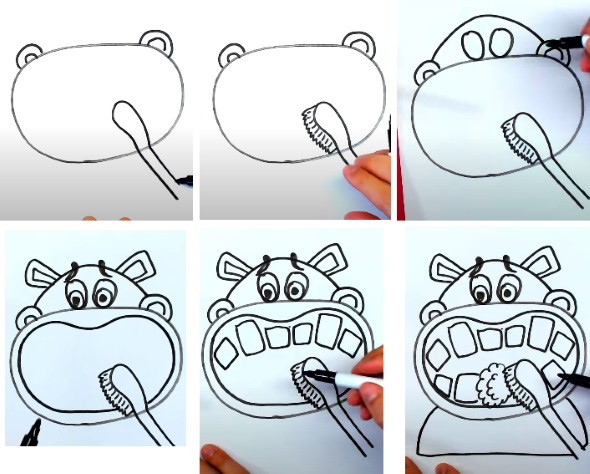
- Draw raised "eyebrows". They can be made in the form of "commas" or simply segments.
- Add small trapezoid-shaped ears to the sides of the head.
- Draw a large "bean" shape. This will be the open mouth. The lines of the outer contour and the mouth should be close to each other.
- Use large rectangles to depict the hippopotamus' teeth on the upper jaw.
- Add a couple more teeth around the edges.
- Draw a “cloud” around the brush using wavy lines – foam from the toothpaste.
- Add the lower row of teeth. They should also be large, like in a child's game.
- Show the hippopotamus' shoulders.
- Color the left side of the mouth with a bright pink pastel pencil, and add purple strokes along the edge.
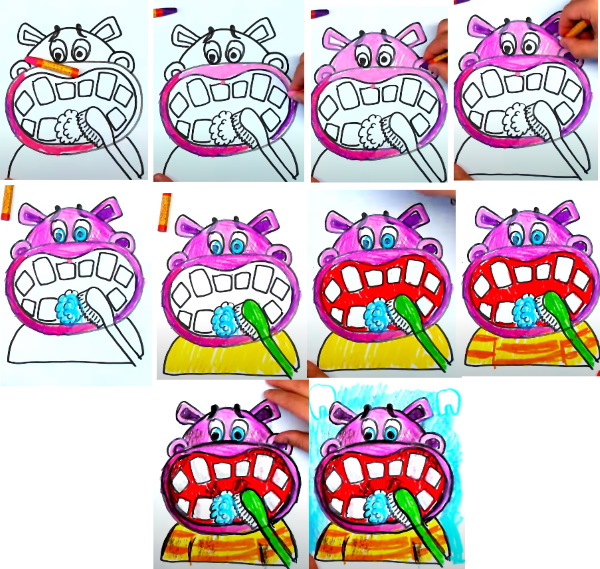
- Paint the upper part of the mouth in a paler color.
- Paint the top of the head with the same shade.
- Paint the inside of the nostrils and ears purple.
- Color the foam and the eyes inside blue.
- Paint the hippopotamus' shoulders yellow and the toothbrush handle green.
- Color the inside of the mouth with a red pencil.
- Use two vertical lines on the shoulders to show the arms and color the horizontal stripes on the clothes orange.
- Use a black pencil to draw the contours and eyebrows more vividly, and also use strokes to depict the tongue inside the mouth.
- Color the background behind the hippopotamus in blue; you can also depict the outlines of two teeth in the free upper field.
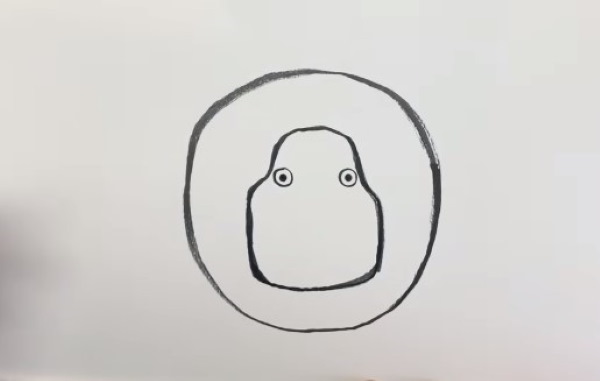
Hippopotamus on land
The hippopotamus, a drawing for children in this example, is also depicted in a simple technique. It can be drawn with children over 3 years old. For work, you will need a simple pencil for marking the contours (in the master class, a marker is used for clarity), a set of colored pencils or felt-tip pens, an eraser.
The drawing is done as follows:
- In the center of the album sheet, draw a large circle - the massive body of a hippopotamus.
- Draw an arc at the bottom – this will be the lower jaw of the animal. The hippopotamus itself will stand with its muzzle towards the viewer.
- Complete the outline of the head as shown below.
- Draw round eyes at the top of the head and paint the pupils in the center of them black.
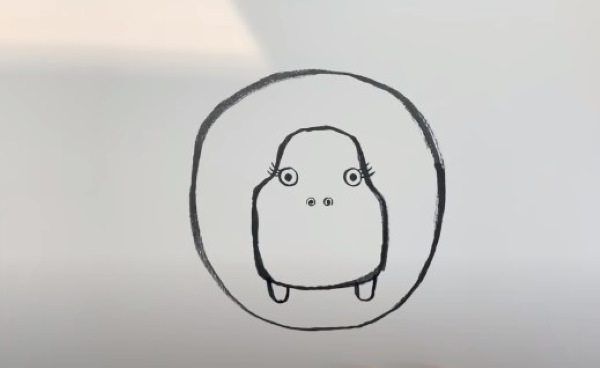
- Draw eyelashes on the eyes with three arches along the edge.
- To draw the nose, first draw 2 large dots and then draw spirals from them.
- On the lower jaw, depict 2 large square teeth on the edges. In some hippos, the protruding fangs can reach 1 m in length.
- Draw a mouth under them in the form of a flattened arc. The hippopotamus' mouth in this drawing will be closed.

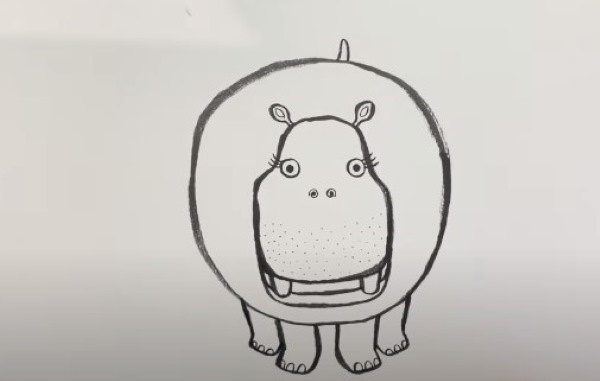
- Draw another similar arc – the lower jaw of the animal.
- Draw 2 oval-shaped ears on the head.
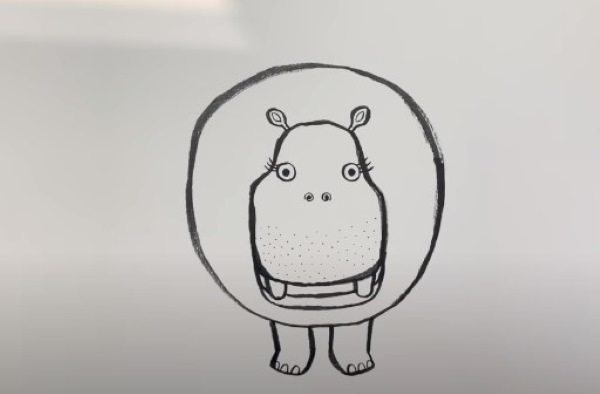
- On the lower part of the animal's muzzle, show short hairs called vibrissae as dots.
- Draw short front legs with toes.
- Make the hind legs shorter, as they are further away from the viewer.
- Draw a small tail on top.
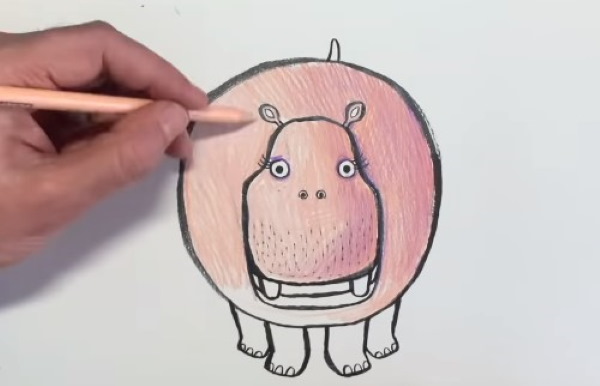
- Paint the hippopotamus's body and head pink. Make the right side darker.
- On the right half of the body and head, also apply shading with a purple pencil and outline the animal’s eyes.
- On the belly, draw a contour with an uneven edge and color it on the right with dark brown, and at the bottom and on the left with a brown pencil. This will be mud. Hippos like to live in mud lakes. But they do not feed on algae, as many people think, but on coastal grass.
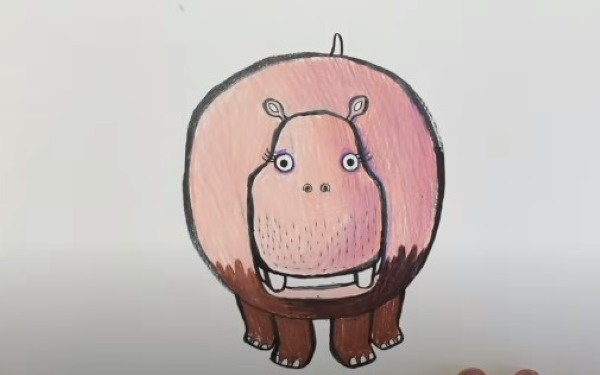
- The hippopotamus' legs are also painted brown.
- Apply shadow to them on the right side using a darker shade.
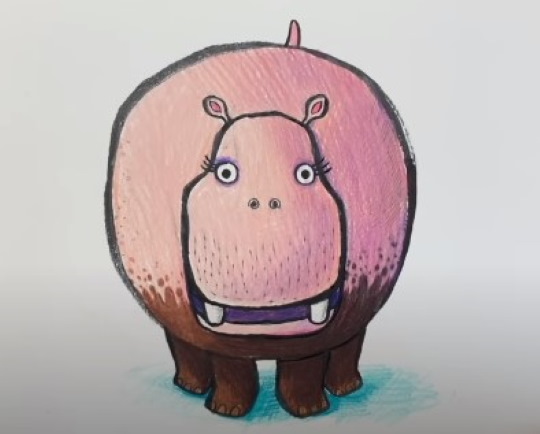
- On the sides of the body, draw drops of dirt in the form of spots of different sizes in brown and dark brown.
- Paint the inside of the mouth dark purple.
- The surface on which the hippopotamus stands should be shown as a shading-shadow under the animal's paws, in blue or green.
The hippopotamus in the picture can be depicted in a different way - lying in a mud puddle, or swimming underwater, add grass and water lilies on the surface of the water. While drawing, it will be useful for children to talk about the peculiarities of this animal's life - where it lives, what it eats and its habits. This will allow, along with acquiring drawing skills, to broaden the child's horizons.
Video about drawing
Hippopotamus drawing for kids: