The balalaika is a musical instrument that is associated with Russia and is considered a symbol of Russian culture. The main distinguishing features of the balalaika are its unique sound and beautiful appearance. The process of creating its image is not difficult: both adults and children can handle it.
The main thing is to follow the step-by-step guide when drawing, and then it will work out beautiful picture, which can be colored or supplemented with interesting elements.
Drawing tools
Balalaika (drawing for children starts with simple options) for depicting on paper will require the presence of certain materials and tools.
Among them:
- simple pencil;
- sheet of paper;
- eraser;
- colored pencils, markers or paints.
Choosing a pencil
A pencil is a simple and familiar tool that we all have to deal with at a young age while sitting at a desk. With its help, you can create various drawings.
It is important to be able to understand the different types of pencils. The main classification is based on the hardness and softness of the lead. According to the European system, the letter "B" is used to indicate softness, and the letter "H" is present on the body of a hard pencil. If the pencil is neither hard nor soft, but medium, then the marking "HB" is used.
Most often, an HB pencil is used to create a drawing. It is convenient to draw the base with it. Hard pencils are used to draw objects with a clear outline, and soft pencils are convenient for shading.
Selecting paper
The choice of paper should be approached responsibly, because it is the paper sheet that will be the basis of the drawing. There are several types of paper suitable for drawing.
Before purchasing it, you need to pay attention to:
- density;
- texture;
- color;
- acidity;
- dimensions.
There are different types of paper:
| For graphite pencils | For colored pencils |
| It is best to draw with a simple pencil on smooth paper. In this case, the lines will be more precise and detailed. Such paper is especially suitable for drawing small elements. Also, paper for drawing with simple pencils should have a higher density. This is due to the fact that you will often need to move an eraser along its surface, removing unnecessary elements: auxiliary or mistakenly drawn lines. The recommended density is 100 g / sq. m. As for the surface, smooth paper will not allow the use of multi-layer techniques, but it helps reduce pencil consumption. | Colored pencils consist of kaolin and special coloring agents. The latter can be of natural or artificial origin. Therefore, paper should be selected taking into account the characteristics of the pencil.
When using colored pencils, artists often use the shading technique. In this case, the optimal density indicator will be 130 g / sq. m. Watercolor paper is great for colored pencils. It is easy to shade and mix colors on it. The same paper will be good when using watercolor pencils |
Master classes
Balalaika (a drawing for children can be done in various techniques and in different versions) can be easily depicted on paper if you strictly follow the step-by-step instructions. It is best to start with simple versions.
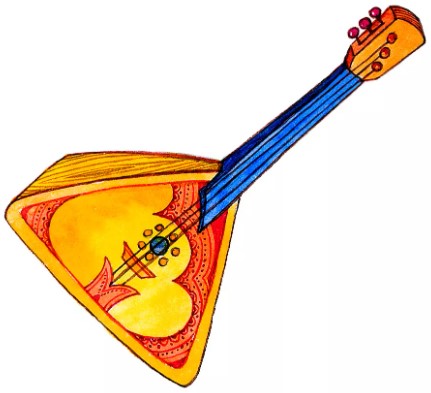
Classical balalaika
There are many types of balalaikas, but among them there is one that deserves the most respect. We are talking about the classical variety of the musical instrument.
As a rule, musical instruments are depicted in the pictures in the position in which they are used to play music. For the balalaika, this is the diagonal position.
To draw it in this position, you need to do the following:
- Draw 2 parallel lines running diagonally from the lower left corner of the paper sheet to its upper right corner. The distance between these lines should be small – a few centimeters.
- Connect the upper ends of the drawn lines with a straight line at 90 degrees, and the lower ends so that an angle is formed. This figure will become the neck of the balalaika.
- Draw the musical instrument's deck. To do this, put a dot on the sketch for the neck drawn in the previous step. To correctly determine the location of this dot, you need to mentally divide the neck into 4 equal parts. At the junction of the lower part and the next one in height, there should be a dot. It is very important, because it will become the upper corner of the triangle, which will soon turn into the deck.
- Put a dot, start drawing a triangle. It is important to try to make its lines curved.
- In the triangle itself, at some distance from the neck, draw a narrow rectangle, more like a strip. The main thing is that this rectangle is parallel to the bottom side of the deck.
- At the very top of the neck, draw a paddle with 3 tuning pegs. It is a quadrangle, 2 opposite sides of which go towards each other. There should be 3 circles in this quadrangle. Another 3 circles are located on the side, on the upper long side.
- Draw a long arc along one side of the triangle representing the deck. In this case, this line will run along the right side. It is needed to give the deck volume.
- Place the voice box on the deck (approximately in the middle of the triangle). It is a circle with a wavy line encircling it. In other words, the voice box is like a flower with many petals.
- On the deck, draw a wavy line from the right side of the triangle to the left. Its waves should be wide.
- In each of the lower corners of the deck, draw 1 small curved triangle.
- Run the strings along the entire instrument. They are all long straight lines. The total number of strings in a classic balalaika is 3.
- Where the strings attach to the underside of the deck, draw a small arc. It should be outside the triangle-deck.
- Paint the balalaika. Yellow and orange colors are best for this, as they will imitate wood, a material traditionally used to make the musical instrument. Both of these colors can be mixed.
- Take red color and paint the tuning pegs and the side of the instrument.
- Using black paint, draw black frets, color the voice box, darken the holders and corners.
Vertically positioned balalaika
Balalaika (a drawing for children can be depicted in different positions) in a vertical position can be drawn on paper if you follow these steps:
- Draw 2 parallel lines that will become the prototype of the neck. However, at the bottom they should turn into a triangle.
- Draw a circle approximately in the center of the triangle. This will be the voice box.
- Above the 2 parallel lines drawn in the first step, add an inverted triangle. However, instead of a bottom corner, it should have a rounding.
- To make the balalaika three-dimensional, draw parallel lines along the upper, lower and right contours.
- Extend the corners, draw the tuning pegs and frets, run the strings, and “secure” them in the holders.
- Draw a wavy line diagonally across the deck to imitate an apron.
- Take colored pencils and start coloring the musical instrument. For the deck, use orange, burgundy and brown colors. The voice box is colored black, and the fret stripes on the deck should alternate: light, dark, light, dark.
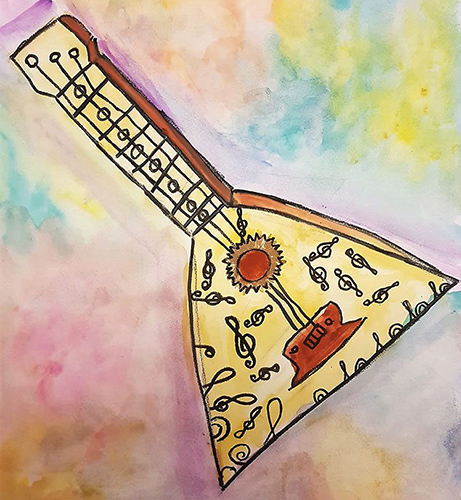
Balalaika with ornament
Children love everything bright and colorful, so you can try to draw with them not just a balalaika, but a balalaika with an ornament.
To do this, you need to do the following:
- Draw the outline of a musical instrument using a pencil.
- As in the examples above, the neck is drawn, which transitions into the deck.
- Using the same techniques that were used in the previous examples, create the remaining elements of the balalaika - the spatula, the round reed, the wavy apron, the frets, the straight vertical strings, the holders.
- On one side of the balalaika, for example, on the left, draw a line that will add volume.
- Draw an ornament on the deck. Wavy lines are used for this.
- Take a black marker and trace all the previously marked lines.
- In the lower corners of the deck, use the same marker to add semicircular elements.
- Make the ends of the ornament denser, darken the holders.
- On the side part, draw several even stripes that will become the decoration of the instrument.
- Color the balalaika. Here you will need bright markers. It is recommended to give preference to green, red, orange. Gray and brown colors are also added.
When choosing a color for an ornament, it is important to remember: the brighter it is, the more joy the drawing will bring to the child.
With paints
Working with paints is a little more difficult than with pencils, but the result will be more pleasing. To draw a balalaika with paints, you need to look at the image of the object and study the elements it consists of.
Then you can prepare the materials and tools that will be needed for the work:
- simple pencil;
- eraser;
- ruler;
- sheet of paper;
- paints.
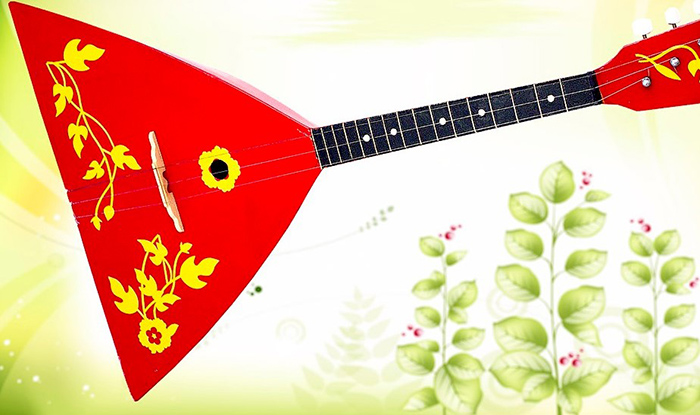
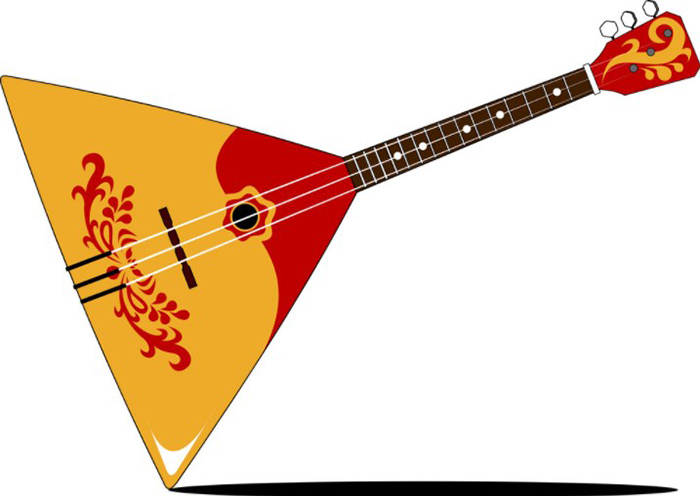
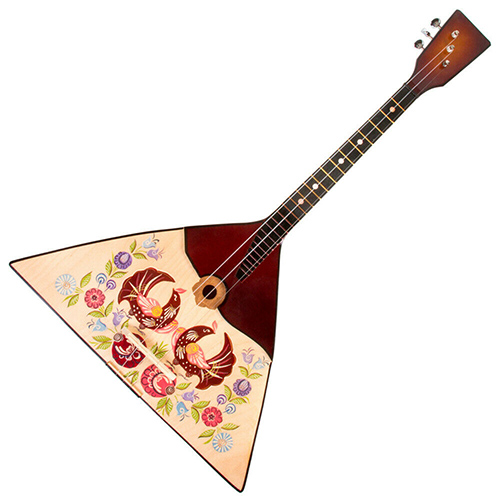
There is no need to put the image of the balalaika far away. It will be needed more than once during work. Before moving on to drawing, it is necessary to carefully examine the balalaika, paying attention to its components. On the deck there is a round resonator hole, called a voice box.
Above is a shell, designed to protect the deck during active music performance. Instead of a shell, many models may have a pattern - an image of flowers or berries. Balalaikas are often painted in the Khokhloma style, Gorodets painting or Gzhel. Other Russian ornaments can also be applied to the surface of the musical instrument.
The drawing process will take place in the following stages:
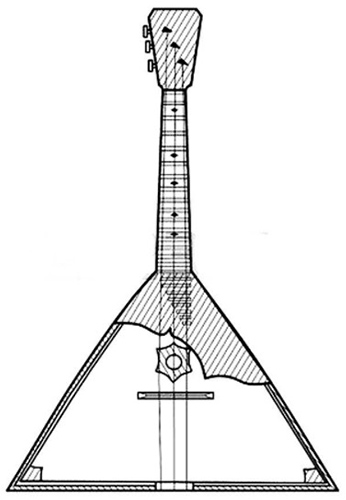
- Outline the three main elements of a musical instrument: the deck, the neck, and the peghead.
- The deck is represented as a triangle. The neck is a long rectangle, and the shoulder blade is an irregular quadrangle. It is important to depict these 3 figures, observing the proportions. As a result, you will get a general scheme of the balalaika - its primary sketch.
- Soften the lines, making them more "lively". To do this, slightly round the corners of the deck and blade.
- Approximately in the center of the deck, draw a voice box that has the shape of a circle. There should be a beautiful pattern around it. You can draw several smooth arced lines that will represent petals. As a result, you will get a beautiful voice box in the shape of a flower.
- When applying patterns to the surface, you can use elements of Russian painting. These include stylized flowers, leaves, grape vines, bunches of berries, red cranberries, curly grass.
- Proceed to decorating the fingerboard. Here you should depict the frets. There are 3 strings running along the fingerboard. There should be 3 tuning pegs on the shoulder blade that crowns the top of the fingerboard. They can be represented as small circles.
- Make the voice box dark. Also, you should choose colors that will add brightness to the balalaika.
- To paint the deck, use beige and red paints. After that, you need to wait until this layer dries completely.
- Start creating stains. For this, use a darker shade. Such stains will perfectly imitate a wooden surface.
- Paint the remaining parts of the balalaika. The neck should be given a dark chocolate color. When this layer dries, paint the 3 strings. Each of them should turn into a light gray strip.
- Using bright colors, “revive” the pattern around the resonator.
The balalaika is a musical instrument that is rightfully considered a symbol of the Russian people. It proves that only 3 strings are enough for creativity. And although it is not easy to play in reality, it is very easy to draw a balalaika, even children can do it.
The main thing is to imagine what this tool looks like. During creative work, you can use only a simple pencil and a few markers.
Video about drawing
Master class on drawing a balalaika