Flowers from colored sheets of paper are a simple version of applique, which can be created together with a child. At the same time, for creative work it is necessary to prepare a minimum set of materials with tools, including glue with scissors, a pencil and paper of different shades.
The result is a beautiful craft that you can give to your mother for a holiday.
Master classes
The flower applique can include a whole composition consisting of several different inflorescences with petals and grass. Bells and buttercups are suitable as flowers. All the details need to be glued to a cardboard sheet.
To create a symmetrical bud, it is recommended to fold a sheet of paper several times and cut out the figure along the contour. As a result, a similar figure will be obtained on the other side.
Necessary materials and tools:
- pencil;
- glue with scissors;
- thick cardboard sheet;
- colored paper in blue, green, yellow shades.
Step-by-step description of creating a bell:
- Fold a sheet of blue paper in half. Draw half of a bellflower on the fold.
- After cutting out the figure, you should get a smooth flower bowl. To give the petals a figured shape, cut the blanks as required.
- Cut the bud along the central lines between the petals.
- Place the petals on a piece of cardboard, spread them apart and glue them at a small distance from each other.
- To decorate a flower bowl, you can use flowers or small mugs.
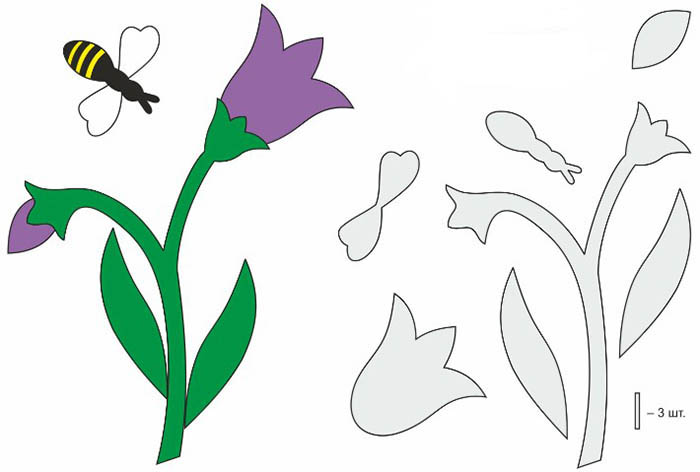
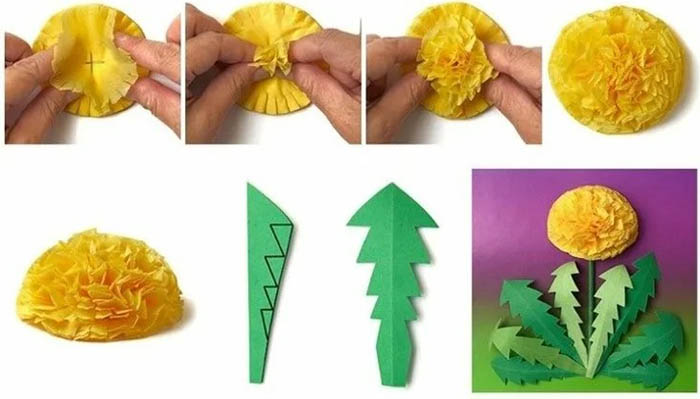
Step by step process of creating a buttercup:
- Fold a square yellow sheet of paper diagonally, then along the center line of a triangle. Then fold again along the center line.
- On the fold, depict a petal, which can be pointed or smooth.
- Cut out the figure. After opening the blank, you should get a bud consisting of 8 petals.
It is permissible to create a buttercup not from one whole flower, but from several separate petals with an identical shape:
- Fold the yellow paper sheet like an accordion.
- Cut out the petals and fold the flower into pieces.
- Place the core between the petals.

To ensure that the flower arrangement has a solid structure, it is recommended to make grass.
This part can be created in several ways:
| Way | Description |
| Cutting with scissors with curly teeth | Grass can be cut from a green sheet of paper using shaped teeth. In this case, there is no need to draw a picture on the surface of the workpiece. You just need to move the scissors along the paper. |
| Volumetric applique | The green sheet of paper can be cut into equal parts, then each part can be folded at the top and glued to a sheet of cardboard. To decorate the green bush, the paper needs to be folded in half to cut out half of the part. After the blank, it needs to be opened. |
| Tear-off applique | You need to take an oblong green sheet of paper and tear it into several separate pieces that resemble grass. You can also tear a piece of paper a little at the top. |
After cutting out all the details of the composition, all the flowers and grass must be combined together on a piece of cardboard and glued.
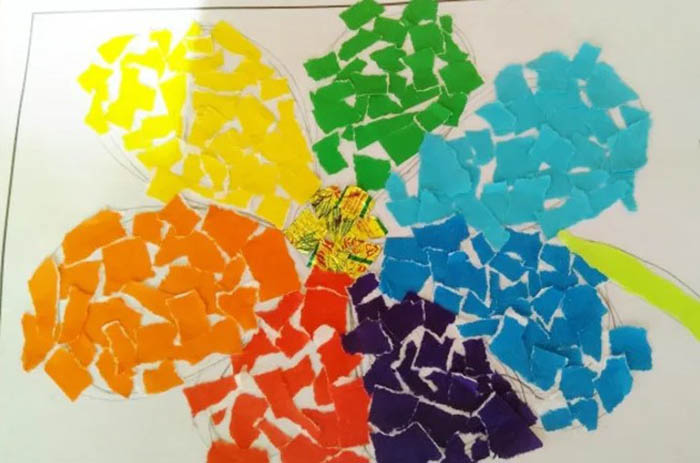
Small children can make a tear-off applique. In this case, you need a stencil with the desired design, which you need to transfer to a white sheet of cardboard using a pencil.
List of materials and tools:
- paper napkin for removing glue residue from paper;
- regular pencil;
- cardboard sheet;
- PVA glue;
- sheets of paper of different shades.
Step-by-step description of the work:
- Place the selected stencil on the surface of a white sheet of cardboard and trace around the outline with a pencil.
- Cut a narrow strip from a sheet of paper of a certain shade. Bend the workpiece along its entire length. Carefully smooth out the fold line from the center in different directions.
- Bend the strip back and tear it off. Then bend a new strip of identical size. Repeat similar manipulations several times to obtain the required number of torn strips from paper sheets of different shades. In this case, the blanks should be small.
- Apply a thin layer of glue to the image that has been transferred onto the cardboard base.
- Glue the torn pieces of paper to the cardboard according to the color. It is not recommended to rush in this matter. The movements should be careful, so you should work layer by layer and row by row.
When fixing the applique to the base, the pieces of paper should not extend beyond the outline of the drawing.
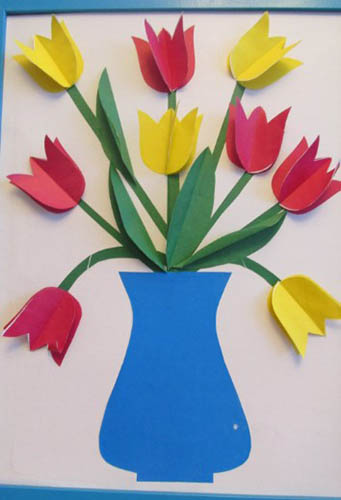
Together with your child, you can create a simple floral applique in the form of a vase with tulips based on geometric shapes.
List of materials and tools:
- paper sheets in red, yellow and green shades;
- pencil;
- PVA glue;
- sheet of cardboard.
Step-by-step description of the work:
- On a sheet of reddish paper, draw a tulip and cut out the figure.
- On a sheet of greenish paper, draw a stem with 2 leaves growing on it. Cut out the figure.
- Use the resulting templates to create several blanks. To do this, attach the parts to sheets of paper of the corresponding shades, trace along the contour and cut out. As a result, you should get from 3 to 5 tulips.
- To make a vase, use a yellow sheet of paper. Draw the details on the surface of the base and cut along the outline.
- Place the vase on the cardboard base, placing it in the center.
- Carefully fix the stems with foliage, placing the parts above the level of the vase.
- Glue the buds to the stems on top.
- Then glue the vase so that the stems are located under this detail.
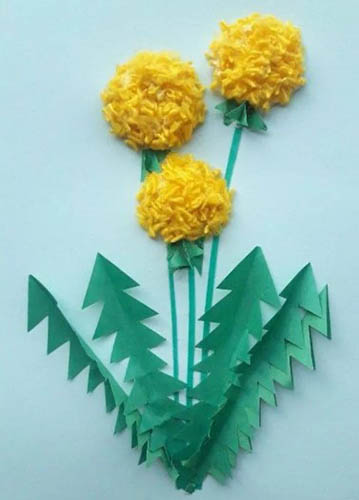
The flower applique can be created from cupcake molds, which will serve as the basis for the dandelions. This craft is suitable for primary school students.
List of materials and tools:
- paper sheets of green and blue shades;
- yellow and white muffin tins;
- PVA glue;
- scissors.
If you don’t have special muffin tins, you can use a sheet of yellow paper, from which you need to cut out 2 circles.
Step-by-step description of the work:
- Smooth out the muffin tins. Use scissors to create a fringe on the pieces.
- A blue-tinted sheet of paper will serve as the background for the fake.
- From a green sheet of paper, cut out 2 elongated strips that protrude as stems.
- Using glue, attach the stems with dandelion inflorescences to the blue leaf.
- Cut out leaves from green paper and secure with glue near the stems.
Volumetric crafts
With the first spring holidays approaching, it will be relevant to create a three-dimensional postcard from daffodils.
List of materials and tools:
- yellow corrugated paper;
- a sheet of blue cardboard paper;
- glue brush;
- PVA glue;
- scissors;
- colored paper sheets of lilac, green and white colors.
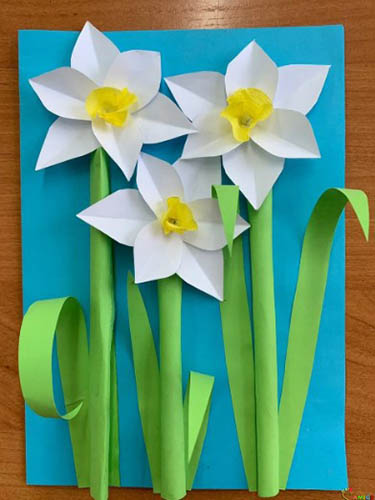
Step-by-step description of the work:
- Draw a quatrefoil on a white sheet of paper and cut it out. Make a cut along the line and join 2 petals together using glue. The result should be a three-dimensional piece consisting of 3 petals.
- Combine 2 trefoils together using glue.
- Cut a strip from corrugated paper and twist it. This part will be the middle of the bud. Glue the blank. You should get 5 parts.
- To create a flower arrangement, make 5 flowers.
- Cut stems with leaves from green paper.
- Cut a rectangle out of a lilac sheet of paper. Fold the blank like an accordion to make a vase.
- First, glue the vase to the blue sheet of cardboard. Apply glue only to the long edges of the rectangle, narrowing the part at the bottom so that the workpiece resembles a vase.
- Then glue the stems with leaves, hiding the ends of the parts under the vase.
- Glue the buds on top of the stems.
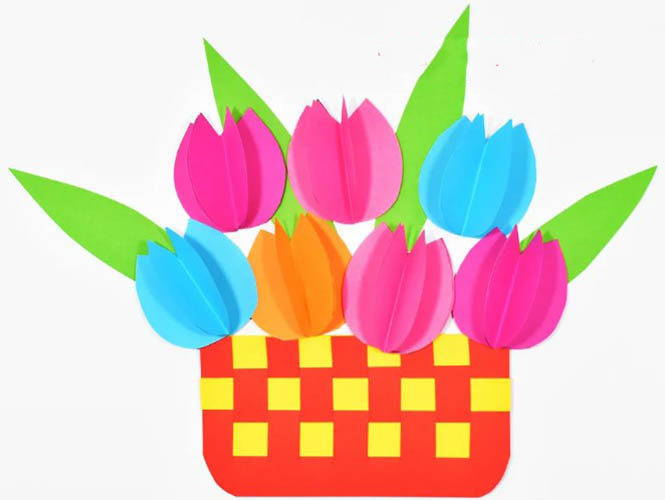
The flower applique can have a three-dimensional appearance. For example, it is acceptable to create a wicker basket containing tulips.
For the composition you need to prepare:
- cardboard sheet with colored paper sheets;
- scissors with glue;
- a regular pencil with a ruler.
Step-by-step process of creating a craft:
- Cut out a rectangular blank of any size from a sheet of cardboard.
- Use a pencil to draw the cutting lines. Use a ruler to make sure the lines are straight. If the bottom horizontal strip is 1 cm, then the vertical lines will be the same size.
- Cut the workpiece along the lines vertically. Prepare 3 strips of cardboard sheet 1 cm wide, the length should match the length of the rectangle.
- Place the first strip between the cut strips on the rectangle. Then add the remaining 2 strips.
- After aligning the parts, apply glue and cut off the excess from the top and each side. If desired, the corners of the basket at the bottom can be rounded.
- To create voluminous tulips, cut out flowers from a sheet of red paper.
- Fold the cut out figures in half. Then join the sides together using glue. As a result, you should get 21 flowers, each of which has 3 parts.
- Cut long leaves from a green paper sheet.
- Glue a wicker basket onto a cardboard sheet of any shade. Place tulips with foliage on top of the blank.
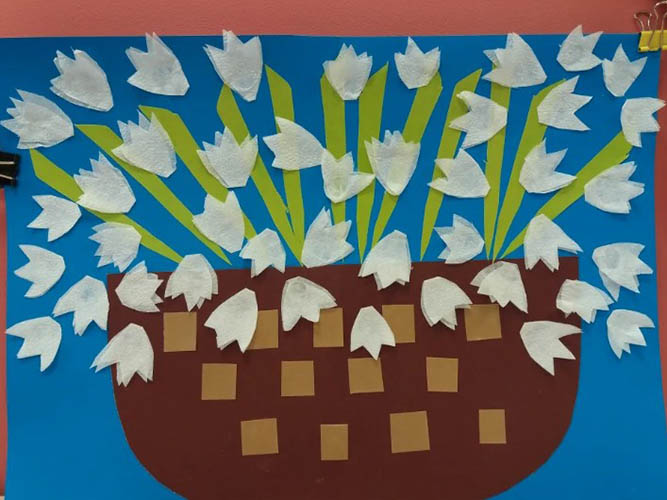
A flower craft in the form of snowdrops does not require much skill and ability, but can be a great gift for friends and relatives. Such an applique can be made by children in kindergarten.
Necessary tools and materials:
- paper sheets of green and white shades;
- blue cardboard sheet;
- glue stick;
- scissors.
Step by step process:
- Use scissors to cut the white paper into 2 pieces. Cut each piece into thin strips that will act as flower petals.
- Glue the resulting strips together in the form of loops. Apply glue only to the edges of the parts.
- To form one snowdrop, use 3 strips in the form of loops. Glue the blanks together. Do the same with the remaining parts to obtain several inflorescences.
- Cut 3 strips from a green sheet of paper to create stems. Fold the blanks in half along their entire length.
- Insert the flower into the stem from the edge. Bend the upper part of the stem downwards. Do the same with the remaining snowdrops.
- Cut out 3 elongated sheets from a green sheet of paper.
- Use white paper to make a trapezoid vase. Cut this piece into horizontal strips.
- Glue the resulting strips onto the base, applying glue only to the edges of the blanks. The vase should rise slightly above the surface of the cardboard sheet.
- Place snowdrops with leaves into the resulting vase.
Original ideas for flower arrangement appliques
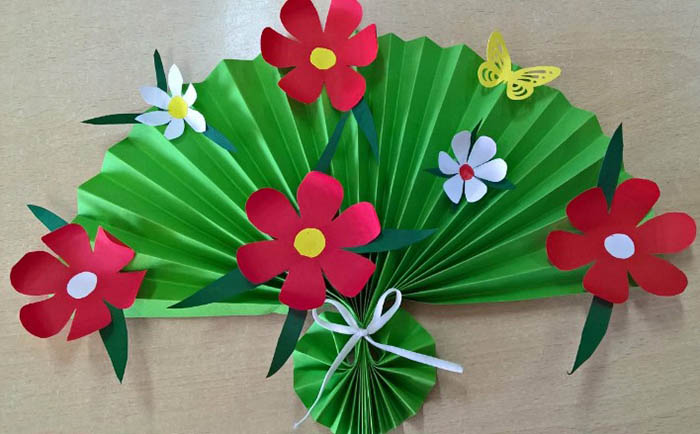
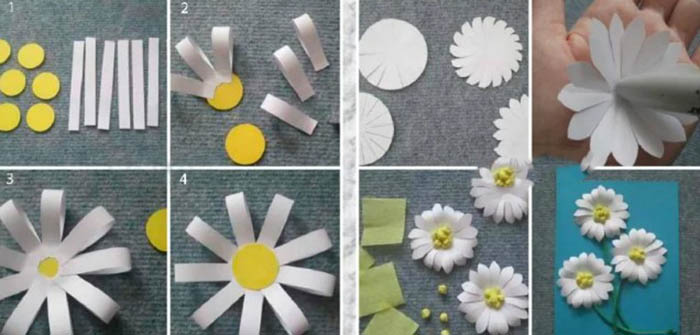
The flower applique can be presented in the form of a bouquet of daisies. Before creating the craft, it is recommended to look at pictures with your child that depict local plants, learn their names, and also look at options for greeting cards.
List of tools and materials:
- pencil with a ruler;
- glue with scissors;
- red, yellow, green and white paper sheets.
Step-by-step description of the work:
- Cut the base for the flower bouquet from a green sheet of paper. To obtain a symmetrical detail, it is recommended to fold the sheet in half.
- To create flower centers, draw circles on a yellow sheet of paper.
- On a white sheet of paper, draw stripes measuring 1x14 cm using a ruler and pencil.
- Draw stems with leaves on green paper.
- Cut out the prepared parts from paper.
- Use white stripes to create drops. To do this, glue the edges of the blanks together.
- Glue the petals onto the core of the yellow bud.
- Turn the resulting flowers over to the front side.
- Attach green stems with flowers to the base.
- Complete the craft with leaves and a red ribbon.
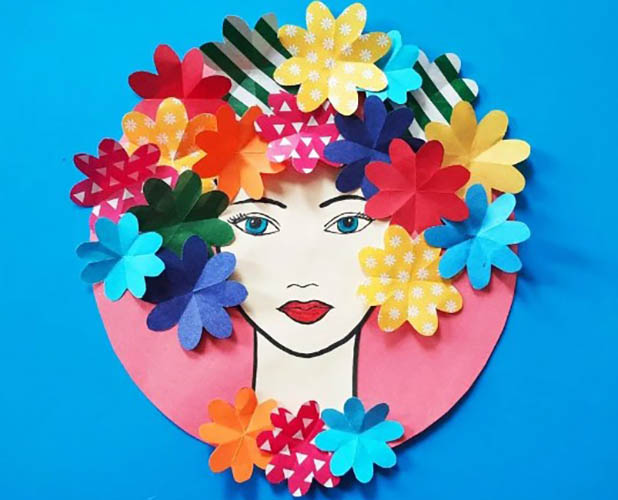
To create an original greeting card, it is permissible to create a flower, inside of which there will be a portrait of the person to whom the craft is addressed.
List of tools and materials:
- pencil with a ruler;
- PVA glue;
- colored cardboard;
- colored sheets of paper.
Step-by-step description of the work:
- Cut the colored paper into strips measuring 1x10 cm. There should be 25 pieces in total.
- Fold the resulting pieces in half, but the fold line should not be pronounced.
- Draw 2 circles with a diameter of 5 cm using a pencil. Cut out the depicted parts.
- Glue the petal-strips of a loop shape onto one circle. Fix the blanks along the edge and at different levels. Glue the remaining circle on top.
- Place a photo of a person in the center of the circle.
- From a green cardboard sheet, cut out foliage with a stem to which the bud will be attached. Join the 2 blanks.
- You can leave an inscription or a congratulatory wish on the card.
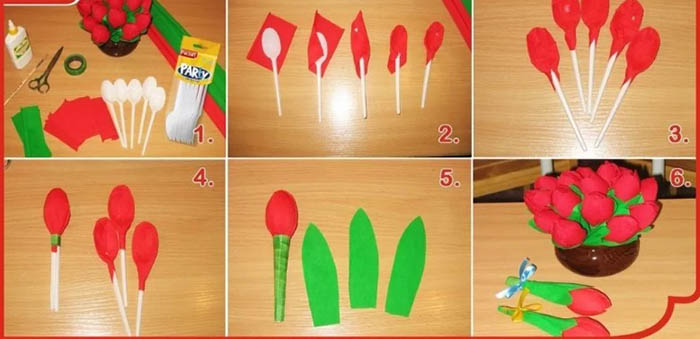
Using corrugated red paper and disposable spoons, you can create a bouquet of tulips that can be placed in a small vase.
Necessary tools and materials:
- 5 disposable plastic spoons for one flower (to create a bouquet of several buds, you need to prepare the appropriate amount of material);
- corrugated paper in red or pink, as well as yellow and green shades;
- scissors with glue and tape.
Step-by-step description of the work:
- Cut red or pink corrugated paper into 5 squares measuring 12 x 12 cm.
- Using a green sheet of paper, cut out 3 large leaves, the length of which should be equal to the length of the plastic spoon.
- Place spoons diagonally on the prepared square blanks and wrap.
- For better fixation of the paper, glue the ends of the blanks together.
- Place 2 spoons together with the right sides together. Wrap them with tape at the bottom. Place the remaining 3 spoons on top and wrap them with tape again. The result should be a bud.
- Place the cut foliage on the bud and wrap it. Place the leaves overlapping each other.
- Cut a long strip from green corrugated paper to tie around the foliage.
- To create a bouquet, perform similar actions to design a certain number of inflorescences. After that, combine the prepared blanks in one flower arrangement.
There are a large number of different colored paper appliques that can be given to mom for her birthday, March 8th, and any other holiday.
Simple fakes are flowers that can be simply glued to cardboard or made three-dimensional. Such options are suitable for children of the junior and middle groups of kindergarten. Children of the senior group of kindergarten and primary school students can try more interesting and original fakes.
Video about the application
Application for mom: paper flowers in a vase: