Drawing is a difficult art, especially when it is necessary draw peopley. This process should begin with creating silhouettes. Subsequently, the skill of competently distributing space for creating human figures in various positions will appear.
Selecting a person's position
Silhouettes of people for drawing begin with the stage of regular sketching. With constant training, the future artist develops a visual sense of how to use the available space on the canvas. He begins to understand what part of the drawing should be allocated to this or that part of the body.
Gradually the artist feels the confidence of the hand that holds the pencil.
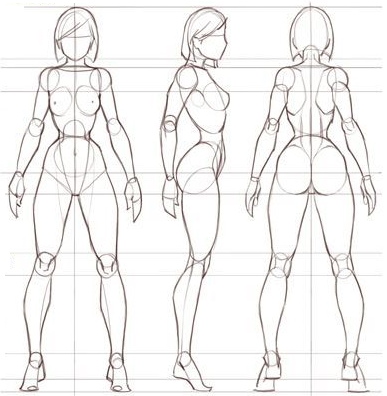
To quickly master the image of the human body and its features, you need to understand what angles are. The most common of them are the following:
| Angle | Description |
| Profile | The picture shows one side of the human body. |
| Half a turn | The subject's face is turned three-quarters. This is one of the complex perspectives of the drawing, which has many options for conveying facial features. |
| Full face | The person in this position is facing the audience and his body is symmetrical in relation to the artist. |

When creating a sketch, the artist acts from memory and therefore it is better to make several different angles of the future portrait in order to more clearly imagine the face in all its details. After that, you can draw each detail of the body from memory, as if getting acquainted with its features and mentally fixing it on paper.
The features of a person's structure are important in accordance with his:
- floor;
- growth;
- body type.
These anatomical differences need to be consolidated on paper before moving on to sketching the human body in pencil.
The main thing is to learn to maintain proportions. This will make the drawing realistic.
How to draw a silhouette
Drawing silhouettes of people starts with getting the proportions right.
The sequence of such work is as follows:
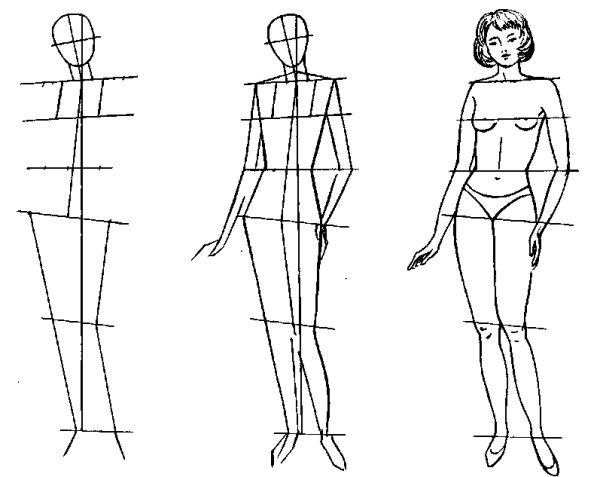
| No. | Stage | Description |
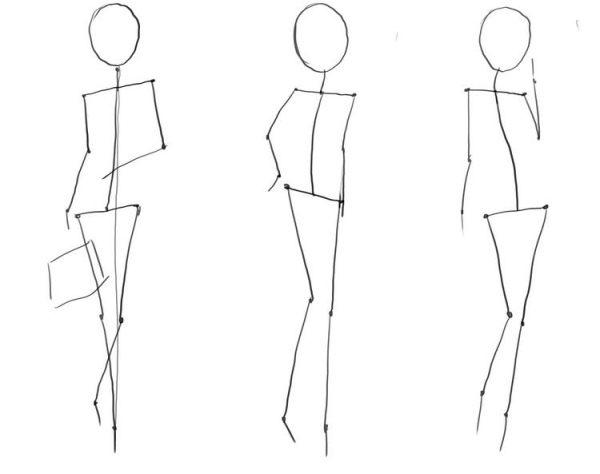
| 1 | Creating a portrait skeleton | The sheet is divided into parts using lines. If the person is standing, there will be about 8 of them, and for a sitting portrait, 6 are enough. Next, the creation of the scheme of the future drawing begins. Filling of the parts should be done from top to bottom as follows:
All the marked parts should be smoothly connected so that they do not look like a set of separate parts. The basis (skeleton) of a person will appear on the sheet. After this, the grid with division into segments can be erased. For more precise division at the beginning of the work, you can use editors, for example, Photoshop. After printing, the blank can be placed under the work sheet. To ensure that the proportions within the figure are respected, you don't need to draw a clear line of the body right away. You can schematically indicate the muscles and joints. Such tricks will help make the human figure more accurate and proportional. |
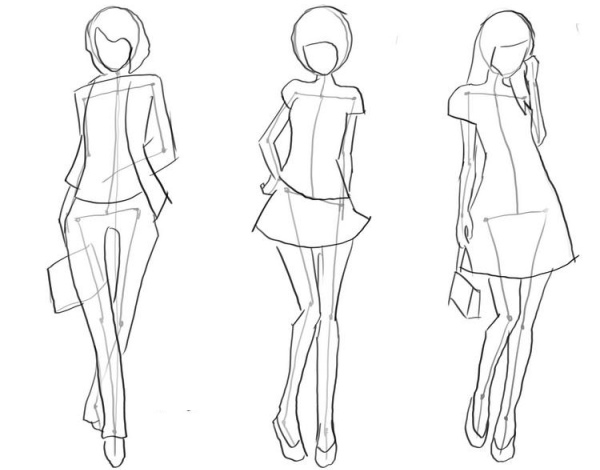
| 2 | Detailed drawing | At this stage, all previously created body parts are connected together with a smooth line.
Add on top:
|
To have drawing skills, you need not only to practice constantly, but also to buy good pencils. They come in different levels of softness. A special gradation scale will help you understand which one is right for you.
In the European interpretation it is as follows:
- B – means soft;
- H – hard;
- HB – medium or hard-soft.
The number in front of the letter indicates the level of softness or hardness.
For pencil drawings, a medium pencil (HB) is usually used. It creates lines well, erases well, and allows you to create shadow accents.
In addition, the artist must be observant and constantly watch how people move or sit.
Rules for depicting simple poses
Silhouettes of people for drawing can be made in various positions. Their polishing requires persistence and regular practice. They will allow you to develop a mechanical sense of scaling and get a picture with a proportional image.
Sketches of portraits of people in pencil, created in different poses, help not only to draw high-quality sketches, but also full-fledged portraits. After that, it is easier to draw a person in any position, for example, when he sits, walks or runs.
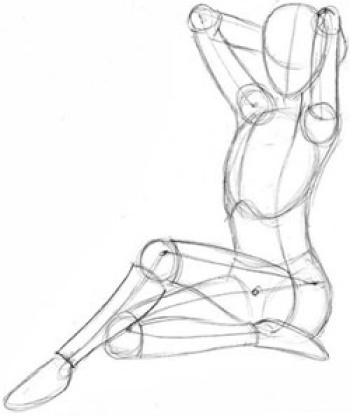
In a sitting position
This type of work requires the correct distribution of all body parts in the drawing. It is better to start with drawing portraits depicted in photographs or find a model who agrees to sit next to you.
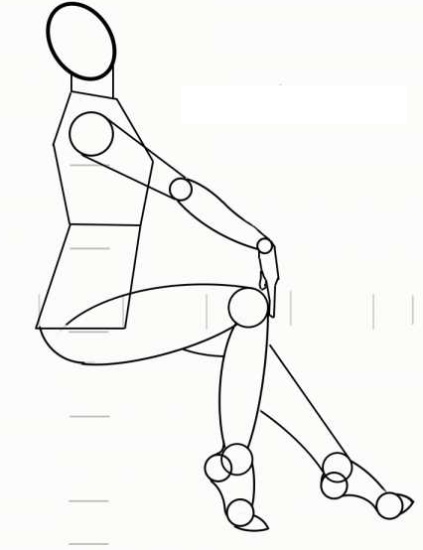
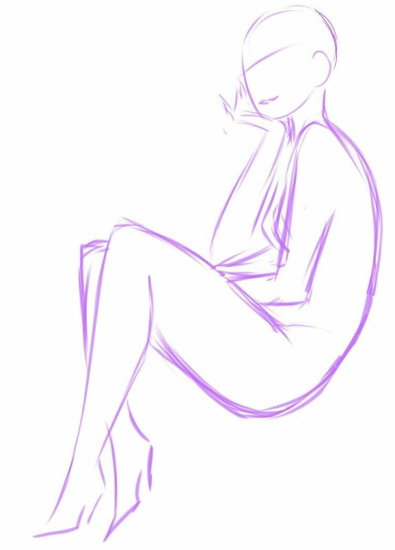
The sitting position should convey the dynamics of the person's intended movements, and not make him a frozen doll. The position of the hands is important in this regard: they should not be hidden behind the back.
The head and body should also be positioned naturally. If the head is turned, this implies a free turn of the head and body, and not a complex bend with a twisted neck and an awkward position of the body.
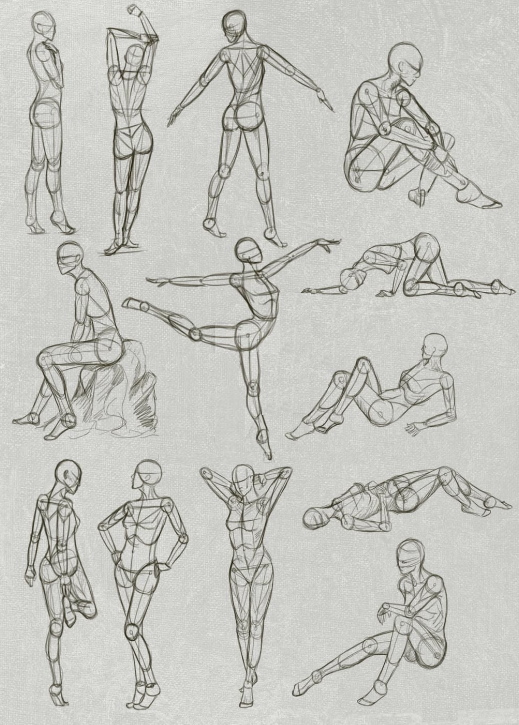
Complex positions
Practice will help to study the outer side of the human body. For training, you can use the classes of gymnasts or dancers who use beautiful poses in their work.
The main difficulty with such images is that not only are the poses correct, but there is also a sense of movement in the picture. It will be difficult and impossible to achieve the desired result the first time. Over time, the artist develops a skill that will help create a beautiful portrait.
Working sketch
Silhouettes of people for drawing can be made from several successive stages:
- Create a composition. The format of the drawing (vertical, horizontal) depends on the pose chosen to create the image.
- Select the scale of the painting according to the formatFor a larger design, you need a canvas that is large enough so that it doesn't seem squeezed into a tight space. If there is too much free space, the face gets lost and appears too small.
- Pay attention to each highlighted body segment.
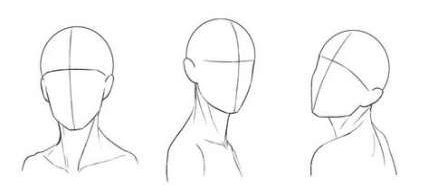
Head and face
To avoid confusion, it is recommended to designate each segment with numbers.
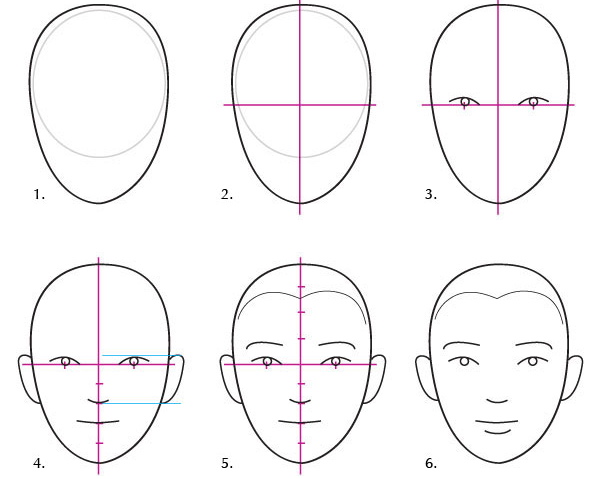
When sketching a head, you need to follow these guidelines and sequence:
- Considering that the head is like an egg, a beginner artist can draw an oval. It may not be perfect, because it is only a sketch.
- Narrow the bottom part a little to create a chin. Its shape depends on the chosen model. It can be slightly square, rounded or elongated.
- To make the image symmetrical, draw a barely noticeable line down the center of the face. It will divide the body into right and left parts.
- Draw a line for the eyes, which will be located above the middle of the created oval. It will allow you to make the eyes at the right level and the optimal size.
In this work, there is no need to clearly draw facial features. Only schematic lines of their location are needed. Hair can also be shown as a single mass, without detailing the hairstyle.
Neck
The neck shows the features of a person’s structure and character. The rotation may vary depending on the pose of the model, but it is important to remember that the thickness of the neck should be less than the size of the head.
For example:
- in a drawing made from the front, the neck is always straight, smoothly flowing into the line of the shoulders. To achieve believability, you can highlight the area of the collarbone and tendon;
- in the profile view, the neck line starts from the middle of the jaw. The front part goes down and passes into the neck, and the back goes from the back of the head with a slight bend;
- The man's neck is more muscular and wider than the thin woman's. In the center of the man's neck is emphasized the Adam's apple.
Shoulder area
The shoulder should be rounded, but not a solid oval. It should not be too sharp or too sloping. This parameter depends on the model or the artist.
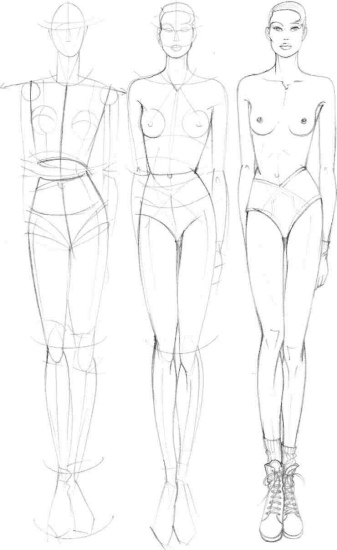
Torso and pelvic area
These body parts are very different in men and women, so it is necessary to dwell separately on the drawing of each type. Experts advise first learning to draw a woman's body, which has many curves, and only then begin studying the male body.
Making a model of a female body is much more difficult and you will need more than one sheet of paper to master this art.
A woman's chest starts almost from the shoulder line. The chest is drawn immediately after the shoulder line. It can be outlined schematically, leaving the drawing until the next stage.
Another feature of women's physiques is their narrow waist. The main thing here is not to overdo it, so that the waist does not turn out to be unrealistically narrow. You can simply show a graceful curve and move on to drawing the pelvis. In women, it usually has a rounded shape.
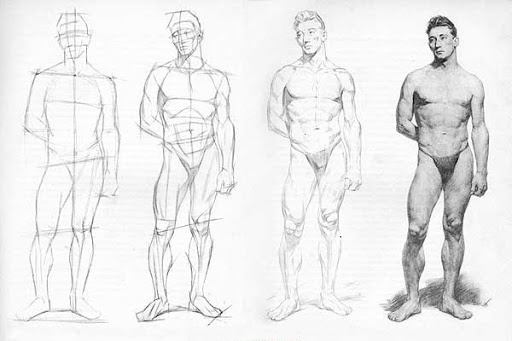
The male body has a triangular configuration. The broad shoulders narrow towards the pelvis with 2 lines. Having drawn such a triangle, it can be used as a basis. Later, it will be possible to outline the shoulders more precisely. The male chest is wider than the female chest, and the hips are narrow and do not have a pronounced roundness. However, this is what will emphasize the masculine principle.
Hands
Beginner artists often make mistakes when creating hands. The forearms and palms of their models turn out to be disproportionate to the rest of the image.
To avoid mistakes, it is necessary to adhere to the following recommendations regarding:
- hands. They must have a certain relief. Its configuration is determined by the presence and volume of muscles. By studying the hands of different people, you can understand how to draw them correctly. A woman will have few muscles and therefore you can make a practically smooth line without bumps;
- type and size of palms. The proportions of the palms match the size of the face relative to the body. First, you need to draw 2 squares, then inside them, mark the shape of the mittens, and from it, draw the fingers and hand. At first, it will be lowered without movement. When this pose is mastered, you should move on to more complex dynamic poses.
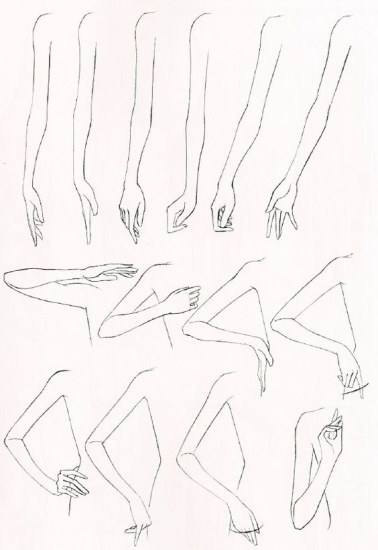
The sketches of the hands allow you to give the image the necessary emotional tension.
Legs
This is the final stage of creating a sketch. It starts from the hip line. When a person is positioned in profile, special attention should be paid to the buttocks and the middle of the back of the thigh.
This detail of the female body is characterized by roundness and smooth transitions, so do not draw the legs straight as sticks. They will make the portrait unnatural.
At the knee, the legs join and then diverge a little again, making the silhouette lively. When creating the sketch, the feet are indicated schematically as 2 oval or triangular parts.
Clothing and accessories
Not only artists, but also fashion designers learn to draw people. It is important for them to show the outfit from all sides initially in sketches and silhouettesFor this, they must not be flat, just like the human body itself.
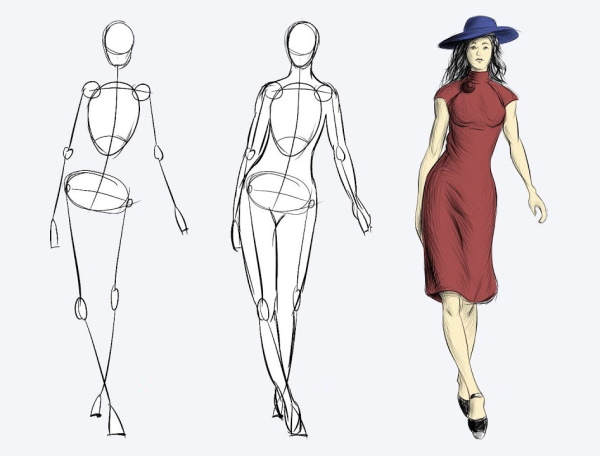
For work you will need a hard pencil, which does not leave marks when erased. After it, the finished sketch will look natural. The pose of the model is also important: only in motion can you show the outfit in all its glory.
It is better to start drawing clothes from the edge. The edges of the fabric always touch the skin. The edge can be on the collar, at the sleeves, at the waist and hips. It cannot be drawn as a straight line, because the clothes should fit the model, and therefore repeat the contour of her body. The direction of the contour line depends on the movement of the body part on which it is worn.
Drawing a sketch consists of several stages:
| No. | Stage | Description |
| 1 | Drawing clothes | When creating a dress or suit, you need to consider what should be in the drawing. The image needs to be thought out in advance, including small details and strokes. A dress or suit should follow the curves of a person's body and should in no case be straight as if on a hanger. |
| 2 | Creating a human image | Professional designers draw their sketches directly on the model, and they rarely observe proportions. But they are artists whose main goal is to show a suit, not the beauty of the human body, so their models of people are often called stylized. They do not need to study in detail the structure of the human body and the proportionality of its body. It is enough to outline the silhouette with a few lines, and put a dress on this peculiar frame.
Step-by-step drawing for beginner artists should be as follows:
|
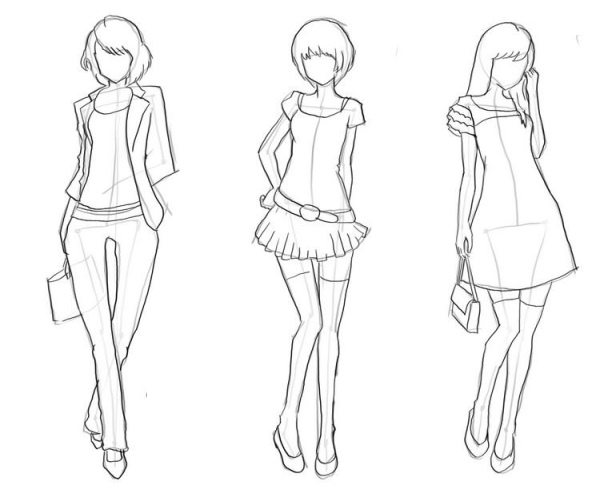
| 3 | Drawing clothes on top of the created model | After creating the silhouette of the figure, the designer can begin drawing clothes on it. It will decorate the not very attractive image and make it more lively. The main thing here is the dress, and the model is given a supporting role. In the world of fashion industry, all new models first look like hand-drawn sketches, which are eventually embodied in reality. When a sketch appears, a figure is drawn to it, on which it is tried on, in order to understand how it will look when it is sewn from the cut material. To do this, it is enough to designate a schematic image as a canvas for new dresses, trousers, coats and blouses. In such a drawing, you can understand what details can decorate clothes, choosing the right option of frills, ruffles, buttons and seams. |
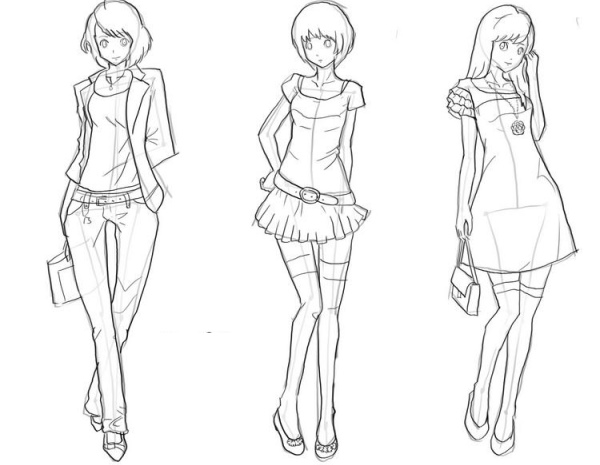
| 4 | Drawing clothes and accessories | When the base is ready, you can start drawing the product in detail. You can choose not only the material, color and trim details, but also the pattern on it. This will make the model modern and beautiful. To create your own line, it is better to come up with original details that will only be in this collection. Fresh ideas will allow you to combine things into a single collection, creating a unique style. To do this, the fashion designer must always be at the center of fashion trends, but at the same time have his own creative ideas that make him different from others. |
Sketches should be made with confident pencil movements. This will highlight the author's boldness and show the collection from its most advantageous side.
To do this, all the folds and curves in the right places need to be carefully drawn. Then they will fit the waist, shoulders, hips and arms as if in reality. This can be done from memory, recreating the movement of a living person.
Learning to draw silhouettes of people is not easy, but if you want, you can achieve good results. The main thing is not to forget about proportions, the peculiarities of the construction of individual organs, and to practice more.
Video on the topic: silhouettes of people for drawing
How to draw silhouettes of people: