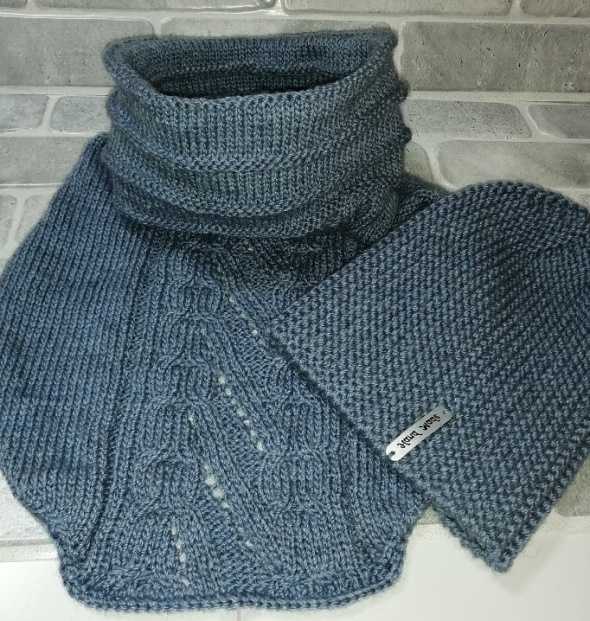
Short row or partial row knitting is a popular technique used to create warm, woolen garments.
It is quite simple to perform and can be used by both experienced and novice craftsmen when making a beanie hat and involves partial knitting with the selected pattern, followed by turning and continuing the work in the opposite direction.
Features of the technique
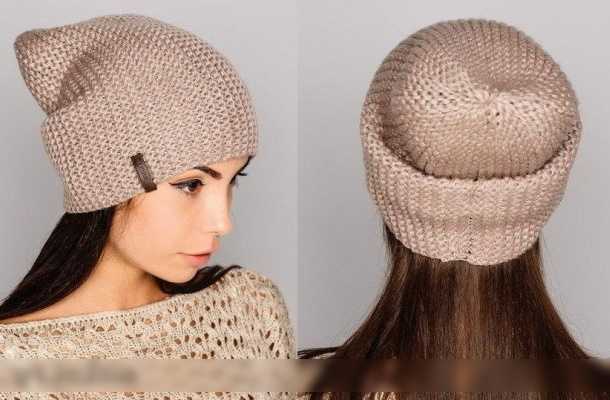
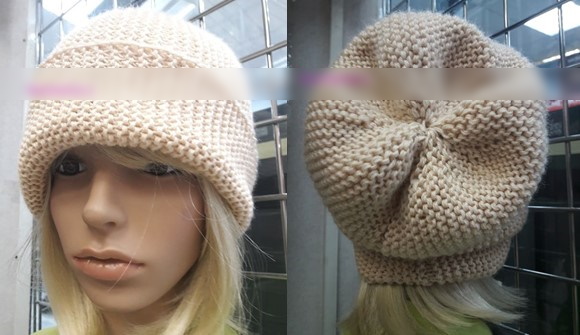
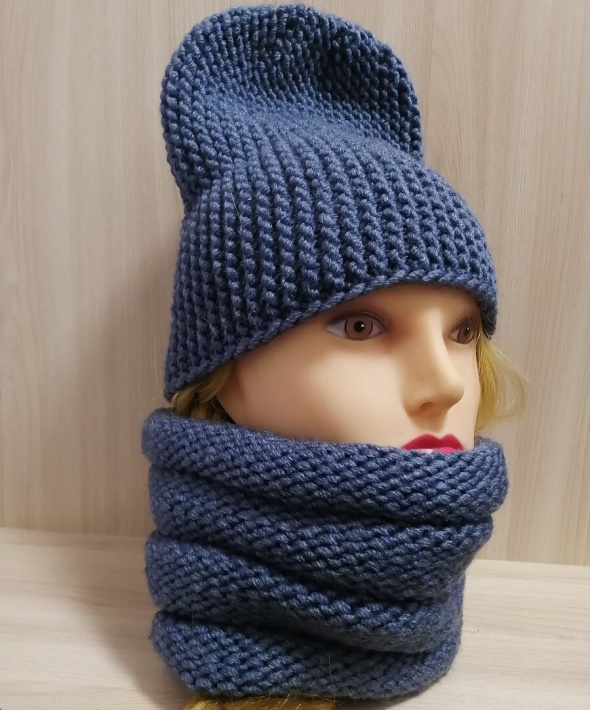
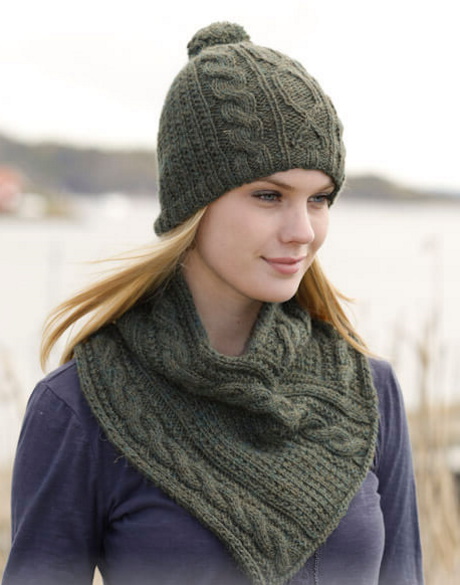
A beanie hat with short rows is a stylish and fashionable youth accessory made from thin or thick wool yarn.
Its main difference is the narrowing at the crown, achieved by creating incompletely knitted rows, after which the fabric is unfolded and the work continues in the opposite direction.
In the next row, the same loops are knitted + 1 additional, and then the knitting is turned again. It continues until the initial row of loops is completely knitted.
You can use any patterns (braids, elastic, chain) in this knitting technique for a beanie hat, but the most convenient for beginners will be working with a garter stitch or a stockinette stitch.
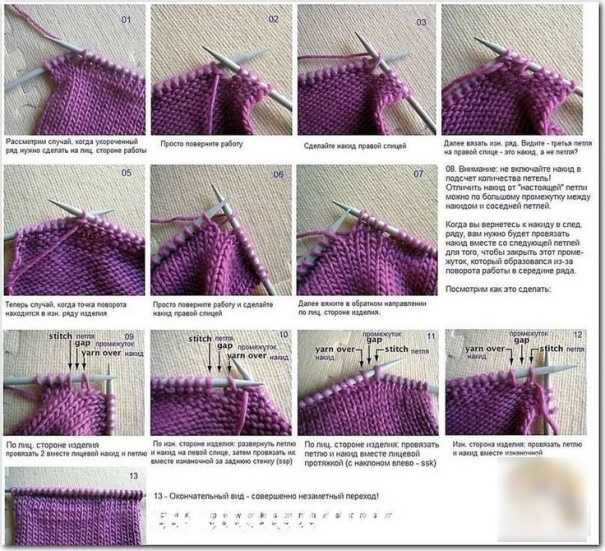
The pattern is knitted up to the turning point marked with a marker, after which there is a transition to another row with a yarn over, using a “German”, “Japanese” or lasso loop, which allows you to avoid the appearance of “holes” in the knitting.
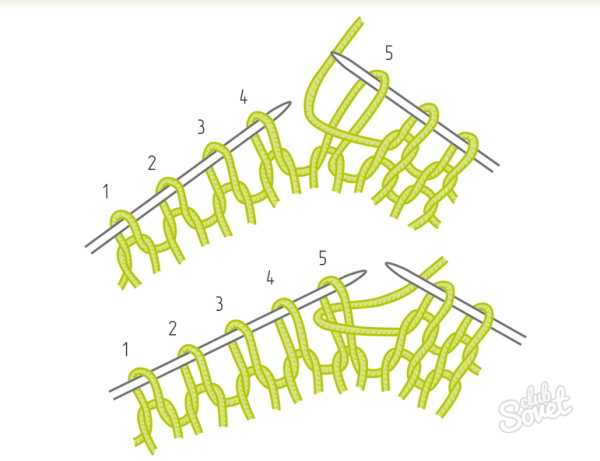
Using a yarn over
When using a yarn over:
- The 1st circle is first knitted according to the pattern, and then the turning point is marked with a marker, the fabric is turned over and a yarn over is made onto the right knitting needle.
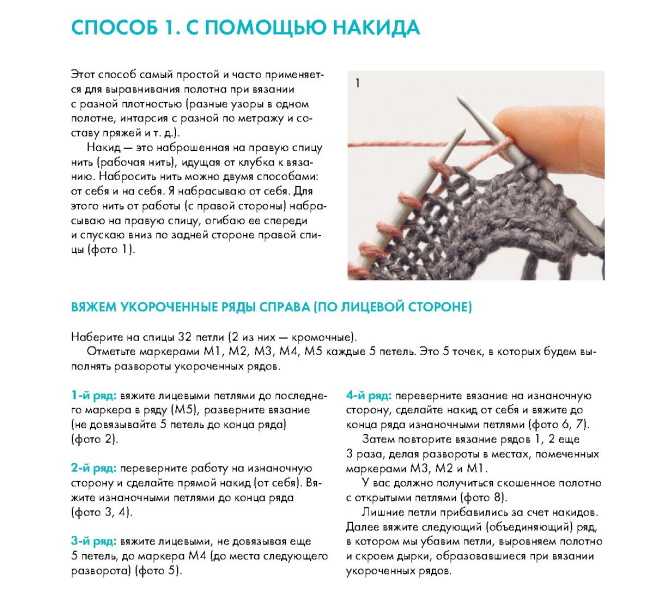
- The 2nd row is knitted to the marker, after which the product is turned over to the front side again and a new yarn over is made.
- In the 3rd row, the yarn over is knitted with a front loop together with the next one, and in the purl (4th) row, it is knitted with a back loop.
With knitting of the loop of the previous row
When creating a turn with a loop knitted from the previous row:
- In the 1st row, the pattern is first made according to the diagram. In the place of the turn marked with a marker, the right knitting needle is inserted into the loop located on it, but on the row below, knitted as a face and transferred to the left knitting needle.
- The fabric is unfolded and begins with a slipped stitch, after which the pattern is knitted to the marker. After that, from the stitch located one row below, the right knitting needle is knitted purlwise, transferred to the left knitting needle (it remains on the same side).
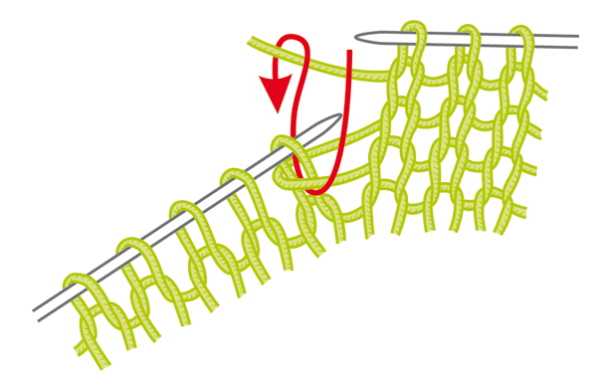
- Turn the work over and knit the 3rd row entirely with front loops (including the additional one), and the 4th row with back loops.
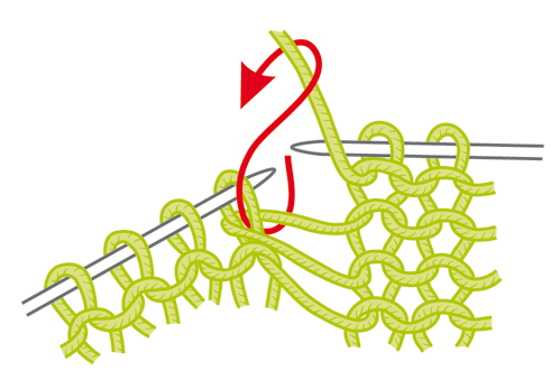
Lasso loop
Performing a lasso loop involves:
- Knit the 1st row according to the pattern (up to the marker marking the turn), after which the loop should be transferred to the right knitting needle, and the working thread should be brought to the wrong side and wrapped around its loop.
- Turn the fabric with the slipped and wrapped lasso loop onto the left knitting needle, and when knitting the next row to the marker, make only purl loops, and then wrap the new loop.
- Go to the front side and pick up the lasso loop from the bottom row with the left knitting needle and knit it together with the adjacent front loop. Then knit according to the pattern or with front loops.
- The loop in the purl row is knitted in a similar manner.
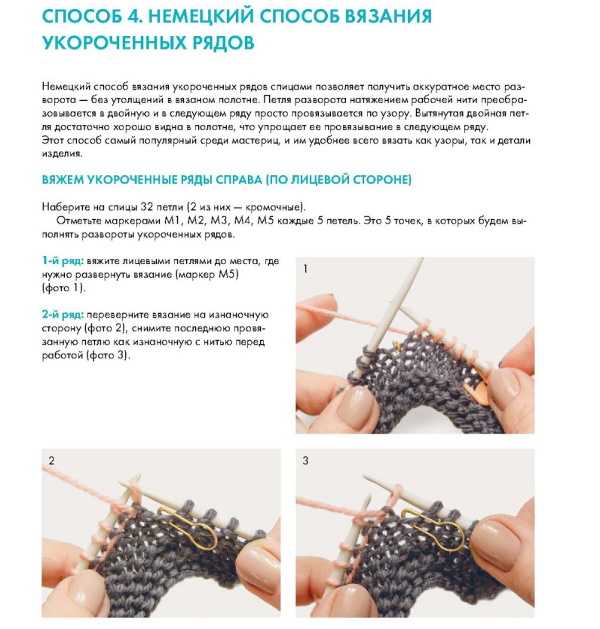
German loop
When using the "German loop" you should:
- In the 1st circle, perform a row according to the selected pattern to the marker mark (installed at the turning point) and then turn the fabric. The next loop should be transferred to the right knitting needle, while the working thread is tightened so that the walls of the last 2 loops of the previous circle protrude.
- Perform the 2nd purl row (before turning) and turn the fabric. Again, slip the loop onto the right knitting needle, tighten the working thread, highlighting the walls of the loops from the 1st row.
- Turn the product over, make a pattern repeat, and knit the tightened loops behind the walls as front loops.
- In the same way, knit the purl stitch behind the walls of the loop of the 4th row of the wrong side.
Japanese rotary hinges
When using a Japanese hinge, it is assumed that:
- Perform the 1st round according to the pattern of the selected design and, turning the product over, transfer the next unknitted loop to the right knitting needle.
- Complete the 2nd purl row, knitting up to the marker mark (indicating the turn), turn the product over, slip the starting loop of the circle and knit it with face loops.
- Approaching the turn, turn the right knitting needle towards you (so that the wrong side is visible), find the anchor thread (it is located at the junction of the penultimate and last loops), located one row below, pick it up with the left knitting needle and knit it with the front one.
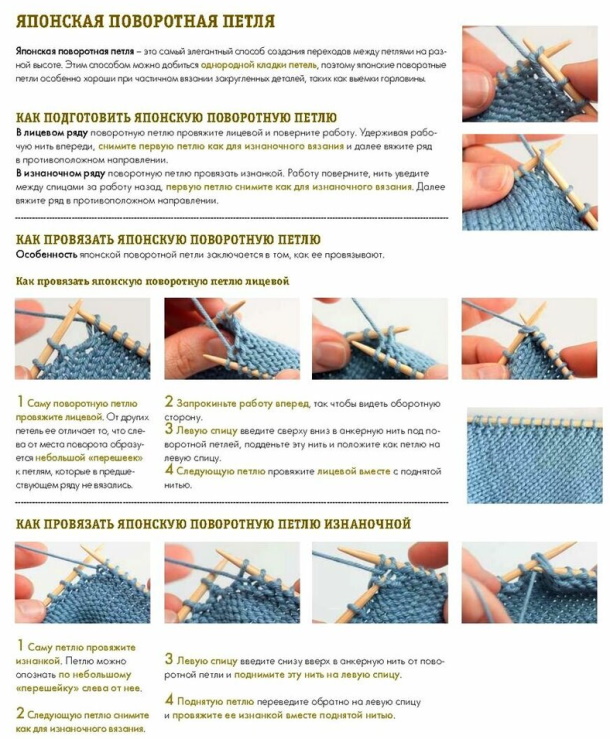
- Do the same on the wrong side, only the anchor thread should be knitted as a purl stitch.
The choice of a specific knitting technique depends on the master himself.
Master classes for beginners
The beanie hat is knitted in short rows with a fabric consisting of several wedges that smoothly flow into one another. The crown will be on the left side, and the forehead on the right.
Necessary tools
Tools used:
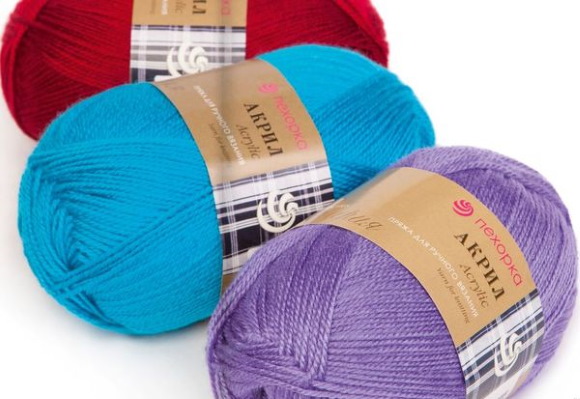
| Threads | For knitting hats, high-quality wool or semi-wool (thick or medium thickness) yarn with a yardage of 200-300 m in one skein is used. It can be made of wool (merino, alpaca) with the addition of acrylic, angora or nylon (at least 10-15%). The choice of a specific brand depends on the preferences of the master, but the most popular among professionals are threads of the following brands: · Pekhorka; · Alize; · ALPI; · Lana. The product obtained from their use is soft and stretches well, but at the same time does not lose its original properties for a long time. |
| Tools | Knitting needles are selected depending on the thickness of the yarn or can be 1-2 sizes smaller, which will make the pattern more ornate and voluminous. You can work on both straight and circular knitting needles with a 60-80 cm cord, made of wood, bamboo or aluminum. |
| Additional elements | · scissors;
· knitting marker; · thread with a needle; · notebook for notes; · ruler. |
Garter stitch
The beanie hat in garter stitch is knitted transversely from wool yarn (for example, Pekhorka) in 2 folds of thread in shortened rows. Before starting work, a sample is necessarily knitted. The knitting density in this case will be 25 loops per 12.5 cm.
Since the product is knitted not in the usual way, but in a transverse way, an additional calculation of its height is carried out, as follows:
- to create the “stocking” model, you will need to add 35 cm to the height;
- for a hat with a lapel and a simple beanie model, the height is taken as the usual 25-30 cm.
Calculation of loops: - 25 * 35 / 12.5 = 70 loops.
During work you need to:
- Cast on 70 stitches and knit:
- in the 1st row, knit 65 loops. You will need to stop when there are still 6 loops left unknitted on the knitting needle and wrap the 66th loop with the working thread. To do this, you should throw it onto the right knitting needle unknitted, wrap it with the working thread pulled out to the wrong side and return it to the left knitting needle.
- Turn the product over and complete the 2nd row entirely with purl stitches.
- In the 3rd round, knit 66 stitches, and transfer the 67th stitch unknitted to the right knitting needle, wrap it with the working thread and return it to the left knitting needle.
- Row 4: Complete the entire row with purl stitches.
- In the 5th round, 67 loops are knitted, and 68 are inserted as before onto the working thread and thrown over to the wrong side.
- 6, 8, 10 and the remaining odd rows are knitted as 2nd and 4th purl stitches.
- In the 7th round, 68 loops are knitted. In each subsequent odd round, their number will increase by 1 (69 in the 9th row, 70 in the 11th row).
- After the first wedge is ready, you need to do 2, 3 and 4 in the same way, and each time it is recommended to try it on, applying the fabric to your head in a slightly stretched form.
- Once 12 wedges have been completed, the fabric needs to be sewn together, for which the last row is left on the knitting needles. Its long end of the thread is inserted into the needle, passed along the edge of the crown and pulled together.
- The seam is made in a blind way, for which 2 rows of face loops are knitted before the main set of loops using an auxiliary thread.
- Once you have finished working, you will need to unravel them (you can also just leave them open) and sew them loop to loop (it is advisable to imitate the front ones).
This hat can be worn as a stocking hat or with turn-ups.
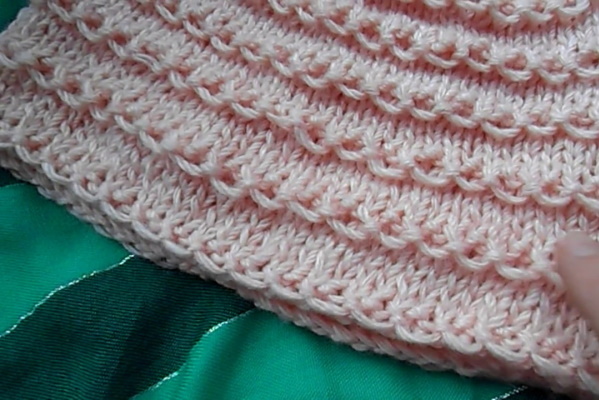
Stockinette stitch
A beanie hat with short rows made of thin combined yarn, for example, Alize Superlana Tig (100 g / 570 m) and Alize Angora Gold Simli (100 g / 500 m), is knitted with a “garter stitch” pattern on circular knitting needles No. 5 in 3 strands of yarn.
You will also need the following for the job:
- hook;
- sewing needle.
The approximate size of the hat is 56-58 cm, with a height of 27 cm (without the lapel), and you should:
- Using a hook and an additional thread of a contrasting shade, create a chain of 50 loops. The thread can be cut off.
- Unfold it and cast on 50 stitches along the teeth using the main color thread:
- In the 1st row, knit 42 stitches (8 stitches remain unknitted). Remove the next stitch, 43, to the right knitting needle unknitted, wrap with yarn and return to the left knitting needle.
- The 2nd round is worked entirely in stockinette stitch (including the edge loop).
- In the 3rd row, 42 loops are knitted, and 43 is pulled up with the knitting needle from the 1st row and knitted together with the next loop. The next loop, the 7th from the edge (44), is first transferred to the right knitting needle (wrong side), wrapped with the working thread and returned, not knitted, to the left knitting needle.
- Turn the knitting over and knit 43 stitches in the 4th round (the last, edge stitch, is also knitted).
- In the 5th round, knit 43 loops with the front surface, pull the 7th (44) loop from the bottom row and knit.
- Wrap the 6th loop from the edge (45), as in the previous odd rows, with thread and turn the knitting.
- In the 6th row, knit 44 loops entirely (including the edge loop), and in the 7th row, knit 44 loops, pull up the loop wrapped from the bottom row (5th), knit it and wrap the thread around the 5th loop from the edge in the row.
- Turn the knitting over and work the next 8th row, then the remaining even circles (10, 12, 14, 16) in the same way as the 6th, 4th, 2nd rows.
- In the 9th and 11th rows, you need to knit 47 (in the 9th) and 48 (in the 11th) loops, after which, acting in the same way as with the other odd rows, you need to lift the wrapped loop from the bottom row, knit it together with the next standing front loop and first transfer it to the wrong side, and then wrap the next, not yet knitted loop of the row with the working thread.
- The wedge ends on the 16th circle, knitted entirely with front loops.
- In total, to create a hat, you will need to knit 7 wedges in a similar manner, and then sew it together, for which you will need:
- Unravel the first set row and transfer the loops to the knitting needle in parallel. There should be as many of them as there are loops on the opposite side of the product.
- Sew the top, gathering the loops along the edge and pulling the top together to tighten the thread.
- Sew the edges of the hat using an invisible stitch, loop-to-loop, and hide the ends of the thread inside the product.
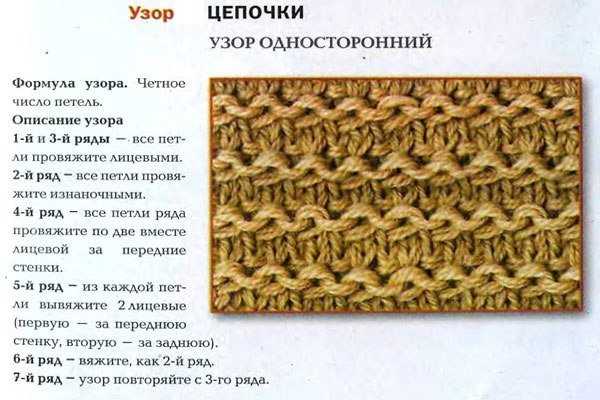
With the "Chain" pattern
The beanie hat with short rows and a chain pattern will be 30 cm high.
You can wear it with a lapel or a slouchy top, and for knitting you will need:
- Valencia wool yarn, with the addition of 7% angora and 50% acrylic, density 100 g/220 m;
- circular needles 3.5;
- ruler;
- needle;
- scissors.
Work begins with knitting a sample, which is necessary to determine the number of loops in 10 cm and to clarify the cast-on row.
After this follows:
- Cast on 54-56 stitches + 1 using knitting needles, join the knitting into a circle and start working on the pattern, for which you need:
- After removing the edge loop in the 1st row, knit it with face loops.
- Turn the fabric over and, after removing the edge loop, complete the 2nd round with purl loops.
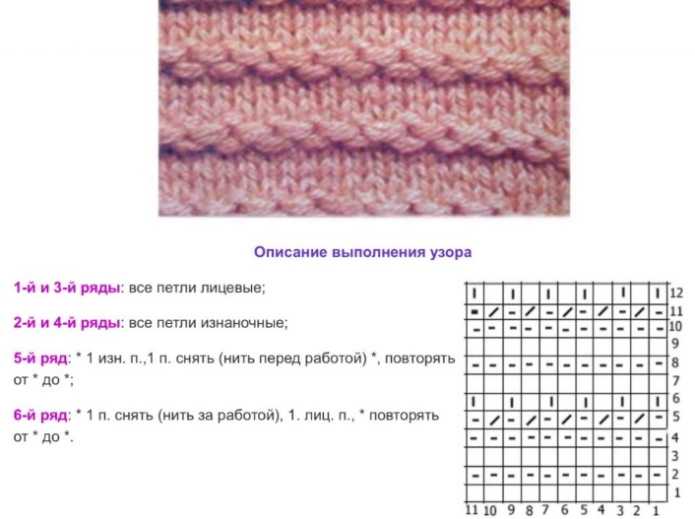
- In the 3rd row, make a rapport consisting of 1 purl and 1 slipped loop. Repeat it until the last 6 loops, after which the outer loop in the row is transferred unknitted to the right knitting needle, wrapped with the working thread and returned to the left knitting needle.
- Turn the fabric over and make the 4th circle (after the wrapped loop) with a rapport of 1 front and one slipped loop. Repeat until the end of the circle.
- Row 5 is completed entirely with only face loops. The loop wrapped around is also knitted as a face loop, for which the right knitting needle should be inserted in front under the wrapping thread, grab them together and make a knot. The next (from the edge), unknitted loop is wrapped around with thread.
- The 6th round is done entirely with purl stitches, and in the 7th row you should knit all the stitches up to the last 4, knit the wrapped stitch as a front stitch, and wrap the last stitch behind it with a thread, making it the outermost one.
- Turn the work over and complete row 8 with purl stitches.
- In the 9th row, make a chain of 1 purl and slipped loop, 1 purl and slipped loop to the last 3 loops in the row. The previous, wrapped loop is lifted from the bottom row and knitted purlwise. The 3rd (from the edge) loop is wrapped with thread.
- Turn the knitting over and in the 10th row make a rapport of 1 slipped stitch, 1 knit stitch and one slipped stitch. Repeat it to the end of the row.
- Row 11: knit to the last 2 loops. Wrap the 2nd (from the edge) loop and turn the fabric over.
- Row 12 is done entirely with purl stitches, and row 13 is done with knit stitches. The last unknitted stitch is wrapped with thread.
- On the fabric turned over with the wrong side, perform the 14th circle with purl loops, forming the 1st wedge.
- Proceeding in the same way, knit 13 wedges (after 9 wedges are ready, the product will need to be tried on, placing it on the head in a slightly stretched form).
- Sew the cap wedges along the edges and tighten the crown, pulling all the loops together with thread.
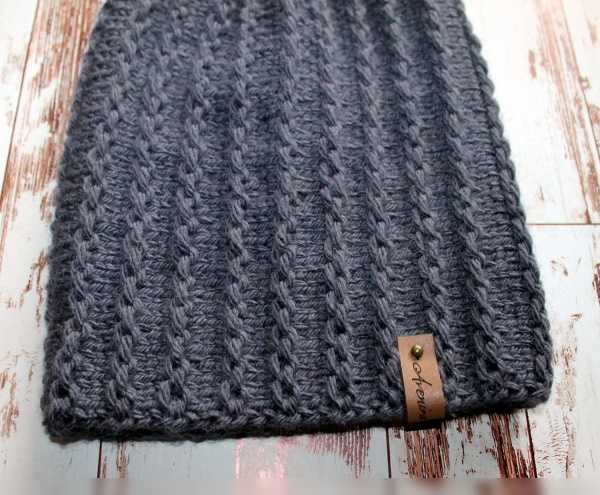
With harnesses
The beanie hat with short rows and cables is knitted by adding 2 threads.
Suitable for work:
- thick wool yarn (100% merino wool) with a density of 50g/170m;
- circular knitting needles, 4.5 or 5 mm thick;
- scissors and needle;
- knitting marker.
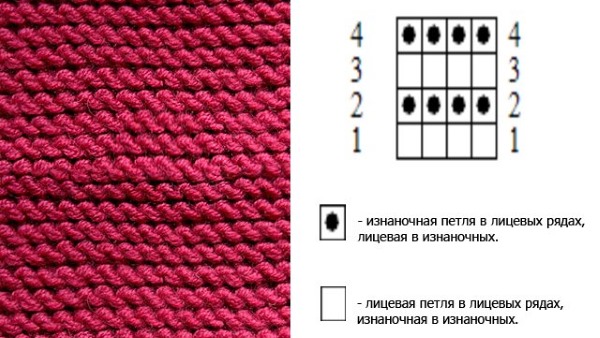
Pattern diagram:
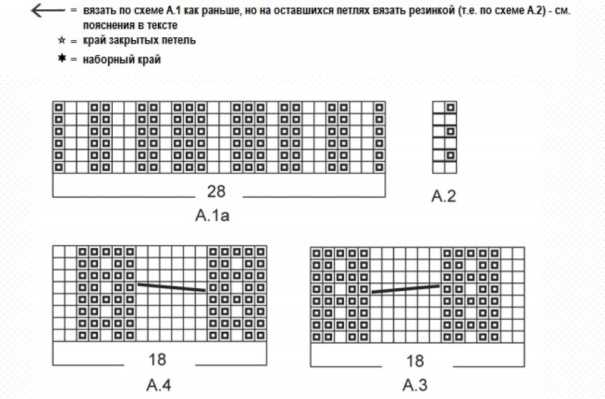
With a knitting density of 17*22 rows, you will need to cast on 109 loops with knitting needles No. 4.5 and knit:
- In the first row, there are 28 loops according to pattern Aa - 1 purl loop and a rapport of 1 front and 1 back loop. It must be repeated 3 times until the last 3 loops - 1 front and 1 back.
- Place a marker at the end of the row and knit 5 more rounds in exactly the same way.
- Switch to knitting needles No. 5 and perform row 7 according to pattern A1a - 1 purl loop + rapport of 1 front and 2 purl loops knitted together. Repeat until the last 2 loops in the circle - 1 front and 1 purl. A total of 83 loops should be knitted.
- In the 8th row, make a pattern according to the A1b pattern, consisting of 28 loops and representing 2 braids crossed in the center of the hat. Mark the beginning and end of the pattern with a marker and go to the A2 pattern. It is knitted up to the marker (placed at the beginning of the A1b pattern).
- Knit the fabric to a height of 18 cm and continue working with a 1*1 elastic band (alternating front and back loops), completing another 2.5 cm of the product.
- Start decreasing by knitting 2 front and back stitches together in each row (thus decreasing 13 stitches).
- After there are only 28 loops of the A1b pattern and 42 loops of the elastic band left in the row, connect the purl loops with the front loops so that there are only 29 loops left in addition to the pattern.
- Reduce 13 stitches (the row will consist of 16 stitches + pattern) and perform the next round according to the pattern 2 front + 2 back stitches.
- In the final row of 18 loops, cut the thread, pull it tight, securing the crown and sew (it is best to bring it to the wrong side).
- Decorate the hat with a pompom made of fur or thread.
Tips for Beginners
When knitting a hat with shortened rows, professionals recommend that beginners:
- Start working with easier patterns (garter stitch, stockinette stitch), gradually complicating the work pattern.
- Use only high-quality yarn for work, with the obligatory addition of nylon or acrylic to the wool fibers, which will make the finished product more durable, soft and wear-resistant.
- When knitting in a circle, use a marker to mark the beginning and end of each row. It should also be used if knitting needs to be put aside urgently, without the possibility of knitting the row to the end.
- Use a notebook, noting all the calculations, decreases and increases of loops. You can also paste in the data on the selected threads.
- Circular knitting needles should be taken according to the thread manufacturer's recommendations or 1.5-2 sizes smaller, which will make the pattern more embossed.
Short rows are ideal for creating youthful beanies with a perfect crown.
Compatible with almost any pattern, they involve assembling the product from several wedges, require a certain amount of care when performing the work and adherence to the chosen technique of transition and loop wrapping.
Video about knitting
Short Row Beanie Hat: