Hats made of thick yarn are a popular item of clothing for knitting. There are many different ways to make hats, such as thick yarn earflaps, cuffed hats, rib knits, English knits, and braids.
Knitted thick yarn earflap hat for women
A knitted hat with earflaps allows you to protect your head from the cold during periods of low temperatures.
There are several methods of making the product:
- garter stitch;
- front or back stitch;
- relief pattern;
- stockinet;
- jacquard knitting.
Despite the differences, the basic elements are similar across all models and styles.
These include:
- main fabric;
- ears;
- visor with or without a turn-up.
The differences in the products are due to changes in the shape and length of the visor and ears. For beginners, making a hat with earflaps using garter stitch is suitable, in which the front and back rows are knitted like front loops. Also, a popular knitting method is a hat with earflaps with long ears.
Garter stitch hat with earflaps
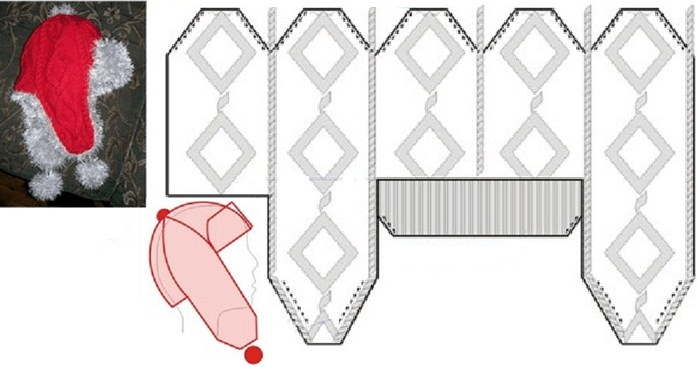
The diagram shows an example of a finished model of a hat with earflaps made from thick yarn.
Instructions for making a hat with earflaps
First of all, before making a headdress, it is necessary to determine the size of the future product.
To do this, take measurements from the head using a measuring tape, according to the instructions:
- Measuring the height of the head from the eyebrow line to the back of the head, passing through the crown.
- Determining the depth of the hat, for which it is necessary to pass the tape from one ear to the other, also through the crown. The resulting number must be divided by two.
The width of one ear is 1/3 of the width of the back of the future hat. To determine the size of the product, use the formula. Half of the head circumference is taken as X: X: 2: 3 + 1-2 cm. If the finished headdress is planned to be insulated by adding wool or lining, then 2 to 5 cm of the future lining are added to the measured height.
To make a hat you will need:
- 150 grams of yarn (or 2 balls);
- knitting needles No. 6 or No. 7;
- scissors;
- hook #6 (optional).
Instructions:
- Making an ear. To do this, cast on 12 stitches and knit, adding 1 stitch in each row on each side until the number of stitches reaches 20.
- The next 16 rows are knitted without increases.
- Afterwards, you need to cast on eight loops and knit 22 rows without adding loops.
- The finished fabric is put aside and the second ear is knitted using the same technology.
- Making a visor. You need to cast on 22 stitches and knit, adding 2 stitches in each row on each side until the number of stitches in a row is 30.
- The next 26 rows must be knitted without increases. Put the finished visor aside.
- You need to transfer the finished elements to one of the knitting needles, observing the order: ear, visor, ear.
- On the elements knit 40 rows without adding loops. In the first row it is necessary to cross between the parts to avoid the appearance of holes.
- Next, you need to continue knitting rows, decreasing 7 loops in every second row, until the total number of loops reaches 9.
- Afterwards, the thread must be cut and pulled through the loops.
- Next, you need to knit the back seam, fold back and secure the visor.
- If desired, the edges of the product can be tied with a seam using a crochet hook.
Features and nuances
A hat made of thick yarn is easy to make with knitting needles if you prepare it correctly. You need to first make a sample of a knitted fragment of 10x10 cm. Such a fabric will allow you to understand how many loops there are per 1 cm of the finished product and avoid tightening the hat. You can check the fragment during the making of the headdress.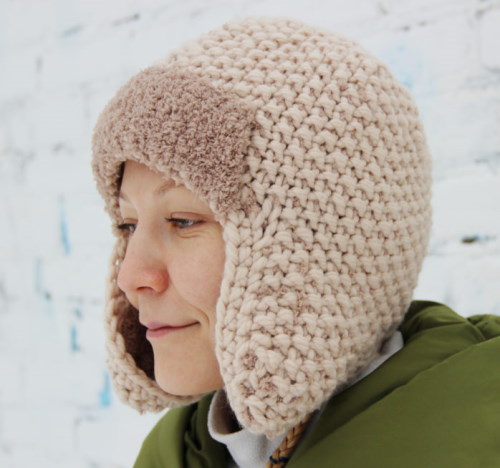
To insulate the hat, you can use a lining, natural or artificial fur. This will allow you to use the product in winter and at low temperatures. When using insulation, it is necessary to include additional loops in the manufacturing pattern, providing free space for the lining or fur.
The finished product can be decorated using various colored threads, decorative inserts, patches and embroidery. It is important not to use a large number of decorations on the hat to avoid an excess of small details.
Thick yarn hat with a turn-up
A hat made of thick yarn with knitting needles using a lapel is one of the most versatile headwear, which is suitable not only for women, but also for men and children. The product is made using large-diameter knitting needles. Often, hats are decorated with a variety of patterns, which are large due to the thick yarn. Such a headdress is versatile and relevant for any image. In particular, they are suitable as an accessory for oversized clothing.
To make a warm hat with a turn-up you will need:
- 30g of yarn;
- circular knitting needles No. 4;
- knitting needles No. 4;
Pattern for a hat made of thick yarn with a turn-up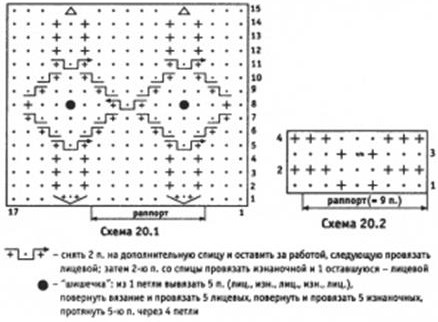
The diagram shows a hat with a lapel, made using the "bumps" pattern. Such decoration allows the headdress to acquire an original appearance without the use of additional decor, and thick yarn provides protection from the cold in the winter.
Instructions for making a hat with a turn-up
A hat made of thick yarn with a lapel is one of the simple methods of making hats with knitting needles. Before starting knitting, it is necessary to measure the head to determine the size. For knitting, an "elastic band" is used according to the scheme - 1 front loop, 1 back loop.
Instructions for knitting this type of hat:
- Cast on 60 stitches with 2 strands of yarn using the “cord” method.
- Using diagram 20.1 as a guide, knit 7 cm of the product in a circle, forming a pattern.
- In the first row you need to add 20 loops.
- After forming the pattern, you need to add 12 loops evenly across the product, knitting 5 rows with an elastic band.
- It is necessary to knit each loop of the elastic band in pairs with each loop 5 rows below.
- Form the bottom using stockinette stitch.
- At the bottom of the product, divide the loops into 8 parts.
- In every second row, knit 2 stitches together at the beginning of each section.
- Pull the remaining loops together with the thread used in the work.
Features of knitting a hat with a lapel
An important factor in making a knitted hat is the choice of material. The properties and functions of the future product depend on the yarn, so it should be treated with care.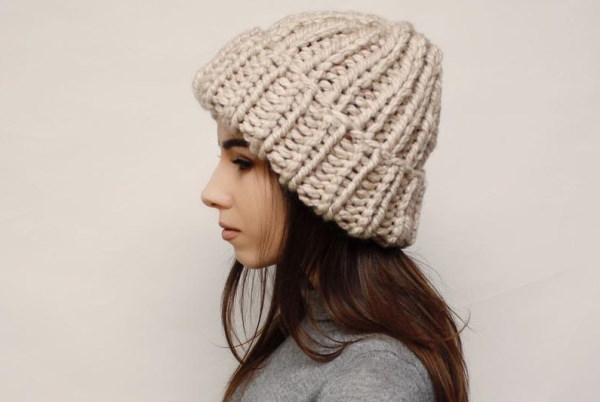
| Yarn type | Properties in the finished product |
| Melange | They have a bright color, which must be taken into account to avoid visual loss of color. |
| Pile and boucle yarn | The most suitable option for garter and stockinette stitches. It is used to make visors, trims and other elements. |
| Acrylic | Gives the product greater strength, durability, and also reduces shrinkage when washing. |
| Mohair, merino and angora wool | Provides additional protection from the cold, suitable for making winter hats. |
| Cotton, silk and bamboo fiber | Provides additional air circulation through the headgear. Used for hats intended for wearing during the spring and autumn. |
Also, choosing dense and thick yarn can lead to a decrease in the width and an increase in the density of the finished product. To avoid this, it is necessary to make a fragment of the finished product 10x10 cm wide.
If you don't have circular knitting needles, you can use short knitting needles for socks and gloves. In this case, you will need to use several knitting needles at once. For a voluminous product, it is recommended to use knitting needle stoppers to avoid losing loops and to fix them.
Thick yarn hat with elastic band
Knitting with the use of "elastic" is considered widespread. Such hats may differ in style, but the method of their production is similar.
Common styles:
- tight-fitting;
- elongated;
- large knit;
- free.
By reducing the number of loops towards the edges of the product, this type of headwear fits tightly to the head.
Pattern of a hat made of thick yarn with a rib band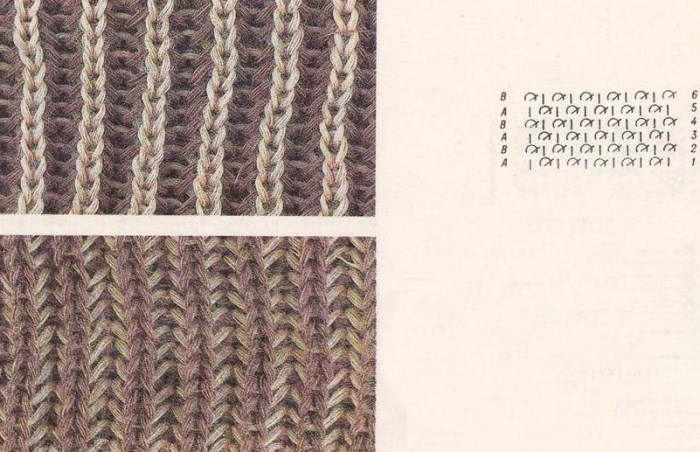

Instructions for making a hat with an elastic band
As with other headwear, to knit a rubber band hat, you must first determine the size of your head and knit a sample. The choice of yarn type depends on the expected season in which the hat will be worn and on the required properties of the finished product. Regardless of the style, the manufacturing principle will be similar.
For the "elastic" hat you will need:
- 200g of yarn, when making a two-color product, you need 100g of one color;
- knitting needles No. 4;
When using yarn of two colors, it is recommended to mark the rows with a marker. On the chart, the colors are marked with the letters A and B.
Instructions for knitting a "rubber band" hat:
- You need to cast on 60 stitches onto the knitting needle.
- Knit 10 cm of the product with an elastic band for the lapel.
- Knit 3 cm with a 1x1 elastic band, using one or two colors.
- Knit 3 cm of the bottom with a 1x1 elastic band.
- Knit 2 rows of 2 stitches from the front.
- The remaining loops must be pulled together with the working thread.
Knitting features
For a thicker and denser knit, which gives the product an "airy" look, you can fold the working thread twice. It is important to remember that the thickness of the knitting needles (and accordingly their number) also depends on the thickness of the threads.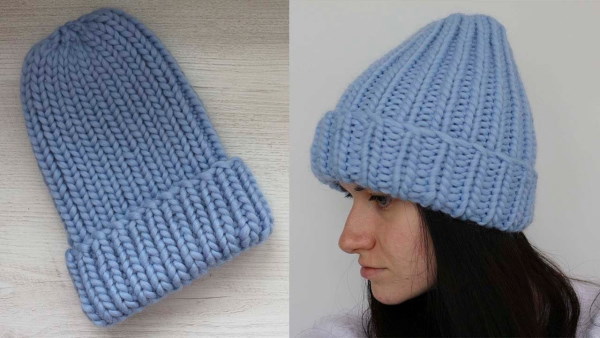
The finished product can be decorated with embroidery and decorative elements. The key factor in this case is the weight of the decoration. A large mass of decorative inserts can lead to stretching of the hat threads.
Large English knit hat
A thick yarn hat knitted with English knitting (or Takori hat) was invented by Svetlana Takori and is a long and airy headdress with one or two lapels. Despite the simplicity of manufacture, the hat is recognizable and popular. The length of the accessory may vary, it starts from 40 cm and ends at 60 cm. This characteristic depends on the number of lapels intended to protect from the cold by covering the head more densely.
Knitting pattern for a Takori hat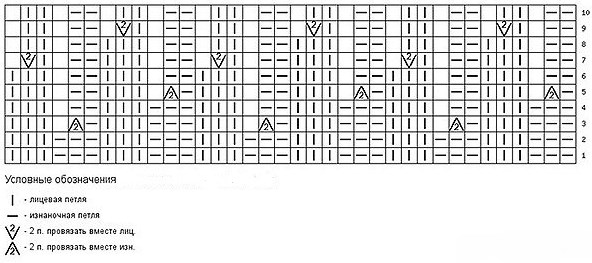
Instructions for making a Takori hat
Before starting work on the product, it is necessary to determine the appropriate size and number of loops per 1 cm. To do this, the head is measured and a trial piece is made.
To knit a hat you will need:
- yarn (about 150g);
- circular knitting needles (a set of 5 double-pointed knitting needles will also work);
- needle;
- scissors;
- tailor's tape;
- hook (optional).
The sequence of actions when making a hat:
- The thread needs to be folded several times (about 4) and cast on 60 loops to create a dense edge.
- The rest of the product is knitted with threads folded twice.
- The first row is done according to the pattern: 1 loop is removed, 2 is removed with a yarn over, as if to purl, 3 is knitted together with the front loop.
- The pattern of the second row: 1 loop is removed, 2 with a yarn over is knitted as a front loop, 3 with a yarn over as a purl loop. The row ends with a purl loop.
- Odd rows are knitted according to point No. 3, even rows - according to No. 4, until the fabric reaches the required length.
To make a hat, you need to make decreases towards the head so that the product fits more tightly.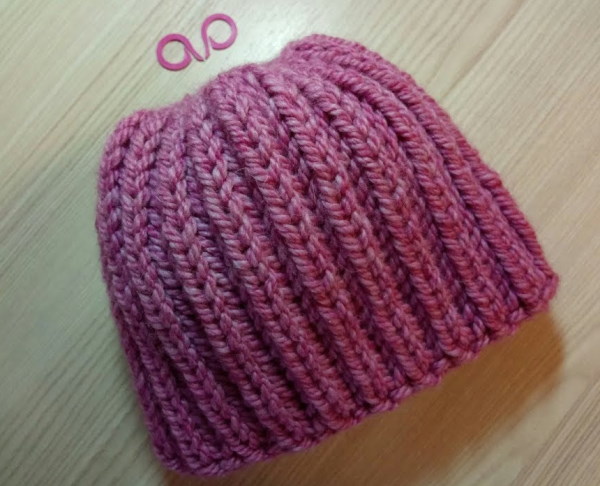
There are several ways to decrease:
- A smooth transition from English rib to 1X1 rib or stockinette stitch. It is done by dividing the fabric into three parts and knitting loops at selected key points. The first decrease should be behind the edge, and the rest should be evenly distributed across the fabric. This decrease is often used as a decorative element.
- Fitting. It is made by decreasing the fabric by 4 loops in every third row. For this method, it is necessary to knit 2 loops together, placing them evenly on the fabric. In this way, it is necessary to knit 33 rows, ensuring the evenness of the pattern.
- It is considered an analogue of the second, the difference is the division of loops into four parts, forming a semblance of triangles. When decreasing, it is necessary to knit three loops together in each 4th row. It is important to observe the slope of the loops at the beginning of the row to the right, at the end - to the left. As in the second method, it is necessary to knit 33 rows.
It is necessary to finish decreasing when the number of remaining loops is about 10-13. They need to be pulled together, leaving a working thread for the seam.
Features and nuances
One of the key factors is the length of the future product. If you need a product with a double turn, the hat cannot be shorter than 47 cm. Also, the product is knitted without using seams, in one piece, using circular knitting needles. The recommended yarn is a material that contains mohair.
Thick Yarn Braided Hat
Making a hat with a braid allows you not to think about additional decoration of the headdress. This knitting allows you to give the hat an effective and relevant look.
There are different types of braid patterns:
- tourniquet;
- simple braid;
- double and triple braid;
- decorative.
Each type of pattern has its own advantages and level of knitting complexity. The pattern requires the use of an additional knitting needle. Braided hats are a common accessory and can complement any look.
Knitting pattern for a hat with braids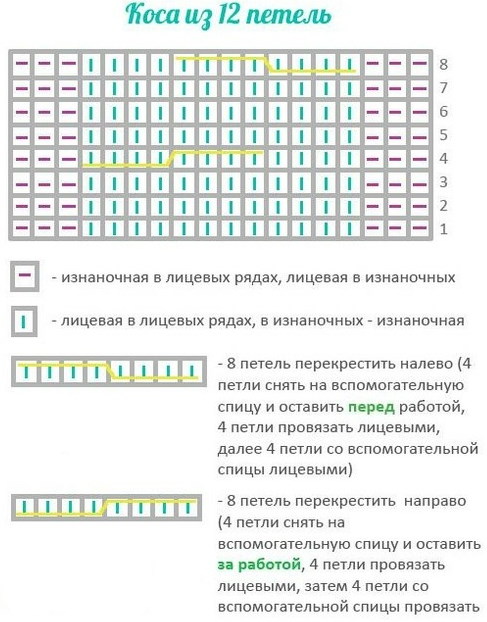
Instructions for making a hat with braids
Before starting work, it is necessary to take measurements to determine the size and make a piece of fabric as an example of the future pattern, allowing you to calculate the knitting density and the number of loops needed for the hat.
For a product with braids you will need:
- yarn of one or two colors;
- circular or straight knitting needles;
- knitting needles for the pattern;
- sewing tape.
Algorithm for knitting a hat with braids:
- Perform 4 additions of working threads.
- Cast on 100 stitches onto the needles, closing the circle.
- Knit with a 2x2 rib pattern to the desired height (when making a hat with a turn-up – to double the height), using the knitting needles for the main fabric.
- Change to patterned knitting needles and, casting on 44 stitches, knit a row with knit stitches.
- Knit the braids according to the pattern, without using purl stitches (12 rapports and 12 front stitches).
- When changing colors, you need to replace the threads one by one per row.
- After knitting for 17 cm, you need to make the first decrease. You need to decrease 1 loop out of 4 in the rapport group (row 4 on the diagram).
- The next three rows are without decreases.
- Second decrease (row 8 of the pattern), decrease 3 loops in the pattern rapport.
- Two rows without decreases.
- Third decrease - knit two stitches together, leaving one stitch knit.
- Row without decreases.
- Fourth decrease – two knit stitches, entire row.
- Row without decreases.
- Repeat the fourth decrease.
- Pull together the collected remaining loops.
Features and nuances
When using an additional knitting needle for a pattern, it is recommended to take a larger number than the main knitting needles. This will make the braid more even and beautiful.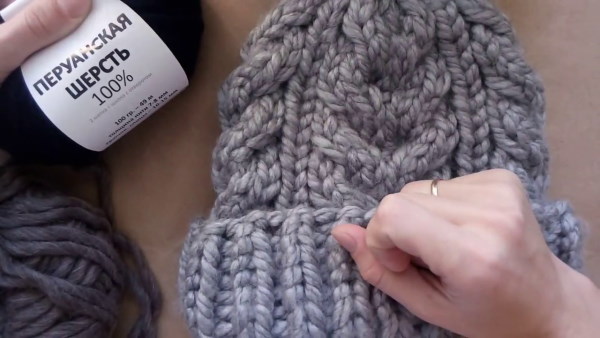
A hat made of thick yarn with knitting needles with a braid pattern is made with both circular and regular tools. For standard knitting needles, you need to lay two additional loops when calculating.
To make a more voluminous headdress, it is recommended to include a few more rapports in the pattern loops.
Hats made of thick yarn have remained popular knitting items for many years. Easy to make, they allow you to create a unique and warm accessory with your own hands.
Video about knitting a hat from thick yarn
Large knit hat made from thick yarn: