The image of a dragon present in myths many cultures, has its own locally specific features. In addition to the specifics of drawing individual species of these creatures, it includes certain stages, without which it becomes more difficult to make a high-quality drawing or copying of a dragon.
Anatomical features of the mythical reptile that are taken into account in drawing
The dragon is a dinosaur-like, fire-breathing, predatory reptile with large wings, sharp teeth, claws, and scales. It is a large and therefore heavy creature, so to move on the ground or in the air it needs a strong body, which usually has well-defined muscles and very powerful bases for its massive wings.
Most drawings of this reptile depict it with a protruding chest, pumped-up paws and a tail with spikes. The size of the head is proportional to the size of the body and the build of the dragon.
A large and massive head is drawn with a large and clumsy body, while dragons with small narrow heads are more slender and fit. Since these creatures do not exist in nature, realistic paintings of many types of dragons will require fragments of the bodies of real animals as a basis for copying. Differences in the features of appearance and physique of some of the most common types of dragons:
| Types of Dragons | Peculiarities |
| European | Classical dragons covered in scales with 4 legs and 2 wings. They are depicted as evil and bloodthirsty. In northern Europe, there are also myths about two-legged winged dragons, which are often classified as wyverns. |
| Multi-headed | They have 2 or 4 legs and 2 or more heads, but the rest of their body structure is no different from ordinary dragons. |
| Eastern | They are depicted as cheerful and friendly. In Eastern culture, dragons have a long, curving body without wings, parts of which are covered with fur or feathers, and squat paws with a massive base, similar to those of birds. Chinese dragons have 5 fingers, Korean dragons have 4, and Japanese dragons have 3. |
| Water | They may be scaleless and covered with fins, as they live underwater. Water dragons are sometimes depicted without wings, in which case they resemble a sea serpent. |
| Indian | Before the arrival of Europeans, American Indians worshiped the "feathered serpent" Quetzalcoatl and similar deities, in their non-human form having the appearance of dragon-like winged snakes with feathers covering their entire bodies or only their wings. |
| Legless | Winged serpentine dragons without paws. |
How to draw a simple dragon step by step
Drawings of dragons for copying depict them with 2 or 4 legs, a pair of wings and a long tail. In addition to forming the skeleton in drawing this creature, you should either detail the muscle cover or cover the body with solid dragon armor.
Typically, the body of this reptile is covered with spikes and heavy scales. The description of the creation of a common 4-legged winged dragon is given with generalized characteristics, allowing you to create a basis for a high-quality drawing with subsequent freedom of improvisation.
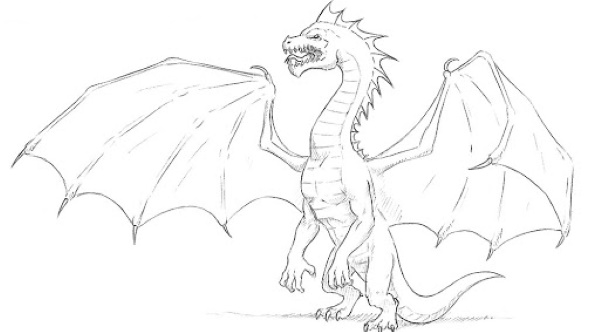
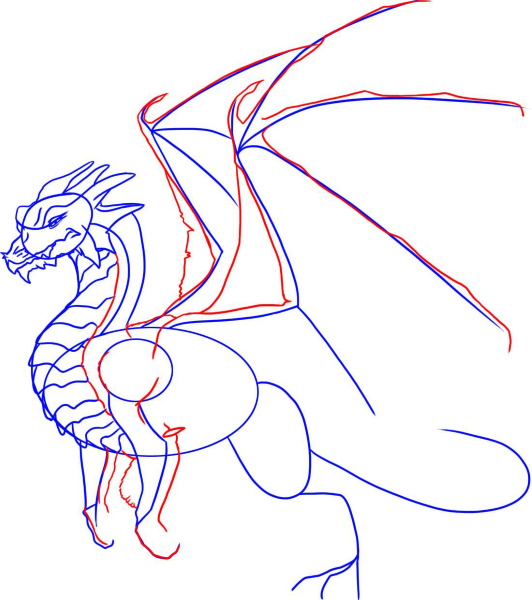
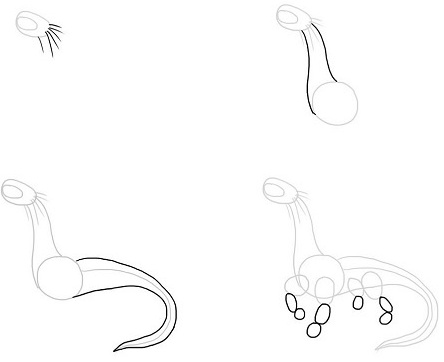
First, draw a sketch or a dragon skeleton. For this, you can combine a dog skeleton, which is suitable due to its protruding chest and general build, with bat wings. A dog's chest, for example, is also used when drawing dinosaurs.
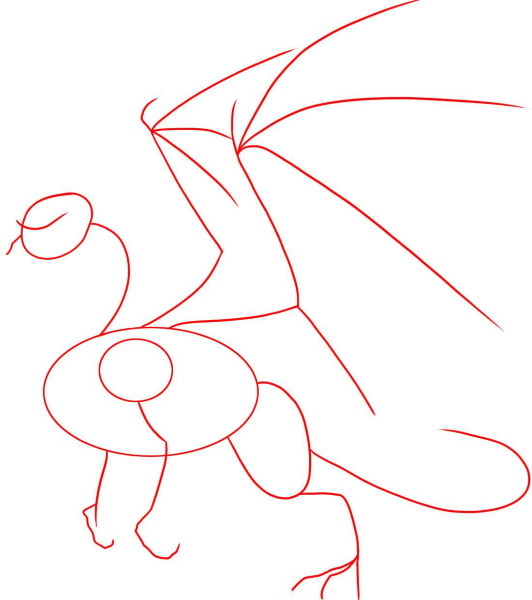
It is not necessary to draw every bone in detail. For the sketch, it is enough to mark the torso, back, skull and end of the muzzle with circles of different sizes, the largest of which is used for the torso, and also draw lines for the limbs, tail and each part of the wings. If the skeleton turns out awkward, you can reduce the length of the neck, paws, and increase the chest.
To create a balanced skeleton, you should follow these guidelines:
- The dragon neck starts at the back of the skull, not at the bottom.
- The knee should be level with the elbow, even if the body is drawn in a half-squat position or ready to jump.
- The size of the wings is welcome, their minimum size should be equal to the body. At the same time, they should be of such a size that the dragon is able to flap them, with small wings this reptile will not fly.
- There should be space between the hips and chest; the wider it is, the more mobile the hind legs will look.
- The final stage in creating a sketch is drawing the joints of the limbs, they should be highlighted for a natural look of the dragon's paws. The feet with toes are drawn later. The position of the joints determines both the posture and the harmony of the dragon's figure. As an example, you can focus on the position of the joints of the dog's skeleton and the bones of the bat's wings, trying to mark as accurately as possible with small circles the bends of each limb, starting from their bases, as well as the position of the head and muzzle.
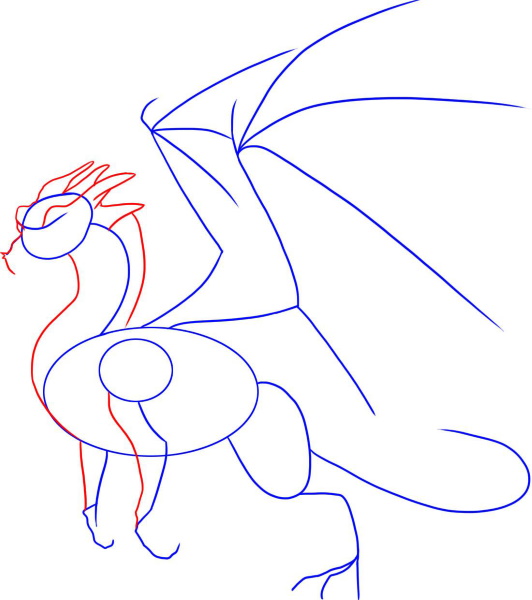
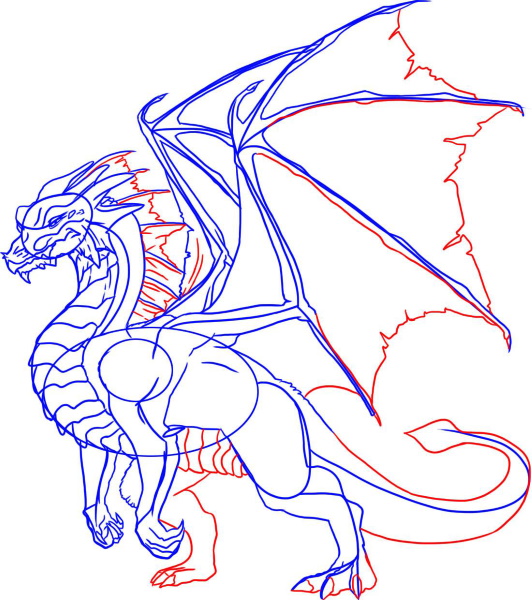
After drawing the skeleton, it should be covered with muscles up to the tail and feet. For this, you can combine the muscle covers of a horse and a dog. Horse muscles from the legs cover the area from the base of the wings to the beginning of their hands.
In order not to use animal examples every time you draw, you can remember the location of individual muscle sections by associating them with different things. For example, on the chest you can see a heart with legs and 3 ovals, the areas of the paws below the elbow and knee resemble drumsticks, and the base of the muscles of the back leg resembles a crab.
The hind legs should be more powerful than the front ones. The more detailed the muscles are, the more expressive the dragon will be. If its body is covered with heavy scales or armor, there is no need to detail the muscles, it will be enough to simply give the body shape. In this case, carefully drawn muscles can be decorated with scales or armor. There can be any number of toes on the paws, the main thing is that the middle ones are highlighted. The feet are also drawn along with the toes.
Next:
- To create the foot, draw one circle at the base of the paw and another smaller circle below, through which, starting from the upper circle, draw lines of the toes, changing the angle in accordance with the surface as they go beyond the lower circle.
- At the end of each finger, a small circle is drawn, each of which is located slightly higher as it moves away from the drawing finger. The middle finger or fingers should end with the largest circles, the circle of the finger further from the drawing finger is drawn small.
- Between the end circles of the toes and the original lower circle of the foot, another circle is drawn on each toe, which should be smaller than the original circle, but larger than the circles of the ends of the toes.
- The ends of the fingers are decorated with curved claws.
- All circles are connected with lines on the outside, after which they can be erased.
- The fingers and feet are complemented with folds of skin.
When drawing the tail, it should be taken into account that it has 2 sides, thickening and thinning in the picture as the tail extends and bends. Its line coming out of the spine will be the central line. Both sides of the resulting 3-dimensional tail are drawn based on it. The central line of the tail can be erased or decorated with spikes or fins. At its end, you can also draw a fin, an arrow, spikes, a mace and similar dragon decorations.
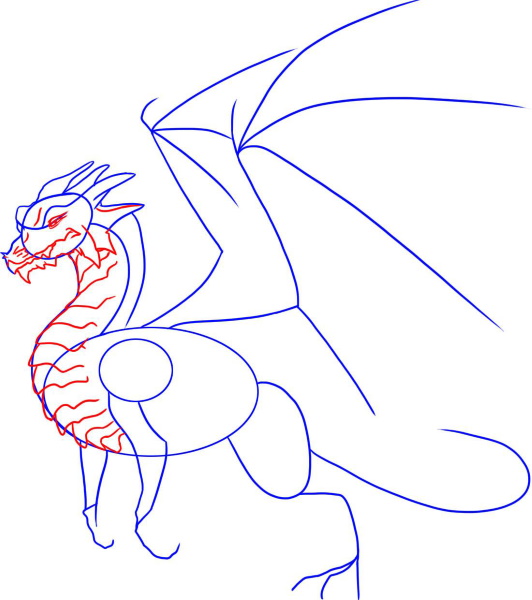
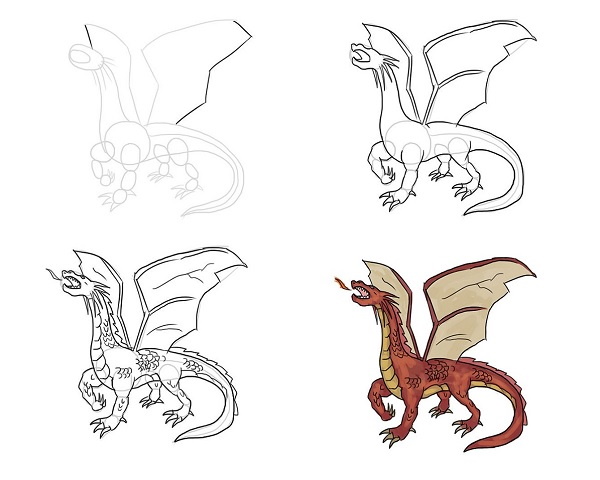
This example describes the drawing of a fully armored dragon, but if you plan to decorate it with scales only partially, before drawing the armor, you need to determine which parts of the body of this reptile need protection the most. The neck, chest, muzzle, fingers, belly and back are more vulnerable in a fight than the sides.
Heavy scales on the wings, their bases, inner elbows of the front legs and knees will restrict the movements of these limbs, so armor should not be drawn in these areas. The tail, like the legs, can be partially protected by covering it with heavy scales on top and bottom.
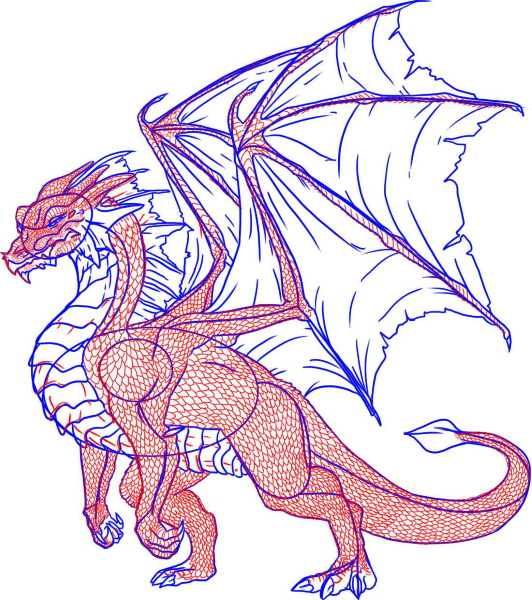
First, you need to choose the shape of the scales, the texture of which will be reproduced in different scales on each part of the dragon's body. To maintain the maneuverability of the moving parts of the body with a solid shell, they are covered with small scales, which can increasingly loosely support the chosen shape of the scales as they shrink. Uneven ovals or triangles are usually used for scales, optionally decorating them with small extensions or spikes.
The dragon's face does not need scales, except for the areas around its eyes. To give the dragon some personality, you can draw spikes at the base of the skull, increasing to horns on the back of the head. The neck, chest, belly, front and back sides of the legs, right up to their bases, the back, and the tail from above and below are covered with heavy plates of scales. Medium-sized scales should cover areas near large armor, the drawing of the tail armor can be finished with a side layer of medium scales.
The wings are left without scales even with a solid shell, the remaining areas are evenly covered with lines of scales of suitable size. The side plates can be drawn as heavy as the main armor, while the moving parts of the legs are covered with small scales. The dragon is drawn.
Tips for drawing solid armor can also be applied when combining it with muscles.
Pictures of dragons for sketching with pencils
Drawings of dragons for copying look brighter due to the emphasis on the animal's personal traits. The drawing will be more colorful if you give this character an individual character. Since it has intelligence and a formidable appearance, dragons are often depicted with various grins, smirks, and situationally ominous emotions when drawing. For inspiration, it is also good to use the skulls of dinosaurs, predatory animals, fish, reptiles, and the faces of real people.
Some artists often draw inspiration from stern-looking politicians, military men or businessmen when drawing these creatures, but dragons do not necessarily have to be depicted as evil, any bright character will do for them. Decorations, scars, flags, associating the drawing with a legend or inventing its history during the drawing process will help add originality to the dragon.
The following tips will also be useful:
- Additional individuality can be given to a dragon by the placement, type and expression of the eyes. According to fantasy artists, the presence of pupils in dragon eyes makes these characters more humane, while with small size or no pupils, the dragon looks wild. Half-closed eyes can look indifferent and arrogant, darkened ones add menacingness to the image, and wide-open eyes give the impression of curiosity and goodwill. When drawing dragon eyes, it is useful to combine the features of reptile and human eyes.
- Drawing a dragon will take time, but it is not necessary to be precise in this process. In erased and supplemented drafts, you can gradually find the most suitable gestures and emotions.
- Creating the image of a dragon can be made easier by sketching its silhouette in advance, which includes the main distinguishing qualities of this reptile.
- One of the main characteristic features of dragons is their scales. In addition to the usual scales and armor plates, you can use anything, the main thing is that it does not diverge from the concept of the drawing. Feathers, fur and even the textures of inorganic materials can be suitable for the body of the dragon.
- To emphasize the size of the dragon, you can add various birds, animals, buildings or landscapes to the drawing. The size of the body, as with other reptiles, can indicate the age of the dragon. For example, the heavier, more massive and spiny it is, the older it is, and vice versa, younger dragons are more graceful and slender.
- The image of the dragon can be complemented with its surroundings, which should also match the coloring of this character. For contrast, this reptile can be depicted in brighter colors compared to the background, or vice versa, make the background brighter. In addition to physical objects, you can add, for example, smoke, sparks, dust and lightning. Darkening individual parts of the body in accordance with the direction of lighting will highlight the parts of the dragon's body that the viewer's attention should be focused on. Light directed from below will make the image scarier.
- The law of size should not be ignored, objects that are farther from the viewer are less detailed and are drawn smaller or slightly blurred. These can also be parts of the dragon's body, which can be drawn larger in this way.
- The presence of borders of different clarity in the drawing will make it more 3-dimensional. This applies to both secondary objects and the main character. It is better to draw the sharpest borders near the muzzle and eyes, while the blurriness of more distant body contours creates the illusion of movement.
- To avoid accidentally shading what has already been drawn by hand, paper is placed on the finished areas. Some parts of the drawing are periodically erased as it develops.
- The fullness and richness of any drawing depend on the imposition of light and shadow. To do this, you should select a light source and slightly shade the areas of the body that are far from it.
Chinese image
Traditional Chinese dragons usually have a cheerful or neutral disposition. Their menacing and stern variants are also common, but they all have common specifics. Chinese-type dragons are depicted with a mane or fur, short squat legs, a long wriggling body, and, as a rule, without wings.
The recommendations given are intended for one of the simple ways to draw a Chinese dragon, but with their help you can also create more complex drawings:
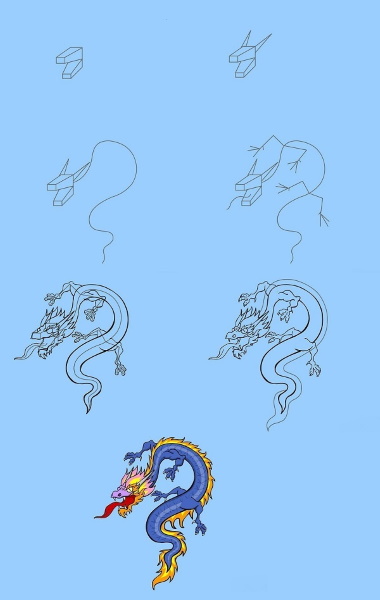
- First, draw a smooth S-shaped line, whose lower bend is wider than the upper one. At the bottom, it ends with another small bend, which will be the back of the dragon's head. This entire line should not be clear, it is drawn in several movements.
- From under the top of the central line, another one of the same kind is drawn, intersecting at a wide angle with the first line in the areas between its folds. This is how the curving ribbon-like body of the Chinese dragon is created. Instead of continuing the 2nd line after the lower intersection, the body is supplemented by another line from below, going from the bend of the 2nd line before the very lower intersection and connecting with the lower end of the 1st line.
- In addition to the mane, mustache and beard, Chinese dragons have strands of hair that look like flames all over their backs, starting from the back of the head and continuing to the edged tip of the tail. There are a pair of strands on either side of the end of the tail, with the last two strands flowing into the third strand in the middle that surrounds the tip itself. The pointed ends of these and all the other strands are directed towards the tail. The strands themselves are drawn from the head along the second S-shaped line that forms it, in accordance with the curves of the body.
- In this and the 3 following points, thin lines are used. The head is created from a sketch on the lower part of the body, formed by a small bend to the left and down. From it, a slightly elongated rectangle is made, at the level of the top of which 2 eyes are drawn. The right eye is located within the rectangle near its left border. From the top point between the eyes, long lines are drawn in both directions, widely diverging tufts of hair, about 10 lines for each side. The rest of the mane is drawn with the same lines, starting from the area behind the eyes and reaching the first strand of hair from the back, and sideburns turning into a beard.
- The beard consists of tufts of hair identical in shape to the back strands, but smaller in volume. It is drawn along the lower and visible to the viewer right side of the rectangle. The nostrils are drawn in the same way as the eyes, placing smaller circles at a distance from the eyes and slightly below the middle of the rectangle. The dragon is drawn with an open mouth, for which there should be enough space between the nostrils and the chin. From the side of the chin, from under the nostrils, a small mustache identical to the hair above the eyes is released.
- From this stage, the dragon begins to be detailed. The tufts of hair above the eyes are outlined from above, below and to the sides, forming spreading bushy eyebrows. The eyes are connected with straight lines to the circles of the nostrils, from which the wings of the nose and the curls of the nostrils that turn inward are made. The nostrils are connected to the convex tip of the nose in the middle from above, the nose in the area up to the eyes is crossed by several lines curving upwards. The whiskers are outlined identically to the eyebrows.
- The beard is extended to the mane, from under the moustache the edge of the upper jaw is drawn. The mouth with lips is continued a little further than the eyes, at the corners of the lower jaw 2 protruding fangs are drawn. Between them a little below the beard passes a long tapering tongue, and the visible section of the upper jaw between the moustache is decorated with two closer set fangs. From behind the wings of the nose 2 long ribbons of curly moustache are drawn coming out in different directions, from the outlined hair on the head create long bends of whole standing strands.
- After the head, draw the paws. Chinese dragons have paws that resemble birds, with a massive base and long clawed fingers. Both pairs of limbs bend toward the tail, their elbows are also decorated with tufts of hair. The front paws are drawn in the area of the lower bend of the body, the back ones under its second bend from top to bottom. Each paw has 5 fingers, but some fingers can be hidden behind the others.
- The scales of Chinese dragons are similar to fish scales, they cover only the body of this reptile. From behind the eyebrows, two short horns are drawn parallel to the hair, dividing in two like deer horns.
- The paws and body hair are shaded with a pencil. The same is done with the beard, mane, moustache, eyebrows, tongue, nose and eyes, in which white dots of pupils are left. To color the contours of the head, horns and hair, white borders are left at the lines forming it. The lips and fangs of the dragon are not shaded.
If some parts of the drawing were painted over, in addition to the eraser, you can outline them with a white pencil.
Reptile with flame
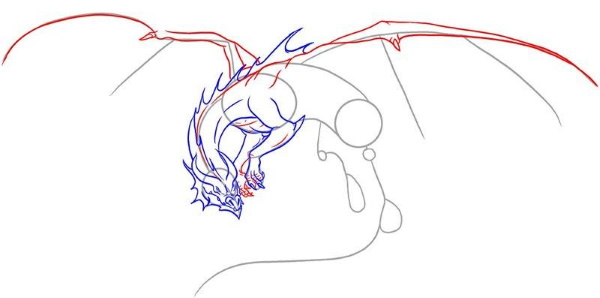
Drawings of dragons for copying reptiles in the process of breathing fire differ from ordinary images in the position of their body, wide-open mouth and angry emotions of the dragon.
In addition to the flame spitting, the special feature of this tutorial is the drawing of the dragon in flight:
- First, draw a sketch of the skeleton, which is a large, uneven oval of the body, a rectangle with smooth, smaller corners slightly lower as its base, and a long line with a bend at the end, which will be the tail, passing from the body to the lower oval and through it. From the upper, slightly tilted to the left area of the oval of the body, draw a line going to the left and slightly below its base along the length of the future neck with a circle of the head at the end.
- From the middle of the right side of the body oval tilted to the left, draw a line of the future open wing, coming out of the body a short distance to the right and up, then continuing as a longer line upwards with a slight deviation to the left. At its end, draw a circle, indicating the dragon's hand. The left side of the body will be the dragon's chest. From the middle of the left side of the rectangle of the base of the body, draw a line of a leg tucked in during flight, going to the left and up and turning into a narrow bend of the knee to the right and down. It ends with another bend, which will be the foot.
- A dragon skull with an open mouth is drawn over the circle of the head. For greater realism, it is drawn with uneven lines. Eyes are drawn on the head, and teeth and a tongue are drawn in the mouth. In most cases, dragons are drawn with horns, otherwise these reptiles become too similar to dinosaurs. One option for this drawing is several small horns growing from the base of the lower jaw and lengthening as they rise to eye level. The nose can be made in the form of a knobby spike.
- The pelvis, chest and head of the skeleton sketch are connected with smooth lines, forming the body of the dragon. A little above the base of the paw line with the wing, a short and upward curved horizontal line is drawn, reaching the middle of the body on the right, which will be the shoulder slightly protruding above the paw.
- Along the line of the paw with the wing, draw powerful muscles, from the circle of the hand draw the bones of 4 fingers on the open wing, the upper one of which goes to the left and up. The three remaining fingers are directed to different levels to the right. The fingers of the wing should be long, but due to the fact that the wing is drawn in a flapping state with the outer bend partially obscuring its inner side, the fingers of the wing are drawn no further than the first phalanx. The exception is the lower finger, which is more noticeable under the wing. It includes 2 phalanges, 2 of which are longer than the 1st. From the lower left edge of the hand, draw a short thumb with a claw sticking out to the left.
- Along the line of the leg to the beginning of the foot, muscles are drawn more powerfully than those of the paw with a wing. The knee of the right leg will be turned towards the viewer, therefore, having drawn a massive thigh with a knee slightly extending beyond the lower border of the oval on the basis of the right half of the oval of the base of the body, below the thigh, they immediately begin to draw a short shin expanding towards the foot.
- The left leg from the viewer's side may be partially covered by the curving end of the tail, in which case the visible part of the foot is drawn after it. The right leg, behind which the powerful tail passes, is finished with four splayed clawed toes. The tip of the tail, which tapers to a point, is decorated with a membrane or other suitable decorations.
- The top of the bent wing is drawn in the form of a narrow crescent, passing along the end of all the phalanges from the area above the neck at the level of the thumb to the level of the base of the right leg. Along the upper line of the crescent of the wing above the ends of the phalanges, draw a tubercle of the finger bones, from which to the lower line of the crescent lead along the contour of the finger bones, ending in claws protruding from the wing. In this case, the left upper and right lower fingers pass along the upper line of the crescent to the end of the wing, and the 2 middle fingers are drawn along the wing with a slight bend, giving the drawing a 3-dimensionality. The contour of the phalanx of the penultimate finger from right to left protrudes slightly, since it also passes along the edge of the wing.
- The hand is connected to the shoulder by a membrane, which starts slightly above the lower edge of the wing and extends behind the back to the level of the hip. The elbow is decorated with a protruding spike. To emphasize the age of the dragon, small holes and cuts along the borders of the membranes can be drawn in the wings.
- The 2nd wing is a visible reflection of the back of the 1st, it is created from a leathery surface with tubercles above the contours of the 3 visible phalanges. The bottom of the visible section of the far wing goes beyond the middle of the membrane between the shoulder and the hand of the near wing, while the outer finger of the far wing extends in an arc from the upper line of the neck to a position above the dragon's nose. The neck and back before and after the wings can be decorated with spikes or flaps of membranes, which can also be passed along the curve of the tail. On the neck and the belly turning into the base of the tail, transverse stripes with openings between each other, characteristic of reptiles, are drawn.
- The drawing is completed by applying chiaroscuro and a stream of flame coming out of the mouth.
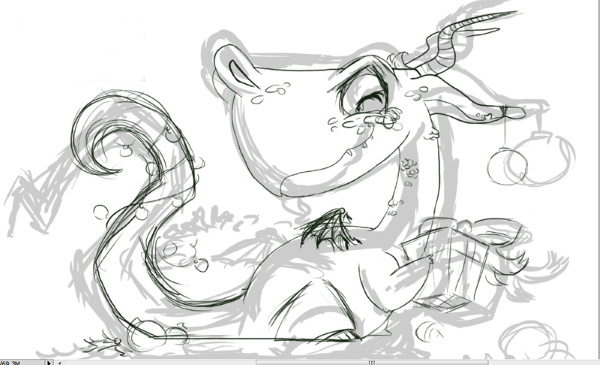
Cute little dragon
This drawing creates a cute winged dragon that looks a bit like a pony and a kitten at the same time:
- First, make a sketch of the body with light strokes. For it, you need to draw a horizontal line, which will be its axis. It is divided into 2 circles located at a small distance from each other, the smaller left circle will be the back of the body, and the right one will be the torso. From the center of the horizontal line segment in the right circle, draw a slightly deviating line to the right with a circle at the end, this is the base for the neck and head of the dragon. The size of the head circle is 1/3 of the size of the body circle, and the size of the circle of the back of the body is 2/3 of the size of the body circle.
- Slightly to the left of the beginning of the neck line, draw a line going down to the left for the base of the front paw closest to the viewer, ending within the body circle. From the end of this line, draw another longer line down to the right, which continues with a foot line directed lower, slightly longer than the line of the paw base. From the lower right side of the body circle, draw a line of the part of the forearm of the second front paw visible to the viewer, parallel to the forearm of the 1st paw. The 2nd far paw also ends with a foot line, which should be slightly shorter than the foot of the near paw according to the size law.
- The line of the base of the hind leg closest to the viewer is drawn to the left down from the right part of the line of the axis of the back circle of the body, it ends within its limits. The shin and foot of the hind leg are drawn to the right down in one line shorter than the visible forearm of the front leg. The line of the 2nd far hind leg is drawn directed downwards with a slight deviation to the left, starting it along the lower right side of the circle of the back of the body beyond its limits. From its end, a line of the foot is drawn directed to the right, slightly shorter than the foot of the near hind leg.
- From the bases of the front and back paws closest to the viewer, draw a small, straight line to the left and up, ending within the circles of the torso and the back of the body. These lines will serve as the shoulder and the base of the back paw, respectively.
- From the left edge of the body axis, draw the contour of the curving tail down to the left, consisting of segments that shorten towards its end. The first segment is the longest. The last segments should form a bend, around which there will be a decoration in the form of a tuft of wool.
- The bends of the lines of the paws visible to the viewer are outlined with small ellipses at an angle, establishing their width. To sketch the front feet, you need to outline the beginnings of their lines with narrower ovals, which will be the basis for the outline of the paws in the form of slightly expanding flippers with a triangular end. From the ends of the lines of the back paws, draw a slightly elongated semicircle, directed to the right and down.
- On the left and right sides of the circle of the head, draw along the contour line of the muzzle tapering to the bottom; they should be connected by a small horizontal line slightly below the circle of the head. It is drawn slightly to the right of the center of the upper part of the circle of the body. Since the dragon's head in the drawing is slightly turned to the left side from the viewer, the line of the left border of the muzzle begins above the right, which begins not far from the lower border of the circle.
- To sketch the wing of the shoulder line ending within the circle of the torso, draw an extension of the same size outside it. It is followed by a line of a slightly longer forearm directed upwards and slightly to the left. The base, bend, and end of the wing paw are outlined with small circles, then the top of the wing sketch is continued to the left with a horizontal line the length of the shoulder line, two longer phalanges of approximately the same size directed lower and ending with 1-2 short phalanges directed almost vertically downwards. The wing should end slightly below the level of the torso axis at a small distance from it.
- The 2nd far wing is drawn in the same way, starting from the area of the back slightly to the right of the base of the near wing and drawing it directed upwards and to the right not far from the circle of the head. It is raised and should end at the level of the crown. The outer phalanges of the far wing are drawn at the upper border of the circle of the head upwards and to the right.
- Along the bends of the tail, draw short lines, establishing its volume, tapering towards the end. The tail segments do not need lines for the tuft of fur at its end. A little higher than the left edge of the circle of the back of the body, also draw a line directed downwards to the right, slightly extending beyond the circle on the left and reaching the 1st ellipse of the visible back leg.
- Paws, tail lines, body and head circles are connected. Around the last segments of the tail without lines, a contour of a lush tuft of hair is drawn, slightly similar in outline to a question mark. The body landmarks, except for the wings, are erased.
- The circles along the line of the paw of the wing left from the viewer are connected, forming a thin shoulder and forearm. From the forearm along the wing, lines of phalanges of 3-4 straightened fingers are drawn, loosely repeating the outlines of the upper phalanges of the wing. Their lower bones are connected with membranes. After outlining the shoulder and forearm of the 2nd distant wing, a small bone thickening is drawn along its outer phalanges. The membrane of the distant wing passes above its outer finger in an uneven crescent from the end of the wing to the area slightly to the left of the end of the forearm of the 1st wing. On the visible surface of the 2nd wing, lines of phalanges of 2-3 fingers diverging from the end of its forearm are also drawn.
- A horizontal and vertical line are drawn in the middle of the muzzle, the latter goes down and slightly to the left due to the rotation of the head. A horizontal line of eyes is drawn slightly above the horizontal division of the muzzle, approximately in the middle of the circle of the head. From the area above the left temple, an ear is drawn sticking out to the left, like a cat's. The raised ear on the right side of the head is drawn higher and larger, since it is closer to the viewer due to the rotation of the head.
- Almond-shaped eyes are drawn between the lines of the eyes and the middle of the muzzle. At the ends of the paws, stripes of fingers are drawn, creating a semblance of the pads of a cat's foot. Under the lower border of the muzzle, a small semicircle of the chin is drawn, slightly above it, nostrils are drawn located near the edges of this border. Along the line of the tail, a comb or small spikes are drawn, you can draw both. The base of the tuft of hair is enclosed in a ring.
- The nape and head are covered with a lush mane, forming a thick fringe. Large irises with vertical pupils are drawn in the eyes. The bases of the paws, knees, elbows and chest are lightly shaded, creating a woolly covering. A tuft of hair is created from the end of the tail with many lines, the pads of the fingers are shaded and decorated with claws protruding from the stripes. If desired, the wings can be complemented with a pattern, an amulet can be drawn hanging from the chest, the dragon's ears can be pierced with earrings or similar decorations can be used.
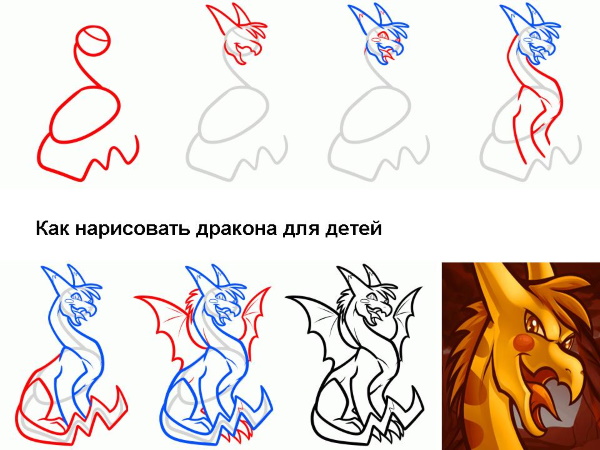
An evil, insidious beast
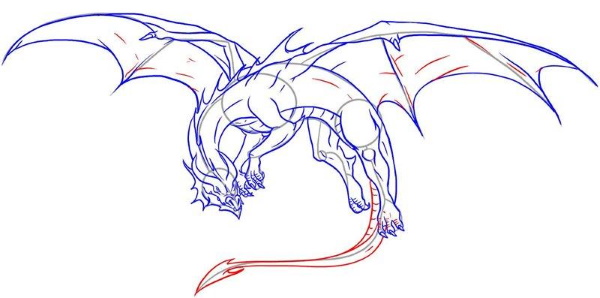
With this simple instruction you can draw a 4-legged dragon in flight, which has a particularly ferocious appearance.
The detailing of the drawing is dominated by rough features and sharp lines:
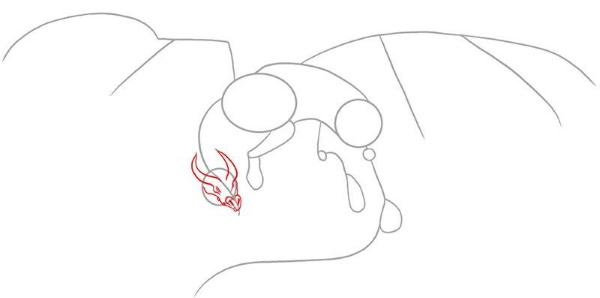
- The sketch of the body begins with a circle of the head, stretched out at an angle downwards to the left, and a line of a long neck, bending slightly above it, which comes out from the upper end of the circle of the head into a large oval of the body located at a small distance from it to the right and below. The sketch of the body should narrow in the lower right direction, resting on an oval for the leg, smaller and lower, in shape resembling a slightly skewed rectangle with smoothed corners.
- From the lower left side of the body oval, draw a short line of the far shoulder directed to the right and down, turning into a long line of the forearm, ending with lines of 2 fingers spread out in a slingshot shape with bends. The elbow is marked with a circle, from the lower corner of the leg oval, draw a short line of the hind leg to the left and down with 3 lines of spread fingers at its end. From the same section of the base of the oval, the legs lead down with a gradual turn to the left, a long line of the tail with bends. Its first turn is to the left and up, then the tail goes into a bend to the left and down, after which a sequence of bends to the right and up, to the left and down to the left are drawn with increasingly shorter lines.

- The dragon's muzzle is drawn pointing downwards, and the upper jaw is similar to a beak. Rare points are made along the lines of the jaws of the slightly open mouth. From the dragon's head, two large, straight horns are drawn extending backwards and curling toward the neck at the ends, like those of a saiga. Above the beak, low eyebrows are drawn with a line of a prominent eye parallel to the beak; the dragon is turned in semi-profile.
- From behind the head, draw a thick neck, which turns into the shoulder of the paw closest to the viewer's right, created by sharp lines, which is completed by a forearm raised within the body and neck with a 3-fingered clawed hand. The oval of the body is outlined with several rough lines of muscles and folds of skin of the abdomen and chest. Then outline the line of the far arm, the 3rd claw of which is half hidden behind the first 2, so its tip will stick out between them.
- Based on the oval of the leg, a powerful shin is created, tapering towards the foot, with 3 large clawed toes, the partially visible thigh of which is drawn to the right and below. The leg is connected with lines to the torso, leaving the crotch open. To the left of it, a 2nd, slightly lowered in comparison with the near, distant leg is drawn with a horizontal foot, the middle toe of which is raised higher than the others.

- The crotch continues with a thick tail that tapers towards the end; along its length and the above-described areas of the body, a small number of sharp strokes of muscles and folds of skin are drawn.
- To the right and left of the dragon, draw large bat wings spread out around the body, the visible shoulder of the near right wing comes out of its back behind the shoulder of the right front paw. The membrane from the wing brush to the back continues behind the outlines of the bend of the slightly protruding shoulder and forearm of the wing, drawn in one line, while the inner side of the near wing will be partially hidden by the membrane between the 2 near fingers of the wing. The base of the far left wing, coming out from behind the dragon's left shoulder, will not be visible because of its body. On the brushes to the fingers of the wings, draw a large bent claw, and the bones of the fingers of the wings extend 1-2 bends beyond the membranes. Each finger is drawn from 4-5 phalanges, ending with elongated claws.
- The drawing is almost ready, at this stage the basic base is erased and they begin to decorate the body of the reptile with attributes that give it a more menacing appearance. On the open inner side of the far wing, lines of phalanges visible through the membrane are added, the same is done with the visible part of the right wing.
- Along the center of the neck and the first bend of the tail, curved spikes are drawn that increase towards the back, an eye is drawn under the line of the low eyebrow, and a tongue protruding downwards from the slightly open mouth.
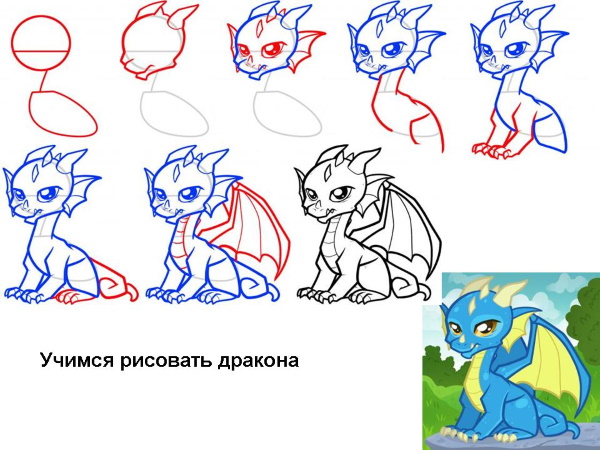
Baby
These guidelines will help you draw a baby dragon in a sitting position with 4 legs, horns and wings:
- The little dragon, like the cubs of other animals, fairy-tale creatures or human children, has a large head, and therefore when creating a sketch of the body, the size of its circle is identical to the oval of the body or even slightly larger. Having drawn a circle of the head, from the area slightly to the right of its lower point, a short line of the neck is drawn down and slightly to the left, resting against the oval of the baggy-shaped body. Its upper part is tilted to the left and ends with a horizontal line from above, to the middle of which the line of the neck reaches, while the left side of the oval of the body is an arc curved to the left, emphasizing the outline of the chest. A horizontal line of the eyes is drawn slightly below the middle of the circle of the head.
- The circle of the head is outlined with a muzzle turned in a half-turn with a slightly protruding lower jaw, starting from the bottom right of the circle and going to the bulge of the small chin slightly below and to the left of the lower edge of the circle. Above the chin, draw a small uneven semicircle without a flat line, directed from the limits of the circle of the head to the left and down. Its lower line will serve as an outline of the closed mouth, and the left line going into the circle of the head will be the far side of the nose. On the semicircle, draw the nostrils, after the beginning of its left line, draw a short angular line of the far cheekbone, connecting with the border of the circle of the head.
- A little to the right and above the top edge of the head, draw a small spike, on the sides of the head, draw short horns that bend back. The beginning of the far horn on the left is not visible, so it is drawn from behind the head, from the area of its bend.
- The small backward-pointing spike in the center of the head is continued to its base just below the top of the head, making it 3-dimensional. In front of it, up to the eyes, another spike of the same shape is drawn, then behind them, the tip of another spike protruding from an invisible area of the back of the head is drawn. A small spike is also drawn just above the nostrils.
- Along the eye line, draw 2 large eyes, the right one being larger as it is closer to the viewer. The straight upper borders of the eyes, slightly inclined towards each other, have rough short bends on the sides in the direction of the eyes. Within these bends, slightly above their ends, draw a semicircle of the lower sides of the eyes. Large black pupils should be drawn in the eyes, leaving white, equally placed spots of glare with a small spot of glare in the lower area of the pupil. They will indicate the direction of the gaze. Starting from the lower jaw, from behind the right side of the head to the horns, draw a 3-bone membranous fin, an identical partially visible fin is drawn from behind the left edge of the head.
- The neck, coming out of the base of the skull in this drawing, is outlined with 2 lines from the chin and the beginning of the lower jaw on the right. The neck goes straight to the chest, then the torso oval is outlined, the lower and extended downward to the right corner of which is separated by a short line drawn within the oval with a downward slope to the left. It is started near the border of the torso oval slightly above its separated area. Having drawn this line to the middle of the torso oval, it is continued with a short curved bend downward and to the right, then connecting it with the lower end of the right border of the torso, which goes along the edge of the torso oval, ending slightly below its limits. This is how the near hind leg, bent in a sitting position, is created. The back is drawn by connecting the right border of the torso with the neck, drawing a small shoulder tubercle between them.
- From the area above between the knee and the dragon's neck, draw 2 short lines directed downwards to the left for the base of the front paw closest to the viewer. Its lower border is drawn along the knee to the bend of the elbow just below the knee, the upper line of the paw is continued with a bend parallel to its lower side, ending above the elbow level. The elbow and the upper line of the paw are continued a little further downwards to the left, ending with an inconspicuous small foot, almost immediately turning into 3 small fingers with claws. The far left front paw from the viewer is drawn placed next to the right front paw in an identical manner, leading it out from behind the chest and leaving a small opening between the paws and the chest.
- From the top of the lower oblique border of the bent hind leg, draw a foot directed horizontally to the left with an end of 3 clawed fingers longer than the fingers of the front legs. The foot of the left hind leg and the belly in this drawing are hidden by the right front leg, so the small gap between it and the foot can simply be connected with a line.
- The inner part of the neck is outlined with transverse stripes going down the chest under the right front paw with a slight bend downwards and openings between each other. At the back, starting from the level of the hip, a downward lying tail is drawn. It is curled into a circle along its length, the length of the curled tail is about half the distance between the feet of the hind and front paws.
- From behind the humerus, draw the wing shoulder going up and to the right, the upper side of which consists of two lines. One long line from the elbow of the wing does not go straight from the body, it is preceded by a short line giving volume to the base of the shoulder, directed even higher to the right. The shoulder continues with a thinner forearm directed even higher, starting at the level where the Adam's apple could be located, and ending at the upper edge of the near right fin of the head.
- The end of the forearm crosses the beginning of the outer finger of the wing, from the base of which a small spike is drawn, it can be put behind the fin. The finger has 3 phalanges going with increasing inclination downwards to the right, the last of which has a thick base. It bends with a claw to the end of the tail to the left downwards, in the resulting opening between the shoulder and the end of the wing from under the forearm spike, 2 lines of the remaining straightened fingers of the wing are drawn in the lower right direction, having one bend downwards and to the left. The line of the middle finger is shorter than the outer one, it is finished at the level of the hip. The line of the left finger of the wing is drawn a little shorter.
- The area just above the claw of the outer finger of the wing, the ends of the middle and left fingers, and the area of the back just below the base of the shoulder are connected by a membrane. Behind the wing and body, the visible part of the silhouette of the back of the far wing is drawn, passing behind the near wing between the head and the base of the tail.
Stylish dragon
This drawing creates a stylish image of a winged 4-legged dragon standing in a half-turn with a raised wing. According to the idea of the drawing, it is not necessary to draw the far wing, since it is completely hidden by the near wing, but if desired, you can also draw its reverse side peeking out from behind the near wing, following the recommendations from other drawings.
This image of a dragon can be used to create a pendant, keychain or patch, while the specifics of the drawing do not require high detail, it can be drawn even without skills:
- First, make a sketch, 1-m draw a small ellipse of the head with a tilt to the left. From the section of the lower elongated border of the ellipse located near the upper right side, draw a smoothly curving line of the long neck down. Its gradual deviation to the left with a smooth departure to the right within the ellipse of the head from above forms the bend of the chest, the neck line rests against the lower left point of the large oval of the torso, the middle of which is located slightly to the right of the "back of the head" of the ellipse of the head.
- From the lower and upper sides of the right side of the torso oval, draw 2 lines to the right, forming an elongated raised triangular shape with a smoothed apex. The upper of these 2 lines is horizontal, it is drawn slightly longer than half the length of the neck line. This figure creates the basis for the rest of the torso.
- From the middle of the upper border of the torso oval, draw a short line of the wing shoulder, reaching the middle of the neck and directed upward and to the right. It does not go further than the right border of the torso oval and continues with a slightly longer forearm line, which is directed upward and slightly to the left, it is drawn to the level of the base of the neck. The wing ends with a long arc upward and to the right, whose upper point is located above the ellipse of the head and slightly to the left of the end of the back of the body, and the end is at the level of the back of the head and at the distance of the shoulder line to the right of the back of the body.
- From the bottom point of the torso oval, a short line of the front paw is drawn, directed downwards and slightly curving to the left. It ends with a small oval foot with a small elevation drawn to the left.
- From under the back of the body, draw a line of the thigh that goes down and smoothly curves to the right a little further than the back of the body, ending at the level of the base of the front paw. From its end, draw a short line of the shin that goes to the right and down, which ends with a smooth small bend downwards, resting on the oval of the foot of the back paw located underneath it. It is at the same level as the foot of the front paw.
- From the area slightly above the extreme right point of the smoothed corner of the back of the body, draw a flexible line of the tail smoothly going to the level of the joint of the back leg, directed to the right and down. The tail continues with smooth bends of a long line to the right and up, a shorter line to the left and up, and a short arc up and to the right.
- The upper left side of the head ellipse is outlined by a line that continues to the center of the upper right side of the ellipse, from which a horn with a tip slightly bent in the direction of the wing is drawn going to the upper right side. Its lower side turns into 4 spikes that decrease in size towards the middle of the lower side of the ellipse, bending in this direction. They will decorate the base of the lower jaw.
- Not far from the transition to the lower left side on the upper left side of the ellipse, draw a small tubercle directed to the left, which will serve as the brow ridge of the distant eye, invisible to the viewer. The ellipse is not outlined below the tubercle, from the base of which the upper jaw line is drawn downwards to the left, determining the length of the muzzle. It should be slightly shorter than the distance from the tubercle to the upper right side of the ellipse of the head, without taking into account the bend of the outline.
- At the bottom left of the upper jaw line, draw a tubercle of the end of the side of the upper jaw that is not visible to the viewer, directed to the left. Immediately from its left end, to the right and down, draw a slightly outwardly curved short line of the beak-shaped end of the upper jaw, continuing as a slightly inwardly concave line of identical length, directed to the right and up to the level of the beginning of the previous line. The next line, completing the upper jaw, is drawn as an arc to the right of the beak-shaped end of the muzzle to the middle of the lower long side of the ellipse of the head within its limits, slightly bending it upward to the left.
- From under the tip of the beak, draw a small horizontal line of the chin to the right, then connect it to the base of the lowest spike with a slightly curved upwards to the left line of the lower jaw. At the border of the upper jaw above the tip of the beak, draw a small spike protruding upwards to the left. Below the spike of the nose at the left tubercle of the beak and on its section below and slightly to the right of the spike, draw the curls of the nostrils. Along the borders of the closed jaws, 1-2 protruding teeth are drawn in different places.
- In the upper right part of the ellipse of the head, draw a semicircle slightly inclined to the right with a base parallel to the lower side of the ellipse, from which a smaller copy is drawn within this semicircle. In the middle of the small semicircle, draw a vertical line for the pupil.
- The head is completed by drawing a distant horn with a base invisible to the viewer, it comes out from behind the center of the upper long side of the head ellipse in the same direction as the near horn. The tip of the distant horn is drawn slightly higher. To the right of it, before and after the near horn, several spikes of the far side of the muzzle are drawn coming out from behind the forehead and the back of the head.
- The neck is outlined with 2 lines, the left of which starts from under the base of the lower jaw, and the right from the tip of the 2nd spike from left to right, decorating the lower jaw. The right line of the neck reaches the beginning of the left part of the upper side of the torso oval, and the left line, repeating the curve of the base of the neck, goes into the chest, slightly convex to the left, then connecting with the lower side of the torso oval. It is crossed by a line outlining the front paw, which begins with a small stroke directed downwards to the right in the area of the torso oval to the left and above the line of the base of the front paw.
- The left line of the front paw follows the shape of the base of the paw, resting on the oval of the foot. The right line of the front paw is drawn from the upper right section of the torso oval, it begins with an arc directed downwards and to the right with a bend to the left. The right line of the front paw is drawn from the lower end of this arc to the section next to the oval of the foot, slightly bending it to the right.
- The back is drawn starting from the right line of the neck that connects with the oval of the torso. Drawing begins with a straight, short line between the bases of the neck and the wing, continuing the slightly downward bending back from the straight bend after the base of the wing to a point slightly above and to the left of the back of the body.
- From the end of the back to a point slightly above the joint of the hind leg, there is a downward and slightly to the right line that bends slightly downwards. To the right of its end, make a small horizontal stroke. From its end to the lower part of the oval of the foot, draw a line repeating the shape of the shin. From a point slightly above and to the right of the center of the lower border of the triangle of the back of the body, draw a line of the thigh to the right and down to the area to the left and slightly above the joint of the hind leg. It is connected to the line of the thigh with a straight line of the knee, and the line of the left side of the shin, repeating the shape of its base, begins from the area of the knee line next to the joint of the hind leg and ends at the oval of the foot.
- From the upper side of the feet of the near front and back paws, draw 3 convex upward arcs, the lower ends of which slightly extend beyond the lower borders of the ovals of the feet. Visible areas of the far paws are drawn in the same way as the front paws, while the gap between the back paws is made wider, and the gap between the front paws placed next to each other is narrower. The far back paw is drawn from behind the left edge of the lower side of the triangle of the back of the body, the far front paw is drawn from behind the left lower edge of the torso oval. Given the position of the far paws, you can draw 2 toes on them.
- The top line of the tail starts from the top corner of the back of the body, the bottom line is drawn from the area just below the middle of the thigh. They outline the base line of the tail, making a large curved arrow at its end. The tail can be drawn uneven and angular.
- Along the base line of the wing, draw a shoulder tapering toward the elbow, a forearm slightly bending to the left at the end, and an outer finger of the wing with a thicker first phalanx. From under the base of the outer finger of the wing, draw lines to the right of 2 more spread fingers of the wing, each of which has 2 phalanges. They end above the end of the back of the body, with the lower finger slightly shorter than the middle one. The parts of the wing are connected to each other and to the center of the upper line of the triangle of the back of the body with a membrane.
- The back of the neck on the right is decorated with large spikes running along it, slightly smaller spikes cover the back of the body and tail. The spikes decrease as they approach the end of the tail and increase as they approach the base of the skull.
- The front side of the neck on the left is separated by a line that widens downwards, runs along the neck from the lower spike decorating the lower jaw and repeats the shape of the left border of the neck. This line goes under the nearest front paw, after which the line continues along the belly to the nearest back paw. This section of the neck and belly is decorated with lines that start on the left and turn upwards on the right in one turn of a spiral with openings between each other. The lines change their slope as they reach the belly.
- In separate random areas of the body, paws and tail, draw several round scales. On the skin of the wings, put several pigment spots. The horns, nostrils and upper eyebrow of the dragon can be decorated with earrings.
New Year's option
The year of the dragon is a component of the Chinese zodiac, therefore, to draw a dragon for the New Year, a drawing of a regular Chinese dragon will do. For originality, you can draw it or another dragon next to a Christmas tree and gifts, or a dragon with a gift.
Gifts are created from regular cubes:
- For the top side of the cube in perspective, you should put 2 reference points on the same level, the distance between them will determine the width of the cube. Then, putting a finger between them, or something smaller depending on the size of the cube, put 2 vertical points on the top and bottom side of the finger or object. 4 points are connected on the sides of the figure with straight lines, leading them counterclockwise and starting from the top point.
- Down from the bottom and side points, vertical lines are drawn, ending in the same manner as the bottom half of the top side of the cube. They are connected by lines parallel to the bottom sides of the top side of the cube.
- Along the middle of the sides, draw 2 vertical lines, which serve as a gift ribbon. They continue on the top side of the cube, drawing them parallel to its side lines and passing one ribbon under the other.
- The intersection of the festive ribbon is complemented with a knot.
Cartoon dragon
Drawings of dragons for copying can have different levels of realism. In most cases, dragons are depicted as evil and scary, the bodies of these reptiles are covered with scales and spikes, and they are often drawn spewing streams of flame, but these qualities may be unnecessary in a cartoon image.
When creating a drawing for children, the dragon is drawn as cute and friendly, softening its image with large open eyes and a smile:
- A cartoon dragon also starts with a sketch, first drawing a small circle of the head. A little lower and to the left of it, draw a circle of the belly, twice as big as the circle of the head. They are connected by an upward and left-curved arc of the back, going from the area above the left edge of the circle of the head to an identical area of the circle of the belly. From a point slightly lower than the left edge of the circle of the head to a point slightly to the right of the upper edge of the circle of the belly, draw a curved left-curved arc of the right side of the body, which thickens as it approaches the circle of the belly.
- From the point of the body circle slightly below its left lower border, draw the lower side of the tail going to the left and down, smoothly bending it upward to the level of the upper side of the belly circle. The tail continues with a short bend to the left and slightly down. From the area of the belly circle slightly below its contact with the back line, draw the upper side of the tail, initially repeating the shape of the lower side, then narrowing the tail to its end, decorating it with a small arrow.
- The base for the wing is drawn with 2 lines. From the middle of the back arc, the shoulder line of the wing is drawn upward and slightly to the left, ending slightly above the top of the head circle. From it, to the left and slightly down, a slightly curved upward line of the outer side of the wing goes. The 2nd wing is drawn from the section of the back arc slightly to the right of the base of the 1st wing. Its base is an identically long shoulder, directed upward and slightly to the left, and a slightly curved upward line of the outer side of the wing, directed upward and to the right.
- The basis for the muzzle is drawn in the form of a bean tilted to the right and slightly downwards with the ends pointing upwards, starting at the middle of the head circle and ending to the right of its lower quarter. The bean should extend beyond the head circle by half its size.
- In the lower right quadrant of the belly circle, draw a foot ellipse inclined to the right, its lower short side slightly extending beyond the belly circle. The height of the inclined ellipse is equal to the height of the head circle. Outside the belly circle, slightly to the right and above the left foot, draw an identically inclined ellipse of the right foot of identical dimensions.
- The lower section of the line of the upper end of the bean of the muzzle is erased, then in the upper half of the circle of the head on the sides at the base of the bean, 2 upwardly elongated semicircles of eyes are drawn. The right eye is the far one, therefore it has a higher base and a smaller width.
- At the upper left edge of the lower line of the bean, draw a small arc of the mouth open in a smile, directed downwards and to the left, connecting at both ends with the lower line of the bean. Above the place of the upper connection of the bean and smile lines, draw an even smaller arc, directed upwards and slightly to the left. This will be the fold of the cheek.
- In the center of the lower end of the bean, draw a small ellipse of the nostril, erasing its lower left section and placing a dot of the nostril in its center. The visible part of the ellipse of the circle of the far nostril is drawn peeking out from behind the upper edge of the lower end of the bean.
- At the lower edges of the eyes, draw large pupils with thick dots, on the upper side of the head circle, draw 2 small triangles of the right and left horns, located slightly to the left of the left eye and above the far right eye, respectively. The dragon's head is drawn.

- The ends of the wings are connected to the areas of the back near their bases with straight lines, in each wing they also draw lines of 2 straightened fingers starting near its outer finger, continuing with protrusions beyond the lines connecting the wings to the body. The protrusions are the size of the dragon's far eye.
- Small front paws with fingers clenched into fists are created from narrow ellipses and ovals. The left near paw is started with an ellipse directed from the area of the body under the base of the left wing downwards and to the left, its lower edge slightly extending beyond the back. From the lower end of the 1st ellipse, a horizontal ellipse of the same length is drawn, ending within the circle of the belly. The base of the paw is completed by a small oval of the hand.
- The right far paw begins with an ellipse directed downwards and to the right, emerging from behind the right side of the body at a level slightly above the base of the 1st paw. Only its upper edge remains invisible. The 2nd paw is continued with an ellipse directed downwards and to the left, half of which is within the circle of the abdomen, and the limb is completed with a small oval of the hand. The boundaries of the contact of the ellipses and the ovals of the paws are erased.
- In the ellipse of the left foot, draw its smaller copy. It fits tightly to its left and lower border, leaving the upper and left rims of the ellipse free. Do the same with the ellipse of the right foot. From the point between the left long border of the ellipse of the left foot and its upper right side, draw an upward curved arc of the leg, ending under the middle of the forearm of the left front paw at the level of the junction of the circle of the abdomen with the line of the back.
- The arc of the leg from the identical section of the ellipse of the right foot is brought behind the circle of the abdomen at the level of the wrist of the right front paw. The lower border of the right leg will be a short, slightly curved upward line from the back of the right foot to the circle of the abdomen, directed upward to the left. On the upper ends of the lower paws, 3 small circles of fingers are drawn, the left of which are larger and have a narrow connection with the left rims of the feet. The fingers become slightly smaller as they move away from the viewer.
- Along the back and tail to its arrow, draw a row of small triangular spikes, which are absent on the section of the back from the front left paw to the tail due to the bend of the body. From the circle of the head at the level of the middle of the base of the neck, draw a line repeating the shape of the back, separating the inner side of the neck and the body. It is drawn to the section of the arc of the left hind paw, which is located under the wrist of the left front paw.
- The inner side of the neck and the abdominal circle are covered with lines slightly curved towards the previous sections with openings between each other, without going onto the front legs, beyond the right border of the abdominal circle, as well as beyond the arch and foot of the left leg.
- From the area just above the lower side of the tail, draw a line repeating the shape of its lower border, which will separate the lower side of the tail. It is drawn to the area of the lower border of the tail, not far from its transition to the arrow at the end of the tail. Along the length of the lower side of the tail, draw slightly curved lines towards its end with gaps between each other. The upper side of the tail and the left side of the body, including the left leg, are covered with a small number of loosely lying circles and dots. You can draw clouds of smoke near the nose.
There are a huge number of different types of dragons in the legends of the peoples of the world, the idea of which may differ within one culture. This popular mythical image is constantly changing and supplemented due to its demand in fantasy and the entertainment industry, which makes following strict frameworks in drawing dragons optional. However, for a high-quality copying or when creating your own drawing of a dragon, you can use the described tips, which help to balance its physique and more vividly express certain features of the dragon.
Video on how to draw a dragon
How to draw a cartoon dragon: