Weaving various items from plastic bottles is an activity that allows you to spend time usefully. The result of the work will be recycled plastic and the appearance of a beautiful, functional thing in the house. To learn this craft, you need to know how to prepare materials, as well as consider step-by-step master classes for beginners.
Tools and materials
In addition to plastic bottles, other materials and tools will be required. The table shows a list of everything needed, as well as the purpose of all materials.
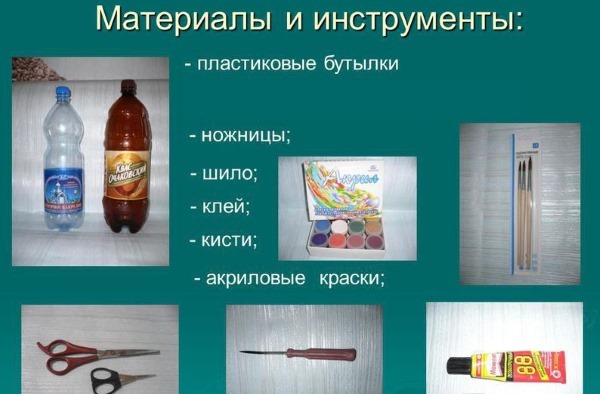
| Tools | Purpose |
| Scissors | Cutting plastic, removing excess. |
| Stationery knife | Cutting off excess parts of the bottle. |
| Ruler | Creating markings, measuring the length and width of some parts. |
| Fishing line or nylon thread | Connecting parts together. |
| Large sewing needle | Passing thread between plastic parts. |
| Transparent glue Moment or glue for plastic | Fastening of decor and small elements. |
| Felt-tip pen | Carrying out marking. |
| Scotch | Temporary fixation of elements. |
| Strong cardboard | Creating or strengthening the bottom. |
| Colored tape, acrylic paint, fabrics | Decoration of products. |
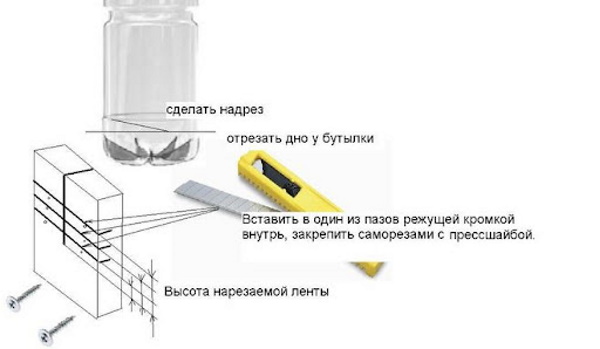
Weaving patterns may vary, so the list of materials may change. However, weaving from plastic bottles is not possible without a special cutter that will allow you to “unravel” the plastic into strips.
This device can be made from a blade from a stationery knife or a pencil sharpener. The blade is screwed onto a small board. It is positioned at an angle and is firmly fixed above the board with bolts and flat nuts or washers.
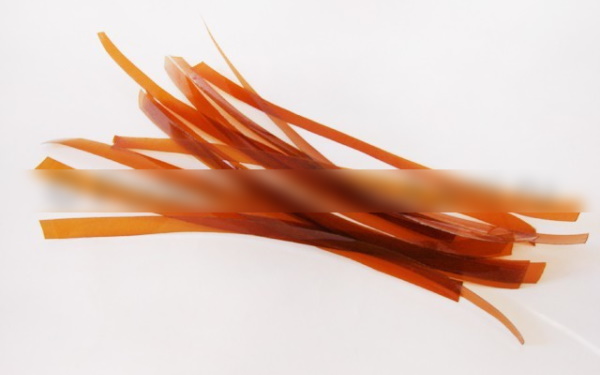
The prepared bottle is placed on the board and twisted, causing the plastic to begin to cut. The craftsman pulls the plastic tape out by the cut corner, carefully holding the bottle with the other hand.
Selection and preparation of plastic
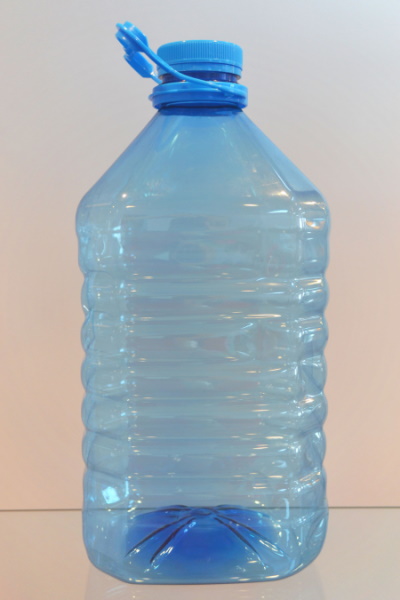
For weaving you need a large container (5-6 l). Smaller containers are harder to cut. Bottles with a capacity of 1.5 liters can be used provided that they are cylindrical. Containers with curves and unusual shapes will not produce a smooth strip.
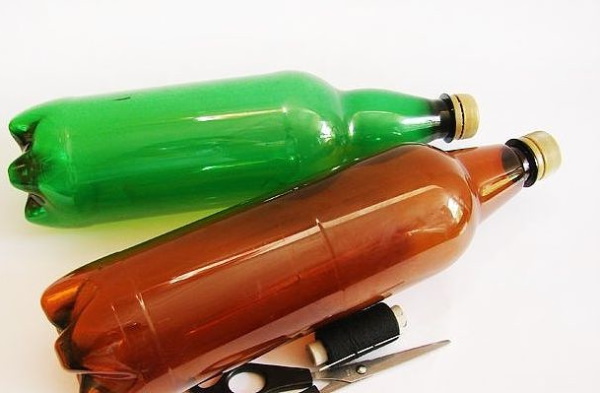
Experienced craftsmen advise beginners to use bottles of the same color for their first works. It will be easier to work with. In addition, minor flaws that may occur during the learning process will remain unnoticeable.
When the work becomes more accurate and the master gets the hang of it, you can use bottles of different colors, alternating green, brown and white ribbons in the weaving to get an unusual pattern. To create any product, you need to collect bottles. You can prepare the material faster with the help of friends. They can put aside PET waste. The main thing is to warn them not to crush the bottles.
After the drinks have been consumed, the containers should be washed and put away for storage without screwing the lid on, so that there is no unpleasant smell inside the container. When the required number of bottles has been collected, you can begin preparing the material.
Step by step instructions:
- Fill a large tank or bathtub with hot water, the temperature of which will not exceed 65 degrees. At higher temperatures, the plastic may deform, as it is intended for cold drinks.
- Fill each container and completely submerge it under water.
- Leave for 30 minutes.
- Take out the bottles, drain the water. Remove all labels.
- If there is any glue left, it should be wiped off with a soap solution and the hard side of a dish sponge. It is not recommended to scrape off the glue with a knife. You can scratch the plastic, which will affect the aesthetic appearance of the finished product. For the same reason, you should not try to remove the glue with products containing acetone. They will make the plastic dull.
- Place the bottles on towels and leave until completely dry.
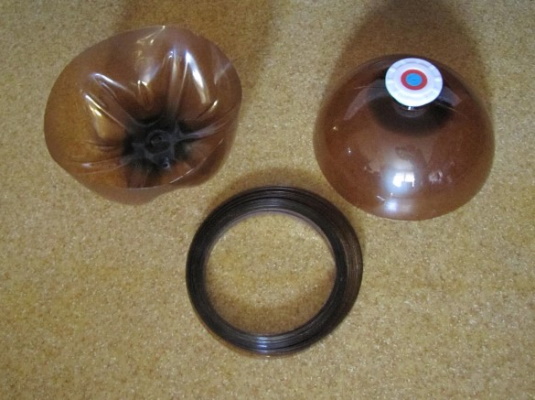
- For weaving you will only need the cylindrical part of the bottles, so you need to cut off the bottom and necks using a stationery knife.
There are 2 ways to cut strips.

Option #1:
- Cut the cylinders lengthwise. Unfold the blanks. You should get rectangles.
- Make markings using a ruler and a felt-tip pen. The stripes will be the same length and width. For the first works, it is advisable to use wide stripes (at least 1 cm wide). The length of the stripes is calculated using the following formula: width of 1 strip x 8.
- Cut the strips along the markings using scissors or a utility knife.
Option #2:
- There is no need to cut the cylinder. The workpiece is placed on the cutting board.
- Adjust the height of the blade. This determines the width of the tapes.
- Make 1 cut.
- Press the bottle from above with your left hand.
- Slowly pull the tape out with your right hand. The tension will cause the bottle to spin and the plastic to be cut.
- Once the tape is ready, you will need to cut its ends diagonally using scissors.
The exact quantity or footage of tapes depends on the volume of the finished product.
Weaving methods
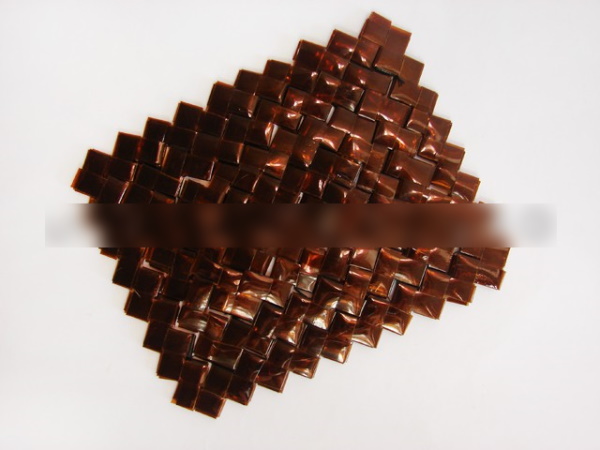
There are 2 methods of weaving from plastic tape: corners and chessboard. They are easy to perform, so a beginner will not have to spend a lot of time on training.
For the first work, it is advisable to select a pattern for weaving a small item, for example, a basket for storing small items. Then, gradually, you can move on to creating larger items suitable for use in the household.
Corners
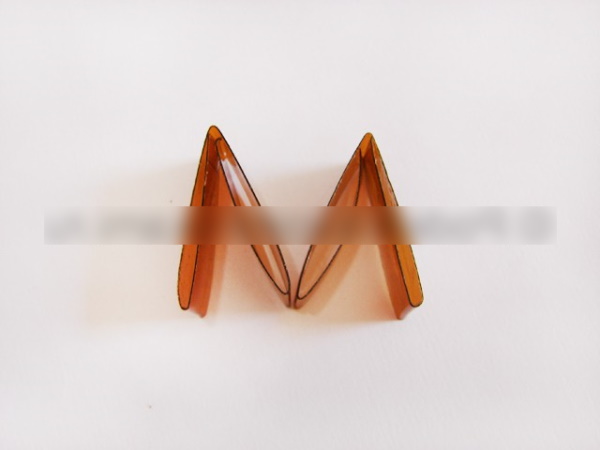
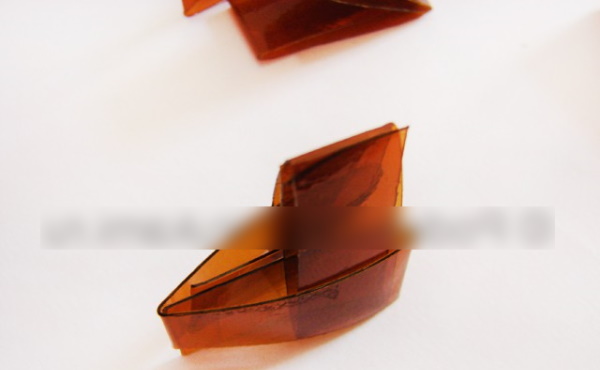
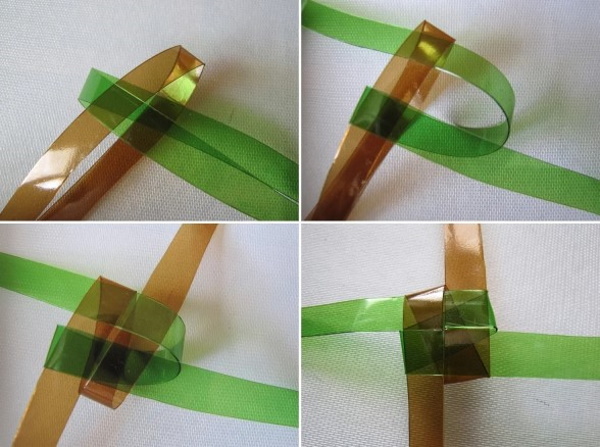
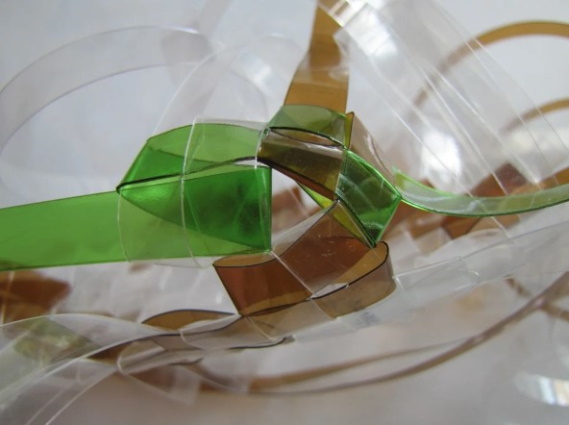
Weaving from plastic bottles (for beginners, the weaving process is described step by step later in the article), using the "corners" technique, begins with preparing the main elements. 1 ribbon needs to be folded in half. Fold the ends and press them to the central fold line. As a result, you should get a corner with 2 holes at the ends, into which the same parts will be inserted.
Instructions for weaving a small square basket:
- Thread the edges of the other piece through the holes at the ends of 1 corner. Move them toward the center so that a corner is formed.
- Pass the new piece through one end of the previous one.
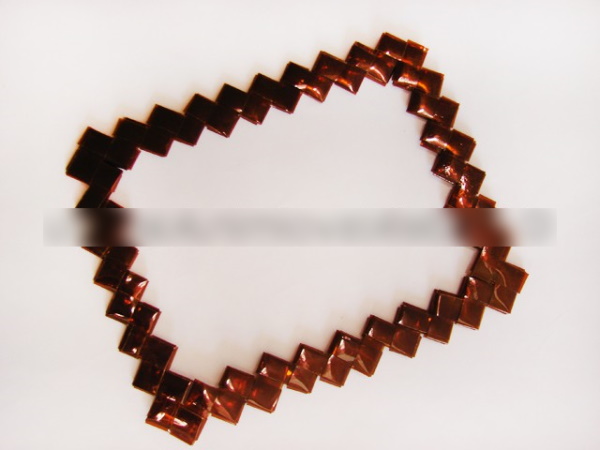
- In the same way, secure the remaining pieces until you get a zigzag ribbon equal to the length of the intended product.
- Then weaving is carried out in rows in height. The blanks are inserted into each other in the same way.
- Prepare 4 pieces of the same size. They should all be identical in height and width.
- From 2 rows of “corners” weave a basket handle in the form of a zigzag ribbon.
- Pass the fishing line or thread through the eye of the needle.
- Passing the thread through the free edges, fasten all the parts together. Secure the ends of the thread with knots.
- Using a ruler, measure the length and width of the bottom of the basket.
- Draw a rectangle of appropriate size on cardboard.
- Cut out the blank.
- Glue the bottom to the basket using clear glue.
Once the glue is completely dry, the basket can be used.
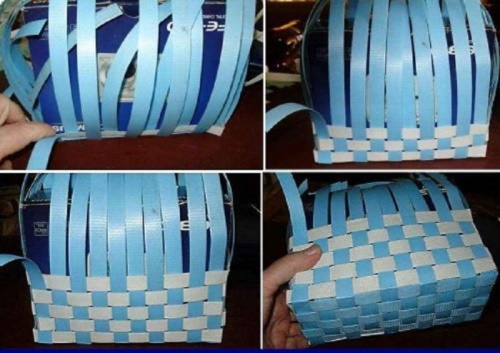
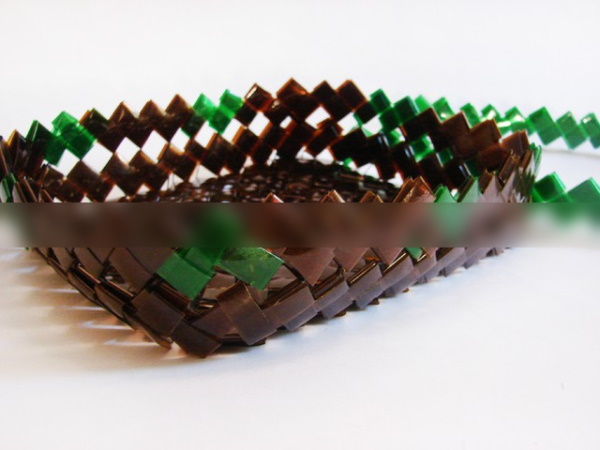
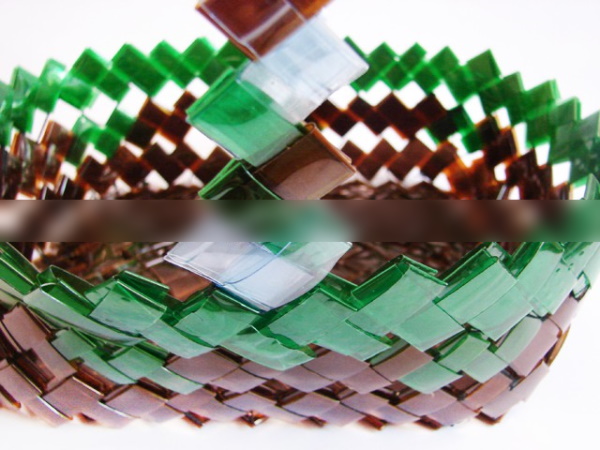
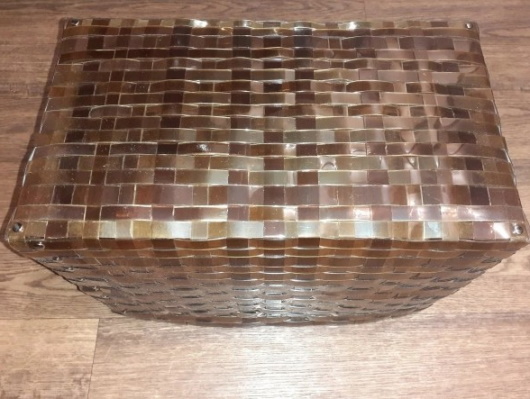
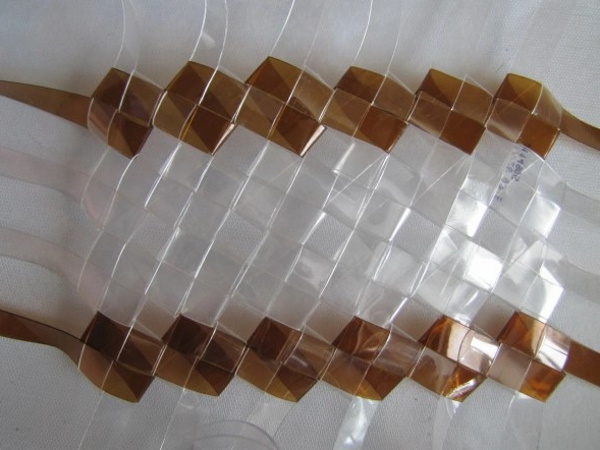
Chess order
To weave from plastic bottles in this way, you need long ribbons made with a cutter. For beginners, here is a step-by-step guide to creating a small rectangular basket. To ensure that the product is even and holds its shape well during work, you will need a cardboard box of the appropriate size.
How to weave:
- Place the box upside down.
- Place strips on top of the bottom. There should be no gaps between them.
- Attach the ends of the ribbon to the box with small pieces of tape.
- Pass new strips under these, placing them in a checkerboard pattern. This means that the perpendicular strip will pass through those that are already fixed, through 1, then from above, then from below.
- After the bottom is completely covered with weaving, the ribbons need to be fixed at the corners with tape or a stapler.
- The walls of the basket are woven in a similar way. They should be the same height.
- The protruding ribbons should be cut and folded inward, under the weaving. This is necessary so that the edges of the basket are not sharp.
- Insert the thread into the eye of the needle.
- Fasten the walls of the basket with cross stitches.
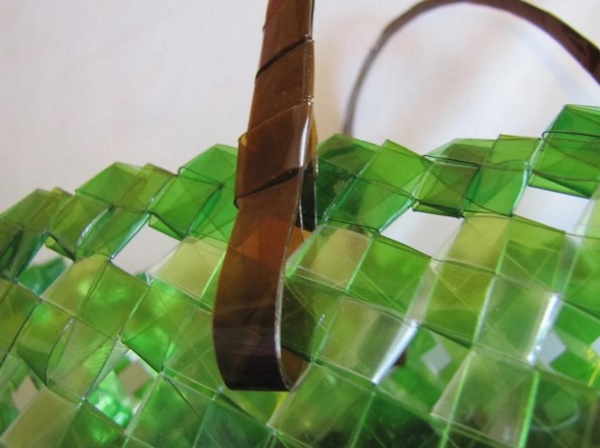
Similarly, weave 2 small handles. Attach them to the walls of the basket using a thread and a needle.
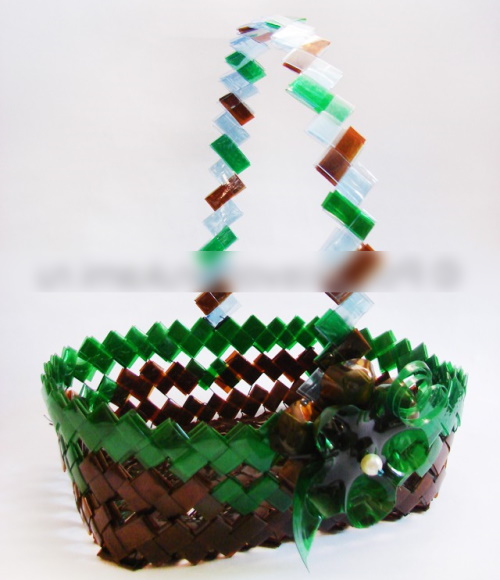
Master class on weaving a small decorative basket
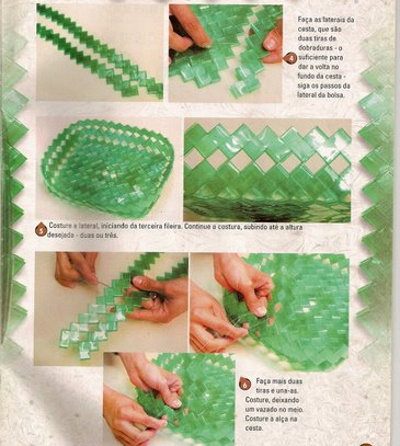
Weaving from plastic bottles (for beginners, the process of weaving, assembly and decoration is described step by step) can become a profitable hobby if you learn how to weave baskets for storing small items. In addition to functionality, such products can become an interior decoration. Therefore, they will be in demand for those who love decor.
To do this work you will need about 15 bottles with a capacity of 1.5 liters. They need to be cut into strips and folded into weaving forms "corners".
Next steps:
- Weave 2 zigzag ribbons 15 cm long.
- Weave 2 zigzag ribbons 10 cm long.
- Using a needle and clear thread, attach the pieces together to form a rectangular frame.
- By analogy, weave 2 more frames of a smaller size. They should fit into each other and not leave gaps. Therefore, it is necessary to constantly apply elements to the first frame and calculate how many corners need to be fastened.
- Connect all the frames together so that they form a continuous canvas.
- Pass a thread with a needle through each element, fasten all the parts and tighten the knots.
- Assemble a new ribbon 50 cm long from the blanks.
- Attach it to the bottom of the basket with a thread and a needle, lift it up. You will get 1 row of basket walls. Secure the seam.
- Again, assemble the zigzag ribbon 50 cm long.
- The tape should be secured so that each square is connected separately. The result should be open-ended squares. The needle and thread should be passed through the corners.
- The remaining rows are woven and secured in the same way. The higher the walls of the basket are, the deeper it will be.
- Weave a handle from longer strips and attach it to the narrow walls of the basket.
The basket is ready. Now it needs to be decorated with a large flower made from plastic bottles.
How to do it:
- Cut flowers from the bottoms of 3 bottles: 1 large, 2 smaller.
- Use a lighter to carefully burn the edges so that they are slightly deformed and look more natural.
- Fasten them together with transparent glue. The large flower should be in the center, and the small ones on the sides.
- Pierce the bottoms and attach them to the basket using wide stitches.
- Apply glue to the stitches and attach large beads to the center of each flower.
A beautiful basket for storing small items is ready for use.
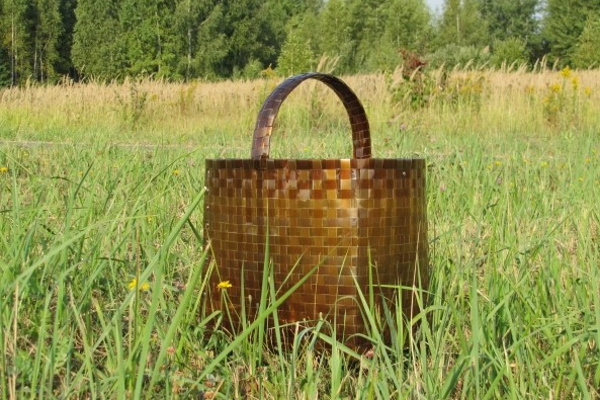
Master class on weaving a large household basket
Weaving from plastic bottles (for beginners, the process of weaving from long ribbons is described step by step) allows you to create strong and reliable baskets that are useful for use in the household. You can take them to the forest for mushrooms, store vegetables and fruits in them, put things in them.
For a 7 l basket, you will need 76 m of tape. It is advisable to cut strips from large containers to get tapes 2 m long. There should be 36 blanks in total.
Next steps:
- Cut the ends of the ribbons at an angle. This will make the weaving process easier.
- Straighten 4 ribbons, place them on the floor. Mark their middle with a felt-tip pen.
- From the central marks, you need to put 2 more points, stepping back from the middle to the sides by 15 cm. Then make the same marks, stepping back from the previous points.
- On all other blanks, only the center needs to be marked.
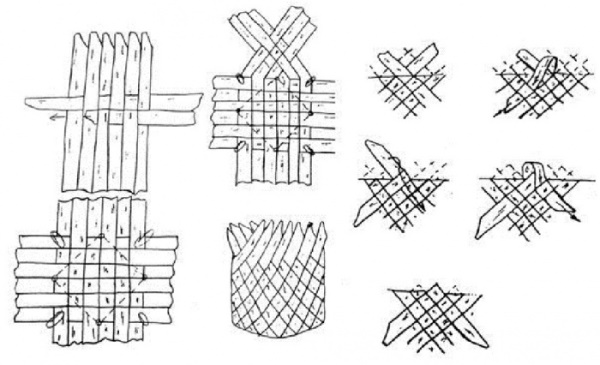
- Weave a checkerboard pattern of 18x18 strips.
- Fix the corners of the square with small drops of transparent Moment glue.
- Choose any side of the fabric, fold it upwards. Start weaving the side wall.
- Weave a 9x9 strip fabric. Secure the edges of the square with glue.
- Repeating steps 7 through 8, weave the remaining walls of the basket.
- Turn the product upside down. Tighten the tapes in the corners so that there are no gaps.
- Measure the bottom diagonal with a measuring tape. Check how even the weaving is. If there are any imperfections, they need to be carefully corrected.
- Turn the basket over. Weave another circular row along the edges of the walls. Secure the joints with thread.
- The edges need to be braided so that they do not have sharp corners. Cut off the excess ribbons and pull them inside the weave.
- Close all side seams in the same way. It will be more difficult to shape the seams from the inside, so you can use pliers or large tweezers to pull the tapes through.
- To weave the handles you will need 16 ribbons, 1 m long.
- 2 ribbons need to be woven onto 2 walls of the basket from the outside.
- Weave 2 ribbons into the walls of the basket on the inside.
- Weave all the strips together in a circle.
- Once you have the handle shape, you need to stretch it to the opposite edge of the basket and make sure that it is long enough.
- Secure the edge of the handle to the other wall of the basket, weaving in the ends of the strips.
- For reliability, you need to lubricate the ends of the handle with glue for plastic. Then the handle will be even stronger and will not come off.
- To make the handle more rigid, you need to additionally weave 8 more plastic strips into it.
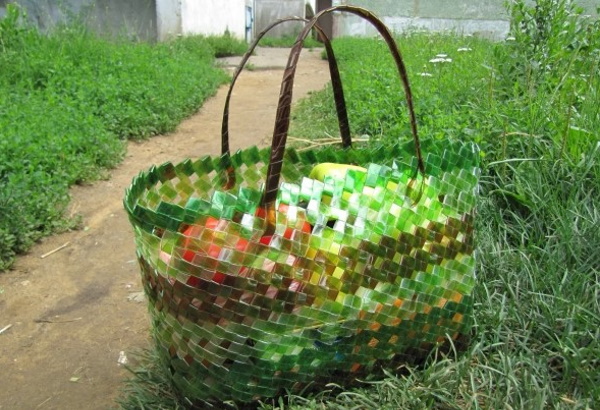
The basket is ready. It can serve for more than 7 years. Plastic is easy to wash off dirt, it does not fade in the sun, and is also resistant to wear. To carry heavy things in such a basket, you need to weave thin wire into its walls and bottom. The service life of such products increases by 2 times.
Plastic bottles can be turned into beautiful and functional things, so don't rush to take PET waste to the dump. Experienced craftsmen advise beginners to try their hand at weaving baskets of different shapes.
To improve your skills, it is recommended to look at step-by-step master classes. Then you can move on to creating larger items, such as wicker furniture, garden fences, and playground decorations.
Author: Frolova Ekaterina
Video about crafts
Weaving from plastic bottles: