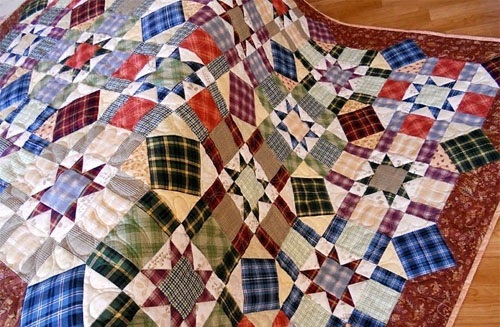
Patchworking is an idea of making a single piece of home art with your own hands from many pieces of fabric, which requires patterns, materials and a little imagination.
What you need for DIY patchwork
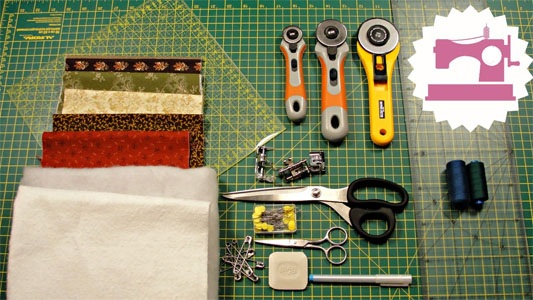
To start patchwork sewing you will need:
- Fabrics.
- Templates.
- Tools.
An important advantage of patchwork is the possibility of using any fabric. Fabric scraps and scraps may be suitable.
The main characteristics of fabrics for patchwork are presented in the table:
| Cotton fabrics | Valued for:
|
| Wool | Advantages:
|
| Denim |
|
| Silk |
|
A needlewoman working in the patchwork technique will need a template - a pattern made of cardboard or plastic of the required shape.
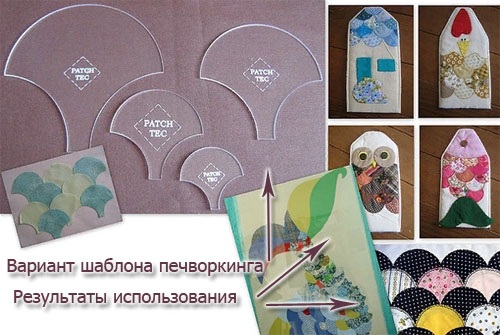
Templates are sold in stores or made independently:
- You need to draw a template on paper without taking into account the seams.
- Draw another outline, leaving 5 mm between the entire surface of the template.
- Cut out both outlines from cardboard, you will get two templates for the element.
For inexperienced needlewomen, templates of simple shapes, such as squares, are suitable.
In addition to fabric, patchwork uses:
- Threads.
- Pencils (or chalk).
- Pins and needles for sewing.
- Scissors.
- Thick cardboard.
- Sewing machine.
All of the above is sold in handicraft stores. Ready-made patchwork kits are also sold, which also include patterns for the product.
Patchwork techniques
Patchworking - There are several different patchwork techniques, differing from each other in the complexity of execution, schemes, required materials and the amount of time spent on the work.
The most common techniques are:
- Fast squares.
- Watercolor.
- Chess patchwork.
- Stripe to stripe.
- Triangles.
- Pizza.
Fast squares
The name of the technique comes from the use of squares made from pre-sewn pieces of fabric.
- The technique allows you to use any number of colors in your work;
- 4 fabric colors – classic option.
- First, 2 single-color strips are sewn together, then 2 strips of a different color, then all the remaining colors.
- The strips are placed face-to-face and sewn together. The result is something like a sleeve.
- Having marked a 45 degree angle, starting from the top edge of the sleeve, marks should be made along the length of the starting strip.
- You will get squares made from 4 types of material.
Features of the technique:
- "Clean back" - matching seams and corners.
- The technology reduces working time by 2-3 times.
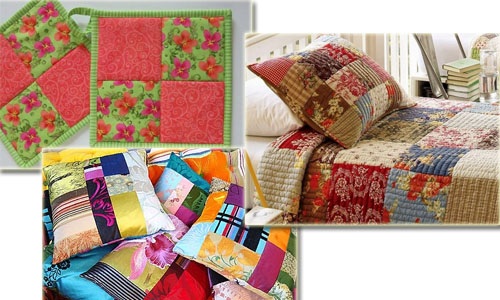
Similar blocks are suitable for various products:
- Potholders.
- Pillows.
- Patchwork quilts.
Watercolor
DIY patchwork, the patterns for which are varied and vary in complexity of execution, is often performed in the watercolor technique - one of the most complex patchwork techniques. Its popularity lies in the structure of squares. The main rule of the technique is the selection of colors.
You can achieve the effect of a watercolor painting by moving from light to dark shades of fabric.
Recommendations for selecting materials:
- The pattern on the fabrics is preferably of different sizes. On one - large, on the next - smaller, and so on.
- Floral patterns would be the most suitable.
- The materials must be in harmony with each other in color and patterns.
What's next?:
- Choice of fabric. The plain fabric should be close in color to the border fabric. The border fabric is the fabric that separates the background fabric and the patterned fabric, which will help create the effect of one pattern transitioning into another. You will also need a fabric with a large pattern and a fabric with a small print that should harmonize.
- Then you should cut out the adhesive interlining according to the size of the future product; for convenience, the surface should be marked out.
- Next, you need to cut out all the fabrics according to the diagram and lay them out on the surface according to the instructions in the diagram. Place squares on the adhesive surface of the interlining, cover the fabric with gauze and iron the work onto the interlining.
Turn the panel over with the non-woven side facing up and sew the pieces together.
Chess patchwork
This technique is used to sew two fabrics of different colors.
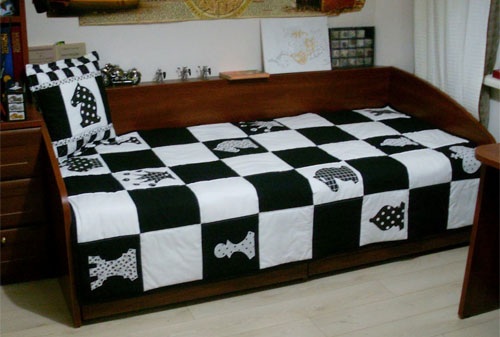
- To speed up the process, strips of fabric of the same color should be sewn in advance, after measuring the size of the required squares, cut into new strips.
- Every second strip is turned 90 degrees, resulting in a checkerboard pattern on the fabric.
- Sew the strips together.
- The result will be a checkerboard pattern.
There is also diagonal stitching of patches:
- You need to take several strips of fabric of different colors and sew them together.
- The fabric should be divided into the required squares, leaving allowances for seams.
- Lay out the strips so that each segment is offset by one square relative to the previous one.
- Sew the resulting strips.
Stripe to stripe
This technique is the simplest method of stitching in patchwork. It consists of parallel stitching of strips of material.
- You will need 5 fabrics of different colors. You need to pin the strips lengthwise, moving from top to bottom;
- Cut 4 triangles from the resulting block.
- Connect the resulting figures together.
- The fragments need to be sewn in pairs, for which you need to place the fabrics with the right sides facing each other and sew them together.
- You should iron the seams from the inside, then from the front side.
Recommendations for use:
- Pins can only be removed after the pieces have been sewn together.
- Each stitching must be completed by ironing.
The strip technique is useful for making bags, toys and other home items.
Triangles
Triangles are easy to work with because they can be formed into almost any pattern, such as diamonds, stars, and so on.
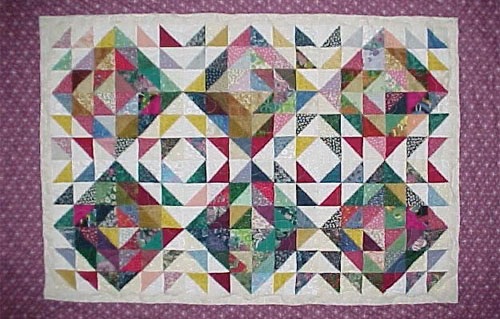
Triangles with a right angle are used, cut so that one of the short sides coincides with the direction of the grain line. By folding the triangle along the long side, you get a square, which is sewn together with the others into a single piece.
There are 2 additional ways to assemble triangles:
- Diagonal stitching. The triangles are sewn along the short edge, creating a strip of fabric. The strips are then stitched together. The method requires special attention to stitching the seams and adjusting the pattern.
- Flag. A quick way to connect a large number of small triangles.
- The triangles need to be pinned in pairs with the wrong side facing out.
- Then secure with pins.
- Stitch on a machine without cutting the threads.
- After sewing the last pair of triangles, the thread needs to be cut.
Features of the technique:
- When sewing squares into a single piece, you should cut off the protruding corners of the allowance.
- Place paper under the machine stitch if the fabric you are using stretches under the machine needle.
Pizza
The Pizza method is suitable for using small pieces of fabric, obtained after sewing. When working in this technique, the product will also be three-layered, but will consist of other layers. The main layer should be any fabric or a piece of adhesive interlining.
- The base should be laid out on the work surface, gradually covered with a layer of pieces of fabric. Any size of scraps will do for this. Their location is also left to the choice of the needlewoman.
- When the patches completely cover the base, you should cover the “pizza” with a transparent mesh, tulle or organza.
- Next, the product is pinned in one direction.
- Then you need to iron the fabric.
- Stitch the layers together using a machine.
Place the finished “pizza” with the lining and backing, then stitch.
Patchwork for Beginners
To start working in the patchwork technique, you should choose:
- Fabrics.
- The design that will be created by the fabrics.
- The type of product that should be obtained in the end.
Decide on the pattern for stitching the patches:
- English scheme.
- Mill.
- Rose.
English scheme
The basis of the technique is the use of different geometric shapes, such as squares, triangles and others, sewn together into a single piece. A must in the technique is the use of a lining cut from a whole piece of fabric.
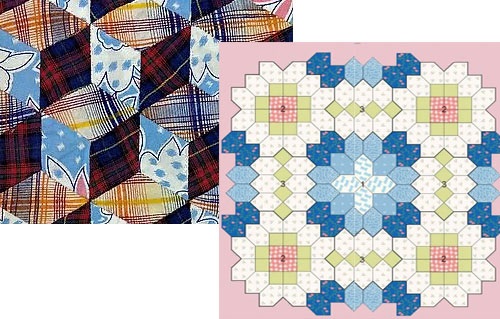
- The fabric scraps are spread out on the work surface.
- Then they are sewn together along the edges.
- Be sure to iron the seams and the fabric itself.
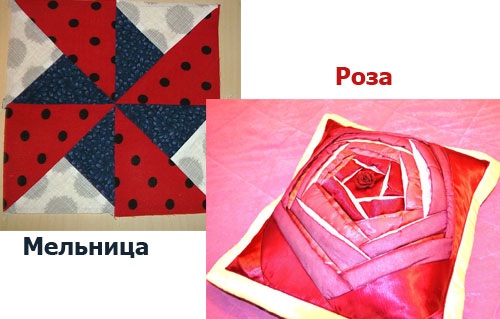
Mill
The pattern is made from two pieces of fabric and assembled from 8 equal triangles (4 for each color).
- Sew a pair of triangles of different colors along the length to form a square.
- Sew the squares together, changing colors to create a strip.
- Assemble two finished strips by sewing from the center.
- Iron the seams and allowances.
Rose diagram
The technique will allow you to use up small pieces of fabric and turn the remaining material into a flower.
- Before sewing, you need to prepare the material; it is advisable to wash and iron the material in advance.
- Cut out the interlining or main fabric to the required size and mark the center with a pencil.
- Pin the first piece of fabric – the flower core – onto the main fabric. It is advisable to make the core in the shape of a triangle.
- Sew on the next piece of fabric that matches in color and size.
- After each piece of fabric, you need to iron the seams and fabric.
- Continue stitching until the main fabric is completely filled, then use to make the desired item.
Patchwork crochet
Knitted patchwork is a type of handicraft in which a finished item is assembled from knitted (crocheted or knitted) scraps using a mosaic principle. The technique emerged out of the need to use up leftover yarn.
Knitted patches are applicable:
- In interior decoration:
- Sewing tablecloths.
- Sewing curtains.
- Kitchen utensils and more.
- For making personal wardrobe items:
- Dresses.
- Bags.
- Pillows and more.
- The craftswomen also make:
- cases for electronic devices;
- book covers;
- toys.
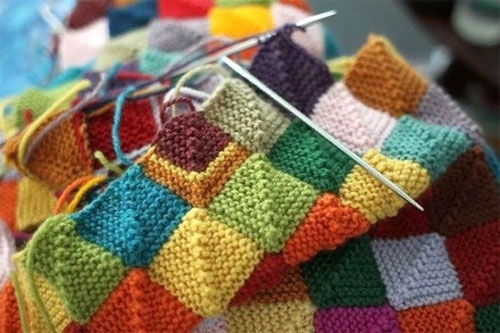
There are two types of knitted patchwork:
- Crochet. Patches can come in different shapes and sizes, with the square remaining the most popular.
- Knitting allows you to use a variety of knitting techniques, from simple garter stitch to complex elements with dense knitting and relief patterns.
Accelerated assembly of parts
Patchworking will help you use up leftover fabric scraps, creating a whole canvas with your own hands. You won't need patterns for working with small scraps.
To do this you need:
- Select suitable scraps.
- Select the size and quantity of parts to be cut out.
- Cut out squares.
- Draw a grid on the adhesive interlining.
- On the lined fabric there are ready-made squares.
- Iron the squares.
- Sew all vertical lines.
- Iron the workpiece along the seams, cut at the tops of the parts without touching the seam.
- Turn the work over and stitch the horizontal rows.
- Iron seams and allowances.
- Turn the work right side out and iron.
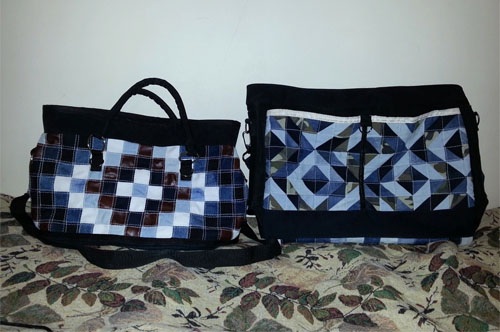
Patchwork sewing from denim fabric
Working with denim requires a certain level of skill as the fabric is thicker than cotton. When working with the material, you don’t have to use a lining, which is a major advantage of the fabric.
From denim fabric you can make:
- Bags.
- Toys.
- Pillows.
- Bedspreads and blankets.
- Furniture decor.
Patchwork pillow sewing
For pillows, you can use large patches; most pillows made with patchwork technique and made by hand are sewn halfway according to the patterns with patches (the fabric will serve as the front side), and a regular cut-out back side.
To work you will need the main fabric and a fabric of a different shade.
- Cut out a template from cardboard.
- Iron the sides of each square of the main fabric 1 cm inward, bend the corners.
- Fold the fabric in half and iron the folds.
- Fold twice like an envelope.
- Cut the colored fabric into squares.
- Cut the second piece of fabric into squares and place them on white envelopes.
- Pin the sides of the envelopes and stitch them with a machine.
- Insert colored elements and fold the corners of the envelopes over them.
- Sew by hand.
- Cut out the back part of the pillow and sew it to the front side.
Sewing cosmetic bags and handbags
A DIY patchwork book, the work scheme of which is very simple, will easily allow you to make cosmetic bags and handbags, for which a scheme is usually not required, the main thing is to follow the instructions.
To sew a cosmetic bag you will need:
- Patches.
- Lining fabric.
- Non-woven fabric.
- Lightning.
- Zipper.
- Cut rectangles from pieces of fabric.
- Sew the rectangles. Cut two rectangles from the base fabric, equal in size to the patchwork piece.
- Sew rectangles to the sides of the patchwork pieces.
- Cut out the lining and interfacing for the inside of the garment.
- Fold the lining inside out, the blank with the outer part facing the front side. Pin and sew.
- Sew a zipper along the short edge.
- Sew the central part.
- Sew the edges together and turn the cosmetic bag inside out.
Patchwork rug
To make the rug you will need:
- Dense fabric.
- Lining, for example, synthetic padding.
- Basic patchwork tools.
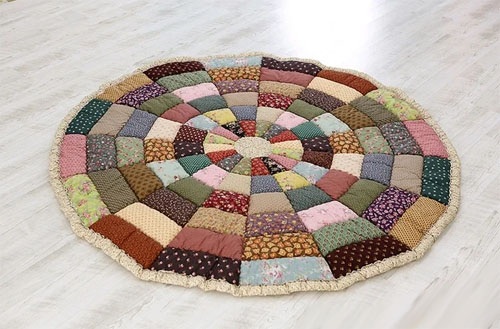
- The fabric needs to be ironed.
- Cut the material into equal strips.
- Place strips of fabric on the lining.
- The stripes should be sewn onto the lining by hand or machine.
Blanket and bedspread with your own hands
The principle of making a blanket and bedspread is very simple, and even a novice craftswoman can do the job. The difference between making a blanket and a bedspread is the need for a lining and stuffing material for the blanket.
- You need to take two pieces of fabric and cut strips of the same length from them.
- Place the strips face down and sew.
- Iron the seams.
- From the third piece of fabric, cut out the third strip.
- Fold the strip right sides together and sew on both sides.
- Once you have the sleeve, cut out squares from it using the template.
- Connect the squares and sew.
- After each stitching, you need to iron the seams.
A story about how to sew a baby blanket using the patchwork technique:
Next, making the blanket:
- Place the back fabric with the inside facing up.
- Add padding if necessary.
- Lay out the patchwork fabric.
- Sew by hand or machine.
Patchwork sewing of furniture upholstery
You can give a new life to an armchair or sofa at home:
- The upholstery can either be sewn onto the old one or removed and a new one attached.
- The removed upholstery will serve as a pattern for the new trim.
- Make a patchwork fabric according to the chosen pattern.
- Use a staple gun to attach the new upholstery.
Toys
DIY patchwork, the patterns of which are developed for creating various household items, is also suitable for making toys of any shape. As an example, a toy in the shape of a monkey is considered. The pattern must be drawn or found in advance.
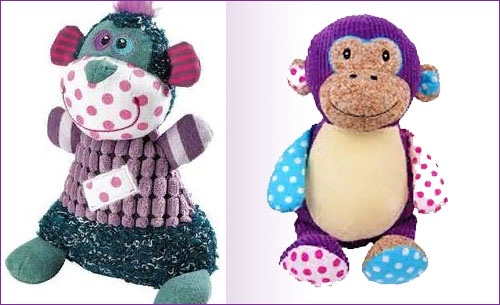
- To create the convexity of the muzzle, you need to copy the drawn template, bend it and draw it again. You will need two of these parts.
- Make holes for the eyes on the muzzle template, cut out the eyes from white fabric using this template, leaving an allowance only for attaching to the muzzle. The pupil material also needs to be processed.
- Cut out two pairs of elements for the arms, two parts of the muzzle, two for the body and 2 heads. It is recommended to cut out the ears and other parts from fabric of a different color.
- Cut out one piece of the body and head from thick fabric.
- On one head piece, on the front side, outline the contours of the parts of the face and mark the line for sewing the muzzle.
- Attach to the contours of the detail, sew with a zigzag. Sew the muzzle details, stitch the line of the mouth and nostrils.
- Sew the muzzle to the head, stuff the gap between the head and the body and sweep the fabric to the level of the chin.
- Sew each paw, leaving space for stuffing.
- Sew the body together by placing the pieces of fabric right sides together, turn them inside out and stuff them. Then sew them together with a zigzag stitch.
- Turn the head right side out and stitch the ears along the applique line. Stuff the paws and sew them up.
- Sew the fingers with thick thread.
- Draw the shape of the part on the top fabric. Pin the fabric with the template to the other fabric.
- Use a sewing machine to stitch the fabric along the outline.
- Cut out the center of the top layer of material. To do this, you need to make a hole in the center and cut along the edges, without touching the stitching.
Patchwork Appliques
All applications are divided into:
- Straight – placing elements on the base and sewing them to it.
- Reverse – sewing an additional layer onto the main fabric and cutting out a detail from the additional layer.
Patchworking is a technique with which you can make things with your own hands, finding patterns on the Internet or inventing them yourself, you can create a thing that will decorate your home, wardrobe, and give a feeling of comfort.
Author: Lennynoov
Article formatting: E. Chaikina
Useful video about DIY patchwork
Video about creating patchwork applique:
I once started to assemble a blanket from pieces of fabric (I was sewing at the time, there were a lot of scraps), but I only had enough for about forty cm square - it takes too much time, so I gave up.
I have been sewing different things with my own hands for many years, but I never knew that it was called “patchwork”) Now I know))
I recently finished a bedspread made from old things. It turned out very beautiful because it is multi-colored, it lifts the mood. Patchworking is my hobby.