Beautiful drawings on cells in volume not only look impressive, but also contribute to the manifestation and development of creative abilities. In drawing such images you do not need to put in much effort, and the process itself brings pleasure to the artist.
Rules for drawing by cells
Drawing is a creative process, so there are no strict rules. The main goal pursued by the artist is to create a realistic image. However, not everyone can achieve the desired result. To give the drawing volume, visually take it beyond the canvas, professionals have secrets that help "revive" images with an ordinary pencil.
This:
- play of light and shadow;
- the arrangement of lines on a plane in a special way;
- the use of auxiliary elements - cells that will be the constituent parts of the future picture;
- work and perseverance.
Every image that you see on your computer monitor or phone display is also based on the principle of cells. However, in this case, the squares are called pixels. They make up the image on the screen, and the squares make up the three-dimensional drawing on the canvas.
The quality of the image depends on the number of pixels: the more there are, the more clearly you can see small details. The same goes for the cells that artists use to create three-dimensional images.
Where to start
Volumetric drawings on cells when creating primarily require the choice of a theme. The source of inspiration can be the works of those who have already achieved success in this direction.
Some objects will be more complex, while others, on the contrary, will be easy to reproduce. A beginner is recommended to start with the latter. Having decided on the topic, you can move on to creating a drawing.
At first, it is recommended to try to depict something simple, then you can saturate the work with a deeper meaning, think through the plot, create unusual forms. Everyone who creates three-dimensional drawings should remember about the use of cells: they help to maintain proportions.
It is best to use a school notebook, lined with horizontal and vertical stripes, for these purposes. It will act as a canvas. The cells are markings that set the shape for creating complex figures based on squares. All that remains is to outline them with a pencil.
Sequence of steps
The process of creating a three-dimensional drawing includes the following steps:
- Creating a sketch sketch taking into account the shape of the object and its location.
- Determining the light source. The position of the shadow depends on it.
- Applying shadows. You need to start with a light tone and gradually move to a darker one.
- Conveying the realism of the work. To do this, the shadows need to be shaded, blurred or lightened using an eraser.
Correct rendering of light and shadow
Light and shadow are the main components of a three-dimensional drawing, without them there will be no 3D effect. To better understand the essence and significance of this principle, you should find a source of bright light and place any three-dimensional object nearby. A novice artist can stand under direct rays and look at himself in the mirror.
If you look closely, you can see that it is the shadows that make the figure three-dimensional. This applies to everything: shadows are present on the face and other parts of the body.
It is important to pay attention to the boundary between light and shadow, which may vary depending on the shape of the object. For example, on a ball the border will be round, on a cylinder it will be straight, and on more complex objects it will take on more complex shapes.

Usually this border is blurred. It will acquire clarity only if a bright light is directed at the object. However, artists should see this blurred line. You should start practicing the transmission of light and shadow with simple objects: a ball, a cylinder. Then, gaining confidence, you can move on to complex forms.
Drawings step by step
Volumetric drawings by cells should start with simple options.
To work you will need 3 items:
- paper;
- pencil;
- eraser.
You may want to prepare several pencils, especially if you plan to create a colored drawing.
House
To create a three-dimensional house on paper you need:
- Mark the middle of the paper and draw a horizontal line above it. It will act as the horizon.
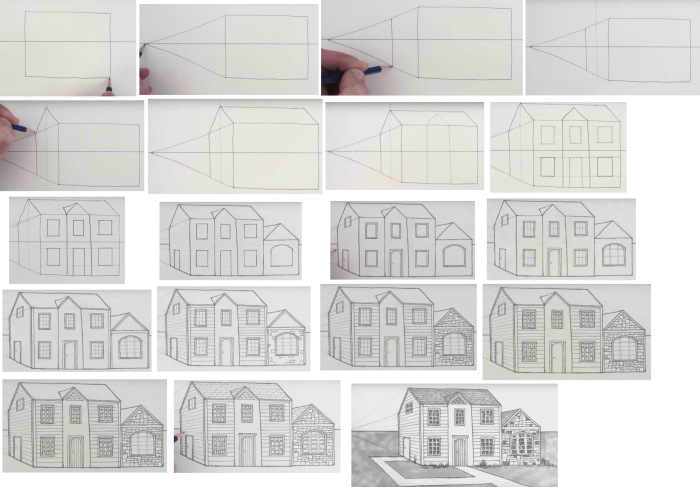
- Draw a rectangle. The length of its sides depends on the size of the future building.
- On the left side of the sheet, on the horizon, place a perspective point. From here, straight lines extend to the upper and lower parts of the rectangle.
- Mark the side wall of the building with a vertical line.
- Draw a vertical line running through the middle of the side wall. It will act as the base of the roof. The line should extend slightly beyond the edge.
- Connect the tops of the roof with its edges with a triangle.
- From the side triangle, draw the main part of the roof.
- Divide the front side of the building into 3 parts. Draw a triangle above the rectangle in the center.
- In each of the resulting cells, depict windows. The door should be in the central lower cell.
- Create a roof volume above the central upper window opening.
- Remove unnecessary details with an eraser.
- Proceed to detailing of frames and glass.
- Apply a double outline where the walls and roof meet.
- Proceed to detailing the walls with panels or bricks.
- Visually enlarge the frames and add elements.
- Use a pencil to mark the tiles on the roof.
- Darken the windows and some areas of the surface. You can add additional elements, for example, draw grass, paths. Trees and flowers will be a good decoration.
Closet
To draw a cabinet, you need to determine the style: the more complex the furniture, the more difficult the work will be.
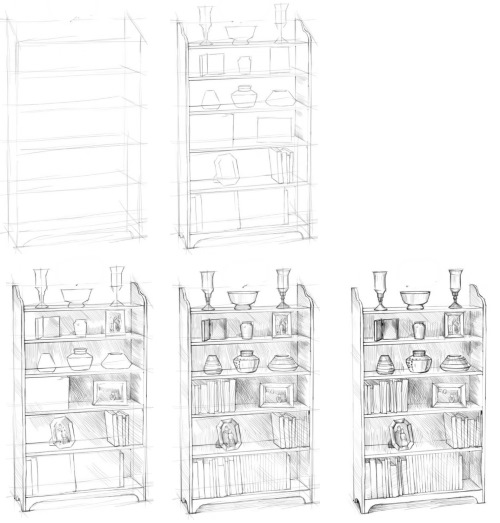
To depict a regular bookcase, you need:
- Draw a quadrilateral. Its upper side should be beveled.
- Create volume and opening doors.
- Find the center of the object. To do this, draw 2 lines from the corners of the quadrangle. Each of them must go to the opposite corner. The point where they intersect will be the center of the cabinet.
The center of the lower part of the cabinet is determined in a similar manner. - In the upper rectangle, mark the doors with glass inserts through which the book shelves will be visible. Mark the direction of the light rays with straight lines.
- Create volume for bookshelves.
- Make a recess for the legs in the lower part of the furniture. Hatching will help shade the 2 sides.
- To make the object more natural, round off its corners at the top. Add handles and ornaments to the doors.
- Draw books on the shelves and shade the walls of the cabinet.
Table
To draw a table, you need to take paper, a pencil and markers. The basic detail of the table will be a rhombus.
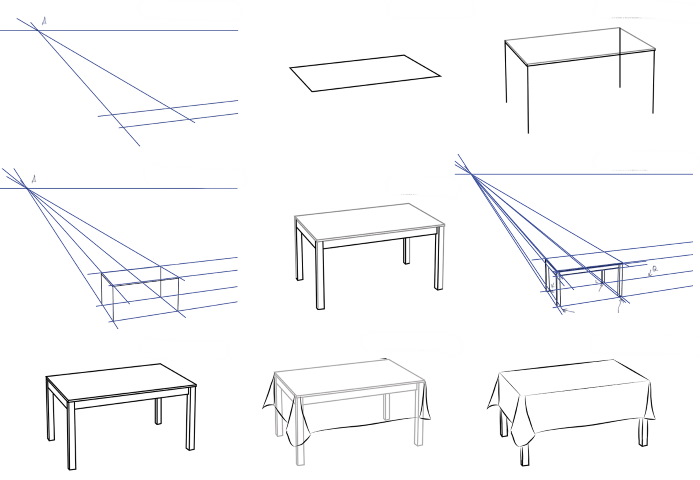
The sequence of drawing is as follows:
- Draw 2 lines inside the rhombus, each of which will connect the opposite corners. On these lines, slightly retreating from the edge, you need to put dots. There should be 4 of them in total.
- From each of the 4 designated points, draw vertical lines. This is the initial prototype of the future furniture legs.
- Visually make each leg thicker on the sides.
- Draw a tablecloth. To do this, draw short oblique lines from all corners of the tabletop, except for the far one. Triangles should be added to them. The edges that hang down should be connected by lines running along the edge of the tabletop.
- Proceed to coloring the almost finished drawing. Brown is the best color for the legs. You can use a felt-tip pen, and the outline of the tablecloth should be gray.
- Start working with light and shadow, which cannot be ignored when creating three-dimensional images. The corners should be shaded in the direction of the sides of the table.
- Paint a tablecloth. One of the easiest ways to make a beautiful tablecloth is to create intersecting stripes of different colors, such as lilac and purple.
Small sketches
You can draw the following simple images by cells and in volume:
| Drawing | Stages of creation |
| Automobile | 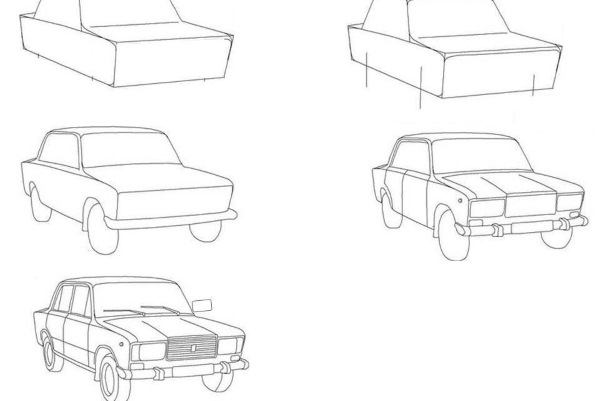
|
| Heart | 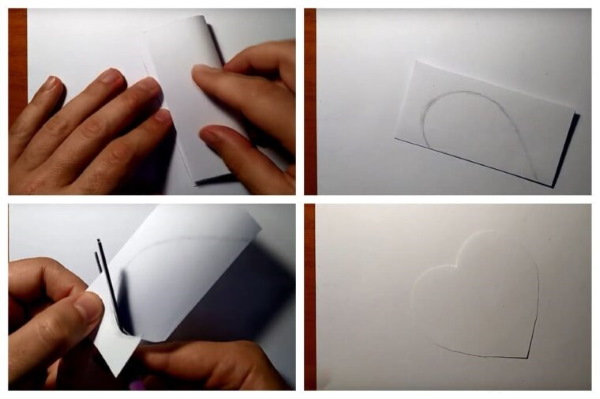 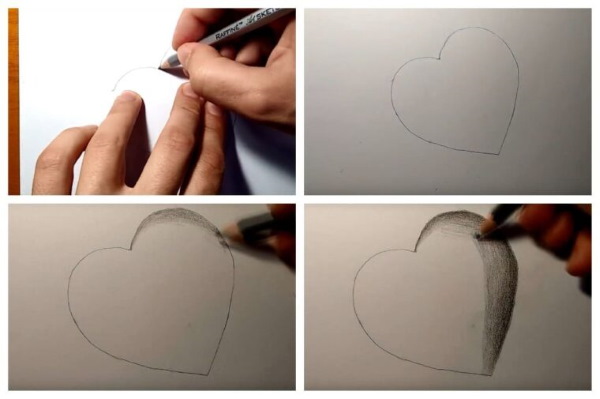 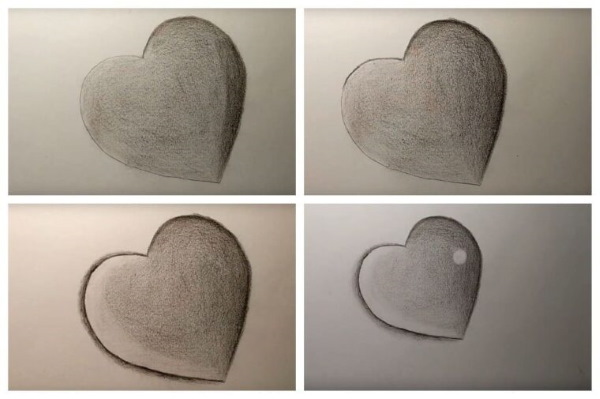 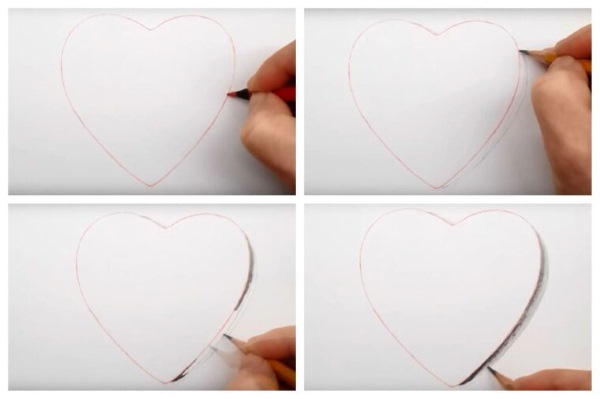 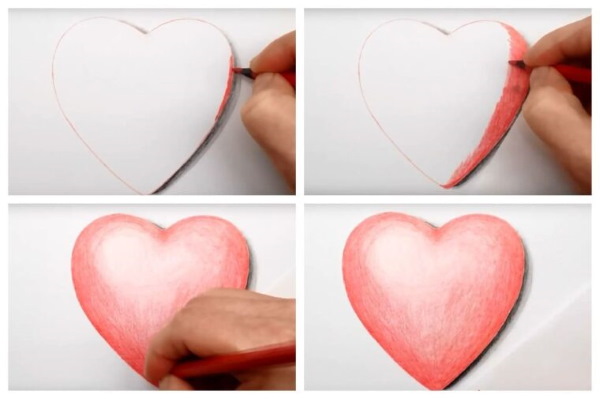
|
| Butterfly | 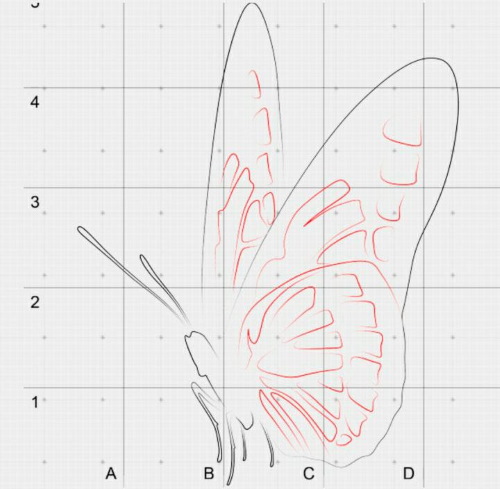 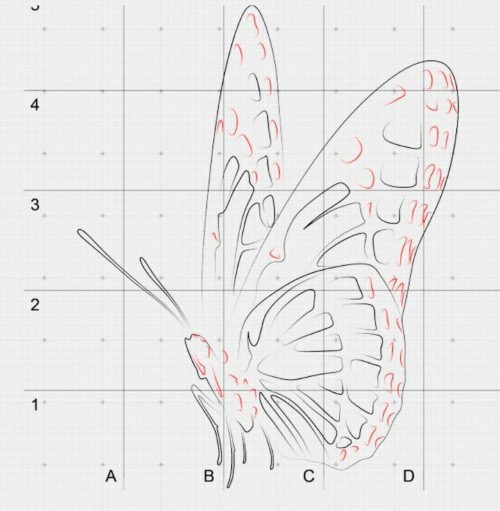 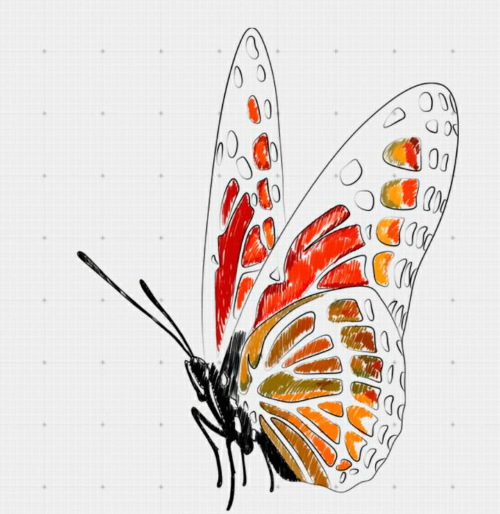      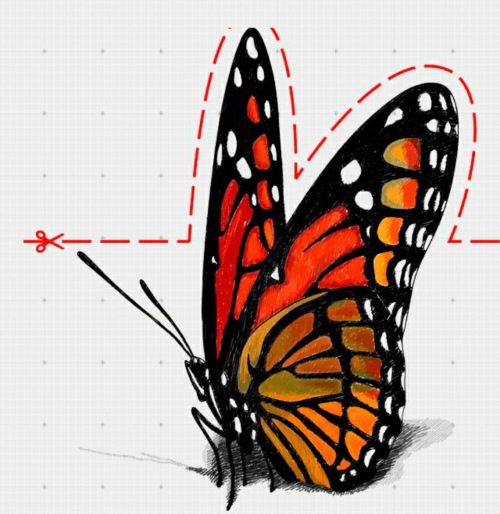 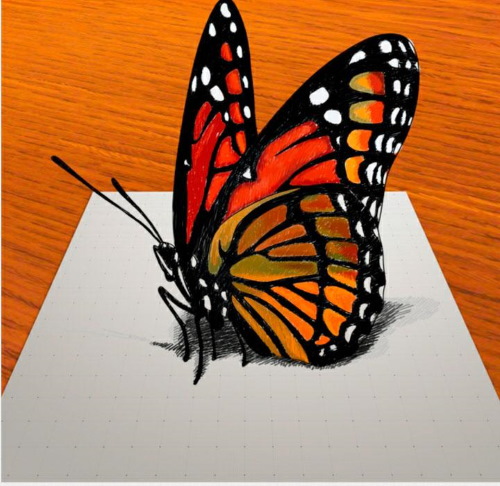
|
| Ladder | 
|
Large and complex, full sheet
On a large sheet of paper, you can depict dynamic drawings. For example, it can be a crack in the ground, the final shape of which depends on the artist's imagination. The more bends, the more beautiful and realistic the result will be.
The stages of creating a drawing are as follows:
- Create a contour. It should be slightly elongated, because the angle of perception is approximately 30° C.
- Draw many vertical lines inside the contour. They will outline the internal "folds".
- Make the lines brighter and at the same time eliminate unnecessary elements.
- Determine the location of the light source and apply a shadow. Taking into account the lighting, the drawing should be darkened diagonally. There should be a solid shadow at the bottom, and a slight "twilight" at the surface.
- Draw the texture of the ground around the crack, and also add grass and stones to the picture.

The figure of a man who seems to be unable to fold the sheet of paper also looks unusual.
To depict it you need:
- Mark the fold line on the paper.
- Draw a line at an angle of approximately 30 degrees to the fold. This should be done twice: on one half of the sheet and on the other half.
- The segments should be of different lengths. The fold will divide the person disproportionately. On one half - the legs and lower part of the body, on the other - the arms, head, shoulders. The arms should seem to "rest" on the sheet.
- Sketch the figure, trying to stretch the lower part more than the upper one.
- After folding the sheet, check whether the top and bottom parts match.
- Darken the details where needed.
Colored
Three-dimensional drawings on cells can be created not only in black and white versions, but also in color.
For example:
| Drawing | Description of creation |
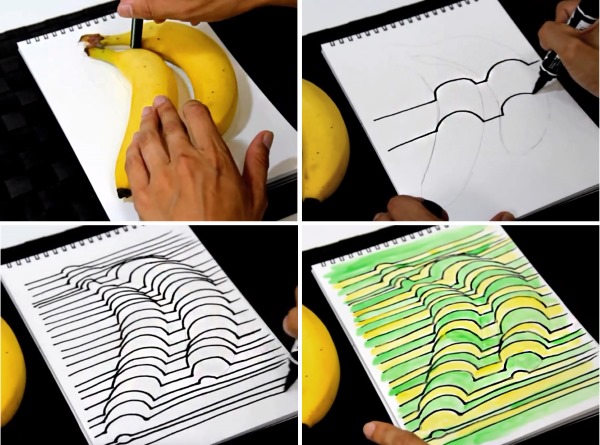
| Bananas | The work on the image of bananas lying on the table is not difficult. In addition to paper, pencil and markers, you should use real fruit.
The stages are as follows:
|
| Hand | 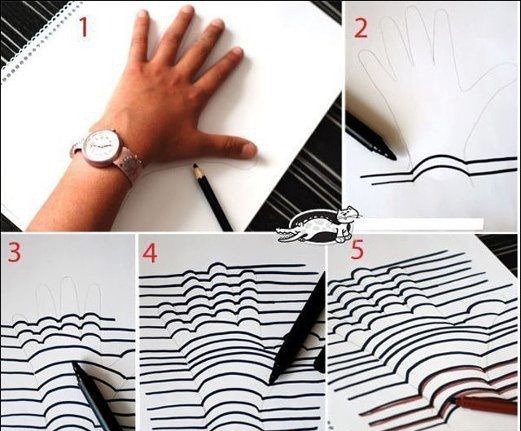 You can draw a hand using the algorithm described above. Just put your palm on the paper and trace your fingers with a pencil. Then draw lines that will go around the image. |
| Funnel | 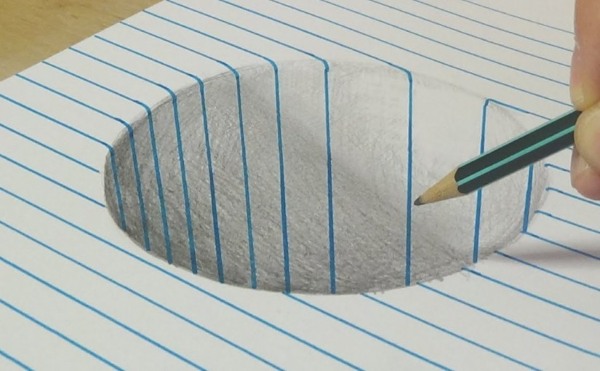
To draw a 3D funnel, you need to:
|
Creating three-dimensional drawings on squares is a fascinating activity that is enjoyed not only by children but also by adults. Anyone who knows how to create 3D images can feel like a true wizard, capable of making drawings “live” with a few strokes of a pencil.
Video about volumetric pixel drawings
Volumetric drawings by cells: