The guitar, one of the popular musical instruments, has a rich sound and the ability to express a variety of emotions and feelings through music. For preschoolers, it is enough to draw the outline of the instrument and mark the strings with straight lines.
Older children can try to create a more realistic image with additional details. This is a neck with tuning pegs, a guitar body, decks and a sound hole.
Necessary materials and tools
The materials and tools described below play an important role in the pencil drawing process, allowing artists to create a variety of works of art.
| Tools and materials | Brief description |
| Paper | It differs in density, texture and color. Different types of paper are used for drawing, including watercolor, designer and others. |
| Pencils | This is a tool consisting of a graphite rod enclosed in a wooden or plastic body. Pencils come in different hardnesses (from 9H to 9B), which allows the artist to create lines of varying thickness and intensity. There are colored pencils, which allow the artist to use a variety of colors and shades. |
| Erasers and pens | These are tools used to erase lines and create soft transitions between tones. Erasers come in different types: plastic, rubber, and others. Kneaded erasers are made of special rubber or plastic and allow you to gently erase pencil lines. |
| Stencils | These are special templates that can be used to create repeating patterns or symbols. Stencils can be made from a variety of materials, such as paper, plastic, or metal. |
| Rulers, compasses | These are the tools needed to draw straight lines and measure distances. Rulers come in different sizes and shapes, and compasses are used to draw circles and arcs. |
| Sharpeners | These are tools for sharpening pencils. Sharpeners come in manual and electric versions, with different types of blades for different pencil hardnesses. They help keep the pencil sharp and ready for use. |
Master classes
It is necessary to learn how to correctly convey the proportions and details of the instrument so that the drawing looks beautiful and professional:
- The guitar consists of a body, a neck, and strings. The body includes a deck, a side, and a back, and the neck is shaped like an arc.
- When drawing, it is important to maintain proportions. For example, the neck should be slightly longer than the body, and the width of the side should be equal to the width of the bottom. The strings should be thin and located at the same distance from each other.
- To make the guitar look more realistic, you can add details such as tuning pegs, a pick, and strings.
- It is important to consider the lighting that will fall on the instrument. It should be uniform and not too bright.
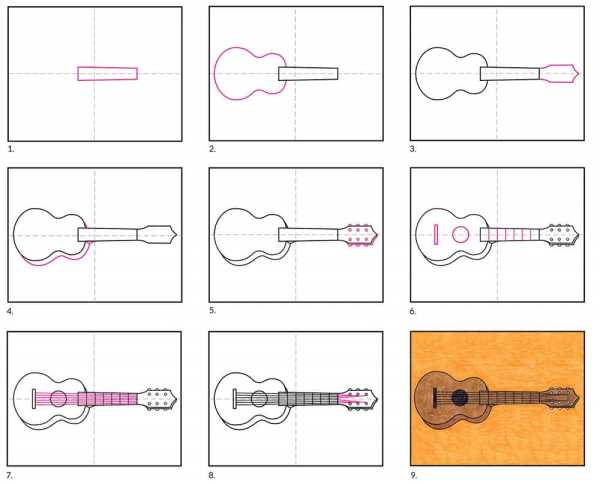
Classic 6-string
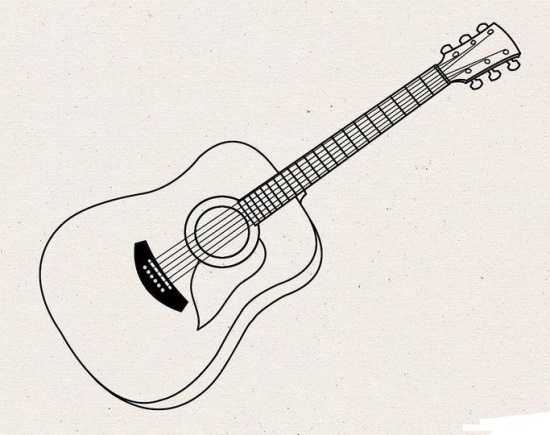
It is a musical instrument whose body is usually made of wood and the neck is made of harder wood or plastic. The classical guitar is considered one of the most popular musical instruments in the world. It is used in different styles, such as classical music, jazz, and others.
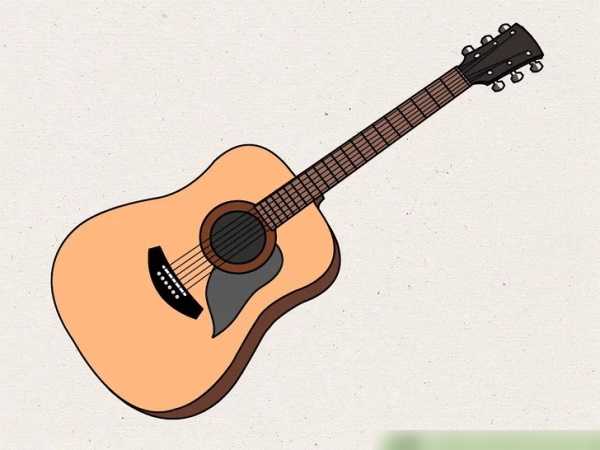
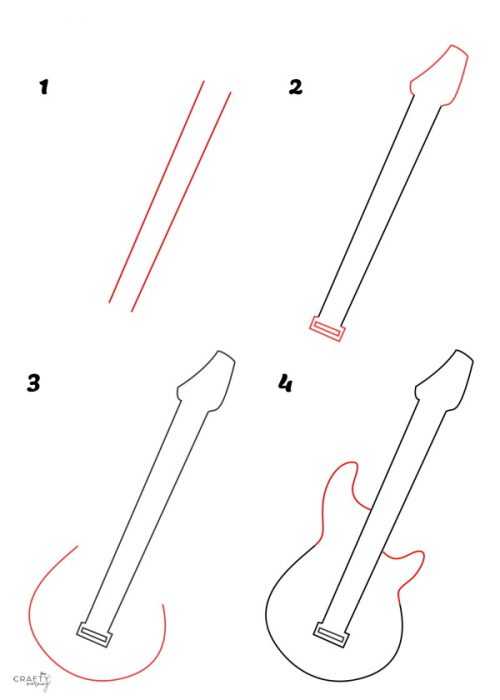
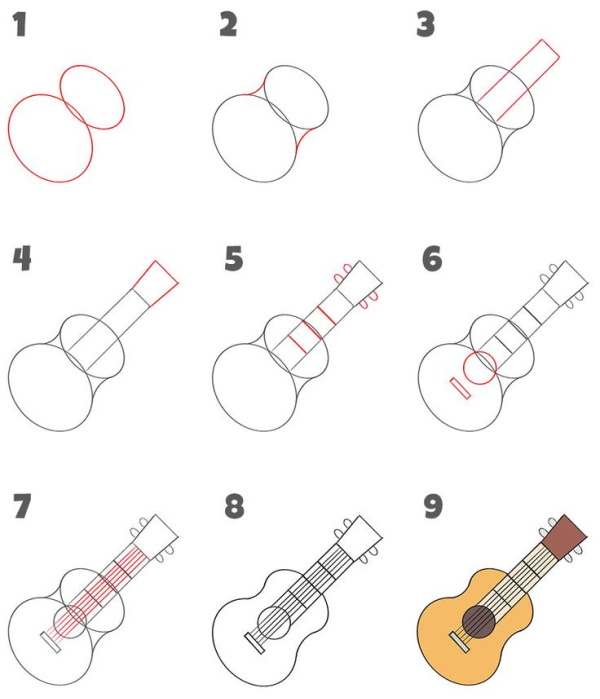
The guitar in the picture can be created using a step-by-step master class, which shows the order of depicting a classic 6-string musical instrument:
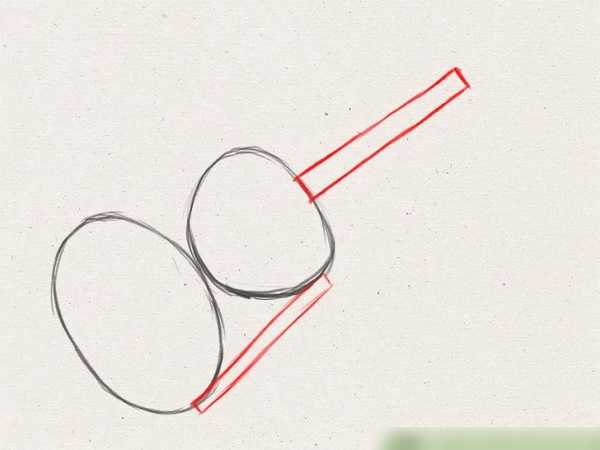
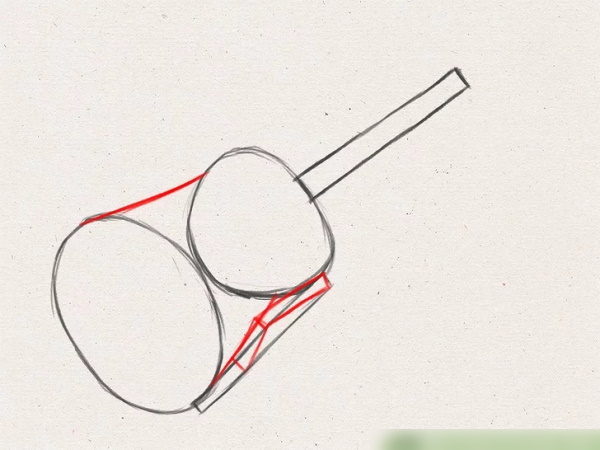
- Draw an elongated rectangle that will represent the guitar neck. This is the base of the instrument. The neck can have different widths depending on the guitar model, but on average the width of the neck is about 5-7 cm.
To give the guitar neck volume, you can add shadows and light lines that will imitate its texture.
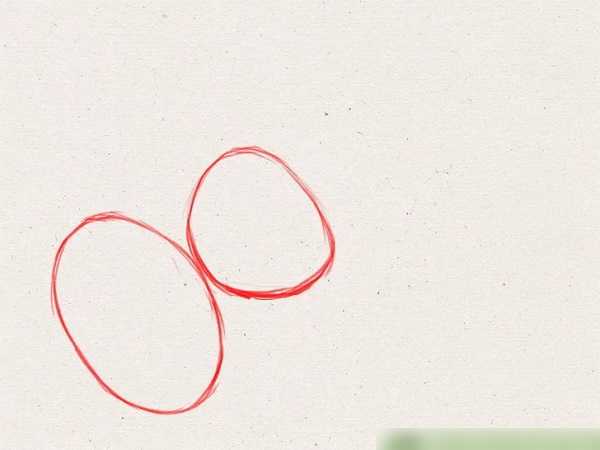
- Add 2 circles: a large circle at the bottom for the base of the guitar deck, and a smaller one at the top for the top. The top of the deck is usually smaller than the bottom. This is the main part of the instrument's body, which is responsible for the sound.
It can come in different sizes and shapes, but usually has rounded edges. In most cases, the top deck is slightly smaller than the bottom and has the shape of a truncated cone.
To add realism to the image, you can add a light outline or strokes that imitate the texture of the wood from which guitars are usually made.
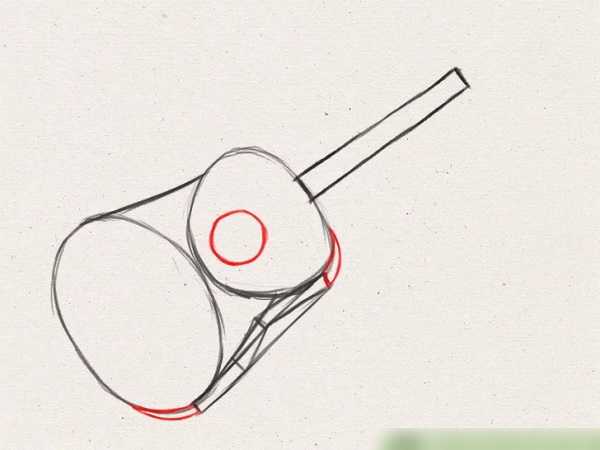
- Draw a round resonator hole on the top deck. It is usually located in the center of the deck and serves to improve the sound of the instrument. The resonator hole may vary in size and shape.
To make the guitar look like a real instrument, it is better to use a standard hole shape. The sizes can vary from 8 to 10 cm in diameter. Add shadows to make the hole more visible and give the drawing a realistic look.
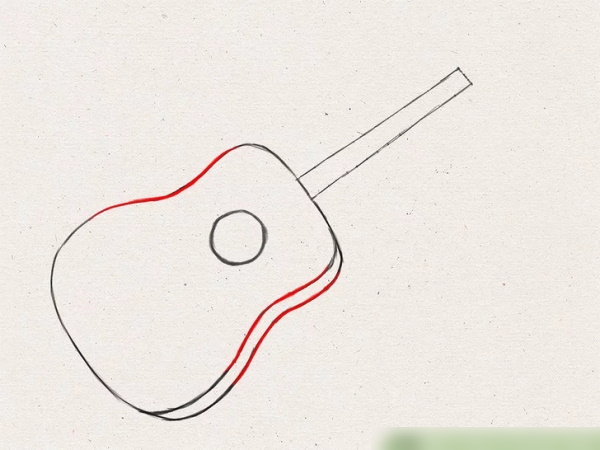
- Draw various decorations on the guitar deck, such as rosettes and stripes. They serve as a decorative element and do not affect the sound of the instrument. Decorations can be varied, but most often they are drawn symmetrically.
For example, if the drawing is mirrored relative to the vertical axis, this will give the image harmony. Use small details to give the guitar a finished look. To do this, add various textures and accents that will help make the image more expressive.
- Draw a bridge below the neck. The bridge should be in the shape of a triangle or trapezoid and slightly smaller than the width of the neck. The height of the bridge should match the height of the lower circle of the guitar deck.
- Draw 3 tuning pegs on each end of the neck. The tuning pegs should be evenly spaced along the entire length of the neck and look as if they are attached to the headstock. They are used to tune the strings.
- Add tension adjusters to the top of the neck.
- Add frets along the entire length of the neck, which are transverse strips that help the musician determine the place for his fingers when playing the guitar.
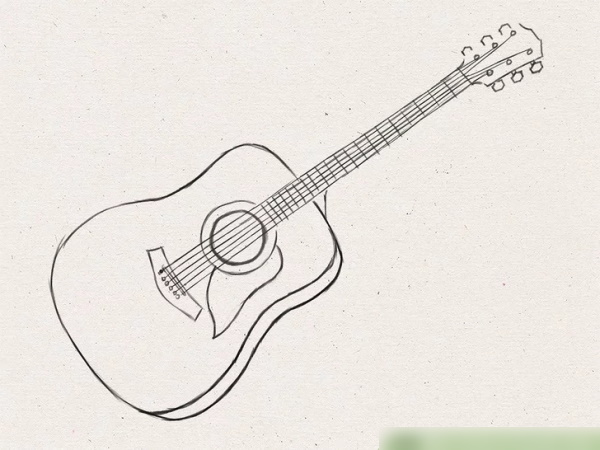
- Draw strings running from the tuning pegs to the body of the guitar. They cross the neck and end at the tuning pegs. Use different thicknesses for the strings to create a realistic image.
- Erase all unnecessary lines and outline the contours of the guitar.
Recommendations:
- Use a ruler or template to draw straight lines and circles to create more accurate and even pieces.
- You can add decorative elements such as inscriptions or ornaments to make the drawing more interesting and expressive.
- Start with the basic elements and gradually add details to avoid clutter and confusion in the drawing.
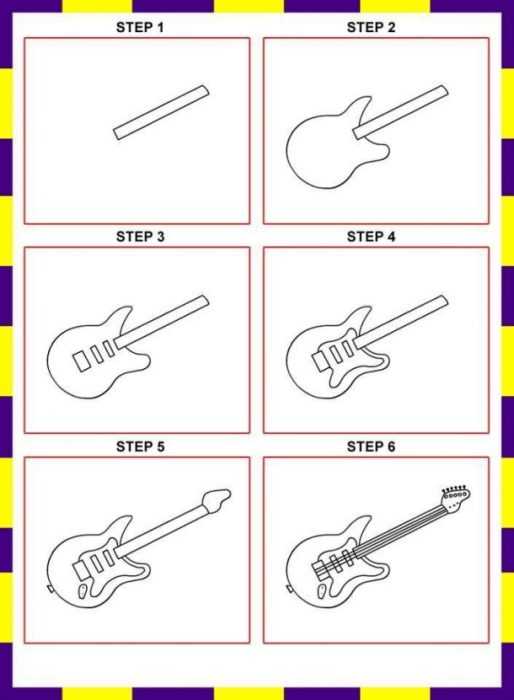
Schematic representation
The guitar in the figure can be depicted in a simplified form after completing the following steps.
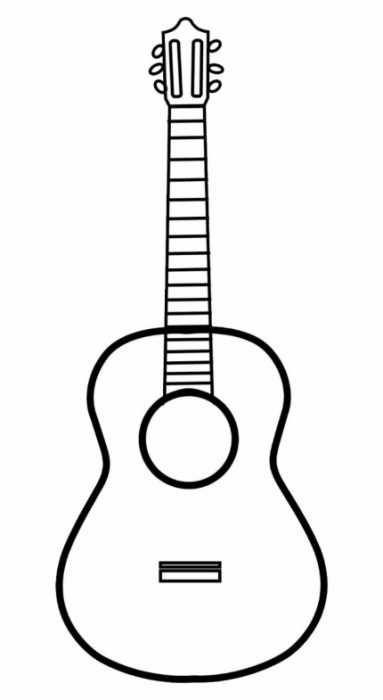
This:
- Start by drawing an elongated rectangle that will represent the neck of the guitar. The neck should be slightly wider at the top and narrower towards the bottom.
- Draw 2 circles below the neck: a larger one at the bottom and a smaller one at the top. This will be the guitar deck - the wooden part of the instrument where the strings are attached.
- In the center of the top circle, draw a round resonator hole. It is usually located closer to the top of the deck and plays an important role in the sound production of the guitar.
- Draw the bridge under the strings that connects the neck to the deck.
- Add 6 tuning pegs: 3 on each side of the neck. Tuning pegs are used to tension the strings and change their pitch.
- Draw the string tension regulators that are located next to the tuning pegs. These regulators allow you to tune the strings and adjust their tension.
- Depict frets - marks on the fingerboard that indicate the exact position of the strings when playing. Frets help musicians quickly find the right notes.
- Remove all unnecessary lines and details.
- Outline the contours of the drawing, making them clearer.
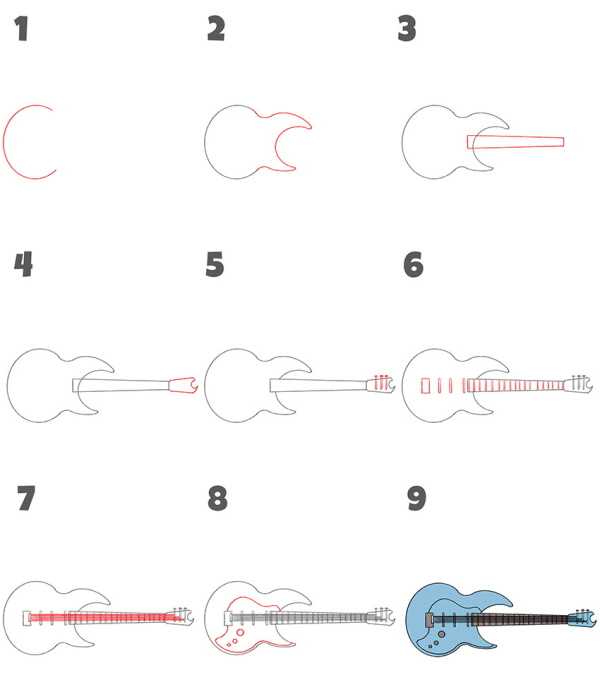
Concert
This is a special type of guitar designed for performing on stage in front of an audience. This instrument is distinguished by its high sound quality and appearance.
It has a body made of wood or other materials and a special design that provides a bright and expressive sound. There are many different models of concert guitars, which differ in size, body shape and other characteristics.
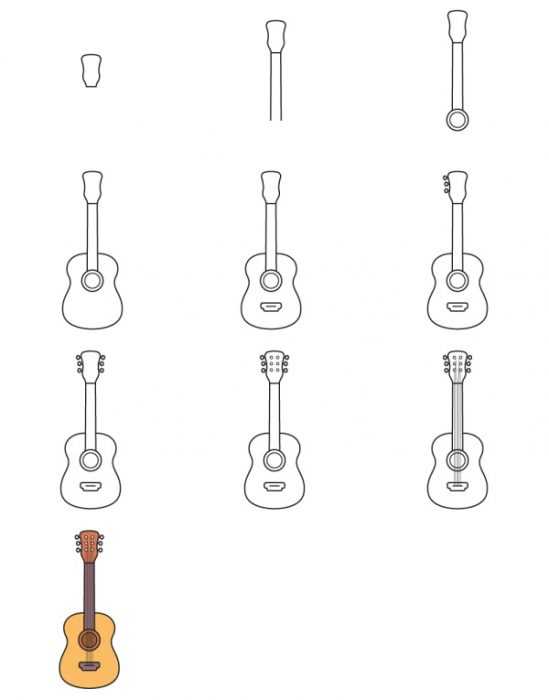
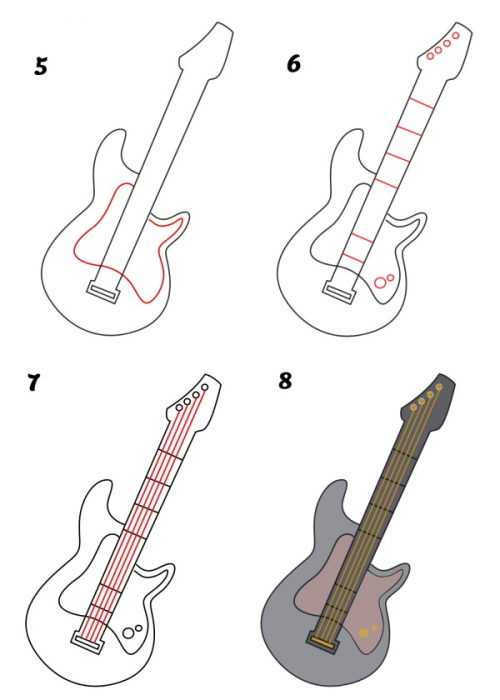
The guitar in the drawing in this master class can be created if you follow all the rules and maintain proportions and details.
You should start with simple forms, gradually moving on to more complex elements:
- Draw an elongated rectangle that will be the guitar neck. It should be long and thin enough to serve its purpose. At this stage, it is important to determine the proportions of the neck and its position relative to the guitar deck.
- Draw 2 circles below the neck, which will represent the deck - the body of the guitar. For greater realism, you can add small bevels on the sides of the deck and make it slightly convex. It should be smaller than the neck in width and height.
This way you can convey the visual relationship between these parts of the instrument.
- Add subtle elements such as serrations, notches on the body or relief lines that imitate wood. You can use different shades of the same color or highlight individual details with a darker shade.
- Add 4 string rests to the bottom of the guitar neck. They should be evenly spaced. The shape of the rests may vary depending on the style and type of guitar.
To create a realistic effect, the bridges should look three-dimensional and three-dimensional. You can add shadows and highlights to emphasize their shape and position on the fretboard.
- Draw 6 tuning pegs on one side of the guitar. They should be evenly spaced along the neck and have a rounded shape. To make the tuning pegs look realistic, it is recommended to draw them with a small radius of curvature. This will create a 3-dimensional effect.
- Add string tension adjusters next to each tuning peg. These are small parts located on each tuning peg. The adjusters should have a simple shape, but at the same time match the proportions of the guitar and not look too bulky.
- Mark the frets. They are the metal bars on which the strings rest. Put round dots on the 3rd, 5th, 7th, 9th, 12th, 15th, 17th, 19th and 21st frets.
- The strings of a guitar are thin lines that connect the neck to the deck. In the picture, show them as thin lines that run from the neck to the deck.
- Remove unnecessary lines to give the image a cleaner, neater look. Erase lines that indicate the edges of the sheet or other elements that are not part of the tool.
- Outline all elements of the drawing, which will help make the image clearer and more detailed. Avoid excessive line thickness, so that the drawing does not look dirty.
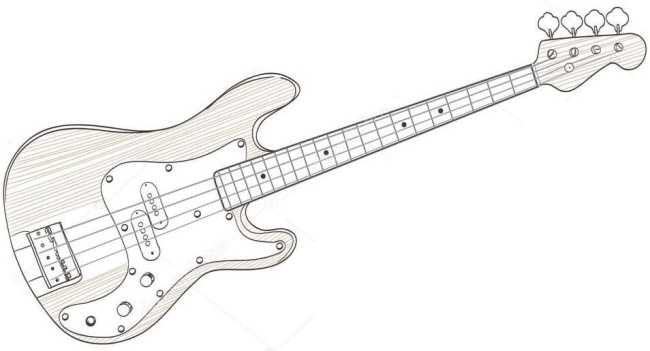
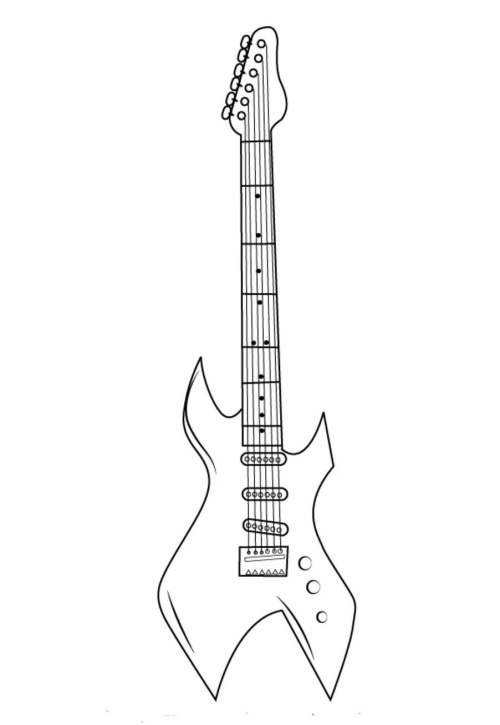
Bass guitar
This is a musical instrument that is used to create deep and rich sounds in music. They come in different shapes and sizes, but they always have only 4 strings.
Bass guitars can be made of wood or metal, and have different body shapes. Some instruments of this type are curved to make them easier to hold while playing.
The guitar in the picture can be depicted using the step-by-step master class:
- Start with the general structure and arrangement of the main elements. It is important to correctly convey the proportions of the instrument.
- Draw the basic outline of the neck. It should be slightly curved and tapering towards the end. This will help create the impression of volume in the instrument.
- Draw the shape of the deck, which should be slightly wider at the top to create the illusion of a rounding. Add a slight bevel to the edges of the deck for realism. Use shadows and highlights to give the deck volume and relief.
- Add decorative elements such as the manufacturer's logo and pick cutout, lines to reflect the wood grain.
- Draw a bridge for the strings using simple geometric shapes to achieve clear lines. Place it on the deck.
- Add 4 tuning pegs to the end of the neck for the strings, using small circles or dots to represent each tuning peg head. The tuning pegs can be different sizes for a realistic look.
- Add string tension adjusters to the neck, which are usually located near the tuning pegs. They can be represented as small triangles or circles.
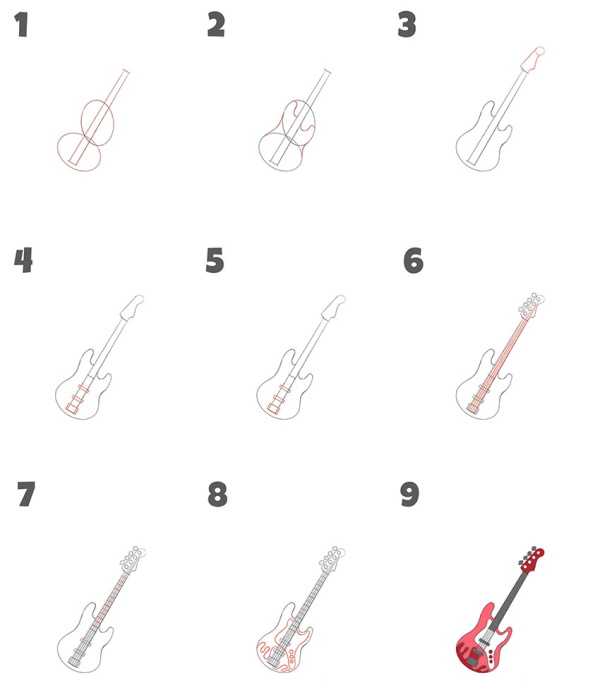
- Add lines to the fretboard to represent the frets. On certain frets (for example, 5, 7, 12, and 17), draw small circles to represent where the strings touch the fretboard.
- Draw the guitar strings using thin lines. They should start from the tuning pegs and end at the frets. Add highlights to the strings to make them look more realistic. Create the effect of string tension by changing the thickness of the lines. Thinner lines at the ends of the strings will indicate their tension.
- Remove all unnecessary lines and contours that are not part of the drawing.
- Trace the outline of the guitar.
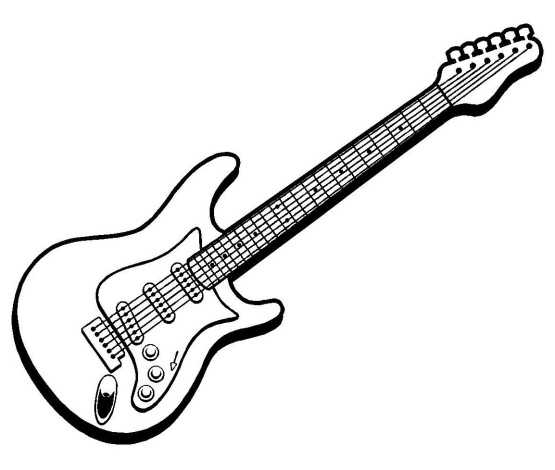
Electroacoustic
This is a guitar that can sound like a regular acoustic guitar, but has a built-in amplifier and speakers.
Thanks to this instrument, musicians can play it not only indoors, where you can hear its sound without additional amplification, but also perform in front of a large audience, using an amplifier to create a powerful sound.
You can draw an electro-acoustic guitar using the master class described below.
By following the tips, you can create your own unique image.
- Start by drawing the guitar neck, a long curved line that represents the base of the instrument. It is usually drawn thin to emphasize the curves and add realism to the drawing.
- Draw the deck, the flat surface on which the guitar's tuning pegs and strings are located. It is shaped like a rectangle with rounded corners.
- Add embellishments and details that give the guitar its own personality. These include binding and decals (on the top of the deck). Binding can be done in the form of thin lines that surround the sound hole and give it a finished look.
Stickers are thin decorative elements that are placed above or below the strings. They are usually square or rectangular in shape.
- Draw 4 stands that support the guitar neck. They are small rectangles located at the bottom of the deck.
- Draw 6 tuning pegs on one side of the neck, arranged in a row. They are responsible for string tension and adjustment of their height.
- The string tension regulators are located on the deck. Draw them near the tuning pegs. The regulators can be depicted in more detail - for example, using small circles and arrows indicating the direction of string tension.
- Add frets as horizontal lines running along the fingerboard at certain intervals. Mark these intervals with circles at the 3rd, 5th, 7th, 9th, 12th, 15th, 17th, 19th and 21st frets. Designate frets of different thicknesses to create the illusion of volume. You can use different shades of color or add shadows and highlights for this.
- Draw the strings going from the tuning pegs to the neck. They should look thin and light.
- Remove all extra and unnecessary lines that were used during the drawing process.
- Using a darker color or thicker lines, outline the contours of the guitar to make the drawing clear and contrasting. You can add shadows and highlights to give the image volume.
Tips for Beginners
To create a beautiful drawing of a guitar using pencils, you need to follow these principles:
- You should always start with a sketch of the basic shapes of the guitar: the body and the neck. It is also important to mark the strings. Mark the basic proportions and relationships between these elements.
- You should add details to the sketch. Draw the tuning pegs, pick and other elements of the guitar.
- It is advisable to work on shadows and volume. To do this, use pencils of different hardness to create shadows and contours. This will help make the drawing more realistic.
- The light source can affect how shadows and reflections should be drawn. The light should fall on the guitar as if it were coming from a single source.
- If you need to add colors, you should finish the work with a pencil first. You can color the guitar only after it is completely finished. Colored pencils give more saturated colors compared to other types.
Therefore, it is recommended to use soft pencils, which will allow you to get more shades.
- Once you've finished the work, you need to evaluate the drawing and think about what changes you can make to make it more expressive. For example, adding additional details or changing the lighting.
To successfully draw a guitar, it is important to have a clear understanding of its construction. Before starting work, it is recommended to study the different types of guitars to better understand their shape and details.
Video about drawing
Guitar - drawing: