Floristry attracts the attention of many beginning needlewomen, for whom mastering new techniques is a goal that helps them constantly improve. Anyone can learn this craft step by step. After the first lessons, you can already count on the result. It is important to consolidate the acquired knowledge in practice.
What is floristry
Floristry is the art of creating compositions from live and artificial flowers, sometimes with the involvement of third-party elements. Skills in this area will be useful when creating bouquets, panels and collages. Floral compositions may be in demand on the eve of holidays and various celebrations, be it a wedding or an anniversary.
Materials for floristry
Having decided to get involved in floristry, it is worth getting the materials necessary to create compositions. Anything can be used to create compositions. Here are the materials that a florist needs most often.
| Material | Purpose | Peculiarities |
| Floral sponge | The basis for the composition. | Usually, it is placed on the bottom of the container, and plants or other elements of the composition are stuck into it. |
| Thin wire | Bandaging material. | It can be used for various purposes, including for making composition parts. |
| Satin ribbon | Decorating the composition. | It is optimal to have satin ribbons of different colors. |
| Tape tape | Taping of sections. | Can be used for different purposes. |
| Cling film | As a wrapper. | Should not be used as a decorative element, only as a technical wrapper. |
Florist's tools
You shouldn't skimp on florist's tools:
- Secateurs. It is recommended to approach the choice of pruning shears with maximum scrupulousness. It would not be superfluous to hold, look at and try the tool in action before buying, if possible.
- Scissors. A florist needs scissors often and for different purposes. Therefore, it is optimal to have 2 pairs of scissors, one for household needs, and the second directly for floristry.
- Florist's knife. It is necessary to keep the knife well sharpened. The structure of the stem can be damaged when it is cut with a dull knife. It is convenient to have 2 knives, one for working directly with compositions at the table, and the other for cutting plants in the garden.
- Hot glue gun. For floristic purposes, a gun with a power of 100 - 150 watts will be sufficient.
- Pliers. A florist needs this tool to twist the wire and create bends on it. Additionally, thin-nose pliers, which are suitable for working with thin wire, may be useful.
- Wire cutters.
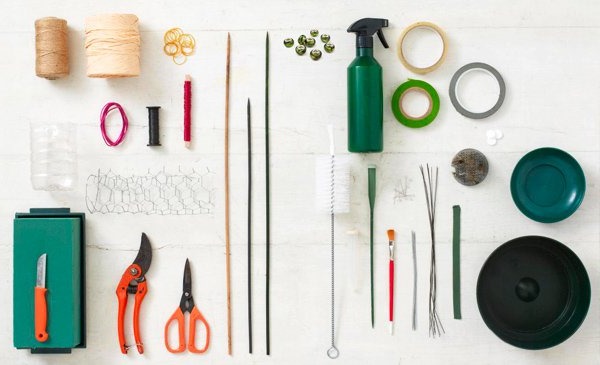
- Color wheel. A functional cheat sheet that makes it easy to select colors for elements when creating bouquets and compositions.
- Stapler. This device is used in the work of a florist to attach parts that cannot be glued or combined with other elements of the composition in any other way.
Basics of making bouquets from fresh flowers
Floristry for beginners step by step suggests that the student should first of all concentrate on unobtrusive compositions. Decorating the bouquet may be unnecessary, and this will negatively affect its attractiveness.
The design of the composition should be based on the purpose for which it is created. Accordingly, it is necessary to use elements that are optimally suited for this purpose.
Combination of flowers in a bouquet
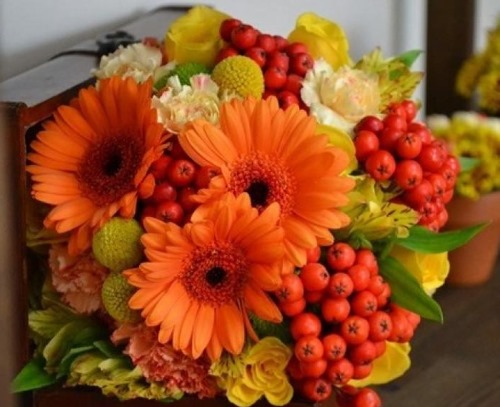
Floral arrangements made primarily using one color are called linear. There are also 4 ranges that are suitable for use by novice florists without worrying about the result.
"Contrasting"
Using plants and elements of opposite colors in a bouquet can make the composition bright, rich, and instilling a sense of optimism.
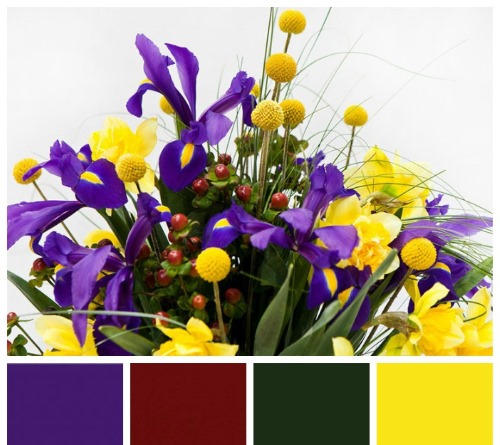
Too much contrast, however, can have the opposite effect.
"Similar"
If a composition contains elements that are close in color, it can be classified as analogous. Additional use of different shades of the same color is allowed.
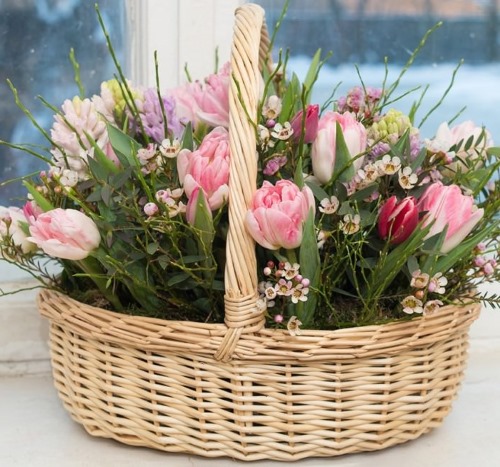
The number of colors here is not limited, perhaps one will prevail over the others, or perhaps all of them will be presented equally.
"Monochromatic"
By using one color but playing with its different shades, the result is a monochromatic composition.
The combination of elements in this case is associated with smooth transitions, which implies that the eye captures the “whole picture as a whole”, but if necessary, each element can be examined separately.
"Rainbow"
There are no special restrictions on color. A wide variety of flowers and other attributes of composition elements can be used. A typical bouquet of wild flowers is a striking example here.
Although there are no strict restrictions, it should be understood that there are colors and other details that do not look the most pleasant together.
Making bouquets of fresh flowers
You shouldn't always rely on an intuitive approach, because even free arrangements are subject to certain laws, and Below is a list of them:
- It is more appropriate to place the brightest and largest buds in the center of the composition, and the faded and small ones, respectively, closer to the edges, this will make the bouquet look more voluminous.
- Decorating with greenery is acceptable in limited quantities; too much of this type of decor will distract from the flower buds, introducing chaos into the composition.
- It is advisable to move the inflorescences a little away from each other, then it will be easier to examine them.
- It is recommended to vary the height of the arrangement elements within reasonable limits.
- There is no need to forcefully bend or twist the plants; it is better to leave them in a natural position.
- It is advisable to use flowers of varying degrees of ripeness, from unopened buds to fully opened ones.
- All the rules listed above can be violated, provided that the resulting composition will have a harmonious appearance.
Making bouquets of artificial flowers
Floristry for beginners step by step provides the opportunity to eventually learn how to create bouquets of artificial flowers. Their main advantage over living ones is durability.
You should start with creating a pattern, and then move on to creating an element based on it from pre-stocked blanks. The final version can be a standard bouquet, a garden composition, a plant in a pot or a flowerpot.
Floral arrangements
There are two main floral styles: “massive” and “linear-massive”.

Regarding the first, it is assumed that the basis of the composition is a massive plant or flower, which is located vertically, and several additional elements are horizontal. There is no focal point here.
Experts do not recommend using a contrasting color scheme when creating a floral composition in a massive style. It is preferable to flow from one element to another, both in terms of their color and their size. A classic example of a composition in this style is flowers in a vase.

Floristry is not always obvious to beginners in terms of such things as determining the style of compositions. Step by step learning the skill, at a certain stage it becomes clear how the linear-massive style differs from the one described above: the plant material should not be completely covered.
Floristry training for beginners, step-by-step master classes
Thanks to master classes, novice florists learn some secrets and become familiar with the pitfalls that mentors tell them how to avoid.
Box of flowers
Floristry for beginners is studied step by step from the basics of composition, which involves Having the following materials on hand, in addition to the basic ones:
- succulent;
- roses with large buds;
- box or crate;
- postcard (optional).
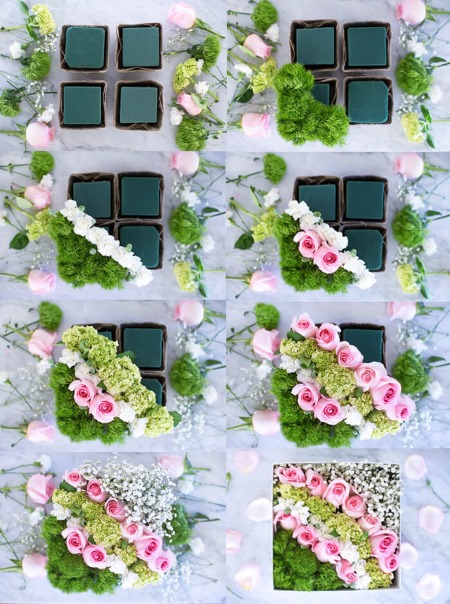
Execution process:
- Based on the size of the box or cardboard box, it is necessary to cut the sponge accordingly and then pack it in cling film.
- You should place the film with the sponge in the box and then secure it using a stapler.
- Plants should be laid out, filling the entire volume of the container, but carefully, so as not to accidentally damage anything.
- Now the box with flowers should be tied with a satin ribbon, and if desired, a card corresponding to the composition in shape and color should be placed inside.
Handbag with flowers
To create this composition, you should stock up on the following materials:
- rose (common);
- eustoma;
- pink tape;
- large purple beads;
- carnations (flowers);
- resinous seed;
- any fabric.
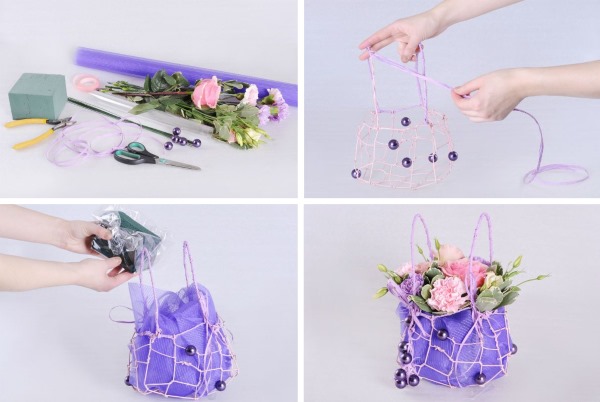
Execution process:
- You need to wrap the wire with tape along its entire length.
- Next, the wire should be intertwined in such a way that it is given the shape necessary for the base of the frame of the future handbag.
- From the same wire you need to weave the handles of the bag, and then attach them to the prepared frame.
- To give the handles an aesthetic appeal, they can be wrapped with satin ribbon.
- The frame of the bag must be lined with fabric from the inside.
- Now you should place a damp floral sponge wrapped in cling film at the very bottom of the bag.
- To ensure that the flowers fit completely into the bag, you should trim their stems accordingly, and then insert each flower into the sponge.
- Using beads and satin ribbon, weaving these items together, you need to make a garland, and then it should be attached to the bag.
Wedding bouquet
Here you need to prepare for execution:
- panicums (5 pcs.);
- decorative cord;
- pink organza;
- ruler;
- decorative plastic tape;
- beads, no more than 1 cm in diameter (15 pcs.);
- pink tulips (7 pcs.);
- green wire.
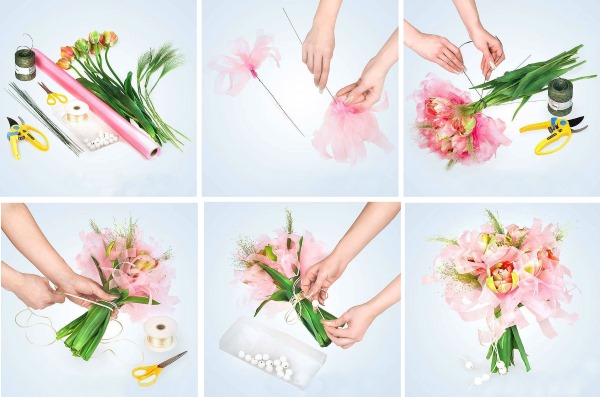
Execution process:
- The organza strip, the width of which should not exceed 30 cm, must be folded in half, and then cut with scissors in the middle, dividing it into 2 parts. Repeat this operation with the other strip, since you will need at least 4 pieces of organza.
- Each of these pieces needs to be folded in half and cut off with scissors into strips 3 cm wide, but the cut should not reach the fold line.
- From these pieces it is necessary to assemble lush flowers, twisting their legs together, and then connecting them with wire at the base, but one leg must be left long, so that its length corresponds to the stem of the decorative flower.
- Tulips should be placed within one level, and panicums should be evenly distributed throughout the bouquet, the framing of fresh flowers will be done using organza details made in the previous step.
- All the stems must now be tied with wire, twisting it as high as possible to avoid loss of shape and disintegration of the flowers united together.
- Using pruning shears, the stems should be cut to the desired length.
- The leaves need to be carefully torn off the stems and placed around the entire circumference of the bouquet.
- Next, being extremely careful to avoid damaging the tulip leaves, wrap the bunch with plastic tape 3-4 times and secure the bouquet.
- The ends of the decorative ribbon can be decorated with white beads.
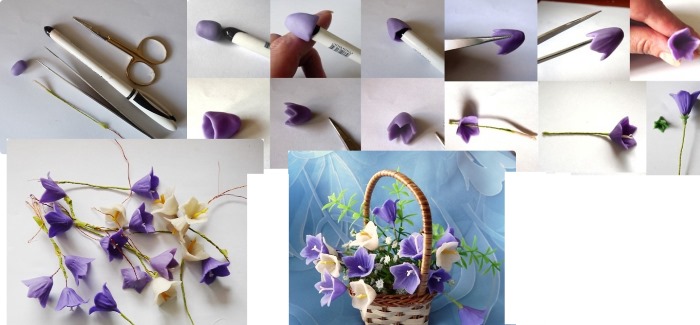
Spiral bouquet
Any flowers will do for this composition. For greater convenience, it is recommended to choose those with dense and even stems. These can be, for example, daisies or roses.
Execution process:
- Several cleaned flowers need to be folded upside down so that they are in a vertical position.
- Having transferred the workpiece to the left hand, you need to take the next flower with your right hand and, slightly tilting it to the right side, place it in front of the workpiece, but the next flower will need to be tilted to the left side.
- Repeat the operations from the previous point with the only difference that now you need to fold the flowers from the back.
- Steps 2 and 3 are repeated until the composition takes on a finished look. The height of the buds can be adjusted along the way, but do not forget to hold the entire workpiece firmly with your left hand. It is also necessary to take into account that the flowers in this assembly should only touch each other by their stems.
- Decor, when used, should also be added in a spiral.
- Greenery can be added at the end. It is supposed to be like wrapping the bouquet.
- The bouquet should be securely fixed with wire or decorative plastic tape, and the excess ends should be cut off with pruning shears.
- The stems need to be cut at an angle, then the bouquet will be able to receive nutrition from the water.
Floristry experts recommend avoiding wrapping round bouquets, including the spiral version, with mesh, paper or film. Small bouquets consisting of no more than 15 elements can still be wrapped. A card with wishes can be inserted into a small spiral bouquet, wrapped, for example, in film.
Parallel bouquet
Bouquets of this type can often be seen at weddings or in banquet halls.
It is quite easy to assemble a parallel bouquet, To do this you will need to have on hand:
- flowers with large buds;
- fern or greenery;
- decorative elements.
Execution process:
- You need to make a “ladder” from the available flowers, placing them next to each other so that the head of the next flower is lower than the previous one.
- The stems need to be tied with tape so that they are adjacent to each other. It would be best to use roses.
- Next, you should add decorative elements and greenery around the flowers, remembering that they should not cover the upper part of the composition, which is the buds.
- To make the bouquet more stable, you can use a wire frame.
- The stems should be cut evenly, after which the bouquet can be decorated with ribbons and bows, and wrapped in some material, if the situation requires it.
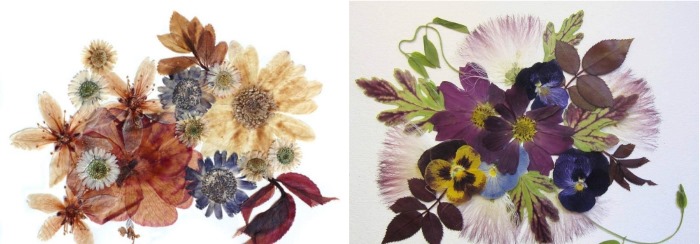
Composition of dried flowers
This composition is not as difficult to make as it is to find suitable dried flowers for it. The plants presented in the example can be replaced with similar ones.
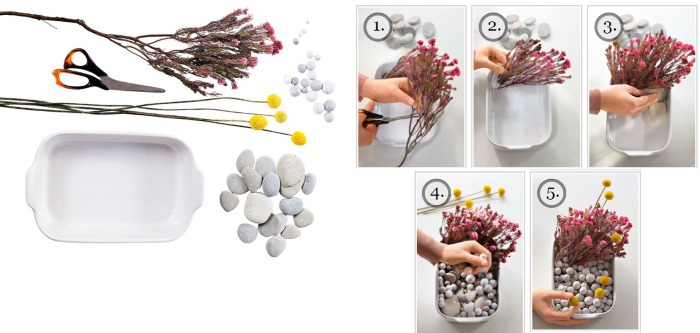
Execution process:
- You need to place the sponge on the bottom of a vase or other container, if necessary, you should cut it, giving it a shape appropriate to the container.
- The immortelle inflorescences, as the largest ones, are placed in the vase first.
- It wouldn’t hurt to add some contrast; for this, you can place black rudbeckia in a vase.
- Now you need to add vertical elements - inflorescences of western rudbeckia, and the free space of the composition can be decorated with branches of pink heather.
- Finally, it is time for the tallest elements of this composition - the haretail inflorescences. It is important to approach these inflorescences carefully, as they have fragile stems.
Oshibana technique
Floristry for beginners step by step also touches upon the Japanese technique of "Oshibana", which in a certain sense can be classified as painting, since it is used to create paintings.
The difference from classical painting is that the "artist" here uses plants dried using a special technology instead of paints or equally with them. These can be not only flowers, but anything: fruits, peel, berries, bark, seeds, and so on.
To create compositions in this style you will need:
- tweezers;
- colored pencils;
- a piece of cloth;
- hot glue gun;
- paints (watercolors);
- tracing paper;
- colored paper or cardboard;
- PVA glue.
Particular attention should be paid to collecting material. This should be done only in dry weather. Each plant should be carefully examined for mold and insect larvae, and if any are found, the plant should be thrown away. Dirty and dusty plants should be cleaned if possible, otherwise they should be thrown away.
After collecting the material, it must be dried. For this purpose, you can use books under weight or old newspapers. The weight must be selected individually for each plant so as not to spoil the material.
Delicate plants should not be subjected to a press weighing more than 20 kg. If the material is too fragile, the maximum weight of the press is 5 kg. For coarse plants, a press of up to 40 kg is suitable.
Large juicy leaves can be dried with an iron through special paper or newspaper. The dried material should be stored in a dry place, protected from light, pre-packed in folders or CD boxes.
The process of making the composition:
- First, you need to decide on the plot of the picture. If you expect a lot of light details, then the background should be dark, and vice versa. The background material can be colored paper or cardboard, which can be slightly colored with paints or pencils. Various fabrics can also be used for the background.
- Having decided on the plot, a sketch should be applied to the main background with a pencil and then redrawn onto tracing paper.
- Elements are cut out from tracing paper, on the basis of which plants are selected for use in the composition.
- Plants, cut to the required size, should be laid out on the main background in accordance with the idea.
- There is no need to thoroughly coat the plant parts with glue; it is better to apply it in a thin layer and carefully attach the parts to the canvas.
- As a final step, the painting will need to be placed under a weight.
Remember that paintings made using the Oshibana technique are strictly not recommended to be placed in direct sunlight., as this may lead to its rapid burnout.
Ceramic method
Ceramic floristry involves the use of polymer clay to create bouquets of flowers and various crafts.
As an example, we will consider the option of making a bell using ceramics.
To make it you will need:
- pencil;
- PVA glue;
- clay;
- paints;
- rolling pin;
- threads;
- a small tin strip.
Execution process:
- You need to make a pattern of the bell and bend a tin strip according to its shape.
- Now you need to take the clay and mix it with a solution of water and paints to get approximately the color you would like to see in the end.
- Using a rolling pin, you need to roll out the clay and then use a knife to cut out several patches in the shape of flowers.
- Use your fingers to create small ribs on the back of the flower;
- Use your fingers to glue the edges of the flower and pinch them in the shape of a cross, moving them upwards.
- To create the stamen and pistil, you will need a thin layer of clay, rolled into a sausage, cut into 3 small parts at one end, and then glue the “pistil” there, framing it with yellow threads.
- Now you can put on the bell.
- The sepal is made using the same technique and glued to the base.
- Finally, you need to roll the stem with clay and tint the flower with oil.
Packaging as part of the composition
Plain paper is trendy. Lace patterns, satin ribbons and even large rope weaves can add charm to a bouquet. Raw linen is suitable as a fabric.
Florist masters increasingly consider nets an outdated trend. Polyethylene can only be used as technical packaging; this material is not used as a decoration for a composition.
Flower care
Live and artificial flowers require specific care. Dried plants are also used in floral arrangements, and they require care that is different from that required for live and artificial flowers.
Caring for fresh flowers
Since plants inevitably begin to decompose in water through the process of rotting, which ultimately leads to the proliferation of bacteria, the water in which flowers are placed should be as clean as possible. This approach will slow down the wilting process, and the flowers will last longer.
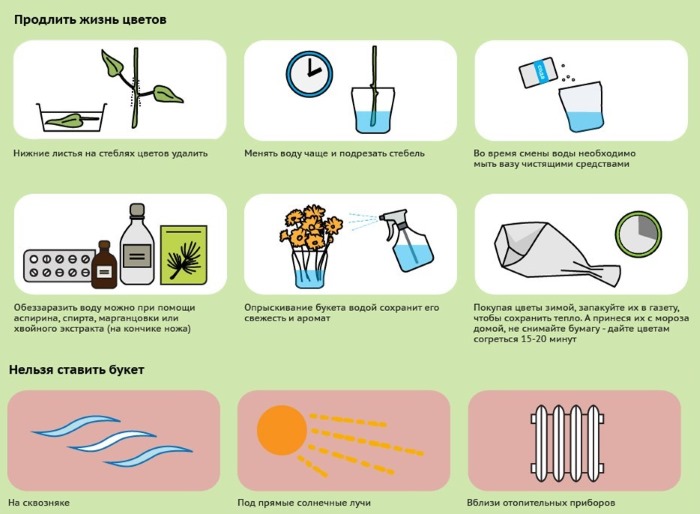
It should not be forgotten that substances contained in tap water can also have a negative effect on the life of the flower, so it is better to use water from a filter. It is not forbidden to use sprayers to cool and humidify flowers.
Rules for caring for fresh flowers:
- It is necessary to remove all shoots and leaves located on the stem that will be immersed in water. After this, the stems should be washed.
- The stem should be cut at an angle, and as much water as possible should be poured into the vase, then the flowers will last longer. The optimal water temperature in this case is 7°C.
- It is highly recommended not to place a vase of flowers near heating devices, this will shorten their life. Flowers will last longer in a well-ventilated room with subdued lighting, away from direct sunlight.
Caring for dried flowers
On average, dried flowers and plants can be stored for up to a year without any damage to their subsequent use in floral arrangements.
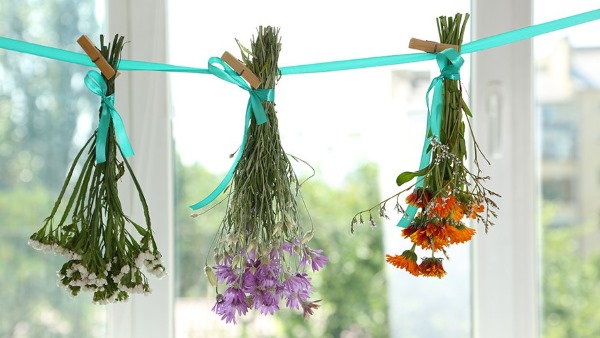
There are rules that allow you to extend this period:
- Dried flowers can be treated with a special fixative for floral arrangements.
- Dried material should be kept away from light, especially direct sunlight.
- To blow dust off compositions made from dry material, you can use a hair dryer, but only at low power, otherwise there is a risk of ruining the composition.
- Avoid areas with high humidity.
- The best option for storing dried plants is to create bunches and then hang them on hooks.
- Dried flower heads can be stored in a cardboard box, after pouring a small amount of silica gel onto the bottom and covering the top with wrapping paper.
Caring for artificial flowers
Artificial flowers require less care to keep them in good condition.
Here are the rules that will help you avoid damaging such material:
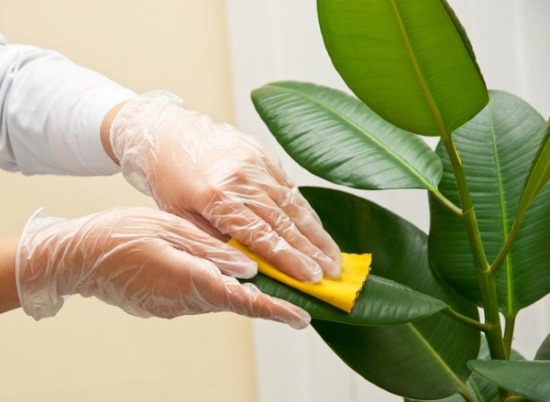
- To remove dust, you can use a hair dryer on low power and a soft cloth;
- Direct exposure of the material to sunlight should be avoided;
- Artificial flowers should be stored in a cardboard box, stacked vertically to avoid dents and deformations.
Where can I take floristry and design courses, cost in Moscow, St. Petersburg
Mastering this craft is a completely feasible task. You can study the traditional method by attending classes at specialized centers. The masters there teach both the terms used in floristry and the basics and various techniques for making compositions.
The cost of such courses in Moscow and St. Petersburg varies from 30,000 to 50,000 rubles. The average training period is 10 days.
You can learn the basics of floristry online. Courses for beginners are conducted remotely, for example via Skype, step by step explaining and showing all the nuances of the work, and also answering students' questions in real time.
The cost of online courses varies from 5,000 to 10,000 rubles. It is also worth noting the possibility of free training in this craft using freely available videos, text articles and books.
Article formatting:Natalie Podolskaya
Video about floristry
Floristry for beginners step by step - how to make a bouquet of roses:
When I come to my beloved Antalya for a holiday (to celebrate a birthday, anniversary) or, for example, when we came to the May concerts, and when someone I know is on holiday, I always order flowers (helium balloons)