Suitable as an original gift for the birth of a child, wedding or anniversary DIY photo albumThe album can be used to store travel photos, souvenirs or printed memorabilia, postcards, personal notes or letters.
The cover for a homemade photo album can be made from different materials - fabric, felt, cardboard, but first you need to decide on the design style and the technique used, choose a color scheme and develop a composition.
Necessary materials and tools
To make a photo album, you usually need sheets of cardboard or thick paper, they will form the basis of the album and the photos will be attached to them. The size and number of sheets are determined depending on the parameters of the album, the number of photos on 1 page.
For the cover design, you can choose cotton fabric, hard felt, cardboard, leather, suede. Depending on the cover material, you will also need synthetic padding, double-sided tape, adhesive fabric, scrap paper, glue, threads.
The following tools will be useful for this work:
- a rubber mat or plastic board that is comfortable to work on;
- metal ruler;
- a craft knife and scissors;
- awl;
- hole punch or eyelet punch;
- pencil and eraser;
- Moment-crystal glue.
The cover of a photo album can be decorated with special scrapbooking elements, cutouts, as well as lace, buttons, braid, ribbons, beads, photographs, drawings, laminated dried flowers.
During the work, it is necessary to have wet wipes on hand, which are convenient for removing adhesive residue. Brats will come in handy, they are used for turning elements, and double-sided foam tape, which is necessary for adding volume.
How to Make a Fabric Photo Album Cover
A photo album with a fabric-covered cover looks interesting. Cotton fabric with a density of 120-160 g/m is suitable for this.2. Such fabric does not crumble, does not electrify, is easy to clean. Suitable for patchwork fabrics.
To work you will need:
- a piece of fabric of the required size;
- synthetic padding;
- double sided tape;
- adhesive fabric;
- cover cardboard with a density of 0.7-3 mm.
You will also need a ruler, scissors or a stationery knife, glue, and a pencil for this work.
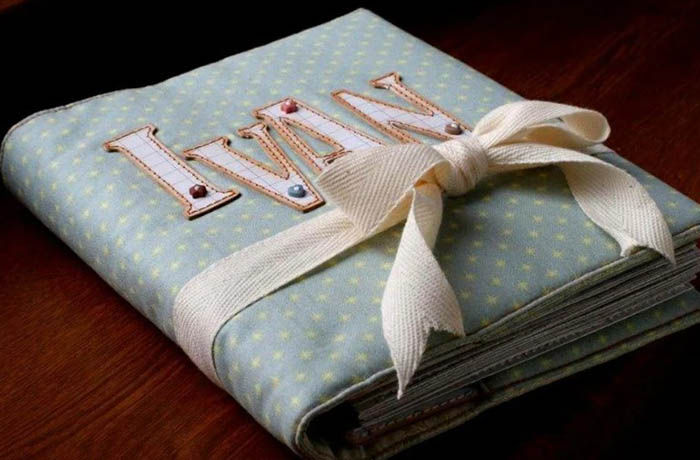
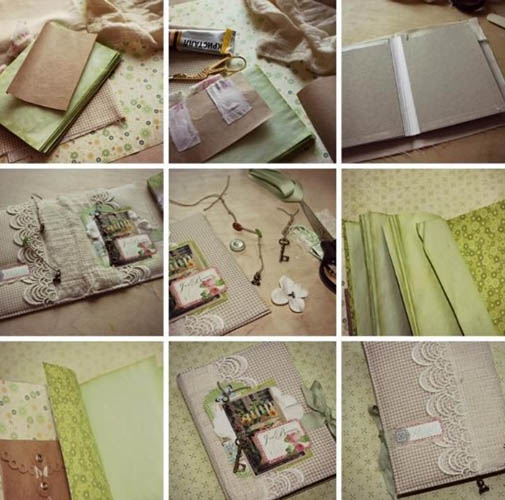
The cover for a fabric photo album is formed on a cardboard base. For this, a blank is made, it consists of 3 parts: 2 rectangles of the same size for the front and back sides of the cover, as well as the spine.
For a small album, the dimensions for 2 blanks are 30x29 cm, for the spine 30x7 cm. It is convenient to store pages in the album on special metal rings. To install the rings, you need to make holes in the spine for the eyelets in advance: for 2 rings, you will need to make 4 holes (2 per 1 ring).
The distance between the centers of the paired holes should be 1 cm less than the diameter of the ring.
Progress of work:
- A strip 10 cm wide and the length equal to the height of the cover multiplied by 2 is cut from the adhesive fabric. 2 cm is added to this for the allowance.
- Place 2 parts of the cover on the adhesive fabric and place the spine in the center. Iron the fabric, fold it inward and iron it again. Make repeat holes for the rings immediately.
- The cover frame is covered with padding polyester. To do this, a piece of padding polyester equal in area to the cover is cut off. The cardboard is coated with glue, the padding polyester is fixed, and the protruding parts are cut off.
- Place the cover on the decorative fabric laid out face down so that the synthetic padding is at the bottom.
- The edges of the cover are lubricated with glue, you can attach double-sided tape to them flush with the edge of the sheet. The fabric is folded, bent and secured with glue or tape. The material must be pulled tightly to avoid air bubbles. Once again, holes are punched for the rings in the spine.
- Silk ribbons 15-20 cm long are glued to the edges of the cover.
- Cut out 2 rectangles measuring 28x27 cm from thin cardboard or paper. Place them on the inside of the cover, masking the places where the fabric and ribbon are attached.
- Fasten 2 rings into the spine.
- If you tie the ribbons, the cover will look more interesting and will not open.
To create the cover, you can use either a single-color fabric or make a combined version from several types of fabric. The places where the patches are connected are marked with lace, thin braid, buttons, embroidery. A pocket for notes can be sewn onto the fabric in advance or the owner's name can be embroidered.
An interesting option is when the woven cover is stitched on a sewing machine along the perimeter. This will give the cover additional strength and completeness. Leather, both natural and artificial, is also suitable for decorating albums.
If you do not use cardboard as a base, the cover will be soft and easily curled, which can damage the sheets and photographs inside.
A photo album cover looks original if it is made of hard felt with a density of 1.5-3 mm. The felt covering can be velour, short-pile or suede.
Design options:
- Option 1. Cut out a cover equal in size to the unfolded album. If you decide to sew in the album sheets, then place them in the middle of the felt cover and stitch them. If the sheets will be secured with rings and eyelets, then the spine is reinforced with cardboard. Cardboard cut to the size of the spine is glued to the felt and covered with another piece of felt on top, after which holes are punched for the rings. To close the album, you can sew laces or ribbons to the cover.
- Option 2. After assembling the album from paper, stitching or gluing the sheets, felt is glued to the outside.
- Option 3. Mark the size of the album page on the felt, cut out 4 parts. Sew the parts together in pairs, inserting ribbons for closing the album on one side. The resulting 2 parts can be additionally stitched. Eyelets are inserted into each part on one side. Place the album sheets between the resulting covers, securing them with cords, rings or ribbons passed through the eyelets.
Felt is decorated in the same way as a fabric cover. A thematic composition on the front side looks beautiful; it can be assembled from ready-made scrapbooking materials. The woven cover is made first, because after all the parts are fastened together, it will be difficult to make changes.
From cardboard
A cover for a photo album made from designer cardboard is another opportunity to make an original gift.

The following cardboard is suitable for the work:
- craft;
- with white coating;
- color;
- bookbinding;
- beer;
- with prints.
The cardboard density should be at least 200-300 g/m². Coated cardboard and electrical cardboard covered with white film are not suitable for work. These materials do not hold their shape well, absorb moisture, and burst at the bend.
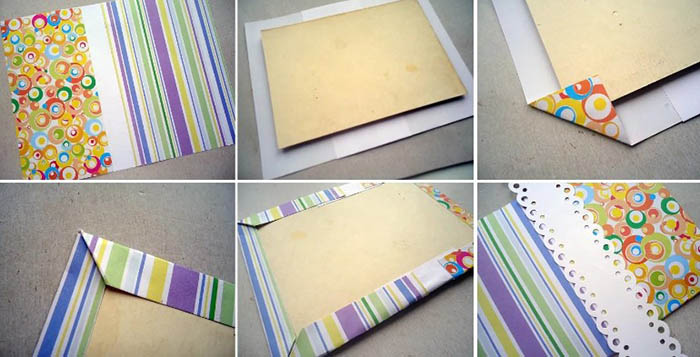
The easiest way to make a cardboard cover is to cut out 2 rectangular or square elements from a sheet of cardboard, which will become the basis of the album.
Using a punch, make 2-3 holes at equal distances in the left part of each element – through them you need to insert the ring holders if the album is assembled on them, or pass ribbons/strings through them. The inside of the cover sheets is decorated.

To do this, cut out pieces from scrapbook paper or thin cardboard with prints, 0.3-0.5 cm smaller than the base. The edges can be rounded.
On both sides of the backing, strings or ribbons are glued to tie the album, and decorative elements are glued on top. All that remains is to design the front part of the cover and insert the required number of sheets for photographs.
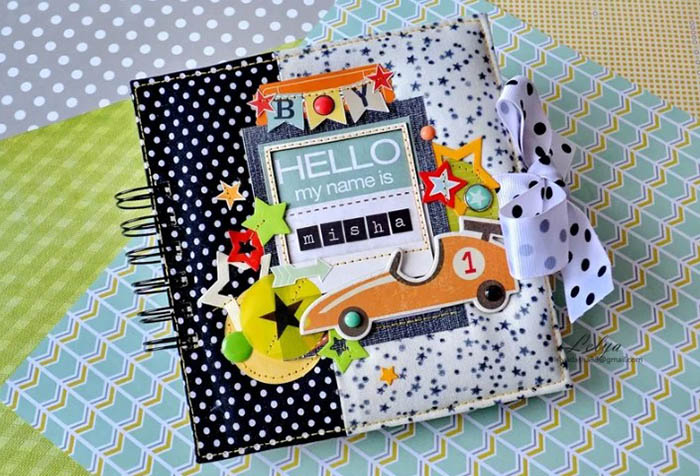
Scrapbooking technique
The cover for a photo album is often made using the scrapbooking technique.
For work you will need the following materials:
- scrapbook paper in a set or individual sheets;
- corner scissors;
- figured hole punches;
- volumetric elements (chipboards);
- stamps;
- stencils;
- cuttings;
- palette knife, texture paste;
- acrylic paints;
- powder, gliders;
- Moment Crystal glue.
You will also need ribbons, buttons, braid, rhinestones, artificial pearls, including those with an adhesive base.
Before preparing the material, you should prepare a concept - sketch out the cover, all the pages, decide on the style and necessary decorations.
If it is difficult to come up with a cover composition on your own, you can use a sketch - a ready-made scheme that indicates the location of each element. Thanks to the sketch, the work will not be overloaded with details, and the layers will be clearly distinguishable.
The following scrapbooking elements should be clearly visible on the cover:
- background, main and additional;
- main element (photograph, drawing);
- title;
- decor;
- explanations (additional option).
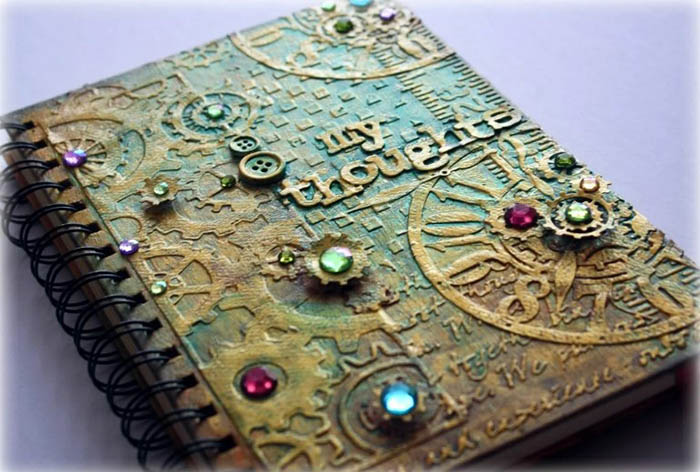
The following techniques are used in scrapbooking:
| Type of equipment | Description | Methods |
| Distressing | Artificial aging. It is used on fabric or paper. The technique is necessary when creating covers in vintage style, shabby chic, heritage. | How to age paper:
|
| Embossing | A three-dimensional design with a rough, glossy or matte effect. Suitable for all styles. | It is done with texture pastes or special powder. A stencil is required. |
| Stamping | The design is obtained by printing a stamp. | Silicone, polymer and rubber stamps are produced. You will also need a stamp pad and a roller. |
Scrapbooking also uses techniques from other types of creativity – quilling, origami, parchment, embroidery.
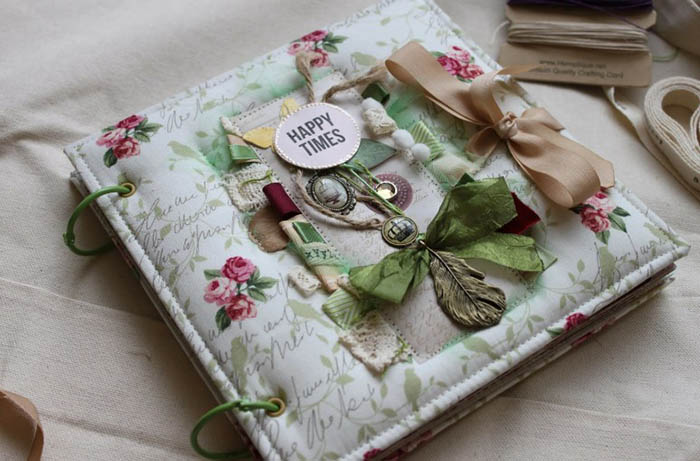
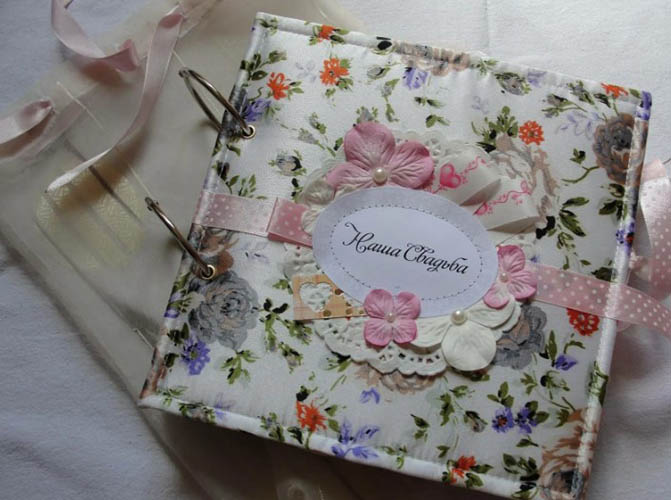
The design is determined by the theme of the photos that will be placed in the album. For a wedding album, a light background is traditionally used, and the decor includes rhinestones, beads, pearls, lace, flowers or bouquets of light colors.
If you plan to place in the album photos taken on vacation at the beach, then use blue or white and blue striped paper as a background, complementing it with decorations in the form of fish, ships, steering wheels, and imitation sand.
You can make a cover for a photo album using scrapbooking techniques by using one of the basic styles:
- vintage;
- shabby chic;
- heritage;
- freestyle;
- minimalism;
- European or American.
In any case, the style and main background are selected depending on the predominant shades in the photographs that will be placed on the cover.
In vintage style
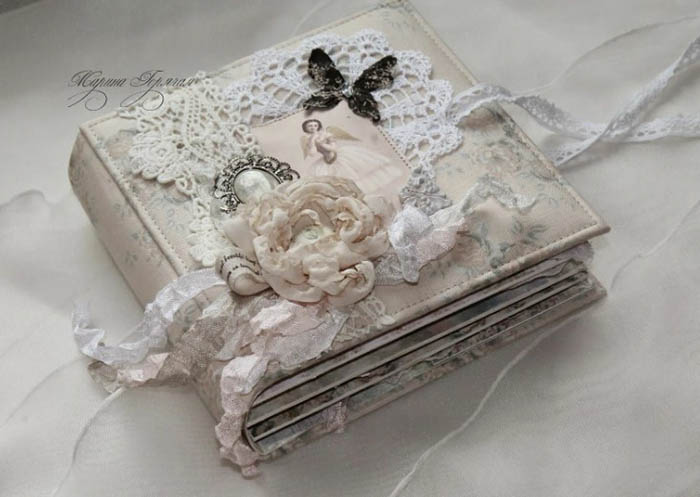
A vintage style photo album cover looks elegant and noble. In this case, decor and base tones are selected in muted warm tones of sepia, cream, beige. The distressing technique helps to designate vintage, with the help of which the effect of aging is achieved.
Beads, newspaper clippings, old photographs, lace, flowers (artificial, dried or painted) are used as decoration. If the cover contains genuine old photographs, the style of execution is called heritage.
Steam punk style
Steampunk style covers attract attention with their originality, as they are supposed to combine retro and futuristic attributes.
Style features:
- the color scheme is kept in metallic shades (rusty steel, bronze, copper, old gold);
- dark shades of red, black, and gray are usually used as color accents;
- Genuine Leather;
- technical elements as decoration (nuts, keys, eyelets, gears, spare parts);
- diagrams, drawings, plans of mechanisms and their parts;
- decorations in the form of mechanisms (chain, watch, lock);
- drawings or three-dimensional images of balloons, airships, cars.
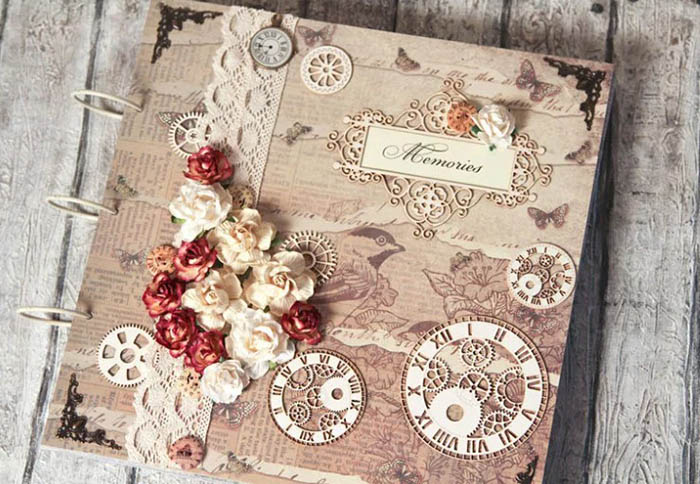
Steampunk scrapbooking is considered one of the most difficult to perform.
Shabby chic
The style is distinguished by its thoughtful simplicity. Striped or polka-dotted paper or fabric is often used for the background, which certainly has an antique effect. Shabby chic implies multi-layering, which is provided by several additional backgrounds, drawings or photographs of different sizes, and quilling elements.
As decoration, you can use antique lace and coins, floral print, half beads, flowers, rings, bird-shaped decorations. This style is suitable for a photo album with wedding photos.
American or classic
As a type of handicraft, scrapbooking appeared in America, so it is considered a classic style.
Characteristic features of a photo album cover in this style:
- the central place is given to a photograph - one large one or 2-3 small format ones;
- multiple backgrounds;
- up to 10-12 types of scrap paper are used, kept in 1 palette;
- multi-layered decoration (ribbons, cutouts, tags, flowers, buttons, game elements, stamps, tickets are placed on the cover);
- notes or phrases that reflect the mood.
This positive style is suitable for designing covers with photographs of children in kindergarten and school, illustrating a trip or an important event (moving, housewarming).
French style
The style is no less popular than the American one, thanks to its elegant simplicity. It is easily recognizable by its geometric shapes.
Features of the French style:
- The main element of the cover is a photograph. There may be several photographs, but all the pictures are cut out in the form of geometric figures and form a single composition.
- 1-2 tones are used as a background, and up to 2-3 colors are used in the palette.
- The placement of elements on the page is graphically clear.
- Decor is used minimally.
- Stencil designs, inscriptions and sprays are used as decoration.
- The edges of the cover can be finished with shaped hole punches.
The French style has many similarities with collage. It is suitable for decorating an adventure album, school graduation, displays 1 day and a certain mood.
Freestyle
One of the most interesting, but difficult to implement styles gives the impression of carelessness, but it is quite difficult to achieve. The style allows you to express the emotional component in everyday life, sports, a trip or hike, relationships with a pet.
What techniques will help you create a cover in a free style:
- 2-5 colors are used as a background;
- paper and photographs should be torn and wrinkled at the edges;
- patterns on scrapbook paper can be outlined with a black pen;
- scraps, remains of cardboard, burlap, clothing labels, nets are used as decorations; they can be thickly smeared with paint;
- roughly applied texture paste;
- If the cover is decorated with machine stitching, it should be stitched with a zigzag stitch;
- decor - badges, pieces of unusual fabrics, lids, transparent and unevenly painted buttons.

The free-style text on the cover is either handwritten or made using cut-out printed letters pasted on unevenly.
A photo album made with your own hands, of course, will not contain all the photos taken during a trip or a memorable event. However, such an album can become a reminder of the vivid emotions experienced and loved ones.
In this case, the cover helps to immediately understand what the selection of photos is about. All that remains is to choose a suitable style for the photo album and create your own masterpiece.
Video about photo album cover
Master class: cover for a photo album using scrapbooking technique: