Even a beginner needlewoman can knit berets for women. The patterns for creating this headdress with a detailed description will help you achieve the desired result.
How to choose yarn for a beret
The main criterion for selecting a model will be not only the style, but also the yarn. It plays the main role in how the beret will lie, keep its shape, and most importantly, be worn.
Angora
Description:
- Soft, fluffy yarn made from Angora rabbit wool.
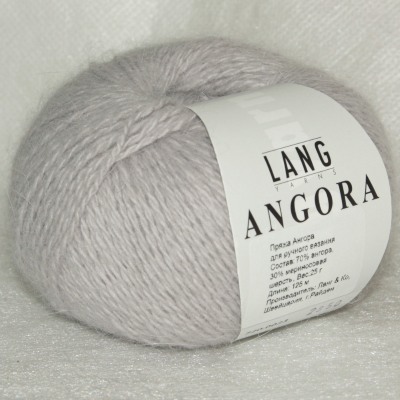
- To make the yarn stronger, a thin acrylic or wool thread is added as a base.
- Products made from angora yarn do not like water and can shrink significantly.
- Having knitted a warm beret from such yarn, you will have to protect it with an umbrella in snowy weather.
Cashmere
Description:
- The amazing properties of yarn made from mountain goat wool allow you to knit absolutely smooth, warm and soft fabric.
- Cashmere thread is lighter than wool thread, but much warmer.
- To prevent pilling, cashmere thread is mixed with wool thread in different proportions.
- Cashmere is not liked by dust mites, which is important for allergy sufferers.
- Such thread cannot be cheap, since it is combed from goats only once a year, during the spring moulting period. There is a lot of manual labor in its production.
Alpaca
Description:
- The yarn is collected from the wool of alpaca animals.
- Like camel wool, alpaca wool is coarse and does not shed at all.
- Does not form pellets.
- It has thermoregulatory properties.
- To make it less itchy, mix it with other types of yarn.
Mohair
Description:
- Mohair is the wool of Angora goats.
- Yarn consisting entirely of goat wool is not produced, it does not hold its shape. For this, wool of other animals is added to the composition.
- The wool of these goats has the ability to increase blood circulation in humans.
Wool
Description:
- Wool thread can be twisted from the wool of any animal: rabbit, sheep, dog, goat.
- The thread is sinuous and elastic, which is why products made from it do not wrinkle.
- The disadvantage of wool is the formation of pellets on products, so it is often mixed with other types of yarn to reduce this defect.
Acrylic
Description:
- The popular yarn is widely available due to its price range.
- It is difficult to find equals in terms of the brightness of the colours.
- Often used in a blend with wool.
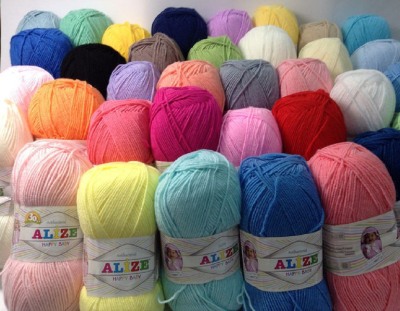
- The yarn is warm, cozy and does not pill.
- Looks good in knitted berets of any style.
Cotton mercenized
Description:
- As a result of the latest processing technologies, the yarn becomes dense and slightly fluffy.
- It does not stretch in products and creates a light fleece effect.
- Does not form pellets.
Iris
Description:
- Perfect for summer lace berets.
- Available in a wide range of colours.
- The thread has a shine, which gives the product a festive look.
- Does not shrink, washes well and can be starched if necessary.
Bamboo
Description:
- The thread, made from plant fibres, is not subject to chemical treatment.
- Retains its antimicrobial properties without causing allergic reactions.
- Bamboo fabric is softer than cotton when knitted, silky to the touch, with a slight shine.
- Widely used for knitting summer openwork berets.
Silk
Description:
- Natural thread is a product of the silkworm's life activity.
- Silk yarn products do not form pellets.
- Perfect for summer lace berets.
- Does not deform after washing, soft and pleasant to the body.
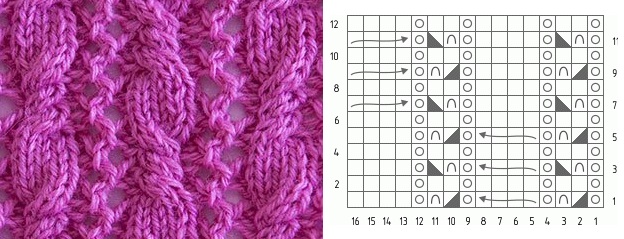
Basque beret: diagram and description
Description:
- Stylish, warm beret, suitable for the cold season. Made of wool, alpaca or cashmere.
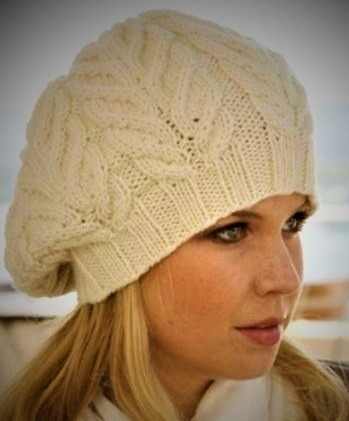
- Braids, textured, voluminous fabric look advantageous if the product is made in pastel, muted colors.
- Due to the width of the elastic band, the model looks beautiful if worn to the base of the eyebrows.
- According to the described diagram, the length of the model is 25 cm.
- This pattern does not require tight knitting; the loops should lie airily when interlaced and create volume.
- When knitting the model, circular needles are used, which allows you to see the result of your work and make adjustments immediately.
Job Description:
- To make a beret you will need 100-120 grams of yarn.
- The product is knitted from the bottom up, starting with the elastic band.
- Depending on the head circumference, cast on 84 to 96 stitches on 3.5 mm circular knitting needles and knit 10 rows with a 3x3 elastic band, alternating front and back stitches.
- Switch to 5mm circular needles and begin knitting the pattern. 1 round—*3 purl, 1 knit, yarn over, 1 knit, yarn over, 2 knit, 1 purl, 2 knit, yarn over, 1 knit, yarn over, 1 knit*repeat to end of row from *to*.
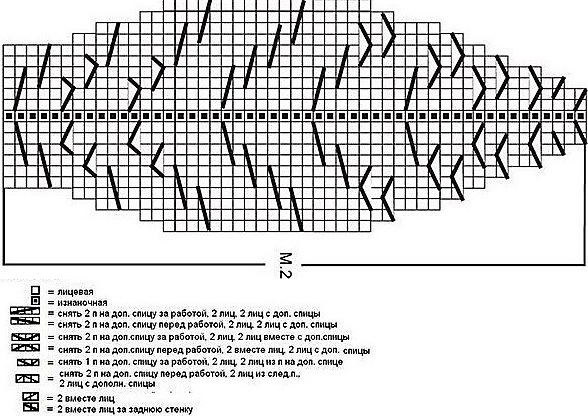
- Continue working: *3 purl, then knit according to the rapport pattern, yarn over from the previous round, behind the back wall, knit with a front loop* continue from *to* 7-8 rapports depending on the thickness of the thread.
- As soon as the number of loops, after knitting the rapport, decreases and it becomes difficult to knit on circular needles, switch to 2 regular needles. There should be 42-48 loops left on them.
- Start decreasing 3 purl together knit one purl. On the next round knit 2 loops together.
- 10-12 loops from the knitting needle are collected on a thread, securing them on the inside of the beret.
Volumetric beret: diagram and description
Berets with knitting needles (patterns and descriptions for women are extremely diverse) look beautiful both with openwork patterns for the spring-summer season, and with a dense weave for winter.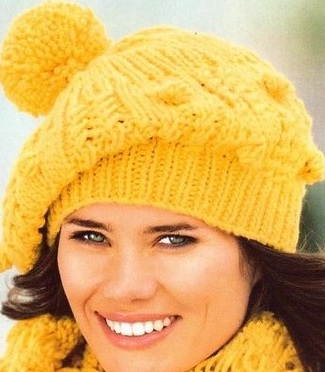
Description:
- A voluminous beret can be knitted with a wide elastic band, which holds its shape on the head, or with a thin piping, allowing it to fall freely.
- Products of this shape look good when made from thick yarn in bright colours in combination with scarves or snoods knitted with similar patterns.
- If the beret is knitted with mohair thread, a knitting pattern with a large texture and weave is chosen.
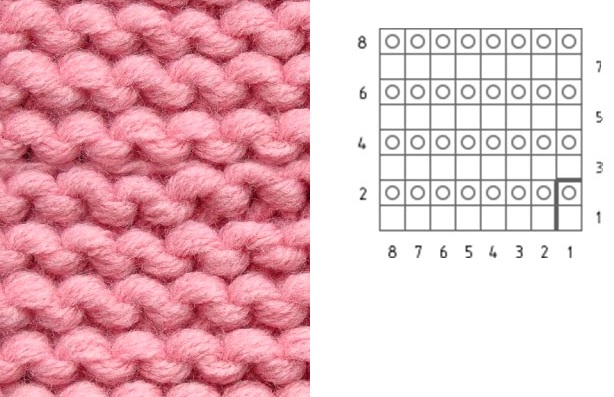
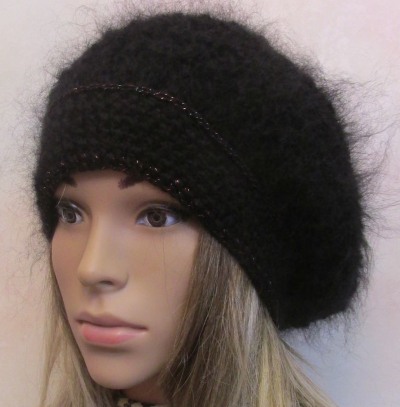
Garter stitch beret: diagram and description
Description:
- Despite the simplicity of execution, products made using garter stitch are obtained
 original and comfortable.
- The yarn can be bouclé, mohair, or thick acrylic.
- Garter stitch is knitted only with front loops from the front and back of the garment.
Stages of work:
- A strip of ten loops is knitted along the length corresponding to the volume of the head. For contrast, you can knit it alternately: 1 row with face loops, 2 row with purl loops.
- On the last row, the strip is closed, and with the help of the last loop, the beret fabric is started.
- From each side edge loop, add 1 air loop to the knitting needle.
- Knit 1 row with face stitches.
- On the second row, make a yarn over through one loop, increasing the width of the fabric.
- In the 3rd row, knit the yarn overs and continue knitting the fabric for 36 rows.
- On row 37, the fabric begins to decrease by knitting together every 3rd and 4th loop.
- Next 4 rows are knitted without decreasing.
- From row 41, 2 loops are knitted together as 1 front loop.
- Reduce to 10 loops. Gather on a thread, tighten and secure.
- The fabric is sewn together, the horizontal strip – the rim – is folded in half and hemmed from the inside.
Beret with English elastic: diagram and description
The thicker the thread in the yarn chosen for the beret, the larger the number of knitting needles you need to take to knit the product.
The presented model requires a 100-gram skein of yarn 500 meters long.
Description:
- The side is knitted with 2 mm knitting needles with a ribbing pattern according to the head volume. The ribbing is knitted with a 1x1 pattern 3-4 cm.
- It should be remembered that the elastic band tends to stretch a little during wear.
- To increase the volume and create fluffiness of the English elastic, you can replace the knitting needles with ones that are 1-1.5 sizes larger.
- In the 1st row, knit and purl stitches alternate.
- In the second row, start with the front stitch, then yarn over, and remove the back stitch without knitting it onto the right knitting needle.
- After turning the knitting over, the loop that was purl in the previous row is knitted, the yarn over is also knitted, the next yarn over is made and the purl loop that follows it is removed without knitting.
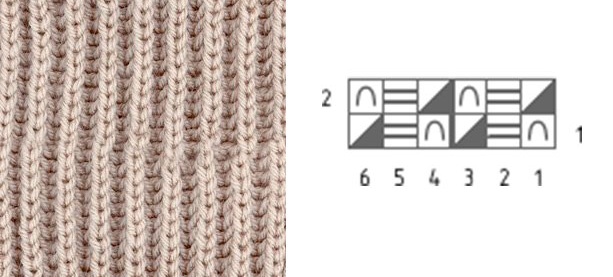
- Thanks to the throws, the volume of the beret increases significantly.
- Having knitted 12-15 cm of English elastic, transfer it to a regular 1x1 elastic and knit 6 rows with it.
- The loops are counted, divided into 6 equal sections and at their junction, 2 loops are removed from each part evenly through the row. In this case, the elastic is knitted strictly according to the 1x1 pattern.
When there are 12-15 loops left on the knitting needle, the thread is broken and pulled through all the remaining loops at the same time, pulled together and secured from the wrong side.
Beret with leaves: diagram and description
Description:
- In a light summer version, such a beret can be knitted from cotton, acrylic, iris or bamboo yarn.
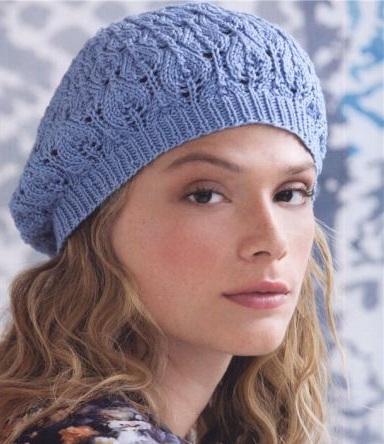
- For the cool season, using mohair yarn you can create a warm, original model.
- The yarn for such an openwork model is taken thin, so that all the elegance of the lines is visible.
- Having collected the loops of the rim, knit it to a height of 10 rows, then you need to add loops, having knitted 1 row, knitting two from one loop, increase their number by half.
- The rim is knitted 1x1 and then according to the pattern.
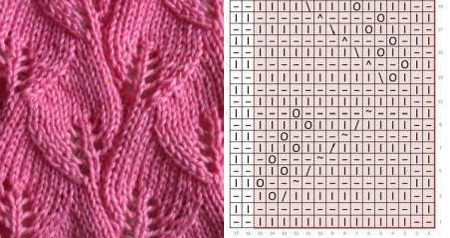
- Calculate the loops so that the front loops from the knitted elastic go into the stem of the leaf, as a continuation of the pattern.
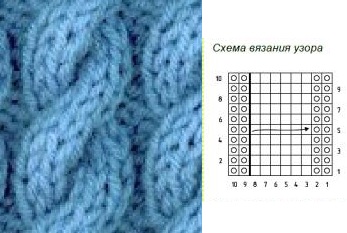
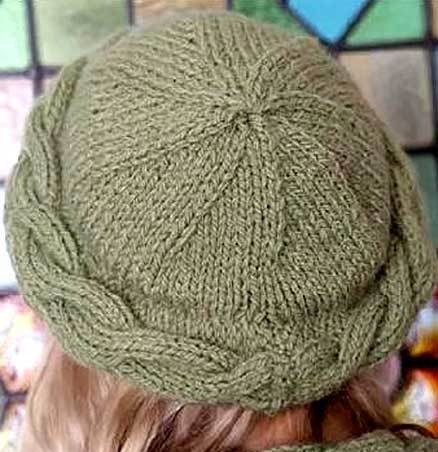
Braided beret: diagram and description
Knitted berets (diagrams and descriptions for women are available in magazines and on Internet portals) allow you to make your wardrobe individual.
Description:
- The braided beret is chosen by middle-aged and older women who love classic shapes.
- In order for the beret to have splendor and volume, beautifully showing the texture of the pattern, knitting needles for its execution should be taken from 2.5 and higher, depending on the thickness of the yarn.
- The braid looks good on berets that lie evenly around the head.
- The headband is knitted with 3 cm face loops, based on the measured head circumference. If you want to insert an elastic band for fixation, the headband is doubled, shifted and sewn.
- On the last row of the rim, add one loop at the same distance to increase the volume by 20-30 as desired. After 20 cm, exit the pattern and design the bottom, as shown in photo 2.
- In a row with face loops, knit 2 loops of one at the same distance.
- Purl rows are knitted without decreasing.
- When there are 15 loops on the knitting needles, pull them together into a ring and secure.
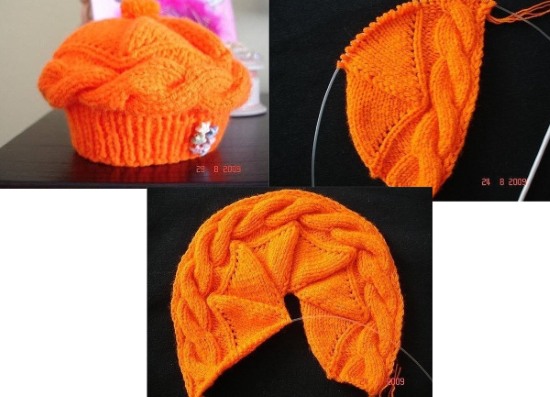
Beret "Pumpkin": diagram and description
The "Pumpkin" beret resembles the vegetable of the same name in shape, however, it is one of the most interesting knitted models for women. The knitting pattern is not as complicated as it seems (detailed description below).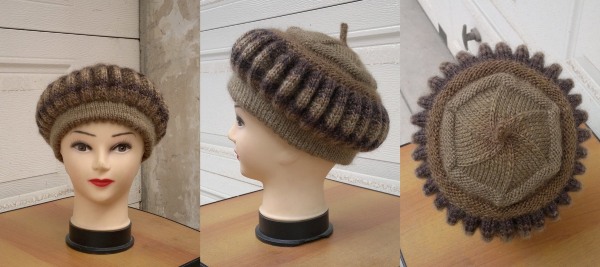
Description:
- The presented beret is knitted from wool with medium-thick threads.
- With a flowing mix of colors of various shades, this model looks stylish and original.
- Interesting in its design and assembly method.
- Knitted with circular needles.
Stages of work:
- Cast on 90 stitches on circular needles and knit 5-6 cm in a circle.
- For teeth in one row, knit 2 loops together and then make 1 yarn over.
- Returning to the previous number of loops, continue the inner part of the rim for another 5-6 cm.
- When you start knitting the central part of the beret, you need to divide all the loops into 30 parts. These will be its convex parts.
- The center of the pumpkin rib is 2 loops, they are always knitted with the front loop, and 1 loop, knitted with the back loop.
- Add loops through the row in each tooth - rib on both sides of the purl loop, simply pulling an additional loop from the bottom row.
- As a result, 6 loops will be added on both sides of the purl loop.
- In one tooth - rib there will be 1 purl, on both sides of it 6 garter stitches and between the teeth - ribs 2 front stitches.
- After a full set, you should begin to decrease the loops, every other row, returning to 90 loops.
- For contrast and to knit the bottom of the beret with a garter stitch pattern, knit 4-5 rows.
- The previous 90 loops are divided by 6 and after every 15th loop, they are connected together with 2X 1 loop through the row.
- When there is 1 loop from the sector on the knitting needle, the product is finished.
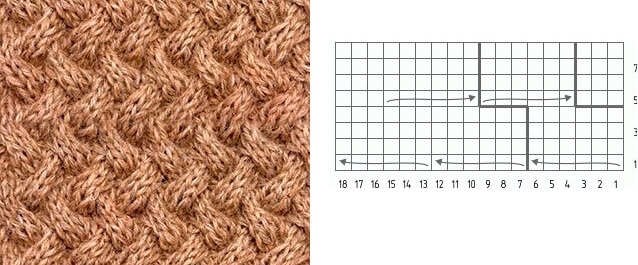
Simple braided beret for beginners
An original model in which braids are the basis of the fabric.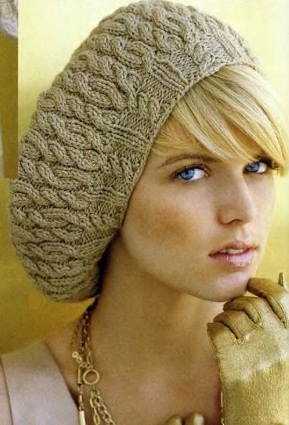
Description:
- Braids and cables are voluminous knitting, so you should choose yarn without long pile, soft and voluminous.
- The beret can be knitted with different types of braids, the distance between them should be at least 4 purl loops. It is against this background that the braids look the most textured.
- The crossing of loops can be done at any distance, parallel and asymmetrically.
- In the proposed model, the braids begin to be knitted on the elastic band, moving into the fabric of the beret.
- After knitting the elastic, you should add loops to increase the volume from the purl loops between the braids and the front loops in the elastic.
The fabric from braids is knitted to a height of 23 cm and begins to finish, first by reducing the purl loops between the braids evenly, and at the end in the last two rows they switch to front knitting.
Summer openwork beret: diagram and description
Knitted berets (patterns and descriptions for women are publicly available) allow you to create unique models that captivate the eye.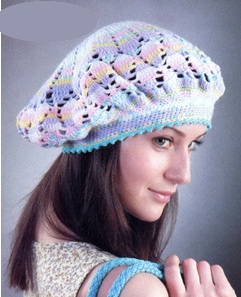
Craftswomen knit them to give themselves a romantic, individual look.
Description:
- Lace berets are ideal for summer. They are very light, allow the head to breathe and protect against heat stroke on a hot day.
- Knitting is made from thin and medium-thick threads. Cotton and bamboo yarn are best suited for creation.
- Summer models are knitted not only with single-color threads, but also with those dyed in different tones, which allows them to be used daily with different sets of clothes.
- The edge of the rim of the model can be decorated with teeth.
- The volume is added in the first row, after the knitted rim, and gradually increased by loops on the back side.
- After 10-12 cm, remove the loops using the same method as added.
- The bottom of the beret can be finished by collecting more loops than usual, this will give the thin beret shape stability.
- If desired, berets made of cotton and bamboo can be starched.
New: Fashionable Nako Beret
The Nako beret is an invention of an Italian designer. It was he who thought out the thickness of the knitting needles. And if you deviate from the master's recommendations and knit the edging with knitting needles of a smaller size, the beret simply will not sit on your head.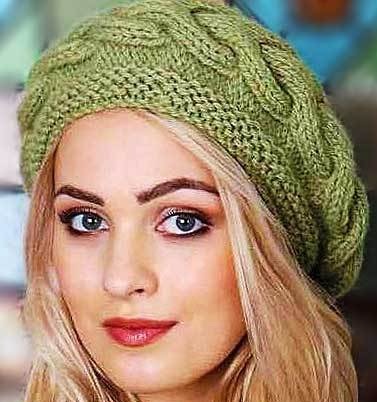
Description:
- Thin yarn is not suitable for such a product. Medium-thickness threads with the addition of acrylic are used.
- The beret consists of 3 parts that complement each other.
- First, the central part is knitted with the basic braid pattern.
- Next, the piping is added around the circumference of the head. At the end of the work, the bottom of the beret is formed.
- To perform this, take thick knitting needles number 5 and 6, as well as an additional knitting needle needed for knitting the braid.
- Wool yarn with added acrylic is suitable for this product.
- Cast on 20 stitches for the central pattern using 6mm needles.
- The braid itself consists of 16 loops and 2 loops along its edges.
Bottom of the beret:
- On the right side of the strip with a braid knitted in the center, 73-75 additional loops are added.
- Knit the fabric 8-10 rows with the front stitch and move on to forming the bottom.
- The loops are divided into an equal number of parts, and at the same distance, 2 loops are knitted together, tilting to one side.
- The back of the product is knitted as usual, without reducing.
- As a result, there are 2 loops left from the wedge, they are collected on a thread, pulled together and sewn on from the inside.
Additional knitting option for a beret Nako:
- The central part - the braid is knitted simultaneously with the bottom, and loops are additionally added to the rim from the opposite edge of the product.
- The braid consists of 4 crossed loops (8 in total) and 3 loops on each side to give the pattern volume.
- In the first row, having knitted the braid rapport, we begin to knit a triangle for the bottom with 1 front stitch and a yarn over.
- Even rows strictly according to the pattern.
- From the 3rd row onwards, after the braid rapport, knit as usual, 1 front with a yarn over and then the loops added in the previous rows.
- When the triangle next to the braid has 14 loops, it begins to decrease, and the second one is increased at the same time.
- The shape requires 6 triangles.
- They make a connecting seam.
- From the opposite edge, add loops for a 1x1 elastic band and knit 10 rows.
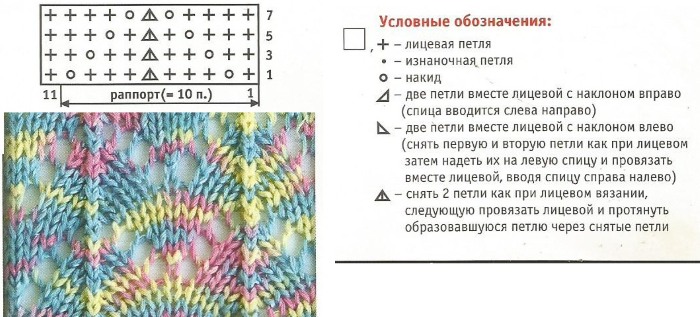
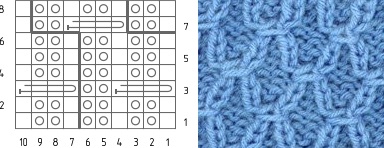
Beret with a checkerboard pattern
Easy to make, stylish and neat beret, knitted with knitting needles, suitable for women of any age. Even a beginner needlewoman will understand the scheme of creation and description of the pattern.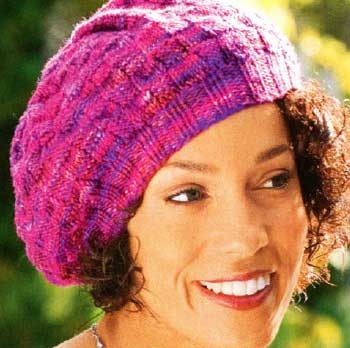
Description:
- The beret is conveniently knitted with a 3x3 elastic band, which will smoothly transition into the “Leaves” pattern.
- Loops for volume are added from purl loops, increasing their number by 50%.
- You can also knit the elastic band with thinner knitting needles: the knitting will be denser, and for the beret fabric itself, take knitting needles 2 sizes larger.
- Any yarn is suitable for this model; the beret is interesting both in summer and insulated versions.
- The loops are reduced evenly when the entire row is knitted with only purl loops.
- In order not to spoil the beauty of the pattern, 5 cm before the end, start knitting with a garter stitch, reducing to 15 loops. Gather them on a thread and tighten.
Knitting pattern:
- To repeat the pattern and calculate the required length of the rim, cast on stitches in multiples of 10 + 2 edge stitches.
- The original pattern is easy to knit. Suitable for young needlewomen, since only knit and purl loops are knitted.

To knit a beret with knitting needles, diagrams and descriptions for the product will help. - According to the pattern, the circles are purl, and the empty squares are knit.
- The pattern repeat is made from 3 rows.
- In the 4th, 8th row and further, after three rows, the entire fabric is knitted with purl stitches to change the pattern.
- From the 5th row the pattern changes in a checkerboard pattern.
Beret from mohair: diagram and description
Description:
- Mohair thread is full of advantages in itself: light, thin, and at the same time warm, it allows you to knit any berets from openwork to garter stitches. In any version, the beret looks decent.
- Mohair thread does not like tight knitting; it gets lumpy during wear.
- If you need a dense product, you need to choose larger knitting needles.
Berets knitted with mohair thread for women of any age do not need complex patterns and descriptions.
Video: knitted berets - diagrams and description
How to knit a beret with knitting needles, watch the video:
How to knit a simple beret, watch the video: