Crafts from natural materials are used not only as decorative ornaments. They can be used in everyday life as household utensils.
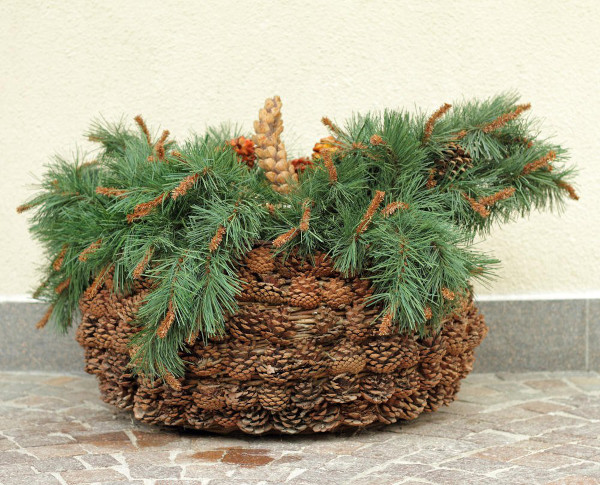
Baskets made with fir cones can be an excellent container for storing sweets, nuts and fruits. In addition, they can be used to make a basis for an unusual gift for the New Year or any other holiday.
Handicrafts are very popular today. Handmade goods are highly valued and in great demand. Many decorate their homes only with items made by their own hands.
In this article you can find detailed master classes on making baskets using pine cones and other materials at hand, as well as useful tips and recommendations for successful completion of the work.
What do you need for the job?
A basket of cones will be made qualitatively if you prepare the materials for work correctly in advance. The main element for the craft is the cones. They can differ in shape, size and color. This depends on the tree on which these cones grow and on the time of their collection.
Which cones to choose
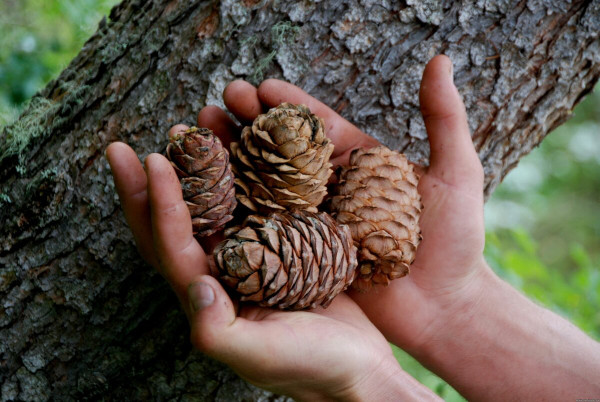
It is better to make a basket from pine cones. Their round shape is considered the most suitable for this craft. If you choose the material of the same size, then as a result the basket can turn out very beautiful and of the correct shape.
When to collect cones
It is best to collect cones that have just fallen from the tree. They fall from pine trees soon after they ripen and open their scales in late spring. You can start collecting pine cones in May.
Cones that have been lying on the ground for a long time can be affected by mold, fungus and various parasites. Therefore, collecting material for making a basket should not be postponed until autumn.
Processing cones
Before starting work, the collected cones must be properly prepared:
- First, you should sort the material by size, shape and degree of scale opening.
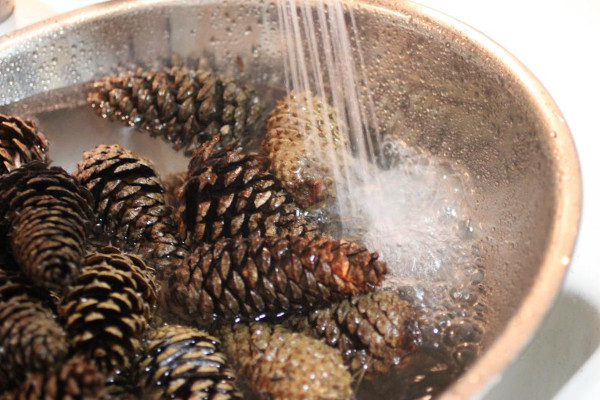
- Next, the cones need to be washed in running water, removing sand, soil and other debris. You can use any detergent (liquid soap, dishwashing liquid, shower gel).
- Poorly opened cones should be dried before washing and wait until they open. After that, they can also be washed.
- After washing and rinsing, all the cones will be covered with scales, so they need to be dried well.
- When all the cones open, they need to be treated with antiseptics. The best option for this is 20% hydrogen peroxide. This treatment will protect the cones from mold and fungus. For safety, work should be done with rubber gloves. Cones can be kept in a container with peroxide solution from a few seconds to 30-60 minutes. It should be said that prolonged exposure of the working material in peroxide can significantly lighten it.
- After all the "hygienic" procedures, the cones must be thoroughly dried. They will open up and be ready for work. However, if desired, the cones can be varnished or painted. This will make the craft more decorative and durable.
What other materials will be needed?
A basket of pine cones will be durable and beautiful if the following materials and tools are used in the work:
- construction metal/copper wire;
- florist wire;
- wire cutters;
- hot glue and glue gun;
- strong threads and needles;
- fishing line;
- artificial flowers and greenery;
- various decorative elements (colored ribbons, large beads or buttons).
The selection of decorative elements depends on what kind of pine cone basket will be made and for what purpose.
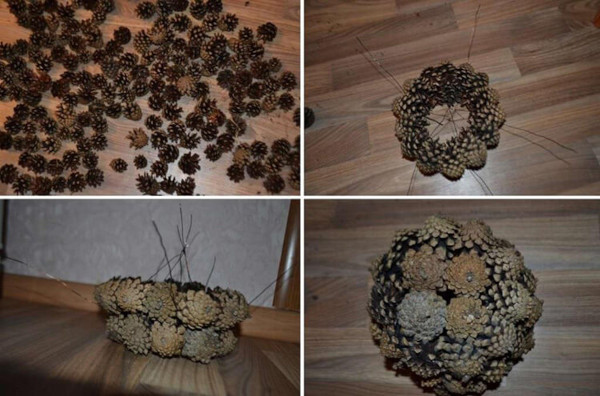
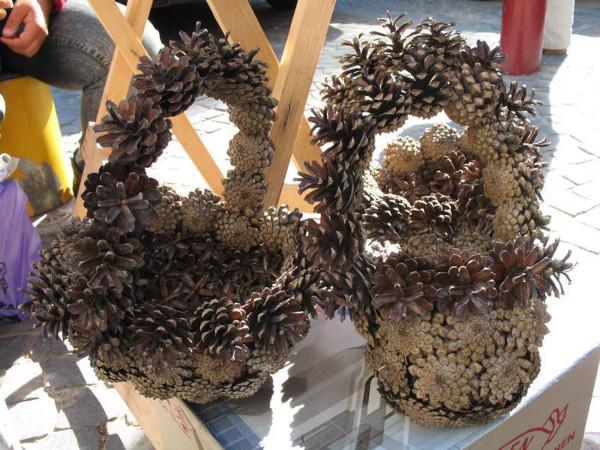
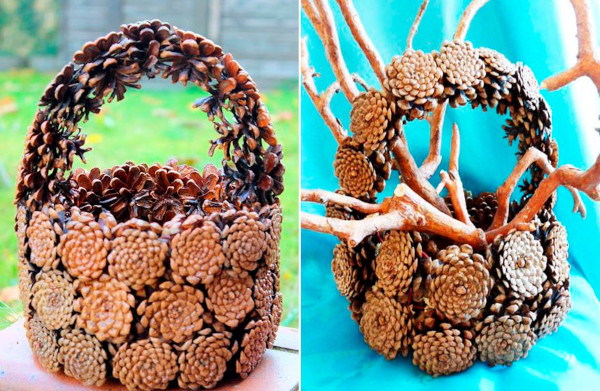
On a wire base
A basket of cones on a wire base will be more durable. It can be of any size.
To work you will need:
- prepared cones;
- metal wire;
- short length of floral wire;
- nippers.
Procedure for performing work:
- Use wire cutters to cut a piece of any length from the coil of wire and fold it in half.
- Insert the cone into the resulting wire loop. The wire should be placed between its scales in the center.
- Twist the ends of the wire tightly around the pine cone.
- Take the next pine cone and place it between the ends of the wire next to the first pine cone.
- Twist the ends of the wire.
- This is how you need to string the cones on the wire, tightly placing them next to each other and securing them. You should get a long garland of cones. Its length will depend on the desired size of the basket being made. For a small basket, the length of the workpiece can be up to 1.5 m.
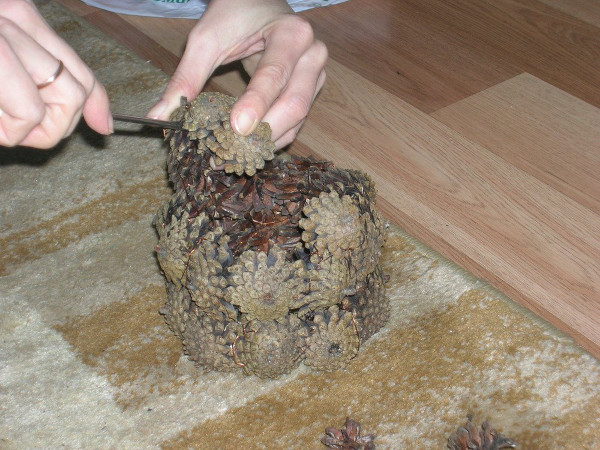
- Next, twist the resulting bundle of cones from one end around the outermost cone in a circle.
- After twisting 2-3 turns to form the bottom of the basket, place the next rows of cones in a spiral, rising above the base.
- Each of the subsequent rows that form the walls of the basket is fastened together with floral wire. This can be done randomly and intuitively anywhere between the cones. The ends of the connecting wire are cut with nippers.
- Next, you should lay and fasten the coils of tape made of cones together until it runs out. Or until the basket reaches the desired size.
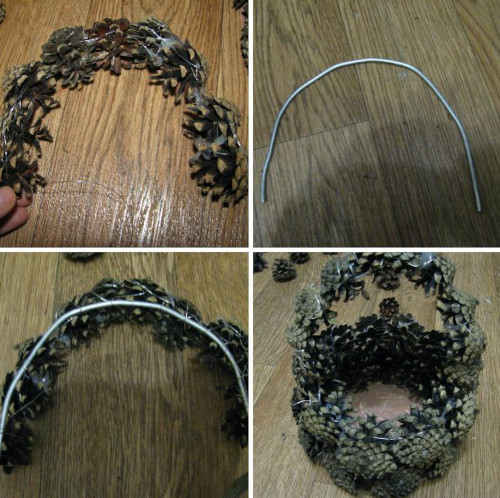
- The next step is to make the handle. To do this, cut a piece of the required length from the coil of wire using wire cutters.
- Fold the cut wire in half, as in the initial stage for making the basket.
- Insert a pine cone into the resulting loop and wrap it with wire in the middle.
- Next, string the cones onto the wire in the same way, placing them close to each other.
- Attach the resulting handle to the basket body using floral wire.
- Cut off excess fastening pieces with nippers.
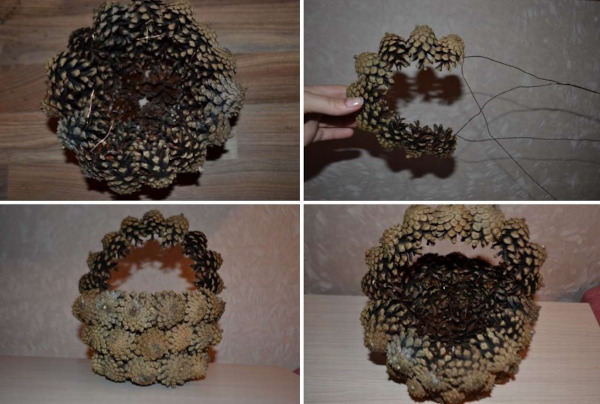
The basket of pine cones on a wire frame is ready. If there are empty spaces between the cones on the finished product, they can be decorated with bows of colored ribbons, large beads or small artificial flowers. The decorative details can be attached to the basket using thick threads or fishing line threaded through a sewing needle.
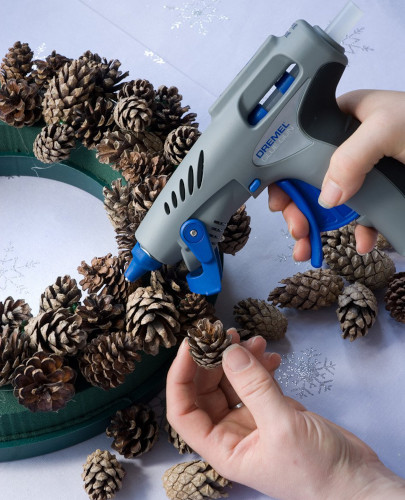
With the help of glue
A basket of pine cones can be made using glue. Such a product will not be as durable and can only be used as a decorative element for the interior.
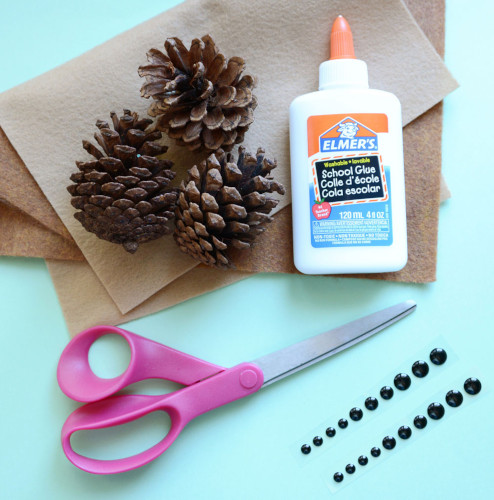
To work you will need a minimum set of materials and tools:
- prepared cones;
- hot glue gun;
- decorative elements (bright autumn leaves, colored ribbons, etc.);
- scissors;
- coarse thread or fishing line;
- sewing needle.
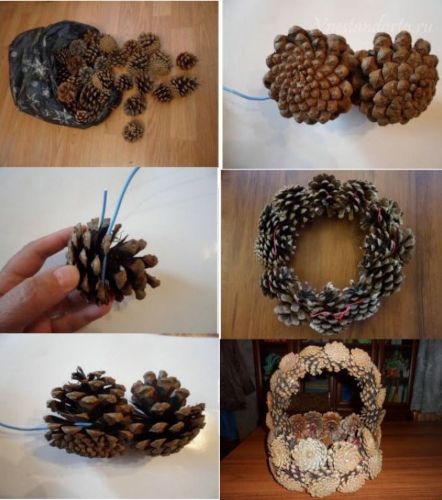
The order of work is as follows:
- The body of the basket can be made only from cones. To do this, the required number of them (it depends on the selected size of the finished product) should be glued to each other one by one, pressing lightly and holding in this position for some time. For the bottom of a small basket, you can use from 9 to 12-16 cones. The bottom of the cones can be glued in a circle, or made square/rectangular.
- When the bottom of the basket is formed and dries, you can start making the walls. To do this, the cones are glued one by one over the outer parts at the base. In this case, the cones should be laid tightly, connecting them between the scales, and applying glue in several places for more reliable fastening.
- Thus, cone by cone, row by row, the body of the basket is formed.
- The handle for it can be both large and small. It depends on the master's idea. To make it, cones are glued together in the shape of an arc.
- Once the handle is dry, it needs to be glued to the edges of the basket body.
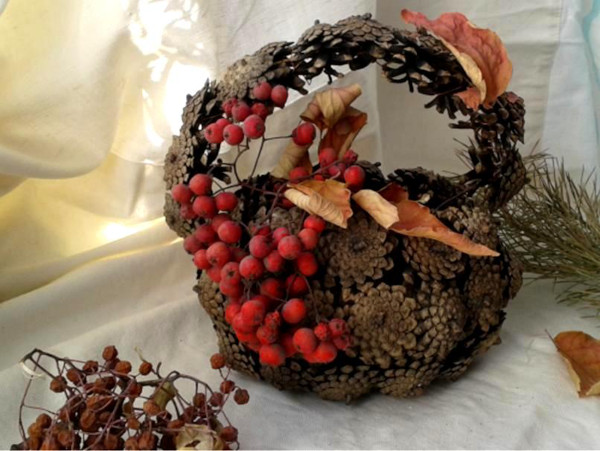
- The spaces between the cones on the body and handle can be decorated to your taste. You can make it autumnal and bright, decorating it with colored leaves.
The basket made of pine cones with glue is ready. You can make the bottom of the basket from thick cardboard covered with colored paper. Then the pine cones will be glued to the finished cardboard base row by row upwards.
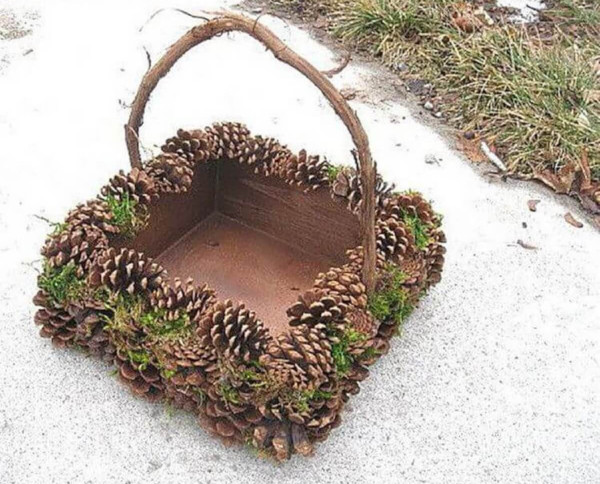
Square
To make a square basket, you can use a ready-made box made of thick cardboard or thin plywood as a base. First, the box should be painted to match the color of the cones prepared for work, or pasted over with colored paper.
The inside of the box can also be painted in a contrasting color.
The following materials will be required for the work:
- prepared cones;
- ready-made box;
- hot glue gun;
- construction stapler;
- wire;
- nippers;
- decorative elements (colored ribbons, small artificial plants, large beads, etc.).
The order of work is as follows:
- Each cone is coated with glue in turn at the bottom and glued to the box. It is better to start from the bottom. You can glue the cones tightly to each other or at some distance. This depends on the basket decoration plan. It is better to glue the cones tightly, and then fill the gaps between the glued material with decorative elements.
- After the first glued bottom row of cones, the second one is glued. And so on to the top edge of the box. The last row of cones should be slightly above its edge.
- To make a handle, cut a piece of the required length from a skein of wire, fold it in half. Insert a pine cone into the resulting loop and twist the wire. String all the pine cones on it in this way.
- Bend the resulting garland of cones into an arc. Twist the wire at the ends into loops and twist tightly.
- Attach the handle to the basket. To do this, use a construction stapler to secure the wire loops at the ends of the pine cone handle in the right places on the edges of the basket.
- Decorate the places where the handle is attached and the empty spaces on the basket body using a hot glue gun and decorative elements (bows made of colored ribbons, small artificial flowers or large beads).
The square basket of cones is ready. Several working methods and a combination of different materials were used in its manufacture. To make a handle for a basket with a base made of a plywood box, you can use ready-made grapevine or weaving from several thin flexible rods.
The product's construction will be more durable. It can be used not only as interior decoration. Such a basket can serve as a container for storing fruits, candies or nuts.
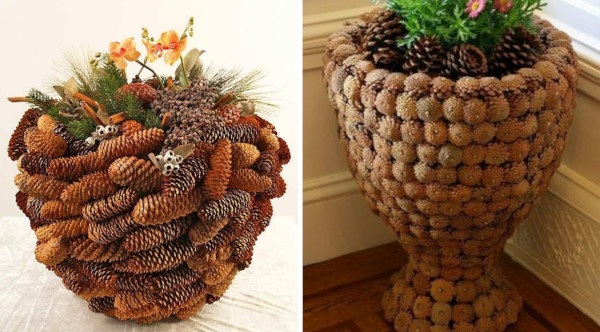
Basket-planter for flowers from cones
You can make a basket-pot for small indoor plants from cones. Such a product can harmoniously fit into the corresponding interior of a country house or cottage.
The following materials and tools will be required for the work:
- a set of prepared cones of the same size;
- base for the planter (large tin can, deep plastic plate or old plastic container);
- thick cling film;
- hot glue gun;
- paint for painting the base of the flowerpot.
The order of execution of the work is as follows:
- First of all, you need to select a container-base for the basket-pot according to size. It should be larger than the pot with the flower, which will subsequently be placed inside the finished product.
- The next step is to paint the base. For the outside, it is better to choose paint in the same color as the cones. The inside can be painted in the same way or in contrasting shades. For uniform coloring, it is more practical to use paint from a spray can.
- After the base for the basket-pot has completely dried, you can begin the main part of the work. You should start pasting the cones from the bottom surface of the prepared container. To do this, the first cone in the base is lubricated with hot glue and attached to the center of the bottom.
- Next, the rest of the cones are glued one by one around the central one.
- When the bottom of the future basket-pot is completely covered with cones, you can attach row after row of cones to the walls of the base vessel to the very edge. The last row of cones should protrude slightly above it.
- Allow the product to dry thoroughly.
The basket-pot of cones is ready. You can not glue the bottom of the container-base with cones, leaving it smooth and more stable. In this case, you should start working slightly retreating from the edge of the base.
If you need to make a hanging product, you can make a handle from a thick braided cord. To attach it to the base, you need to prepare 2 holes in the walls of a tin can or plastic container at the first stage of work, and immediately thread the cord through them.
You need to tie knots on both ends of the cord. Then you can start pasting the base with cones. You can make a high arched handle for the basket-pot. To do this, you need to take the wire, fold it in half, insert a cone into the resulting loop.
Next, the wire needs to be tightly twisted. This is how the required number of cones should be strung onto the wire. Insert the ends of the wire into the prepared holes in the walls of the base container and twist them, or secure them with a furniture stapler.
You can place a pot with a climbing plant in a basket-planter. In this case, the high handle will serve as a support for the shoots.
Design Tips
You can decorate a basket of pine cones in different ways. It depends on the purpose of the finished product and the imagination of the manufacturer.
- Baskets made from brightly colored cones look very interesting and decorative. You can make a completely colored basket out of them, or make colored inclusions in the body or handle. Such products can serve as decor for a child's room or kitchen.
- Baskets decorated with satin ribbon bows look very elegant. Decorative elements can be placed on the handle of the product and on the body, depending on the preferences of the author of the work. Such baskets can decorate a stylized festive event, or serve as a decoration for the room.
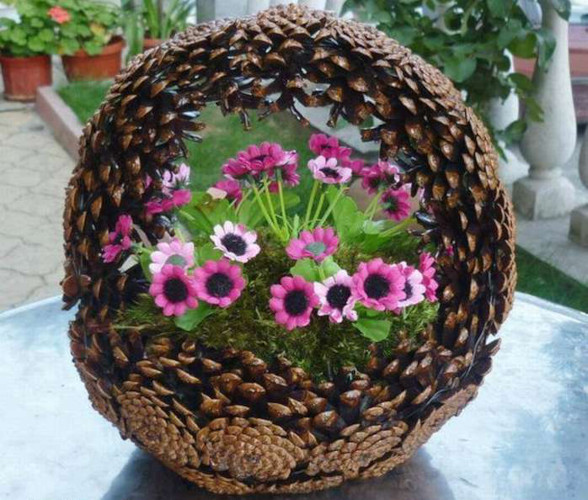
- A basket of pine cones can replace a flower box. If you put polyethylene film and a damp floral sponge inside, you can make a beautiful bouquet of wild flowers and herbs. In addition, the basket can serve as a basis for a bouquet of dried flowers.
- Square or rectangular baskets made from pine cones and painted with silver or gold paint can become an interesting decorative element for rooms equipped and furnished in the high-tech style.
- For seasonal decoration of rooms, you can use decor for baskets made of pine cones from autumn leaves, and for winter - from bleached sisal, coniferous branches and red rowan berries.
- To decorate a kitchen or dining room in a rustic style, you can decorate a basket of pine cones with an insert made of fabric with a checkered pattern, polka dots or small flowers. In such a container for decoration and storage, you can put pastries, fruits, painted Easter eggs or any confectionery.
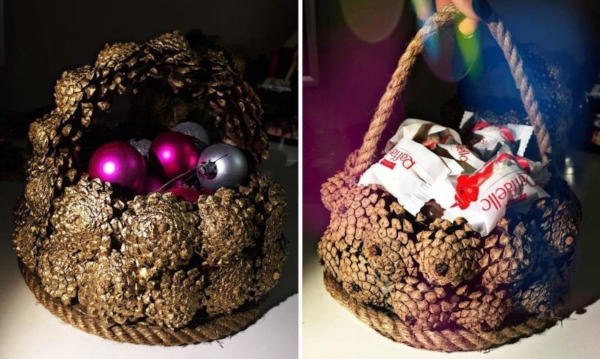
- A basket of pine cones can be used to make a beautiful New Year's decoration for the interior. To do this, the handle can be wrapped with small beads and tinsel, the body can be decorated with small branches of pine needles, and fragrant bright sunny tangerines and candies in colorful wrappers can be placed inside.
In order to make a basket with your own hands from pine cones, you do not need any special skills. You just need to have a great desire to do something interesting, and the ability to fantasize. Then everything will definitely work out.
Video about making a basket from pine cones
Pine cone basket without glue: